paulh.
Senior Member
   
Member since: November 2011
build, fail, learn, succeed - ENJOY
Posts: 2,389
Nov 15, 2011 15:54:51 GMT -5
Nov 15, 2011 15:54:51 GMT -5
|
Post by paulh. on Jun 7, 2012 11:27:39 GMT -5
White over painting of the olive green, I used a wet paper masking methods -which caused a leeching of the colour underneath . Not too badly though. It does look a bit stark but a few brown and grey filters it should settle back down. 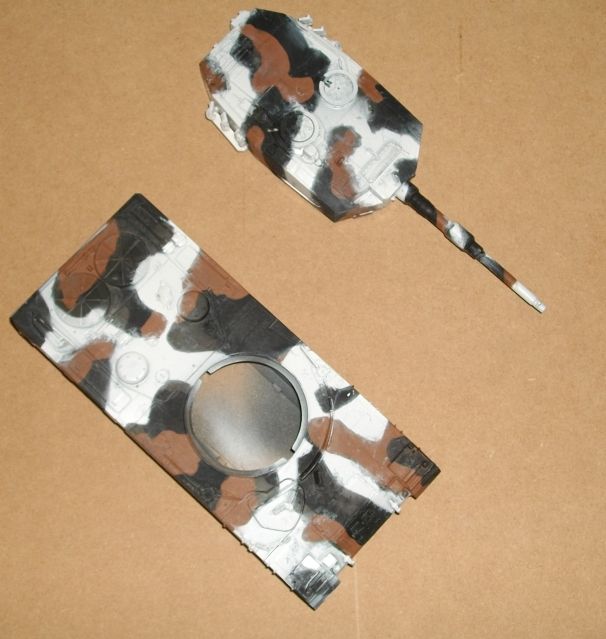 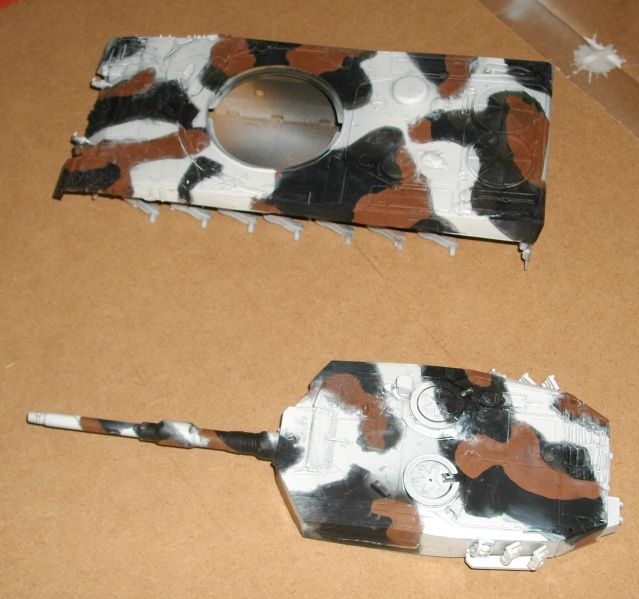 I dont want to risk lifting any of this so its going to get a couple of days to cure off before anyrhing else gets done. TTFN P |
|
|
|
Post by 406 Silverado on Jun 7, 2012 11:36:19 GMT -5
um, yeah that sticks right out. But as you say the weathering will tobe things down.
|
|
|
|
Post by wbill76 on Jun 7, 2012 12:23:44 GMT -5
Making good progress with the paint work paul, looking forward to the next round.
|
|
paulh.
Senior Member
   
Member since: November 2011
build, fail, learn, succeed - ENJOY
Posts: 2,389
Nov 15, 2011 15:54:51 GMT -5
Nov 15, 2011 15:54:51 GMT -5
|
Post by paulh. on Jun 7, 2012 13:20:38 GMT -5
cheers guys. Dicky- leave my pet seagul out of this! I've only just got over Mr B's dining on crabby! I've now realised why the paint has been a bit slow curing- hence the leeching under the masks... what I thought was thinner was in fact flow retarder      |
|
paulh.
Senior Member
   
Member since: November 2011
build, fail, learn, succeed - ENJOY
Posts: 2,389
Nov 15, 2011 15:54:51 GMT -5
Nov 15, 2011 15:54:51 GMT -5
|
Post by paulh. on Jun 8, 2012 16:53:10 GMT -5
Very happy to report (I think) I've recovered this somewhat. After taking Dicks advice a putting things aside in a safe place for 24 hours or so, I found that the white appeared to have finally cured off. I took the opportunity to try a tidy up the leeching into ther black & brown, using a liner brush and a reasonably steady hand and here is the result: 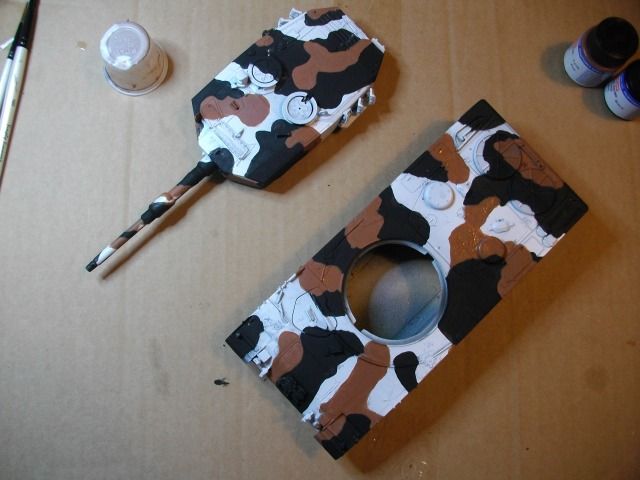 It also gave me the chance to take a pic of the weathering I've tried out for the running gear; This is a mix of filler powder, railway ballast, static grass all bound together with a copious amount of craft acryllic umber paint. This was liberally applied to the lower hull and sponsoons with large amounts also applied to the rear hull plate and lower glacis. 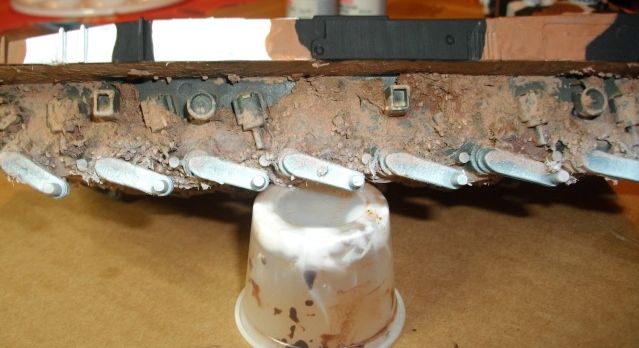 More of this will need to be mixed up for application to the wheels and tracks once I get a bit more paint on them. The hull and turret have now gone into safe storage for at least another 24-36 hours before I'll even consider applying filters to start drawing things together  It was only at this point that I realised that I'm not 100% sure that this version of the Leo in Dutch Service ever had 3-tone. But hey-ho, I've come to far with this now to change things   As always folks all comments & suggestions very gracoiusly welcomed. TTFN P |
|
|
|
Post by wbill76 on Jun 9, 2012 13:44:35 GMT -5
Good work on the clean-up Paul, pattern looks good even if it may not have ever seen actual service...the model police won't be hunting you down just yet I don't think.  |
|
paulh.
Senior Member
   
Member since: November 2011
build, fail, learn, succeed - ENJOY
Posts: 2,389
Nov 15, 2011 15:54:51 GMT -5
Nov 15, 2011 15:54:51 GMT -5
|
Post by paulh. on Jun 9, 2012 15:27:07 GMT -5
Cheers Bill,- big sigh of releif my end I can tell you!
SWMBO off out for the day tomorrow so , after my "chores" I should be able to spend some time working on the wheels and tracks.
|
|
|
|
Post by robbo on Jun 9, 2012 16:23:21 GMT -5
Good save Paul, looks super mate
|
|
|
|
Post by TRM on Jun 9, 2012 16:42:31 GMT -5
That looks the part it does!!!!   The mud is brilliant! I like it the way it is. Camo looks great too!! A nice filter would definitely serve you well I think. Blend everything right together. Then a nice one from the WBill76's (Bill) play book....some mud mixture applied, let dry and then scrub it back leaving a nice look with dirt in the corners and a decent dusty appearance on top!!! Keep it going!!!  |
|
paulh.
Senior Member
   
Member since: November 2011
build, fail, learn, succeed - ENJOY
Posts: 2,389
Nov 15, 2011 15:54:51 GMT -5
Nov 15, 2011 15:54:51 GMT -5
|
Post by paulh. on Jun 9, 2012 17:09:46 GMT -5
Robo, T -thanks guys. Its that kind of encouragement and support that makes this palce what it is  P |
|
Deleted
Member since: January 1970
Posts: 0
Dec 2, 2024 2:44:45 GMT -5
Dec 2, 2024 2:44:45 GMT -5
|
Post by Deleted on Jun 10, 2012 5:01:13 GMT -5
Mr H....some great work on the Leo mate.This is gonna look well good,when its done! ;D......And you just won't let me forget 'Crabby',will ya!  (Did taste good tho!  ) |
|
paulh.
Senior Member
   
Member since: November 2011
build, fail, learn, succeed - ENJOY
Posts: 2,389
Nov 15, 2011 15:54:51 GMT -5
Nov 15, 2011 15:54:51 GMT -5
|
Post by paulh. on Jun 10, 2012 14:50:42 GMT -5
Chris- - short answer - NO! ;D Dicky- your complicitiy is noted sir  Wheels and tracks are now on, and have had a liberal dose if the filler mix- coluor is somewhat different from the stiff already on the hull, but it will all get another light dusting of a muddy brown to blend it all together  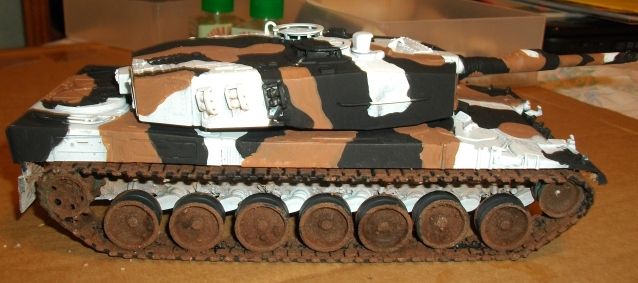 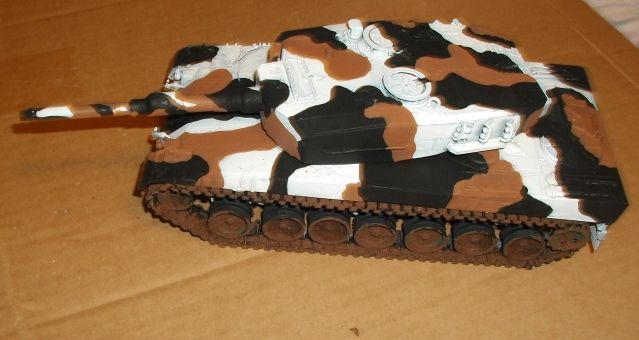 Filters and washes to follow As always folks All comments and suggestions welcomed. P |
|
|
|
Post by TRM on Jun 10, 2012 14:56:49 GMT -5
She is looking good with the legs on!!! Keep it going!!!  |
|
jackh.
Full Member
  
Member since: December 2011
Posts: 1,195
Dec 15, 2011 2:51:27 GMT -5
Dec 15, 2011 2:51:27 GMT -5
|
Post by jackh. on Jun 10, 2012 15:22:42 GMT -5
Some fine progress Paul.
|
|
paulh.
Senior Member
   
Member since: November 2011
build, fail, learn, succeed - ENJOY
Posts: 2,389
Nov 15, 2011 15:54:51 GMT -5
Nov 15, 2011 15:54:51 GMT -5
|
Post by paulh. on Jun 10, 2012 15:25:47 GMT -5
Cheers Gents.
|
|
Deleted
Member since: January 1970
Posts: 0
Dec 2, 2024 2:44:45 GMT -5
Dec 2, 2024 2:44:45 GMT -5
|
Post by Deleted on Jun 10, 2012 16:57:16 GMT -5
I KNEW I should have let Dicky have the whole thing,and I have the claw!!!! ;D
|
|
|
|
Post by wbill76 on Jun 10, 2012 18:07:19 GMT -5
Good progress paul, getting close to the finish line with this one!
|
|
paulh.
Senior Member
   
Member since: November 2011
build, fail, learn, succeed - ENJOY
Posts: 2,389
Nov 15, 2011 15:54:51 GMT -5
Nov 15, 2011 15:54:51 GMT -5
|
Post by paulh. on Jun 11, 2012 1:31:00 GMT -5
Chris-  I'm like a dog with a bone mate, a dog with a bone..... Cheers Bill- more of end of the begining I think - because I have NO idea  how this is going to go once the filters start going on how this is going to go once the filters start going on  I'm thinking brown and/or grey but my paint jobs to date have been fairly basic and straigthtforward - either a variation of olive green or NATO standard 3-tone. So ladies and gents any input, suggestions ideas on that will be very graciously received . TTFN P One other question: should I pick out the tools in their "proper" colours, leave as is, or do a bit of both?
I'm minded to do the latter but leaving the white as an over paint   |
|
paulh.
Senior Member
   
Member since: November 2011
build, fail, learn, succeed - ENJOY
Posts: 2,389
Nov 15, 2011 15:54:51 GMT -5
Nov 15, 2011 15:54:51 GMT -5
|
Post by paulh. on Jun 11, 2012 13:43:12 GMT -5
Roger on that good buddies- picking out it shall be....
|
|
paulh.
Senior Member
   
Member since: November 2011
build, fail, learn, succeed - ENJOY
Posts: 2,389
Nov 15, 2011 15:54:51 GMT -5
Nov 15, 2011 15:54:51 GMT -5
|
Post by paulh. on Jun 12, 2012 13:27:34 GMT -5
A couple of filter coats using SIN industries Brown for dark yellow- I not sure if its comming across in the pics but it does seem to be softening out the edges, but I think its going to quite a few more before its anywhere near ready... 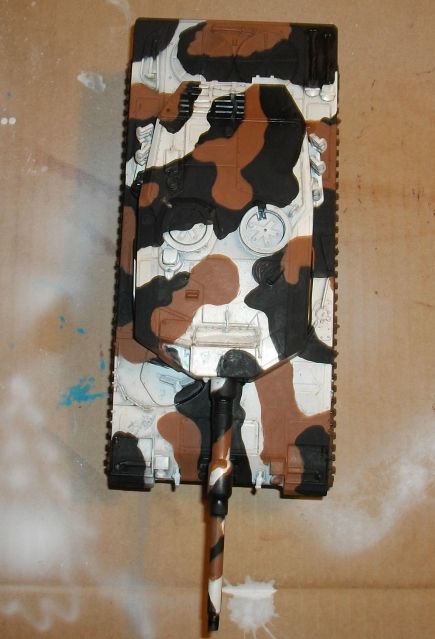 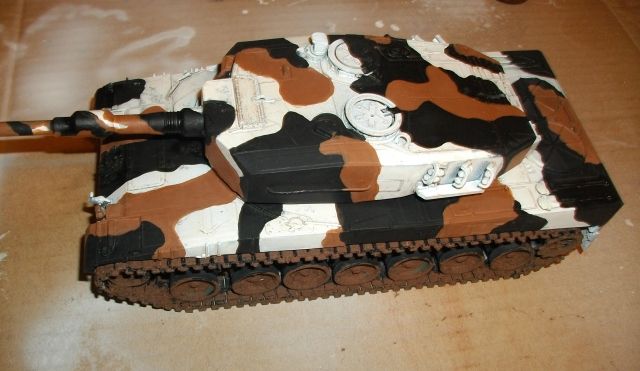 ACW P |
|
|
|
Post by wbill76 on Jun 12, 2012 14:42:54 GMT -5
A difference if visible paul, more so on the white than the others due to the darker shades/contrast. Layers are going to be the way to go with this pattern, you may even need to apply selective applications to only certain colors depending on the effect you want. Your eye is the best judge though in the end, so long as the result is looking the way you want it that's what ultimately matters.  |
|
paulh.
Senior Member
   
Member since: November 2011
build, fail, learn, succeed - ENJOY
Posts: 2,389
Nov 15, 2011 15:54:51 GMT -5
Nov 15, 2011 15:54:51 GMT -5
|
Post by paulh. on Jun 12, 2012 15:09:52 GMT -5
Thanks fellas.
Would a selective filter outline- just on the edges of the white do anything to soften things do you think?
|
|
paulh.
Senior Member
   
Member since: November 2011
build, fail, learn, succeed - ENJOY
Posts: 2,389
Nov 15, 2011 15:54:51 GMT -5
Nov 15, 2011 15:54:51 GMT -5
|
Post by paulh. on Jun 12, 2012 15:18:18 GMT -5
Thats really helpful guys, thanks- I was thinking of a grey filter/wash - good to have the confirmation.
|
|
paulh.
Senior Member
   
Member since: November 2011
build, fail, learn, succeed - ENJOY
Posts: 2,389
Nov 15, 2011 15:54:51 GMT -5
Nov 15, 2011 15:54:51 GMT -5
|
Post by paulh. on Jun 13, 2012 15:59:12 GMT -5
I tried a little experiement.... rummaging around in my paint box I found this- forgot it was there... 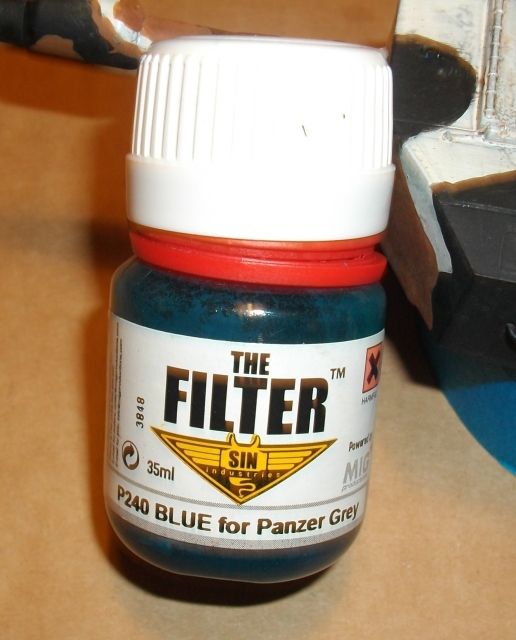 So I decided to give everything a coat. It seems to my eye to have evened things out between the black and brown and also given a bit more depth to the white. 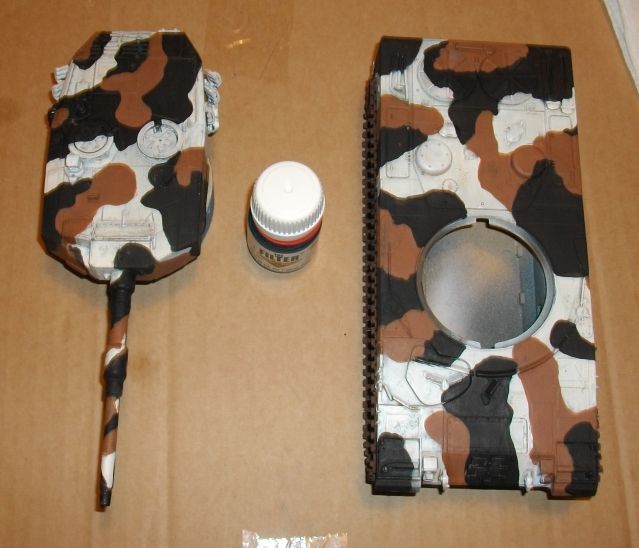  I would be grateful for input form you folks though- make sure I'm not fooling myself.  I've also noted a few flaws in my white , but thankfuly its in places that I can justifiably chip- around the driver and commander/loader hatches question -chip before wash or after? P |
|
|
|
Post by spud on Jun 13, 2012 18:25:40 GMT -5
that looks like its given the white some depth alright Paul,
I chip after the wash
|
|
|
|
Post by wbill76 on Jun 13, 2012 19:21:02 GMT -5
It looks to have done the trick paul. Second the suggestion to chip after the wash. Would also recommend some pin washes to get the detail to pop some as well. Burnt Umber would likely fill the bill (although it won't show on the black portions, enough will on the white and brown to give it depth).
|
|
|
|
Post by bbd468 on Jun 13, 2012 22:39:59 GMT -5
Looking forward to some paint Paul. Nice work so far man.  Gary |
|
paulh.
Senior Member
   
Member since: November 2011
build, fail, learn, succeed - ENJOY
Posts: 2,389
Nov 15, 2011 15:54:51 GMT -5
Nov 15, 2011 15:54:51 GMT -5
|
Post by paulh. on Jun 14, 2012 2:04:06 GMT -5
Thanks very much for the input everyone.
A sealing coat tomrrow and leave it for the weekend to cure, Then its on with the washes next week .
|
|
paulh.
Senior Member
   
Member since: November 2011
build, fail, learn, succeed - ENJOY
Posts: 2,389
Nov 15, 2011 15:54:51 GMT -5
Nov 15, 2011 15:54:51 GMT -5
|
Post by paulh. on Jun 18, 2012 15:31:04 GMT -5
|
|
paulh.
Senior Member
   
Member since: November 2011
build, fail, learn, succeed - ENJOY
Posts: 2,389
Nov 15, 2011 15:54:51 GMT -5
Nov 15, 2011 15:54:51 GMT -5
|
Post by paulh. on Jun 19, 2012 1:44:43 GMT -5
Sir, you tupence is always welcome.
I have a small selection of oils - but I've also got a Hobbycraft at the bottom of the hill..
I was thinking of perhaps a filter or two again- over the gloss coat or do I need to flatten things out again?
P
|
|