|
|
Post by wbill76 on Dec 24, 2012 11:36:09 GMT -5
Spud, ER, Modelfreak, thanks for the comments as always! T, Merry Christmas to you as well! Multi-turrets were all the rage in the mid-30s tank design world...I guess they figured the more the better!  Thom Thom, definitely falls into the wierd/fascinating category...I'm sure on paper it made perfect sense, what could be better than all-around MG support and a side-by-side gun combo that gave you anti-tank capability and HE bunker busting! Of course they overlooked the tiny problem of how heavy the monster would have to be to have adequate armor protection...just a minor detail! ;D Wouts, DML doesn't label this one as a 'Smart Kit' so they took some shortcuts as a result. One of those was in the exhausts department, I guess they figured it wasn't worth the hassle of slide molding them for whatever reason! Luigi, thanks as always and glad to have you along for the ride. So far it's building up fairly quickly due to the relatively low parts count...it's the tracks that are going to take some time to pull together along with that suspension.
|
|
reserve
Senior Member
   
Member since: July 2012
Si vis pacem para bellum
Posts: 2,372
Jul 11, 2012 9:11:45 GMT -5
Jul 11, 2012 9:11:45 GMT -5
|
Post by reserve on Dec 24, 2012 19:23:24 GMT -5
Coming together with the usual elan. I must say that's an evil amount of roadwheels; were they steel or rubber tired on the real thing?
Regards,
Mark
|
|
|
|
Post by wbill76 on Dec 24, 2012 21:04:52 GMT -5
Mark, All of them were rubber-tired on the real deal. And yes, I have to agree on the evil nature of road wheel design when it comes to German armor!  |
|
redleg12
Full Member
  
Member since: August 2012
www.redleg2scale.com
Posts: 401
Aug 28, 2012 18:59:10 GMT -5
Aug 28, 2012 18:59:10 GMT -5
|
Post by redleg12 on Dec 25, 2012 7:24:26 GMT -5
Bill - Merry Xmas....hull already... I think you had help from elves!
Keep it coming.
Rounds Complete!!
|
|
|
|
Post by wing_nut on Dec 25, 2012 10:40:26 GMT -5
Still pluggin' away at it I see. Looking good.
|
|
|
|
Post by wbill76 on Dec 25, 2012 12:23:54 GMT -5
Mike Shhhhhh! You can't let that kind of secret out around here!  Merry Christams my friend! Marc, trying to keep this one moving along at a steady pace to take advantage of the holiday bench time, more to post here in a little while! 
|
|
sfcmikej
Full Member
  
Member since: December 2012
Peace through superior firepower.
Posts: 153
Dec 4, 2012 10:00:36 GMT -5
Dec 4, 2012 10:00:36 GMT -5
|
Post by sfcmikej on Dec 25, 2012 13:21:06 GMT -5
Didn't see this one when you started but I am in now! Looks good so far.
Mike
|
|
|
|
Post by wbill76 on Dec 25, 2012 13:37:00 GMT -5
Thanks Mike! A special Merry Christmas update is in order for this project considering it is, after all, a Christmas present build!  Continuing on with the turrets, Step 11 addresses the twin MG turrets that are cousins of the type seen on the Pz I. I had no desire to display any of the view flaps in the open position so skipped the use of the interior parts and installed them all in the closed position. Curiously DML provides clear armored glass inserts for only the flat side flaps and not the curved flaps...for whatever reason, the curved flaps get an ordinary gray styrene insert. I opted for the hexagonal style of lifting hooks, parts D52, as those are the type commonly seen in the Nr. 3-5 vehicles based on the available reference photos. The MG13s were left off for now and will be installed later after painting. With care during assembly by avoiding getting any glue on part D16, the mantlets can be left movable although their range of movement/positioning is restricted by the turret design. 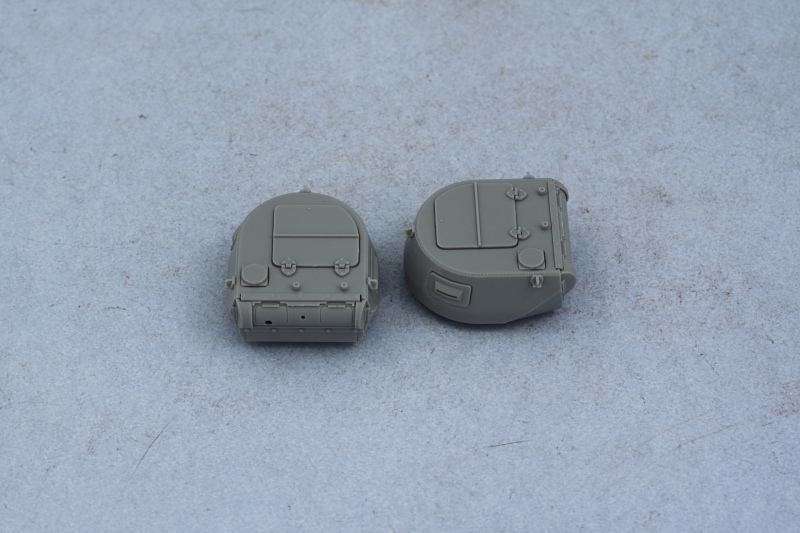 Step 12 begins work on the large main turret and attaches the base of the turret to the top, adds the side hatches, and installs the commander's cupola. The side hatches here also receive ordinary gray styrene vision blocks instead of clear parts and without any kind of interior provided, there's not much point to posing the doors open unless you're going to stuff a figure in there...so mine were closed up. The commander's cupola assembles as a 'stack' of multiple parts and some putty was needed to fill the gap between the cupola and the signal flag port extension that attaches to it. 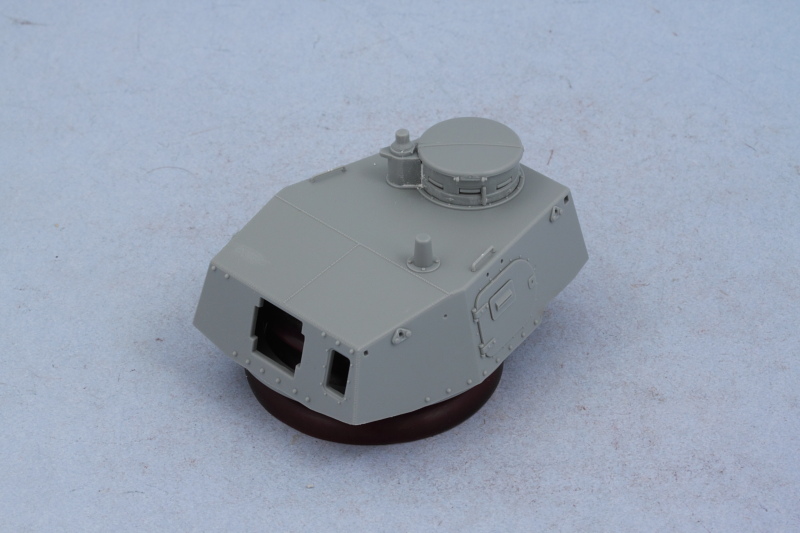 Step 13 adds a lot of delicate detail to the turret side so I bypassed it momentarily to work on Step 14 which assembles and adds the side-by-side main armament. The smaller 3.7cm antitank gun barrel was drilled out slightly to give the barrel a more in-scale diameter and thickness for the muzzle opening. The two guns are paired up in the mantlet as halves, so the resulting join seam needed to be carefully sanded away to create a seamless part. The base of the mantlet is a separate part and shouldn't have a gap, so some Squadron Green putty thinned with liquid glue was used to correct that issue. While the instructions don't indicate it, if you're careful with the assembly and get the alignment of the mantlet base plate and the swivel hub that attaches to it (part B4) correct, it will 'trap' the part sufficiently to allow the main armament to elevate and hold it's position. 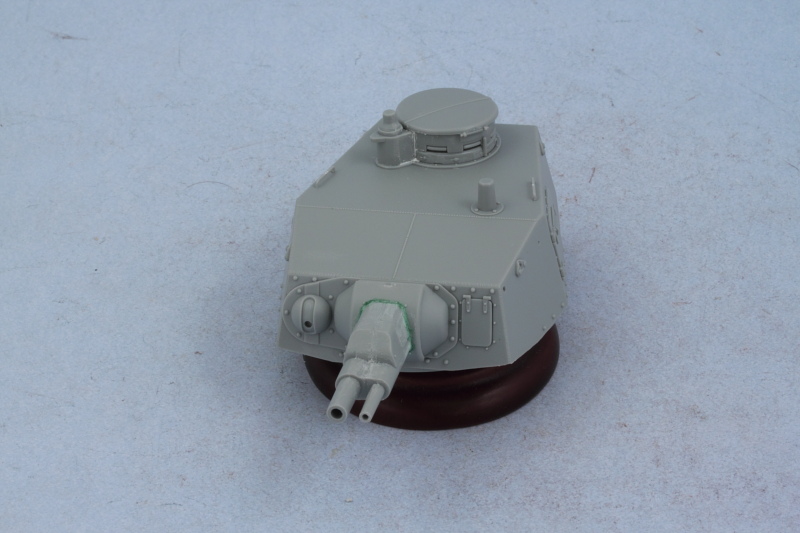 Returning to Step 13, I added the lifting eyes, the antenna and holding tray, and the turret hatch latches. Two different styles of latch are offered and parts B45/44 are the correct style for Nr. 3-5 so those were installed accordingly. 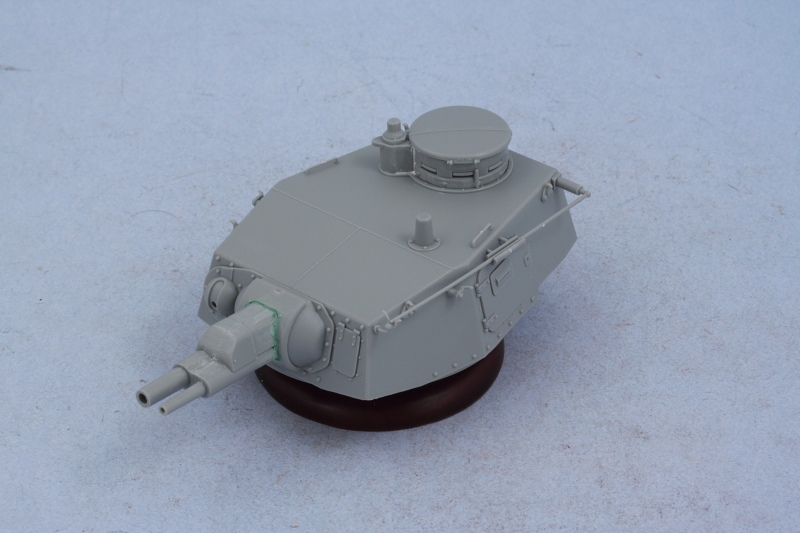 Last but not least, Step 15 adds the turrets to the hull so a sample shot of them in place was called for! 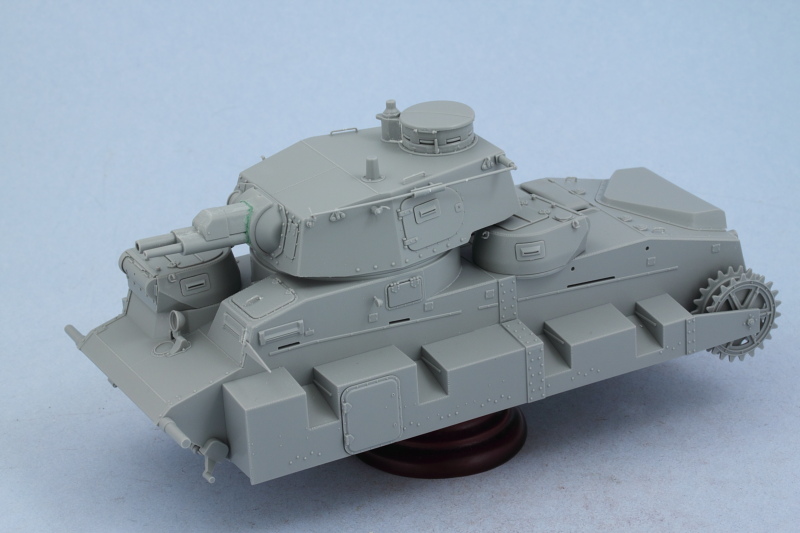 That concludes all the major construction so paint work will be up next! |
|
|
|
Post by tonylee-Rest In Peace on Dec 25, 2012 14:19:38 GMT -5
Hey Bill she's starting to look like something now.
Me i'm waiting on the tracks and if anything ever needed a figure to show the scale of it this monster surely does.
Oh me, the smells coming from the kitchen are heavenly ;D
Tony lee
|
|
|
|
Post by wbill76 on Dec 25, 2012 19:03:06 GMT -5
Thanks Tony! The tracks are for sure going to be a fun exercise on this guy. You're right about the scale, it's about the same size as a Tiger I or a KV-1 but only had a maximum armor thickness of 20mm! Big ol' beast but awfully thin-skinned.  |
|
Deleted
Member since: January 1970
Posts: 0
Nov 26, 2024 14:50:43 GMT -5
Nov 26, 2024 14:50:43 GMT -5
|
Post by Deleted on Dec 25, 2012 19:21:30 GMT -5
Hey Bill nice update . Hope your havin a good christmas !
|
|
|
|
Post by deafpanzer on Dec 25, 2012 20:29:39 GMT -5
Turrets looking good! Like Carl said hope you had a nice Christmas too!
|
|
redleg12
Full Member
  
Member since: August 2012
www.redleg2scale.com
Posts: 401
Aug 28, 2012 18:59:10 GMT -5
Aug 28, 2012 18:59:10 GMT -5
|
Post by redleg12 on Dec 25, 2012 22:32:18 GMT -5
Christmas in the turrets..... I think there is residual help from the tooth fairy and the Easter bunny.
Hoping your holiday goes well
Rounds Complete!!
|
|
afvfan
Senior Member
   
Member since: December 2012
Bob
Posts: 1,772
Dec 10, 2012 17:32:38 GMT -5
Dec 10, 2012 17:32:38 GMT -5
|
Post by afvfan on Dec 25, 2012 22:37:13 GMT -5
Now it's really starting to look the part. Great job on the turrets.
The tutorial reminds me of the number of times I've sat at the bench wondering just what the makers of a kit were thinking (in reference to the sporatic use of clear parts).
|
|
|
|
Post by wbill76 on Dec 26, 2012 10:35:51 GMT -5
Carl and Andy Christmas went well, had a good visit with the in-laws for the annual gift-exchange and dinner get together. Hope you enjoyed the day as well! Mike, definitely a 'turret fairy' at work on this build's design. Hope you had a nice holiday as well! Afvfan, I've often wondered at the logic of DML's use of clear parts for things that clearly have no need to be in clear parts vs. others that should be clear but aren't. Can only shake my head at it and wonder, I'm sure there's some reason somewhere that dictates the optimal size of clear sprues for injection manufacture that causes them to say "we need X number of parts (and no more!) in clear to make this work!" and so voila! they just make the necessary number clear instead of 'normal' styrene.  Dicky Dicky, thanks as always! It does have that strange/hybrid type of feel to it...a lumbering creature for sure, it only had a top speed of 30 km/hr combined with the same armor protection of a Pz I...would hate to have been a crew member on this monster!
|
|
danb.
Reviews member     March 2013 MoM Winner
Member since: November 2011
Posts: 2,808
Nov 17, 2011 9:22:52 GMT -5
Nov 17, 2011 9:22:52 GMT -5
|
Post by danb. on Dec 26, 2012 11:38:16 GMT -5
Nice work Bill shes really takin shape keep going buddy she will be a stunner  Dan B |
|
afvfan
Senior Member
   
Member since: December 2012
Bob
Posts: 1,772
Dec 10, 2012 17:32:38 GMT -5
Dec 10, 2012 17:32:38 GMT -5
|
Post by afvfan on Dec 26, 2012 12:00:25 GMT -5
Dicky, thanks as always! It does have that strange/hybrid type of feel to it...a lumbering creature for sure, it only had a top speed of 30 km/hr combined with the same armor protection of a Pz I...would hate to have been a crew member on this monster! It was pretty formidable in 1936 when it first appeared, compared to what else was out there. Obviously, the Germans saw the design quickly being outmoded though, since they dropped it so fast. |
|
|
|
Post by wbill76 on Dec 26, 2012 14:17:46 GMT -5
Thanks Dan!
Afvfan, true enough...when you place it next to its contemporary designs in the Pz I and II it looks intimidating on the size and weight fronts as well as the firepower...just not in the armor protection department. Reminds me of the similar debate going on in warships at the time in terms of things like the 'battle cruiser' designs.
|
|
|
|
Post by fightnjoe on Dec 27, 2012 15:36:16 GMT -5
watching with interest bill.
joe
|
|
|
|
Post by armorguy on Dec 27, 2012 15:47:00 GMT -5
Cool project Bill !
|
|
|
|
Post by wbill76 on Dec 27, 2012 17:48:16 GMT -5
Thanks joe and Guy, glad to have you along!  |
|
|
|
Post by bbd468 on Dec 27, 2012 19:04:52 GMT -5
Hey Bill, That thing is lookin' fine man, got me itchin' to build mine!  I say thing Bill, cause it easier to spell than Neubau-Fahrzeug Nr. 3-5.... ;D great build my friend!  Gary |
|
|
|
Post by bullardino on Dec 28, 2012 3:59:20 GMT -5
Every time I see your build two thoughts come to my mind. The first one is "What a strange thing, german designers must have been on drugs when they designed this". The second one is "Woohoo, what a wonderful stunning build".  |
|
ogrejohn
Full Member
   Oct '23 Showcased Model Awarded
Member since: June 2012
Go away or I shall taunt you a second time!
Posts: 1,302
Jun 1, 2012 17:33:59 GMT -5
Jun 1, 2012 17:33:59 GMT -5
|
Post by ogrejohn on Dec 28, 2012 5:09:38 GMT -5
The design is kind of an odd duck but you are sure making it into a cool one! Nice work on the turretage!
|
|
|
|
Post by TRM on Dec 28, 2012 10:38:55 GMT -5
Playing a little Christmas Catch-up here!! Looking the part now Bill!!! I like the sounds of paintwork coming up next!!!  |
|
|
|
Post by wouter on Dec 28, 2012 11:02:36 GMT -5
Nice update Bill, with all the turrets it's coming together now ^^ What next up after this build? The Russian multi turret design?  Cheers |
|
|
|
Post by 406 Silverado on Dec 28, 2012 11:16:03 GMT -5
I'm a bit late here.....blame the holidays of course....but glad I'm catching up now. As usual Bill, very clean building my friend. OOOHHH he said painting next....oh yeah
|
|
|
|
Post by wbill76 on Dec 28, 2012 12:17:20 GMT -5
Gary "Thing" works just fine...the name is quite a mouthful on this one for sure! ;D Luigi thanks my friend! I too just shake my head at the ungainly monster that this thing is...and I'm sure that's why they stopped after only 5 of them!  John John, the turretage was some of the most fun in terms of assembly (in a good way), lots of very nice details provided for the weld seams and other bits in this kit. T and Rob, you have the perfect excuse with the holidays, glad you're getting caught up on this one and thanks for the comments! Wouts, ironically I've built the ICM T-28 a loooong time ago and always thought the Neubau would NEVER see the light of day as a styrene kit! Now if you really want a 'land-ship' the T-35 is the ultimate in that design strain! No idea what I will build after this one...I kind of go one-build-at-a-time so I don't lose focus and will turn to look at the stash once this one gets closer to completion and just see what 'speaks' to me! 
|
|
|
|
Post by bullardino on Dec 28, 2012 12:39:50 GMT -5
Bill, it's very likely you are right  |
|
|
|
Post by wbill76 on Dec 30, 2012 19:53:07 GMT -5
One of the downsides of the holiday season is that it's also cold season! I've been sidelined with a cold the last few days and that ruled out any possibility of painting, so I made use of the available time to take care of one of the less-glamorous-but-necessary tasks...cleaning up the tracks for this beast. The kit supplies the individual links on sprues of 40 links with three attachment points per link. 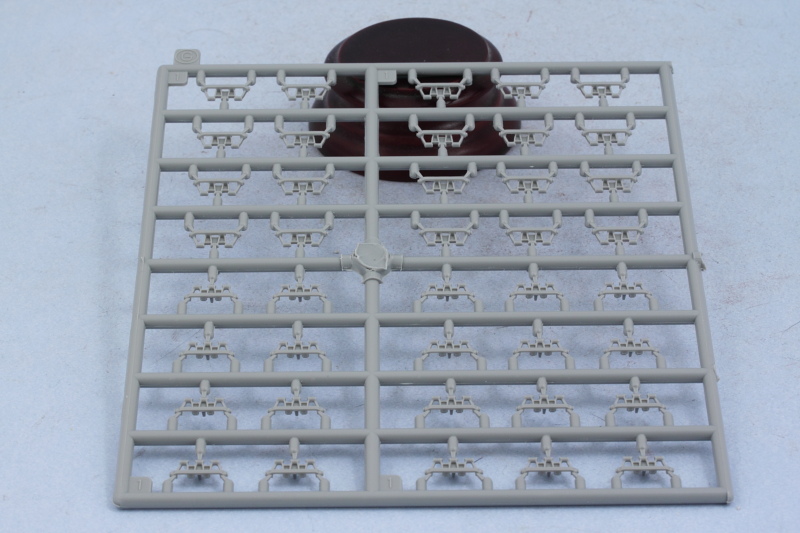 The instructions call for 124 links per side so I removed and cleaned up a total of 250 links just to have a couple handy when the time comes to assemble the track runs. The links aren't handed so I only separated them into two bags in terms of the split of links necessary for each run. 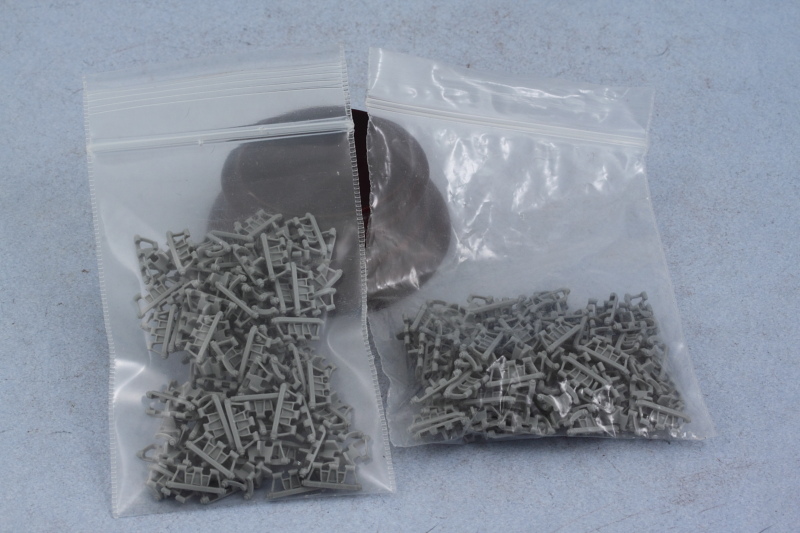 Doing this kind of thing while listening or watching a football game makes the repetition less onerous...and I'm glad to have it out of the way! Hopefully next weekend will afford some time to get things back on track for the paintwork that needs to happen for the build to progress. |
|