noname
Full Member
   March 2012 / April 2013 MoM Winner
Member since: January 2012
I like building models
Posts: 726
Jan 29, 2012 9:24:03 GMT -5
Jan 29, 2012 9:24:03 GMT -5
|
Post by noname on Jan 27, 2013 9:07:35 GMT -5
This is going very well. Never seen weld done that way before. Looks great.
|
|
|
|
Post by wing_nut on Jan 27, 2013 10:51:51 GMT -5
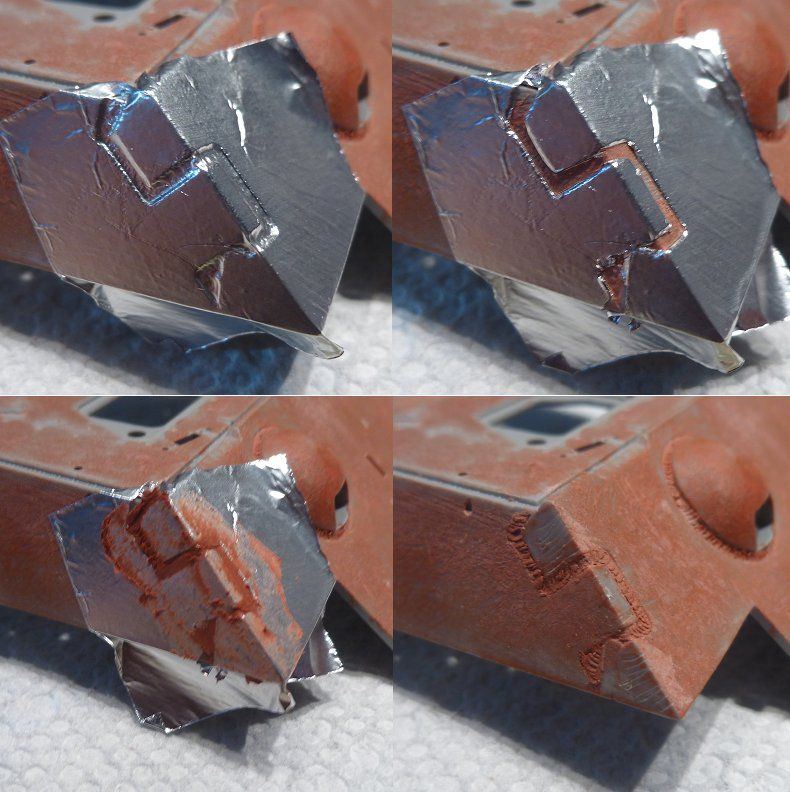
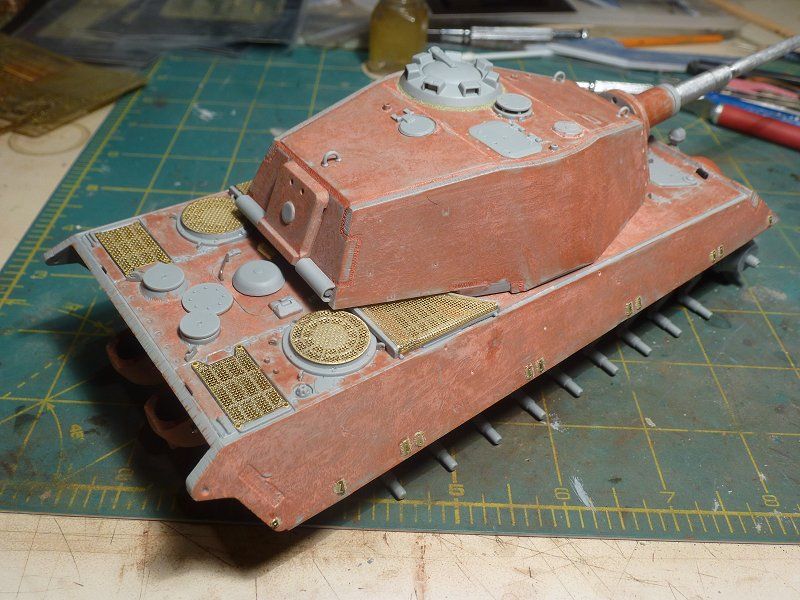
WOW guys, thanks so much for all this positive feedback. Well done Texas. That should be a Thanksgiving tradition. Wout I know the gap you mean. I have miles more welds to do  Gary it Bondo glazing and spot putty... or is it spot and glazing?... whatever. great stuff. Carl turned me on to it. Still working on welds and texture. Here is a better view of how well the Bare Metal foil burnishes. It goes pretty quick too. Burnish, cut, fill and scrape then remove the foil and texture the welds. I need to go over these with a brush dampened with a bit of lacquer thinner to soften them a smidgen.  Here's where I am for the upper hull and turret. Getting close. That rear deck is going to be a real PITA. Lots of little noogies to get around. Unless that part of the deck wasn't rolled steel. Anyone got some good news for me in that regard   |
|
|
|
Post by spud on Jan 27, 2013 11:04:02 GMT -5
Very cool, but isnt that bmf kinda costly stuff, couldn't u use tamiya tape
|
|
|
|
Post by wing_nut on Jan 27, 2013 15:47:18 GMT -5
Spud, it s kinda of expensive. But since I barley build aircraft any more I need to use this stuff up. It is already starting to loose some of its sticky. Yup, Tamiya tape works well too. But the advantage hear it your barely have to put pressure on the knife to get it to cut though so it has its uses.
|
|
|
|
Post by wbill76 on Jan 27, 2013 16:46:22 GMT -5
More great progress Marc! Wish I could help you on the rear deck situation. It was armored plate as well, 40mm thick. Can only assume it would've been hot rolled and the bolted on fixtures were cast separately.
|
|
|
|
Post by Mence on Jan 27, 2013 16:54:05 GMT -5
Very neat work, getting better every time.
|
|
406 Silverado
Global Administrator     
Member since: November 2011
Posts: 10,238
Member is Online
MSC Staff
|
Post by 406 Silverado on Jan 27, 2013 17:35:40 GMT -5
yeah.....well......um don't know what to say Marc, except man that is one awesome KT. I love it the way it is right now. Would pass for a factory hull.
|
|
|
|
Post by fightnjoe on Jan 27, 2013 18:16:22 GMT -5
dang it that is looking good.
joe
|
|
|
|
Post by bbd468 on Jan 27, 2013 20:34:58 GMT -5
Yep...thats the same stuff i got. Im defo gonna try and do some welds with it as yours make me a believer! Ive been useing it to fill seams and the like...still have the same tube i bought nearly 2 years ago. Great job Buddy!  Gary |
|
danb.
Reviews member     March 2013 MoM Winner
Member since: November 2011
Posts: 2,808
Nov 17, 2011 9:22:52 GMT -5
Nov 17, 2011 9:22:52 GMT -5
|
Post by danb. on Jan 29, 2013 3:13:21 GMT -5
Great progress on the KT buddy this has been an interesting read with all the reference material i have a KT ready to be started for a new Hungary campaign dio think i will leave it in the box until i get the ref right  the use of the putty for texturing and welds look puuuuuurfect buddy keep it up its a great subject  Dan B |
|
|
|
Post by wouter on Jan 29, 2013 10:29:33 GMT -5
 Hey, have you parked this outside of your house???  are your neighbors still talking to you???...cheers....Kenny No they don't, but frankly, I dont' care  . Good thing about driving a KT is that you NEVER have any parking problems  Cheers |
|
|
|
Post by wing_nut on Jan 30, 2013 11:12:33 GMT -5
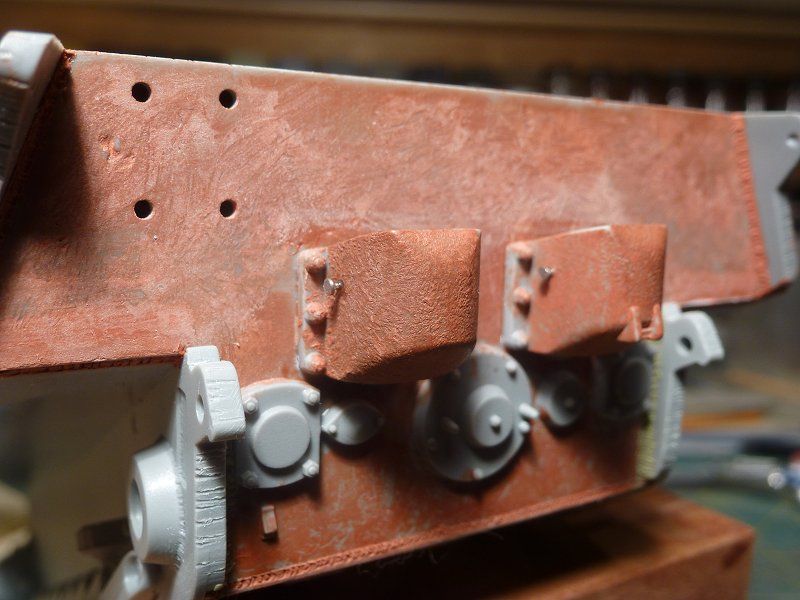
Holy crap there's a lot of catching up to do when you don't post for 3 days. All the activity in all these threads... I'm pooped. Sorry I didn't at least come in to say thinks you for taking the time to look and comment. Thank you. Yes Bill when I read your comment about the rear deck I was a bit depressed. Turned out not to be so bad working around the detail. Well the welding torch has not been put away completey. Still some to do around hinges and little noogies like that. But the main stuff is done and the rolled steel is finished. Finally able to add some of the goodies.   I found some straight pins that look like an appropriate size for the track pin and lifting lugs. Dritz long size 21. Grinding the head was easy enough. Don't have to do that for each link  but made a few for the track pins for the extra treads for the side of the turret.    Did you know the Third Reich predicted the show "Star Trek"? Why else would they may a hatch that looks like the star ship Enterprise?  |
|
|
|
Post by bbd468 on Jan 30, 2013 11:25:30 GMT -5
Hey Marc, Those track pins are awesome!!! Great build W-N....and i like the wee starship hatch.  You know...i was thinkin....we should tell Carl to try cheeto powder to simulate ligh rust in case hes short on supply of pigment.  Gary |
|
|
|
Post by deafpanzer on Jan 30, 2013 11:33:28 GMT -5
Great tip about grinding pins!!!! That would have been perfect for the spare tracks... thanks! Still looking damn good...
|
|
|
|
Post by armorguy on Jan 30, 2013 12:10:41 GMT -5
 Hey, have you parked this outside of your house???  are your neighbors still talking to you???...cheers....Kenny No they don't, but frankly, I dont' care  . Good thing about driving a KT is that you NEVER have any parking problems  Cheers It's normal the neighbours don't talk to you anymore, you turned the gun in their direction !  * great weld seams ! |
|
Deleted
Member since: January 1970
Posts: 0
Nov 26, 2024 12:17:44 GMT -5
Nov 26, 2024 12:17:44 GMT -5
|
Post by Deleted on Jan 30, 2013 12:45:05 GMT -5
truly great work am watching with interest
|
|
|
|
Post by hasenpfeffer on Jan 30, 2013 16:39:04 GMT -5
It's really takin' shape, Marc. All the textures and welds look great. I ground down a couple pins for the spares on my Panther, but you did a way better job... (I sure can be impatient sometimes!)  Did you chuck up the pin in the dremel? |
|
|
|
Post by wbill76 on Jan 30, 2013 21:34:39 GMT -5
Very nice work all around Marc, very nice indeed.
|
|
|
|
Post by fightnjoe on Jan 30, 2013 23:07:11 GMT -5
getting better and better. looks fantastic
joe
|
|
|
|
Post by wouter on Jan 31, 2013 1:33:10 GMT -5
great stuff indeed mate, you really do it very tight 'n tidy, love it while you are still at it...you can always add the fuel vent lines to the sides if you want, an easy fix, and Dragon even moulded the part on the back of the engine department where the lines come out of the hull. These lines were used to extract the fumes of fuel which tended to mass in the fuel cells  Never looked at that Star Trek hatch like that before  Cheers |
|
|
|
Post by wing_nut on Jan 31, 2013 7:36:38 GMT -5
Thanks everyone for the comments. When I cut that hatch off the sprue I just happen to put it down on a piece of black cardboard. Maybe because I just finished all of the Voyager series and am working my way through all of the Star Trek TNG on Netflix just now I might have a heightened awareness of the shape but I swear I heard someone say, " Make it so."  Dave, I chucked the pin in a pin vise. and spun it against a grinding wheel in the Dremel. Wout, thanks, I was wondering what those gizmos on the back plate were. Any little goodies like that... just shout 'em out.  |
|
406 Silverado
Global Administrator     
Member since: November 2011
Posts: 10,238
Member is Online
MSC Staff
|
Post by 406 Silverado on Jan 31, 2013 7:45:30 GMT -5
oh yeah a KT. This is gonna be very cool Marc.
|
|
|
|
Post by wouter on Jan 31, 2013 7:55:39 GMT -5
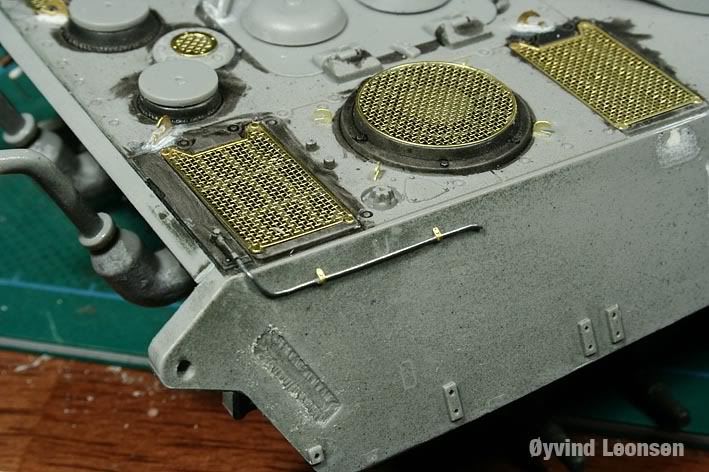
sure, got another one mate. The commanders vane sight is often overlooked. Dragon moulded on a little block on the left of the turret: just drill a small hole into it and insert a small piece of L-shaped wire, as can be seen on my 'La Gleize' KT  normally, two very small bars with a small gap in between need to be added to the front periscope as well, but at the time I didn't dare to try that, I've drawn a red line where it should be. Those two bars, together with the L-shaped wire were an aid for the commander to aim to targets (well, he didn't do the actual aiming himself, but you got the point  Cheers |
|
|
|
Post by wing_nut on Jan 31, 2013 8:00:22 GMT -5
Thanks Rob
Wout I think I saw something on the PE sheet that addresses that. I'll take a look.
|
|
406 Silverado
Global Administrator     
Member since: November 2011
Posts: 10,238
Member is Online
MSC Staff
|
Post by 406 Silverado on Jan 31, 2013 8:08:25 GMT -5
man that weathering/streaking on the ref pic is awesome.
Marc I still think she looks like a factory primered tank the way it looks now. Very cool work on the welds btw.
|
|
DieselRocket.
Full Member
  
Member since: September 2012
Fuh-gedda-bowd-it!
Posts: 122
Sept 9, 2012 7:04:57 GMT -5
Sept 9, 2012 7:04:57 GMT -5
|
Post by DieselRocket. on Jan 31, 2013 12:24:52 GMT -5
Impressive would be an understatement. Love the rolled steel technique, and would love more details on that. Hopefully doing a KT later this year, would like to try my hand at it.
|
|
|
|
Post by Mence on Jan 31, 2013 13:29:01 GMT -5
Nice details being added here, such a lot to learn...
|
|
|
|
Post by wing_nut on Feb 2, 2013 18:28:16 GMT -5
|
|
reserve
Senior Member
   
Member since: July 2012
Si vis pacem para bellum
Posts: 2,372
Jul 11, 2012 9:11:45 GMT -5
Jul 11, 2012 9:11:45 GMT -5
|
Post by reserve on Feb 2, 2013 18:44:00 GMT -5
Sharp, Wingy!
Regards,
Mark
|
|
bigjohn
Reviews member    
Member since: December 2011
John Hale
Posts: 3,438
Dec 21, 2011 2:17:45 GMT -5
Dec 21, 2011 2:17:45 GMT -5
|
Post by bigjohn on Feb 2, 2013 19:04:09 GMT -5
Damn nice work man!
|
|