|
|
Post by TRM on Jan 29, 2013 10:09:41 GMT -5
Thanks Luigi!! Kind of like cheating isn't it? LOL!!! Have at it....maybe the banana barrel?
Thanks Matt!! LOL..the barrel looks long with out the hull...huge!! I liked the yellow too. A little off setcolor for some added interest!
|
|
|
|
Post by wouter on Jan 29, 2013 10:19:23 GMT -5
Great stuff T-dude!!!! And very helpful indeed, what a coincidence ey?  Awesome stuff (btw, don't like those new smilies  ) Cheers |
|
|
|
Post by TRM on Jan 29, 2013 12:44:44 GMT -5
Thanks Wouts!! Might be a coinsendence  LOL...not a fan either...yet!! Once Rob get back to his happy place and is comfortable, I am sure there is small changes here and there that can be done....the smiley's being one!!! |
|
madairbrush
Full Member
   November 2012 MoM Winner
Member since: May 2012
Cheers!! Matt
Posts: 488
May 30, 2012 14:22:05 GMT -5
May 30, 2012 14:22:05 GMT -5
|
Post by madairbrush on Jan 29, 2013 14:24:29 GMT -5
I have seen this photo many times in the internet. This will be a very nice diorama!!!
|
|
|
|
Post by TRM on Jan 29, 2013 14:42:40 GMT -5
Thanks Matt! The Pic pops up alot when trolling!! Fun type of "interlude" let's call it!!
|
|
|
|
Post by TRM on Jan 29, 2013 22:32:14 GMT -5
Hey Dicky!! Thanks a bunch! Appreciate you swinging in!! I am looking forward to the RB! I can only imagine what you will conjure up!! I never thought about the PAGB with the hull...nice!! Reminds me mine is on the self still....just adding that to the list of unfinished kits from last year!!  |
|
|
|
Post by TRM on Feb 1, 2013 6:54:17 GMT -5
So, moving forward here.... I added a couple washes to blend and tone down some things. 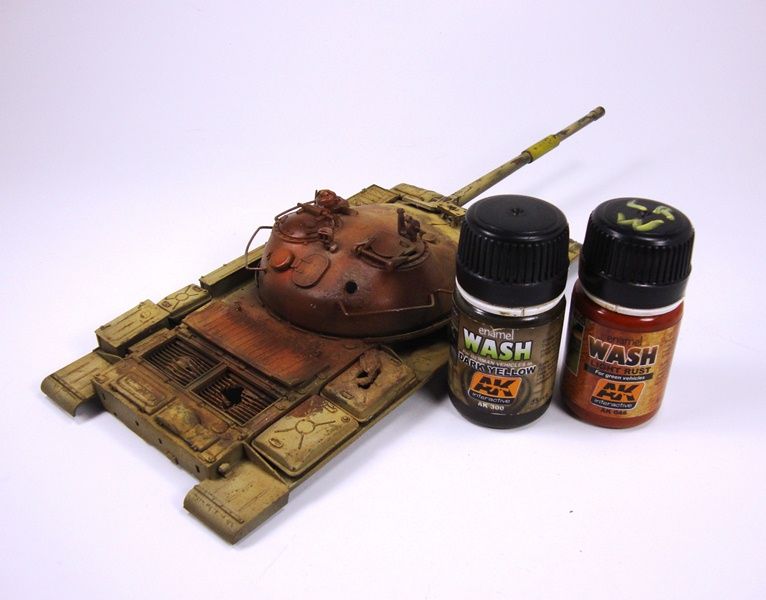 Going back to some texture and color, I applied more pigments to certain areas using AK's Rust Streaks as a medium for my pigments. 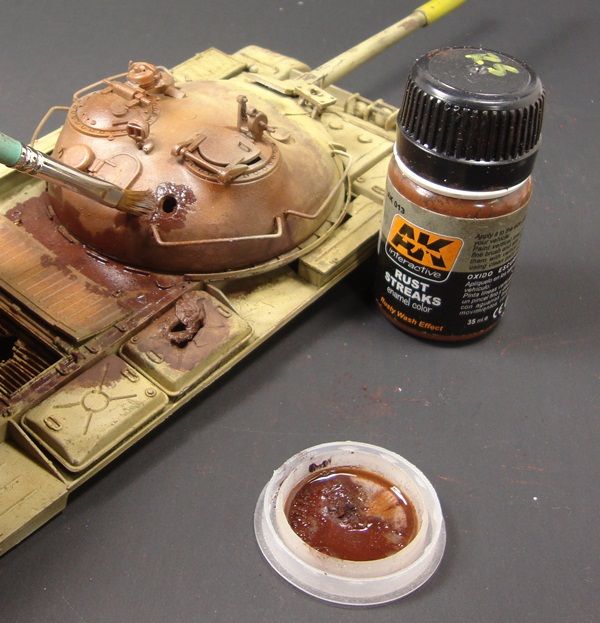 After some drying, I decided to add a little bit of lighter rusting by using Badger Air's Rust from their Railroad Weathering Set. 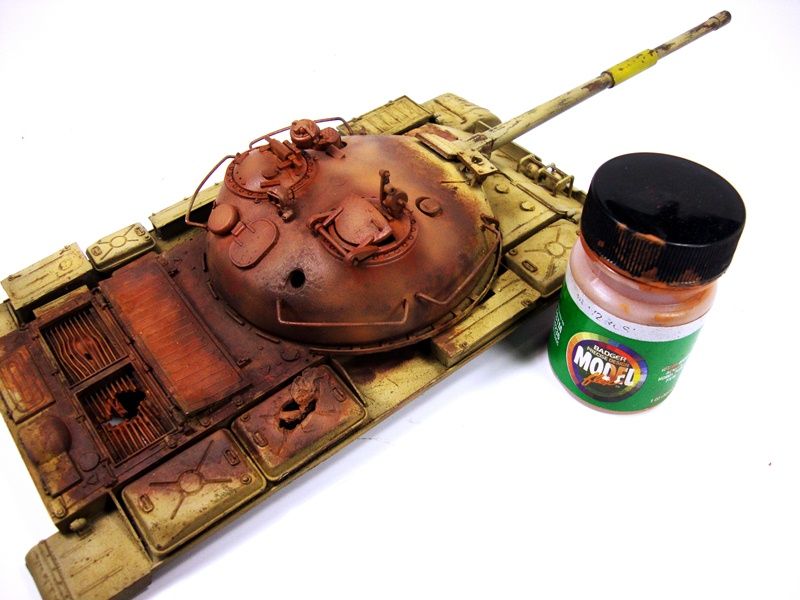 Then, right back into more pigments... 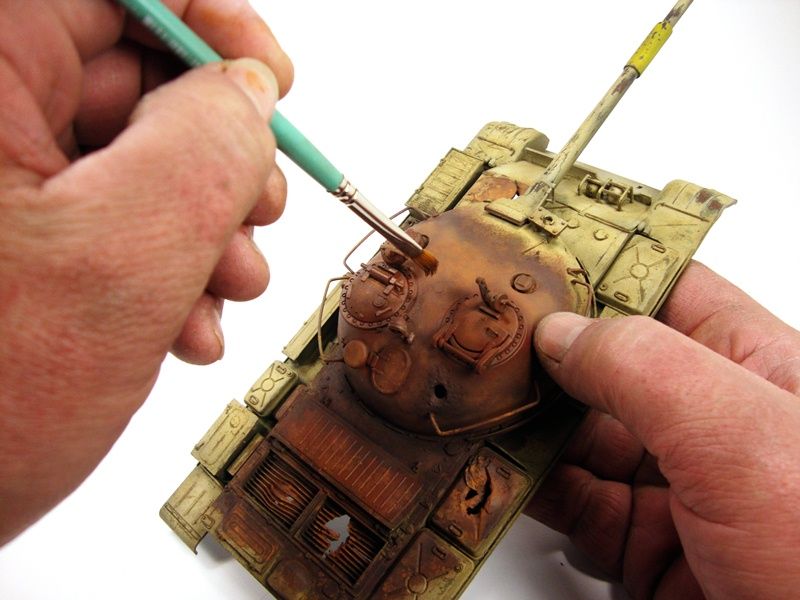 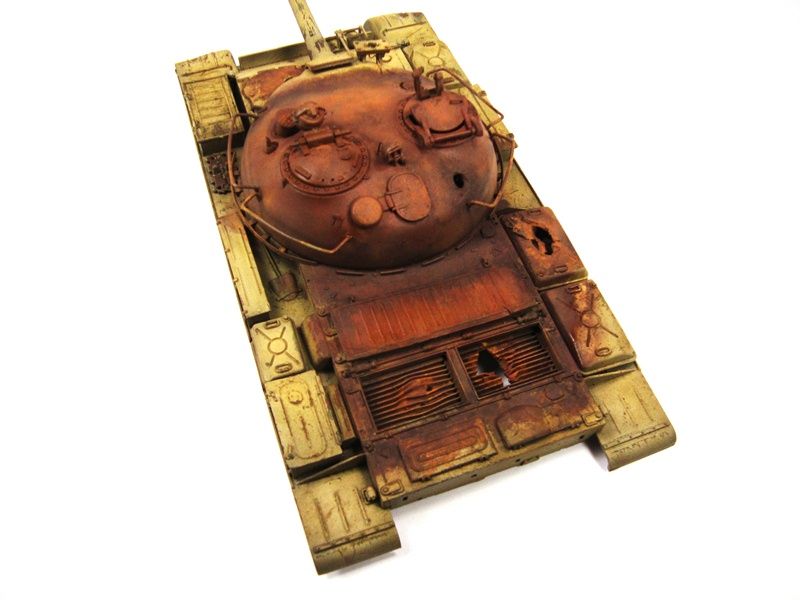 It was time to start adding some soot and ash to this one. Using a black and dark grey pigment, I lightly stipple the pigments to various areas. 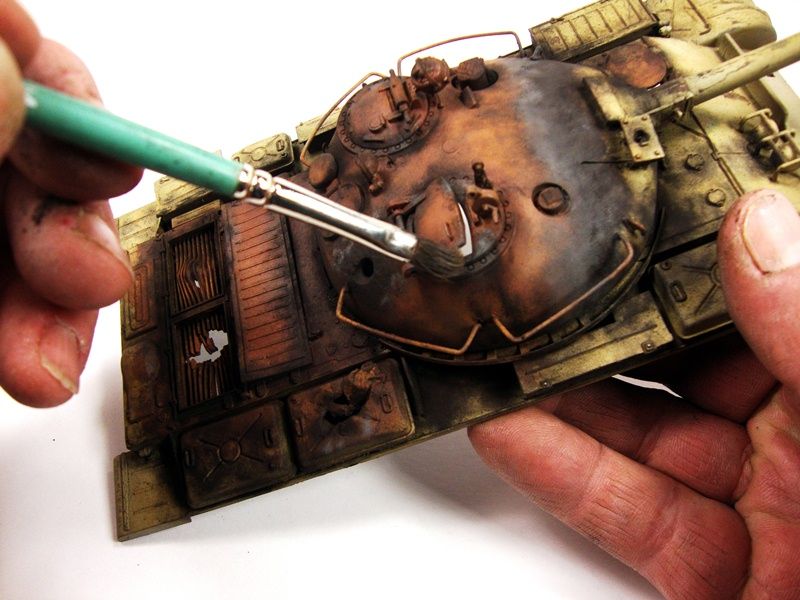 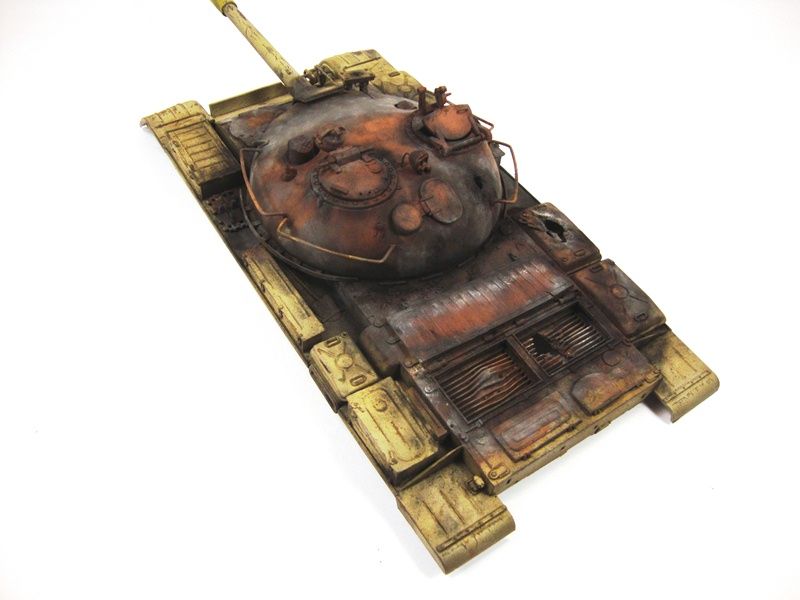 There is still some this to add to this as well as making a quick base for it. As always....thanks for tuning in!!! |
|
Deleted
Member since: January 1970
Posts: 0
Nov 24, 2024 6:10:49 GMT -5
Nov 24, 2024 6:10:49 GMT -5
|
Post by Deleted on Feb 1, 2013 7:44:26 GMT -5
good grief! awesome stuff!
|
|
madairbrush
Full Member
   November 2012 MoM Winner
Member since: May 2012
Cheers!! Matt
Posts: 488
May 30, 2012 14:22:05 GMT -5
May 30, 2012 14:22:05 GMT -5
|
Post by madairbrush on Feb 1, 2013 8:09:24 GMT -5
The rust and ash looks pretty good. I can't wait to see it on a base...
|
|
|
|
Post by deafpanzer on Feb 1, 2013 8:46:35 GMT -5
Friggin' awesome! Is your work bench open for walk in tutorials? I might drive that far...
|
|
|
|
Post by bullardino on Feb 1, 2013 9:12:23 GMT -5
Inspiring build, Todd. The SBS helps a lot who want to try to walk in your footsteps  |
|
|
|
Post by TRM on Feb 1, 2013 10:50:06 GMT -5
Thanks again Snipe!!!
Thanks Matt!!! Real soon I hope!!
Thanks Andy!! LOL...your always welcome buddy!!
Thanks Luigi!! Footsteps I am not sure about that!! But an SBS helps open up thought from other for ideas and improvments as well as helping others I hope!
|
|
|
|
Post by 406 Silverado on Feb 1, 2013 11:08:06 GMT -5
And THAT is how it's done. Fantastic work in the layers and effects bro. I forgot I had that Badger set of paints, will dig them out and give em a go.
We need to plan something for the next show like we talked about...quick build and painting...or was that for AMPSEast ?
|
|
|
|
Post by Mence on Feb 1, 2013 11:08:09 GMT -5
Fantastic, so realistic.
|
|
venom1
Full Member
  
Member since: October 2012
Posts: 1,369
Oct 10, 2012 2:40:03 GMT -5
Oct 10, 2012 2:40:03 GMT -5
|
Post by venom1 on Feb 1, 2013 11:42:53 GMT -5
Wow T, what a superb effort, and 10 points for originality! Can't say I've ever seen a dio like what you've got planned before!! Cheers, Sam  |
|
|
|
Post by bbd468 on Feb 1, 2013 14:24:44 GMT -5
WOW Todd...that looks ferkin awesome! Thats some impressive weathering with rust and i like the SBS you posted as it helps me understand more about how to do rusty stuff. Just been to nervous to go for it....but i wanna so damn bad!!!!  Cheers, Gary |
|
|
|
Post by bbd468 on Feb 1, 2013 16:06:49 GMT -5
Dagnabbit!!!! I was following that!  BTW The ferkin' HOOOGE hands look splendid!  I was wonderin' that too Dicky but wouldnt say. T. your hands look like you must be 7' feet tall! No offence though as they obviously have the delicate touch....oh that dont sound right either.....you get get tha point.... right Todd?   Gary |
|
|
|
Post by TRM on Feb 1, 2013 18:43:41 GMT -5
Thanks again Boss!! LOL...I forget some of the things I have to from time to time. The Badger is not to bad, I like the rust color a lot and the weathered black too. I would be all over a trial run at the next show if you like!! Kind of a per-cursor for the AMPS show. We just need to pick something to build and paint!!! Mence - Thank you very much my friend!! Sam - Thank you!! I will take the points...I can use all I can get!!  Gary Gary - Thank you Sir!! Have at it!! Same as building regular...only thing is the "mindset". It is normal to to not want to cut up of wreck something you just bought. This is why a shelf queen, old build kit or cheap shelf jockey from the LHS...no feelings about them!! After that ask whatever you want...I know if I don't have an answer one of the MSC crew will!! Dicky - Thanks? LOL!! I realize now that I dropped a few pics in an effort to streamline the process...I have 400 steps to this (slight exaggeration more like 327 but I like the round numbers)!! Ask about a step if there is something I seemed to skip and I will get ti up on the screen!! Sorry bout the freakishly large hands..LOL!! Did you catch the boo boo on the left index? Sanded sown a 1" section of the digitalis with an 8" bench grinder at work...LOL!! I laugh because I was in the middle of a non=sparking tool test whereas I take a tool blank and grind it over a pool of Carbon Disulphide, which will ignite with a sneeze to see if the sparks fire it up....well, my finger didn't make any sparks....this time anyway!!!
Gary again - LOL...no not 7 feet...6-3...occupational hazard....with clubs like this it's not always easy to handle those itty bitty PE pieces but I manage!!! Does look kind of funny holing a beast like the T-62 cradled like a baby!! LOL!!!
|
|
|
|
Post by Leon on Feb 1, 2013 19:23:51 GMT -5
T that is coming along nicely.Really like how you did the rust
|
|
|
|
Post by TRM on Feb 1, 2013 19:32:34 GMT -5
Thank you Leon!! Glad you like!!  |
|
|
|
Post by fightnjoe on Feb 1, 2013 20:10:22 GMT -5
t that is fantastic. so real. incredible.
joe
|
|
|
|
Post by TRM on Feb 1, 2013 21:26:27 GMT -5
Mighty kind of you Joe...Thanks!!
|
|
|
|
Post by bbd468 on Feb 1, 2013 21:49:47 GMT -5
LOL........i thought it was a 1/48 at first and had to double back and make sure it wasnt! Im 6' 3" too and struggle with some of the wee bits myself...but my mits aint as big as yours fella! I bet you could punch a hole through a telephone pole without a scratch......ok im done....LOL
T-62 does look really amazing T. and its inspirational. I got to but me a cheap old school Tamiya and try my hand at it. Just gotta take that first big step...aye Todd.
|
|
|
|
Post by TRM on Feb 1, 2013 22:51:09 GMT -5
LOL...a telephone pole!!! The inspirational part is what it's all about...I troll around here and admittedly other sites and can see something that sparks an idea for something else and what not, so I like hearing this most of all. Take the feeling an run with it!! Cheapo kit is the way to go!! Tammy is certainly the way to go...low cost and shake n bake to get you to the fun parts!! Only problem it's very addictive. I am starting a support group when it get warmer  |
|
|
|
Post by tobias5555 on Feb 2, 2013 7:37:55 GMT -5
I used the picture to build the same T-62 some years ago. Good work.
|
|
Deleted
Member since: January 1970
Posts: 0
Nov 24, 2024 6:10:49 GMT -5
Nov 24, 2024 6:10:49 GMT -5
|
Post by Deleted on Feb 2, 2013 7:48:54 GMT -5
Great idea really well done MrT, you can do an inside down tank in the sand with the hull and tracks  As far as the finish goes, another masterclass in weathering buddy  |
|
|
|
Post by TRM on Feb 2, 2013 8:10:48 GMT -5
Hi Tobias! Thanks! Think spud remembers your build, as he mentioned it to me! quick and dirty. I should find more of these 1/2 hull depictions to do!!! LOL!!
Hiya Steve! Thanks!! That is the good thing, still having all the parts left over for something else. Like what Dicky mention, maybe for the Post apocalyptic GB!! Funny things is with the "just the turret" jobs and the "top half" jobs I might actually have an entire tank build complete soon!! LOL!!
|
|
bigjohn
Reviews member    
Member since: December 2011
John Hale
Posts: 3,438
Dec 21, 2011 2:17:45 GMT -5
Dec 21, 2011 2:17:45 GMT -5
|
Post by bigjohn on Feb 2, 2013 8:29:26 GMT -5
WOW!!!! I just started following this one T, Havn't been on the forums much. But man, This looks freaking AWESOME!
|
|
|
|
Post by TRM on Feb 2, 2013 14:07:31 GMT -5
Superb stuff T learning all the timefrom you. Thank you AJ!!  Thanks BJ!! LOL...no problem, just checking in...heck, I forget some of the posts I have!!  |
|
multicam
Senior Member
   
Member since: January 2012
Nate
Posts: 2,039
Jan 10, 2012 14:35:41 GMT -5
Jan 10, 2012 14:35:41 GMT -5
|
Post by multicam on Feb 3, 2013 11:05:02 GMT -5
First Class work, T! Love the ash:)
|
|