venom1
Full Member
  
Member since: October 2012
Posts: 1,369
Oct 10, 2012 2:40:03 GMT -5
Oct 10, 2012 2:40:03 GMT -5
|
Post by venom1 on May 17, 2013 11:35:08 GMT -5
Evenin' gents! Well, just a minor update tonight. Haven't had much time for modelling this week, but I thought I would share with you what little I have done! I had my first crack at the oil dot method. Still not sure about the end result, so I thought I would post it here to get the opinion of you knowledgeable folk. Any constructive criticism would be warmly welcomed, this is a brand new technique for me so I will no doubt take a while to master it. I would appreciate your feedback in helping me do just that! Photo below.... 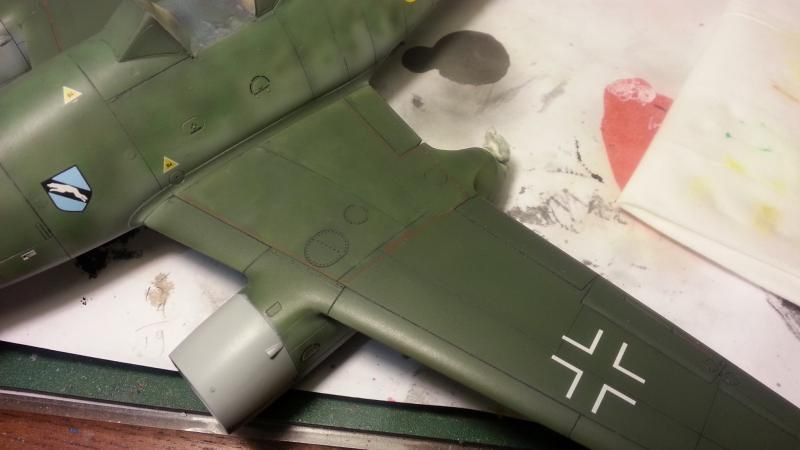 The area of the wing from the engine nacelle inboard has been hit with the oil dot method. I used a combination of Zinc Titanium White, with lesser spots of Lemon Yellow and Emerald Green. A few dots of Yellow Ochre were thrown in for good measure. Everything was blended with a slightly damp brush in a circular pattern, trying not to overlap too much. Then it was all blended further with a dry brush. It may be a little hard to see, the photo was taken with my mobile phone, which while good, does not have the clarity of a "proper" camera. Anyway, it's not too bad for a first go, I think. It definitely gives the paintwork a less uniform appearance and a bit of colour variation and fading as per real life. I will be going to my model club tomorrow, so plan to work on it some more. Hopefully I will have some more to show you soon! Would appreciate your thoughts lads (and ladies!)  Cheers, Sam  |
|
Deleted
Member since: January 1970
Posts: 0
Nov 26, 2024 17:14:31 GMT -5
Nov 26, 2024 17:14:31 GMT -5
|
Post by Deleted on May 17, 2013 12:00:50 GMT -5
Now that looks really good, the effect is subtle but really does break up the overall colour
|
|
|
|
Post by bullardino on May 17, 2013 12:38:28 GMT -5
I had missed all these great updates, this looks awesome  |
|
|
|
Post by wbill76 on May 17, 2013 20:24:55 GMT -5
The oil dot method, when done properly, should impart just the type of effect you've achieved here. It's meant to provide subtle variations to the underlying paint along with fading or streaking should you desire those effects as well. The panel/section you've worked on looks good from here, carry on!  |
|
venom1
Full Member
  
Member since: October 2012
Posts: 1,369
Oct 10, 2012 2:40:03 GMT -5
Oct 10, 2012 2:40:03 GMT -5
|
Post by venom1 on May 17, 2013 20:40:18 GMT -5
Pete - Thanks mate! Have to agree with you, it definitely breaks up the colour  Luigi Luigi - Thanks buddy, glad you like it so far!  Bill Bill - Thanks mate, glad it looks the way it's supposed to! At least I know I am on the right track.  Hopefully I will get some more done this weekend. Stay tuned true believers!.....  Cheers, Sam 
|
|
|
|
Post by dupes on May 17, 2013 20:44:02 GMT -5
Sam - your oil dot result looks spot on to me! I've used it a lot on armor...but not yet on aircraft. Need to do so ASAP!
|
|
|
|
Post by Leon on May 17, 2013 21:01:49 GMT -5
Agree with the guys Sam.The effects your going for look great.  Got a question.Did you seal the base coat before doing the oil dot method? |
|
|
|
Post by bbd468 on May 17, 2013 21:18:29 GMT -5
Same here Sam, dont get any better than that buddy!  |
|
Rick
Full Member
  
Member since: March 2013
what to build, what to build . . . Ok THAT one!
Posts: 854 
|
Post by Rick on May 18, 2013 5:12:22 GMT -5
Looks fantastic. As mentioned, you've nailed the mottled camo perfectly. I'm new with the oil dot wash and mottled camo as well. Scared as hell I'll turn a decent camo into a toy look so I'm watching very close. I've got a couple German kits lined up in the stash so I'm studying intently before I dive in. Your work is outstanding!!!
Rick
|
|
venom1
Full Member
  
Member since: October 2012
Posts: 1,369
Oct 10, 2012 2:40:03 GMT -5
Oct 10, 2012 2:40:03 GMT -5
|
Post by venom1 on May 18, 2013 11:07:51 GMT -5
Wow, thanks guys! Dupes - Thanks for the feedback mate, nice to hear from someone who's used the technique. Glad I have pulled it off!  Leon Leon - Thanks buddy! Yes, the base coat is well and truly sealed. While the paintwork is enamels, it has a number of coats of Future for the decals and a couple of coats of acrylic flat coat to dull it all back down again, so the paintwork is well protected from the White Spirits effecting the underlying paintwork. I followed Jamie's blog to guide me in this new venture. See his blog here (hope it's ok to post the address here!): haggismodels.blogspot.co.uk/2012/09/hasegawa-b5n2-kate-part-6-weathering.htmlGary - Thanks mate, that's a big call! Glad you approve my friend!  Rick Rick - Thanks very much for the kind words! As you can see, the results have turned out pretty good! All I can say is give it a go, you may be pleasantly surprised! I also cannot recommend Jamie Haggo's blog highly enough. It really gave me the confidence to give it a crack!  Geek Geek - Thanks mate, I am still getting used to the technique, but I really like the subtle effect it produces. In a nutshell, I moistened the surface with WS so as to avoid any localised staining, and then followed up with numerous small dots (about the size of the blunt end of a toothpick) of white, yellow, green and buff. Mostly white, with probably only half a dozen or so dots of green and yellow, and lastly two or three dots of buff. Each dot was then locally blended in a circular motion with a slightly dampened brush, taking care not to blend the whole lot together into one single colour. Finally the whole lot was blended further with a dry brush. I did a panel at a time to stop it drying out and allowing me to focus the required attention without rushing. It's early days yet, but I'm pretty happy with it! Hopefully I will continue to improve! Hopefully some more updates coming soon......  Cheers, Sam  |
|
thug626
Senior Member
   
Member since: January 2013
Posts: 2,035
Jan 15, 2013 13:05:28 GMT -5
Jan 15, 2013 13:05:28 GMT -5
|
Post by thug626 on May 18, 2013 11:40:39 GMT -5
Hello Sam, Ditto to what Bill said about the oil dot method. At first it seems like one of those techniques that will "destroy" a finish but, when you get to the end of it, it does impart a rather nice tonal variation. Outstanding work by the way.  Dave |
|
|
|
Post by fightnjoe on May 18, 2013 21:22:24 GMT -5
sharp. very sharp.
joe
|
|
|
|
Post by wing_nut on May 19, 2013 16:46:57 GMT -5
so I will no doubt take a while to master it.
Too late... ya already did.
|
|
venom1
Full Member
  
Member since: October 2012
Posts: 1,369
Oct 10, 2012 2:40:03 GMT -5
Oct 10, 2012 2:40:03 GMT -5
|
Post by venom1 on May 23, 2013 8:44:51 GMT -5
Dave - Thanks mate! Yes, it does impart some lovely subtle tonal variations, that's for sure. The camera doesn't really pick up the subtlety that well, you'll have to trust me when I say it looks much better in real life!  Joe Joe - Thank you very much my friend, that means a lot to me!  Marc Marc - I feel I am a little way yet from mastering the technique, but I am truly humbled, kind sir, that you would say such a thing!   Righto, on with the next update! Thought I would take a few photos of the process itself, show you how straight forward it really is. Hope this will be of some help to some of you! It goes without saying that as you are working with oils, and therefore White Spirits, you need to ensure the underlying paintwork is protected. As my camo colours are enamel, I have laid over a few acrylic flat coats to both flatten the Future down, and at the same time, protect the enamels. If you are working with acrylics, as some of us do, then you are already good to go, and don't have to worry about any additional protection. So anyways, first up is to pick your colours for the session. For this effort I used four different oils, consisting of Zinc Titanium White, Emerald Green, Lemon Yellow and Yellow Ochre. I put them on a piece of card, which helps leech out some of the oil in the paint. This in turn gives a flatter finish. I have found that the separator card that comes in the 24 packs of soft drink is perfect. I just cut it up into sections and I've got myself a cheap disposable palette for my oils. For this method you only need a very small amount of each paint as seen below. You can already see the oil just starting to leech out of the paint..... 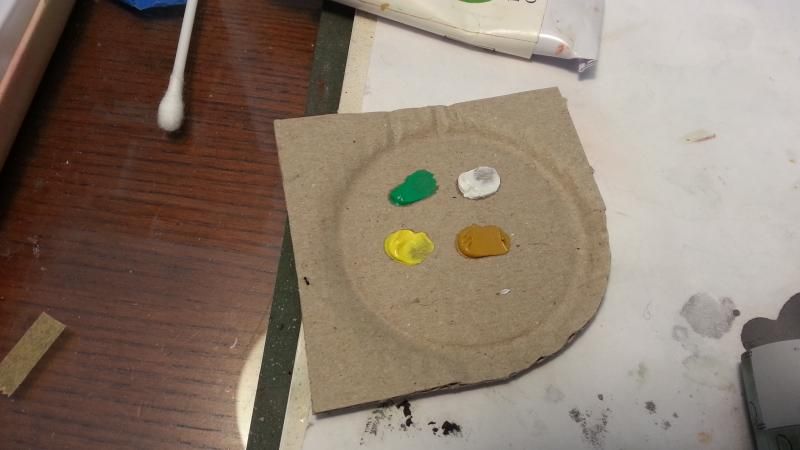 Yes, they are very bright colours. Yes I freaked out just a little bit the first time I did it!  So, the next step is to wet the area you are working on with White Spirit. You don't want it sopping wet, just damp enough to stop the oils from actually leaving stain marks. Don't try and do an entire surface at once (like a whole wing for example), otherwise you may feel rushed and make mistakes. Instead, break it down into areas, and work in sections, finishing one before moving on to the next. Aircraft are great as the have "built in" sections thanks to all the lovely panel lines!  Right, so once you have dampened the area in question, start spreading dots of oil around. Not too big, maybe a little bigger than the diameter of a toothpick. I use mostly white dots to create the faded paintwork effect, and then I mix in some of the other colours which will aid in giving some of that wonderful tonal variation. The end result is as seen below... 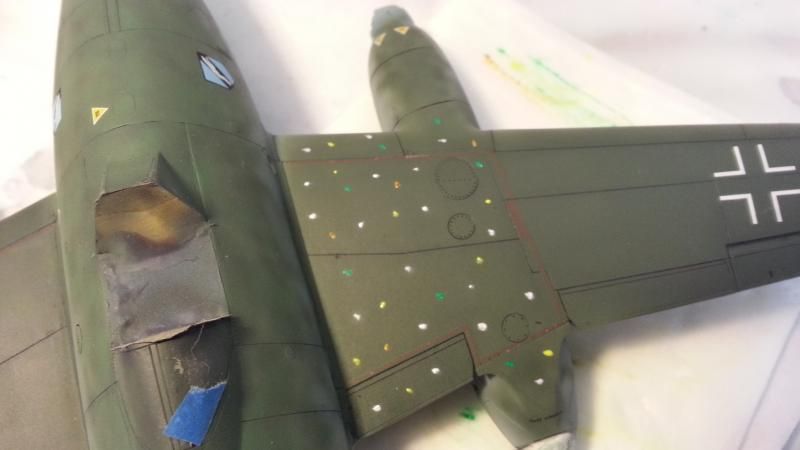 Scary lookin' ain't it??  Now you need a flat brush, dampened (not sopping wet) with White spirits, and start to work the oil paints in rough circles. You want to blend the paint outwards and try and cover some of the wing area surrounding each dot as seen below... 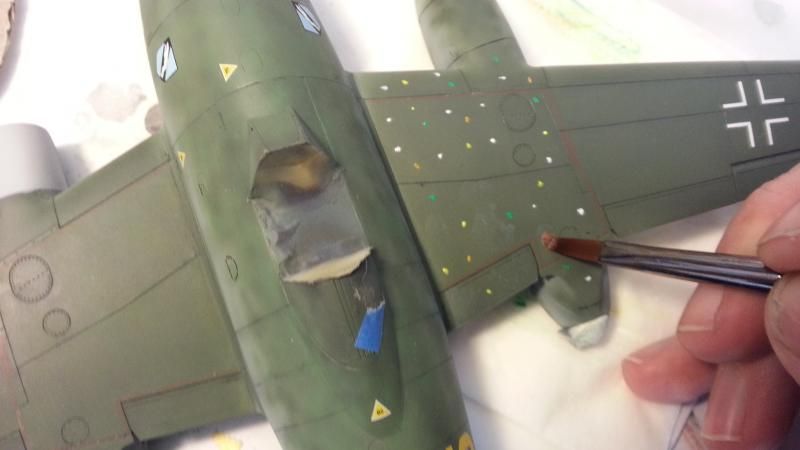 Don't blend all the colours directly into each other, otherwise you will end up with more of a filter. After the first 'run' you should be able to make out the different colour 'zones' that you laid down. Should look something like this.... 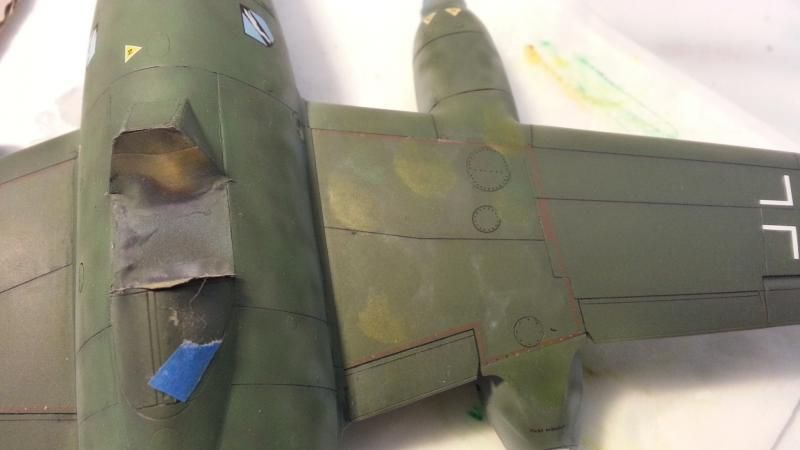 Once this is done, I then go back with a damp brush and sort of stipple the colours together, making sure the edges of the colour 'zones' are blended together to give a more subtle transition from one colour to the next. You should end up with something similar to this.... 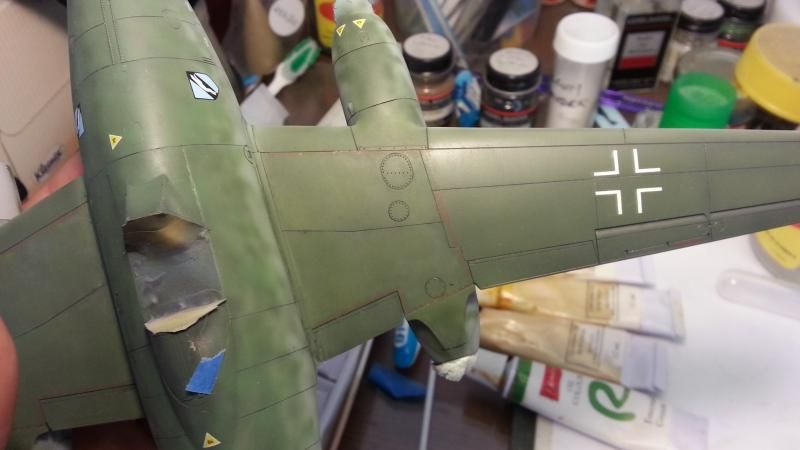 It's hard to see in this photo, but trust me, it's there, and it looks the bees knees (if I do say so myself!!  ) Dunno if you can tell, but the wing has been done from the panel line in line with the outboard edge of the engine nacelle, into the wing root. The outer section of the wing is untouched. It was a lot more obvious in the flesh!! Here are a couple of photos of the finished wings. Hopefully they convey the overall effect well! 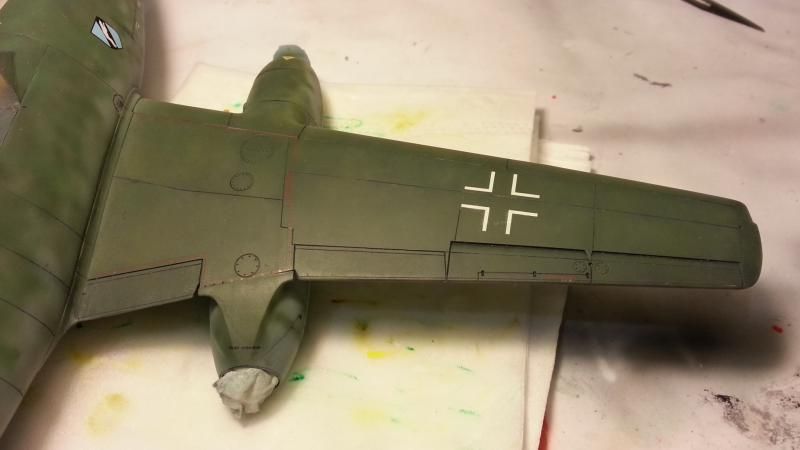 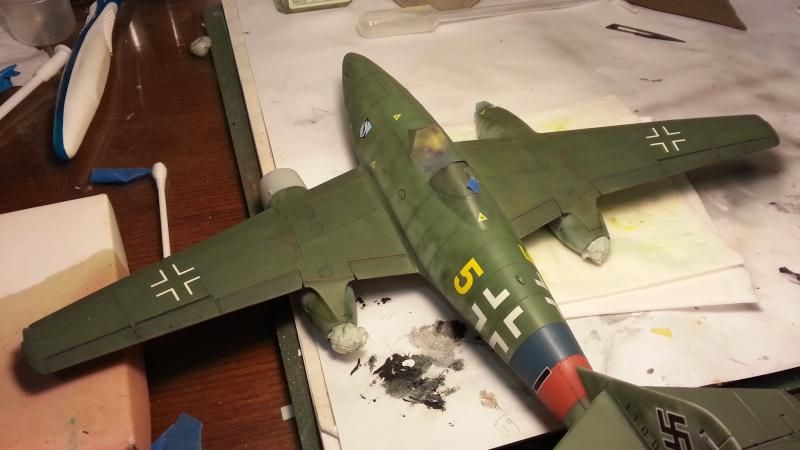 So there ya have it folks! Hope the little tutorial has been of some help to y'all! I still have a bit to go yet, I need to do the tops of the tail planes, as well as the whole fuselage. I also want to dirty up the wing roots and some of the panel lines. Then there are those blue and red stripes.....  Stay tuned, true believers! More will come as my plan comes together.....  Cheers, Sam 
|
|
|
|
Post by bullardino on May 23, 2013 9:57:04 GMT -5
Sam you did a masterful job with oil dots  Thanks for sharing the SBS, very well done and easy to follow.  |
|
|
|
Post by bbd468 on May 23, 2013 10:01:39 GMT -5
Sam, Thats an awesome SBS, thanks for that! Your results are impressive.  |
|
|
|
Post by fightnjoe on May 23, 2013 18:24:12 GMT -5
sam great sbs. between you and ski i might just be able to work some with oils without launching the project into the wall.
joe
|
|
|
|
Post by wing_nut on May 23, 2013 18:31:54 GMT -5
Let's talk in extremes...
Long comment... Your results show the complexity of the tonal variation you can achieve with oils dots.
Short comment... Stunning!
|
|
|
|
Post by Leon on May 23, 2013 19:16:38 GMT -5
Sam,thanks for the great SBS.This will be very helpful on all future builds.  |
|
Rick
Full Member
  
Member since: March 2013
what to build, what to build . . . Ok THAT one!
Posts: 854 
|
Post by Rick on May 23, 2013 20:55:41 GMT -5
Sweeeet! Great result. Pics tell the story. Planning to give it a go as soon as my next victim gets it's coat.
Rick
|
|
|
|
Post by wbill76 on May 24, 2013 20:24:42 GMT -5
Nice work with the dot filters, you can definitely tell the difference between the treated and untreated areas. Going to really add some depth to the finish when you're done with the whole thing.
|
|
venom1
Full Member
  
Member since: October 2012
Posts: 1,369
Oct 10, 2012 2:40:03 GMT -5
Oct 10, 2012 2:40:03 GMT -5
|
Post by venom1 on May 24, 2013 20:49:52 GMT -5
Wow, thanks for all the positive feedback guys! I truly am humbled that skillful modelling folks the likes of yourselves would consider my work with such high praise!  I was worried how my first attempt at oil dot would go. Looks like y'all have put those fears to rest!!  I am going to try and get some more done over the weekend, so I will update as soon as I can. Cheers, Sam  |
|
|
|
Post by dupes on May 24, 2013 22:56:58 GMT -5
Looking forward to it!
|
|
thug626
Senior Member
   
Member since: January 2013
Posts: 2,035
Jan 15, 2013 13:05:28 GMT -5
Jan 15, 2013 13:05:28 GMT -5
|
Post by thug626 on May 25, 2013 0:37:17 GMT -5
Hello Sam, The pics do hint at the dot filter effect. The camera, at least is my experience, does not pick up the subtlety of the effect. I'll bet that looks great in person.  Dave |
|
venom1
Full Member
  
Member since: October 2012
Posts: 1,369
Oct 10, 2012 2:40:03 GMT -5
Oct 10, 2012 2:40:03 GMT -5
|
Post by venom1 on Jun 2, 2013 12:12:18 GMT -5
Greetings scabies and jellybeans! Time for another update! I think I have pretty much done the deed as far as my first oil dot weathering attempt goes. I have now done the entire upper surfaces of the aircraft and am pretty much happy with the end result. Tell me what y'all think! It looks really good in the flesh, and while it took a while, it was well worth the effort. The wings especially have a nice 'weathered" unevenness about them as far as the colour goes, and I added a little grime in around some of the panels and control surfaces for good measure. Ennyhoo, 'nuff with the jibber jabber, on with the pikcherz!  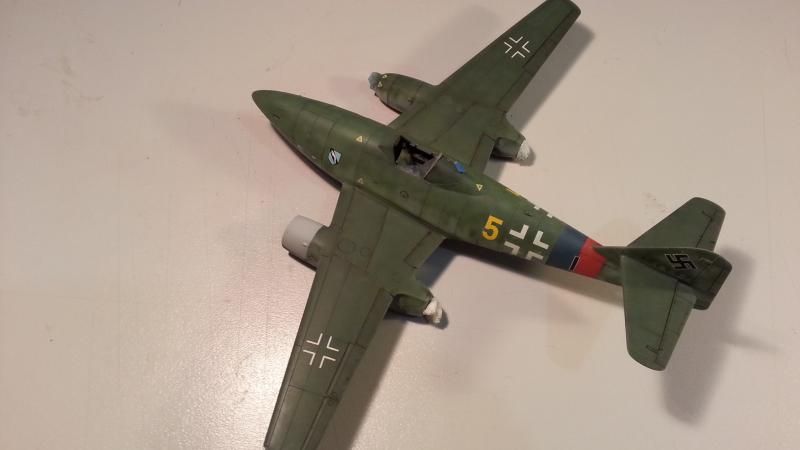 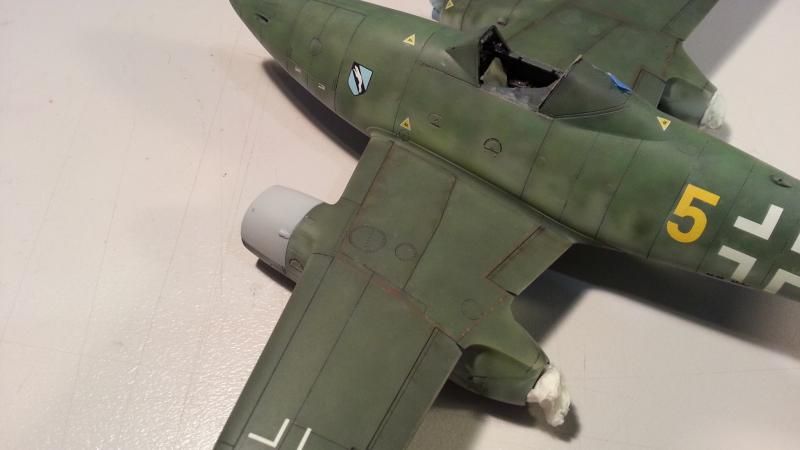 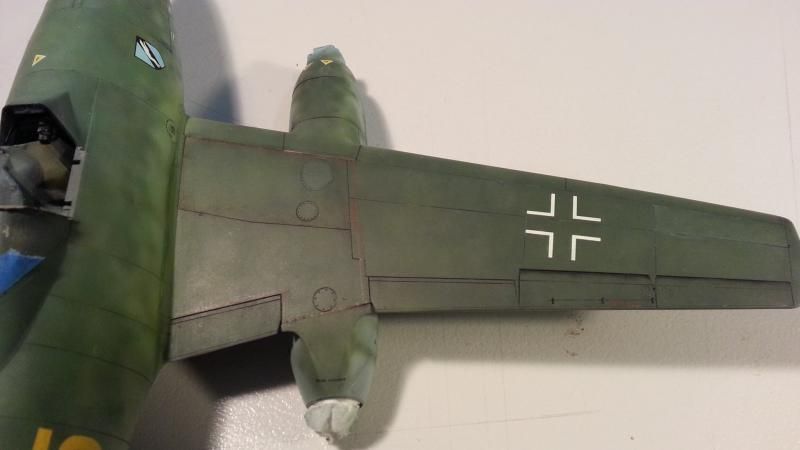 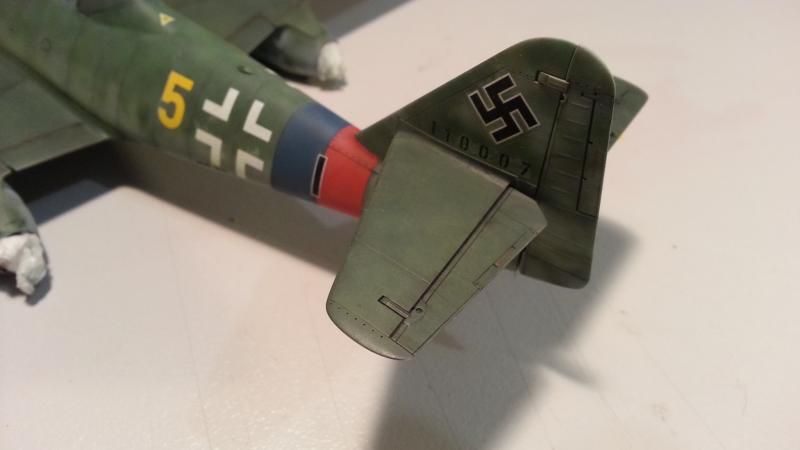 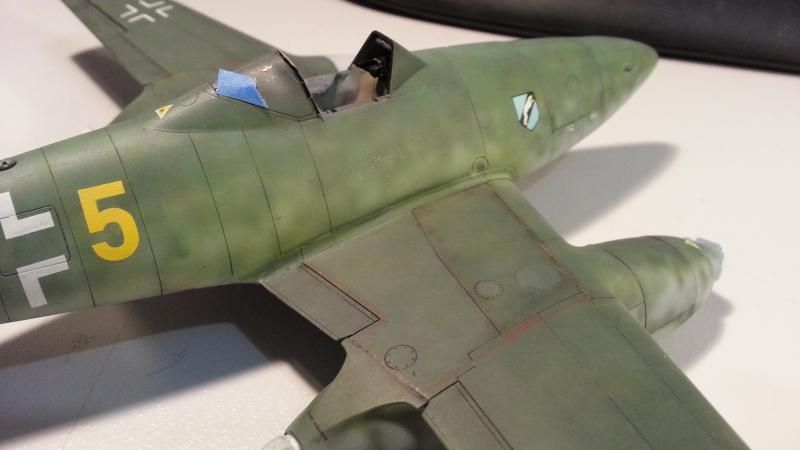 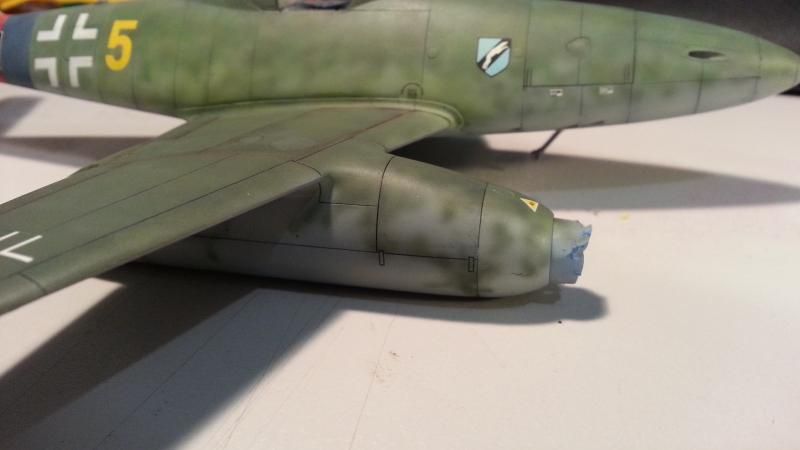 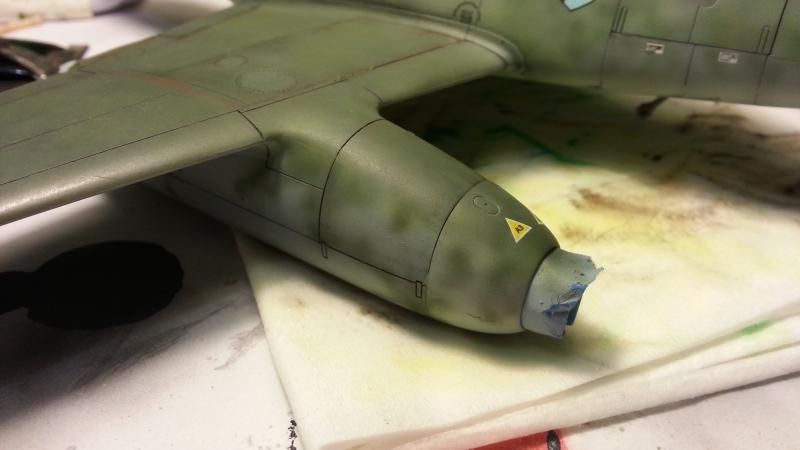 So there ye go!  Now I think its about time to "de-Germanize" it! Next up I will mask up the German markings in preparation for painting them out so I can chuck on some nice Pommy circles!  Stay tuned, true believers!! Cheers, Sam  |
|
|
|
Post by wbill76 on Jun 2, 2013 19:38:25 GMT -5
Well worth the effort Sam, very nice effects. On to the de-Germanization!
|
|
|
|
Post by bbd468 on Jun 2, 2013 23:14:17 GMT -5
Beautifully weathered Sam! I DO BELIEVE!!!!  |
|
DeafStuG
Full Member
  
Member since: May 2013
..
Posts: 1,283 
|
Post by DeafStuG on Jun 3, 2013 18:41:41 GMT -5
Cooooooool, Great Job Camo painting !
|
|
|
|
Post by bullardino on Jun 4, 2013 9:42:07 GMT -5
Great job with those oils, the weathering is spot on. Now on to deswastikation  |
|
venom1
Full Member
  
Member since: October 2012
Posts: 1,369
Oct 10, 2012 2:40:03 GMT -5
Oct 10, 2012 2:40:03 GMT -5
|
Post by venom1 on Jun 6, 2013 10:08:17 GMT -5
Well folks, time for another update, and unfortunately this time it will be accompanied by quite a few of these ---->     This round it was all about "deswastikaization", or the painting out of the German markings. First up was the masking with some low tack painters tape to allow me to airbrush with a sharp edge. I purposely cut the tape a bit wobbly to give the impression that it was brush painted. In retrospect, I should have just brush painted it. This is what she looked like with the masking on.... 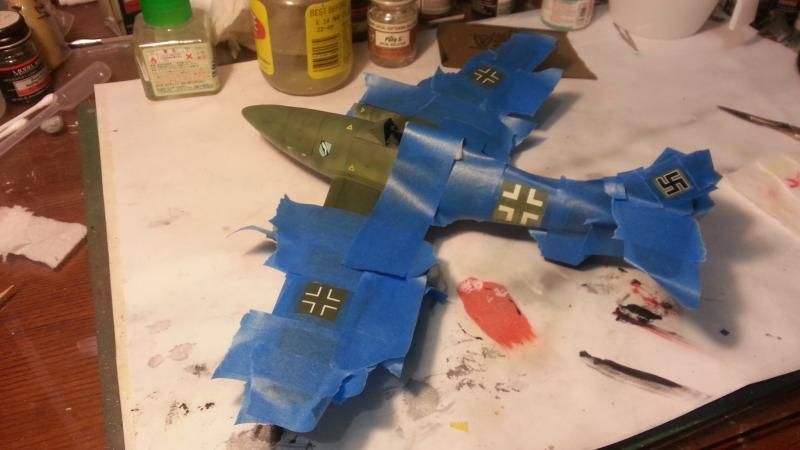 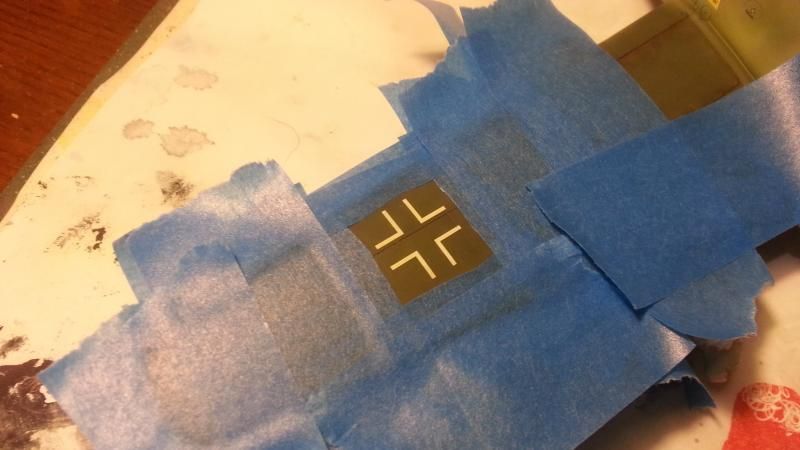 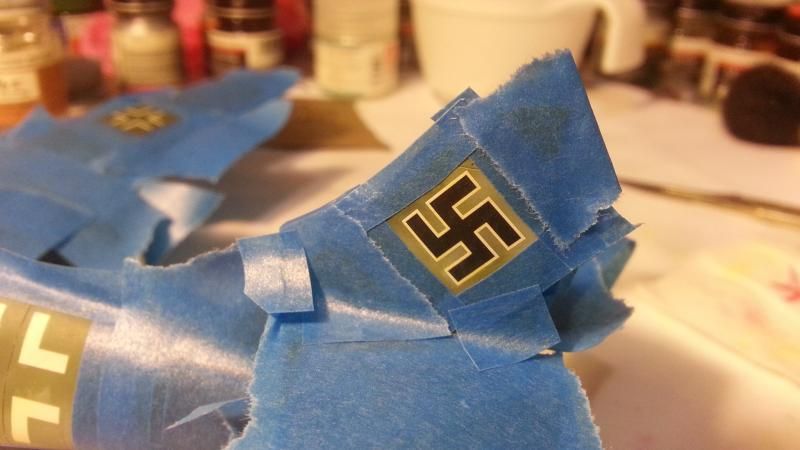 All good to go, I hit the grey areas with some RLM63 Lichtgrau (yes, the top of the wings are supposed to be painted grey. Weird, I know.) and the green areas with some FS34079 Dark Green. We ended up with this.... 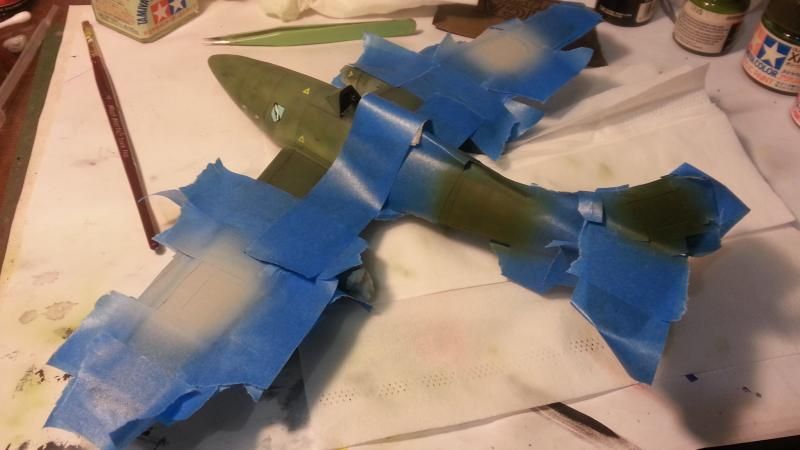 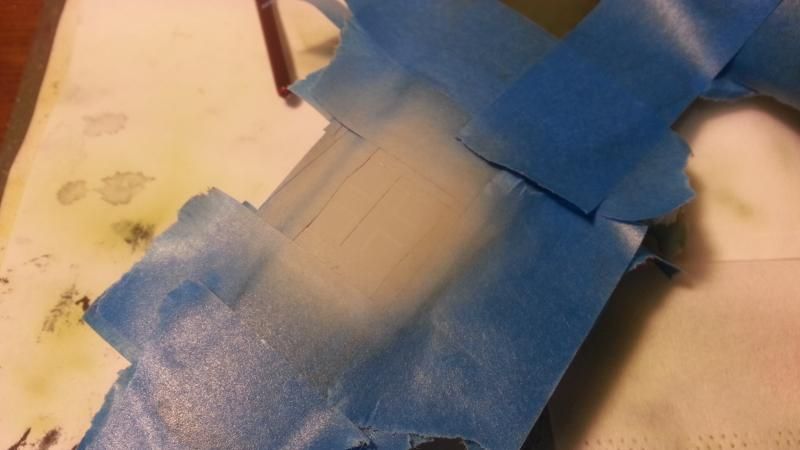 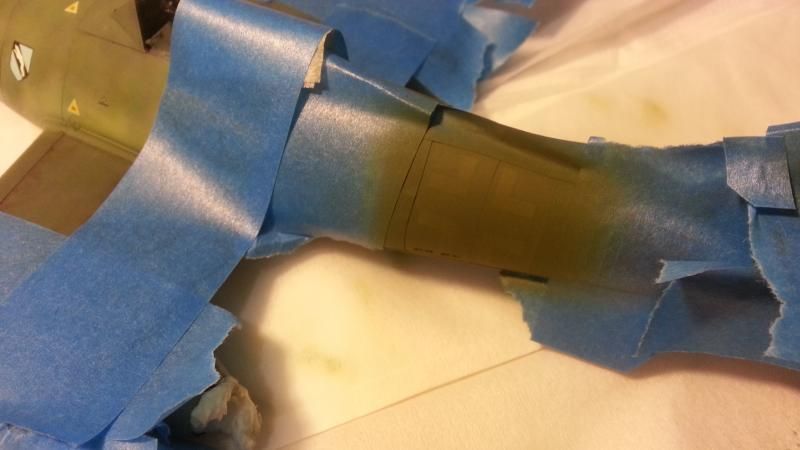 So far so good. Markings juuuuust peeking through, just like I planned! After a little wait, it was time to unmask. Unmasked the bottom first and it was all going swimmingly!  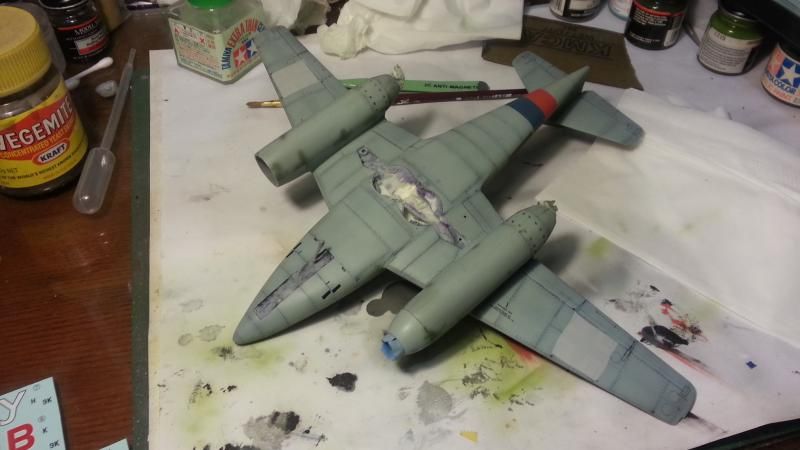 Then I started to unmasked the sides. This is where it all went decidedly pear shaped!!! AAAAAAAAAHHHHHHHHHHH!!!!!!!!      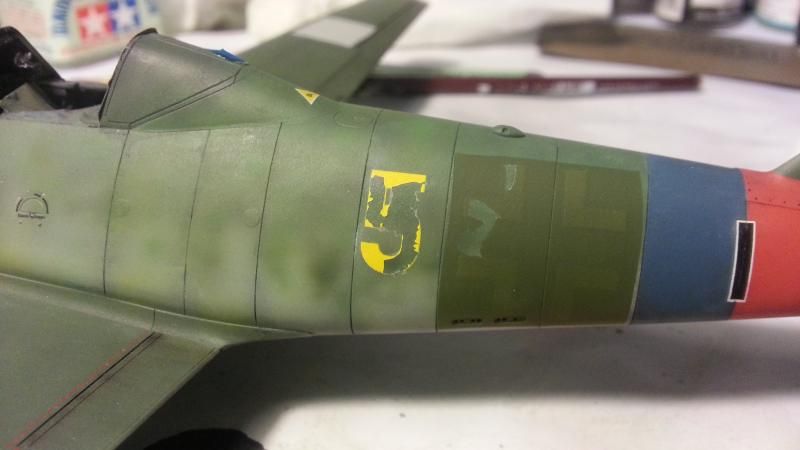 The other side didn't fare much better....  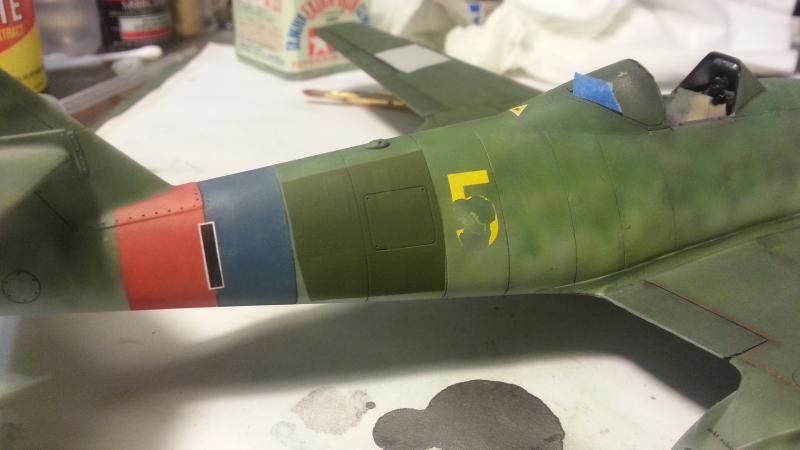 The tail was an unmitigated disaster. Upon removing the masking, it lifted the majority of the tail number!    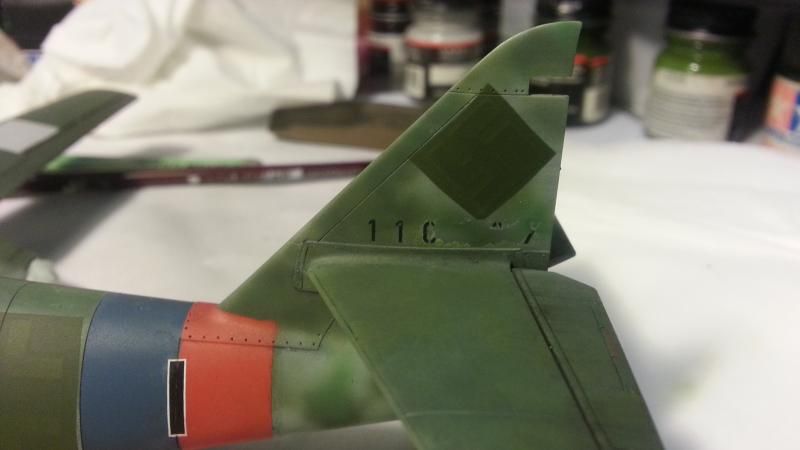 The other side copped it almost as bad...   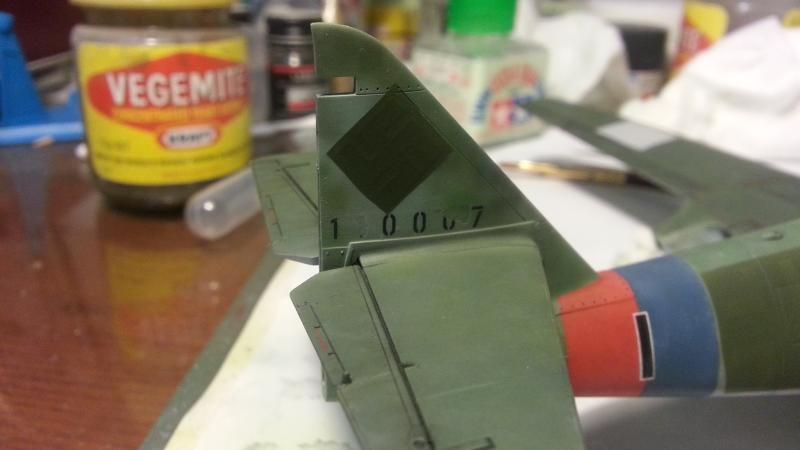 And this is how it looks all up as of this evening...  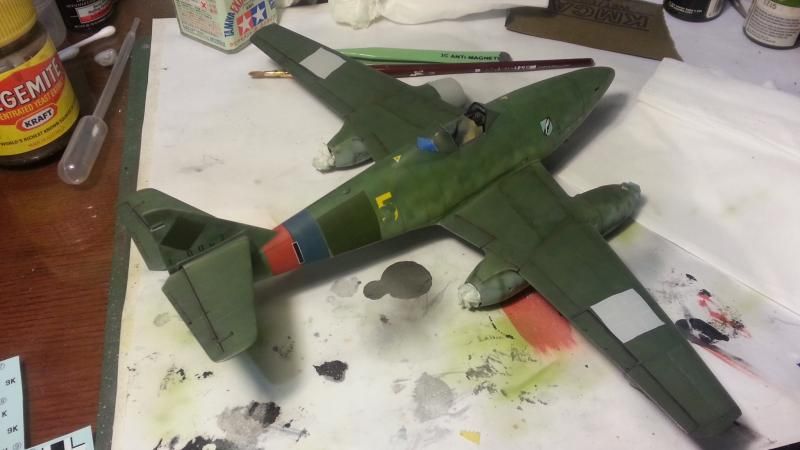 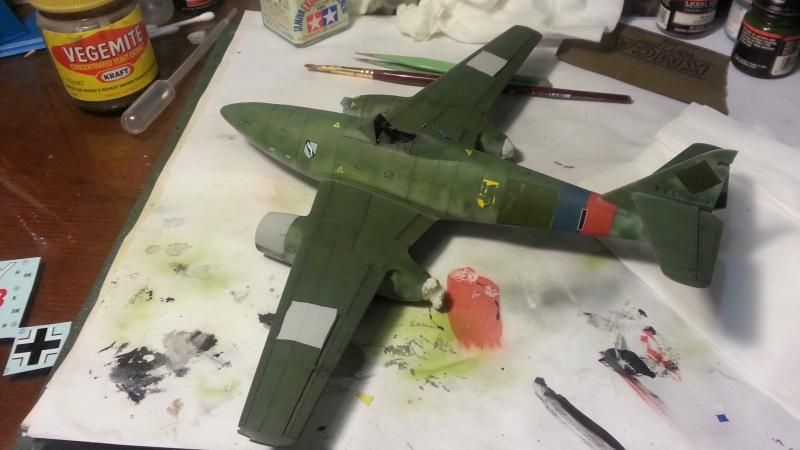 Suffice to say, I am pretty gutted right now, and thoroughly unimpressed with the Cutting Edge decal set. They were EXTREMELY difficult to get to settle down, to the point where I used the Tamiya decals where possible, and they lifted after two or three brush coats of Future and a couple of acrylic flat coats to seal them. Very, very unimpressed!!   I did notice however that some of the fuselage Balkenkruz has lifted as well (tape must have stuck itself there as I was demasking) and that was a Tamiya decal, so maybe it was me rather than the decals which were to blame....  I am willing to give CE the benefit of the doubt because of the Tammy decal, mainly because I have a whole stack of CE decals and cannot bear the thought of going through this again!! Either way, I am gutted right now! Where to from here I hear you ask? Thanks for asking! Well, after putting the model down, breathing deeply and calmly, and resisting the urge to hurl it against the wall, I sat back and thought about how to tackle the problem. The tail numbers will be the most difficult to fix, but it appears that the modelling gods do not hate me entirely.  As luck would have it, the Tamiya decal sheet has enough numbers for me to recreate the tail codes I need, and they are even in the correct font. Hooray! I need to make 2 lots of "110007", and so the sheet has plenty. Phew!  I love you Mr Tamiya, and I want to have your babies! (Obscure Blackadder reference there folks.....) 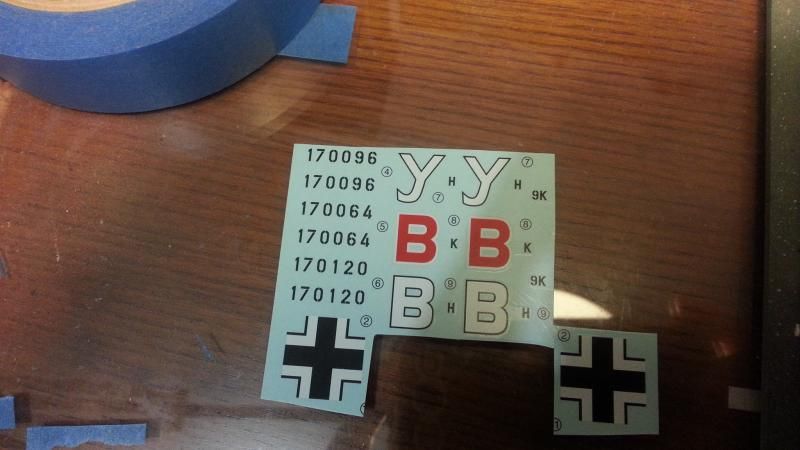 I think I will probably have to brush paint the yellow 5's back onto the fuselage, as I don't really have anything suitable in my decal stock. I suck at brush painting.  (Hence the reason I airbrushed a couple of poxy squares. Coulda brush painted it, but NOOOOOOOO......) Ennyweigh, I think it's time for me to sign off and go and cry myself to sleep!! Hopefully things will look a little better in the morning. Not gonna let this #$%#%@ son of a *$#@$ bastich beat me. So close to the finish line! Stay tuned, true believers! We shall not be beaten!!!  I should have just brush painted it...... Cheers, Sam  |
|