pt109
Full Member

Member since: April 2013
Stop staring at me! heheheh
Posts: 491 
|
Post by pt109 on Apr 16, 2013 20:28:24 GMT -5
Hi Guys, I just joined the forum last night, in the "Introduce Yourself" section with a few photos of a current build (shelf queen). I thought it would be alright to post a few photos here with some more info on the model and a photo that inspired the build....along with the instruction for the conversion and a little info regarding the build.  Photo is a little bright but is a pretty good shot showing the Fuel tanks...(PE from Part of Poland) And the instruction sheet...  And, here's the photo that inspired the conversion: From Squadron Signal's T-34 in Action 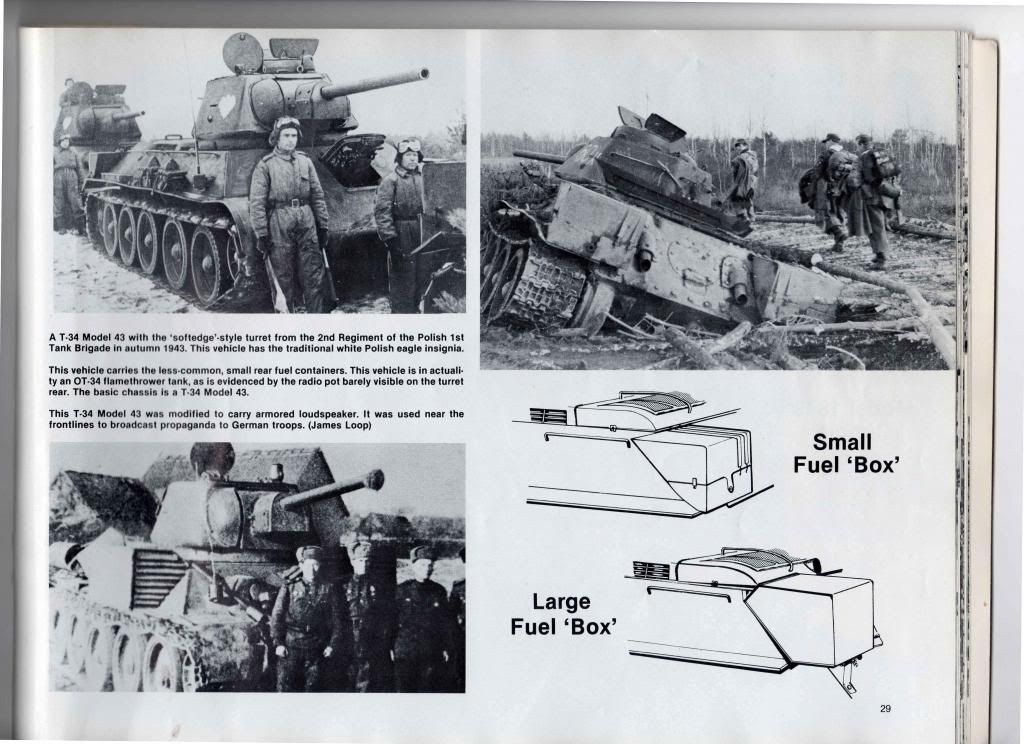 For Discussion Only Vehicle is in top right in photo, and drawings show simple tank detail etc. You can barely make out the rear antennae pot on back of the turret. Eduard makes better looking PE detail wise but I like Part better. Another photo... 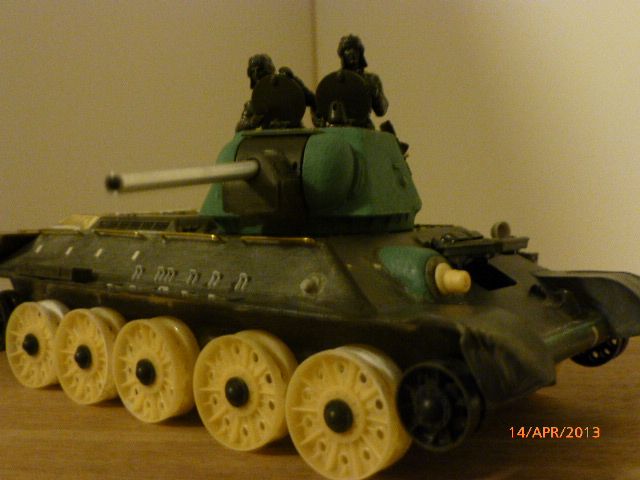 This one shows the mantlet conversion...ATO 42 (they just basically removed the MG and replaced it with the ATO 42)  This one shows the Armo steel wheel set had to use some Tamiya center hubs because the resin ones were poorly cast. Next photo shows the camo pattern I will attempt....heheh. 30th Guards Tank Div. Bottom of page....  Thanks for looking....! Paul |
|
deafpanzer
Administrator 
Member since: June 2012
"Never tell your story to a deaf man"
Posts: 21,154
Member is Online
MSC Staff
|
Post by deafpanzer on Apr 16, 2013 20:34:01 GMT -5
Looks like a fun build to follow! I am embarassed to say this but I have learned something new about those chemical tanks...
|
|
pt109
Full Member
Member since: April 2013
Stop staring at me! heheheh
Posts: 491
|
Post by pt109 on Apr 16, 2013 20:53:31 GMT -5
Hey DF, Nothing to be embarrassed about, I try to learn something new every day... Another scary thing was the hull gunner was replaced by the fuel and air tanks....that's why the antennae pot was moved to the turret rear. Starting the tracks tonight, well not as much fun as the wheels.  Paul |
|
|
|
Post by TRM on Apr 16, 2013 21:02:18 GMT -5
The she is again!! I like you plan for paint!!! Gonna look sweet!!!
|
|
|
|
Post by dupes on Apr 16, 2013 22:07:04 GMT -5
Talk about a "multimedia kit". Looks great so far!
|
|
Deleted
Member since: January 1970
Posts: 0
May 14, 2024 9:31:29 GMT -5
May 14, 2024 9:31:29 GMT -5
|
Post by Deleted on Apr 17, 2013 14:01:49 GMT -5
I'M IN!
G
|
|
|
|
Post by Leon on Apr 17, 2013 18:01:31 GMT -5
Count me in Paul.Never built a Russian tank before,but with all the builds on here i'm getting the itch to do one.  |
|
pt109
Full Member
Member since: April 2013
Stop staring at me! heheheh
Posts: 491
|
Post by pt109 on Apr 17, 2013 19:32:29 GMT -5
Hey Guys!
Thanks again for the kind comments....I think I have a couple other photos with that camo scheme, I'll check later!
TRM: Thank you
dupes: Thank You as well...Yes I could've used the kit wheels but I thought the Armo resin copies were better, but not so...some of them are a little out of round and they needed some repairs to the resin. I would've preferred using a mix of different wheels which was pretty common since the all steel wheels caused a lot of vibrations in the suspension, but I had to cut the axles to make em fit so that prevented using the Tamiya mixed wheels. Aber gun barrel BTW.
agentg: Good to have you on board!
Leon: Go for it! Maybe try a Tamiya oldie but simple goodie out of the box....nice to have you along for the ride!
Regards, Paul
PS Cleaning up the track set right now (older MK non-workable set)
|
|
|
|
Post by bullardino on Apr 18, 2013 1:49:38 GMT -5
A T-34? Count me in, definitely. I have a soft spot for this tank |
|
|
|
Post by Mence on Apr 18, 2013 2:01:42 GMT -5
Wow, you put some work in on this, be great to see you finish it!
|
|
Deleted
Member since: January 1970
Posts: 0
May 14, 2024 9:31:29 GMT -5
May 14, 2024 9:31:29 GMT -5
|
Post by Deleted on Apr 18, 2013 2:09:28 GMT -5
great stuff! a truly multi media affair love it!
|
|
iking
Full Member
Member since: November 2012
Posts: 244
Nov 22, 2012 3:24:55 GMT -5
Nov 22, 2012 3:24:55 GMT -5
|
Post by iking on Apr 18, 2013 2:22:01 GMT -5
making a good progress on the T-34 comrade!  keep it up! lovin' the details! cheers! iking |
|
pt109
Full Member
Member since: April 2013
Stop staring at me! heheheh
Posts: 491
|
Post by pt109 on Apr 18, 2013 21:59:24 GMT -5
Thanks again everyone....
I only did a few small things to correct some details tonight, I hurt my wrist yesterday so my time was limited. Kinda sore after handling some very small PE parts, just brackets that go under the fuel tanks and a missing bolt head on the engine deck cover.
Still a few more details before I tackle the tracks...and of course the figures, plus the driver who you couldn't see in the other posts.
Thanks for the interest guys.
Paul
|
|
vlpbruce
Full Member
Member since: March 2013
Posts: 1,463
|
Post by vlpbruce on Apr 18, 2013 22:20:33 GMT -5
Great work. I'm going to follow you with great interest.
|
|
ironhand6
Full Member
Member since: March 2013
Posts: 280
|
Post by ironhand6 on Apr 19, 2013 23:57:36 GMT -5
wow that is too cool! you have done some good work on this beast,but i really wouldnt want to ride into battle with all that jellied gas sittin on my butt!
|
|
pt109
Full Member
Member since: April 2013
Stop staring at me! heheheh
Posts: 491
|
Post by pt109 on Apr 20, 2013 17:23:01 GMT -5
Thanks vlpbruch....
I hear ya ironhand6, musta been a little daunting.
Paul
|
|
pt109
Full Member
Member since: April 2013
Stop staring at me! heheheh
Posts: 491
|
Post by pt109 on Apr 20, 2013 22:42:39 GMT -5
Hi Guys, Not really an update but just a few more photos....  A blurry photo of the crew....half figures  Added the vanes under the engine screen...just to cover all the empty space. 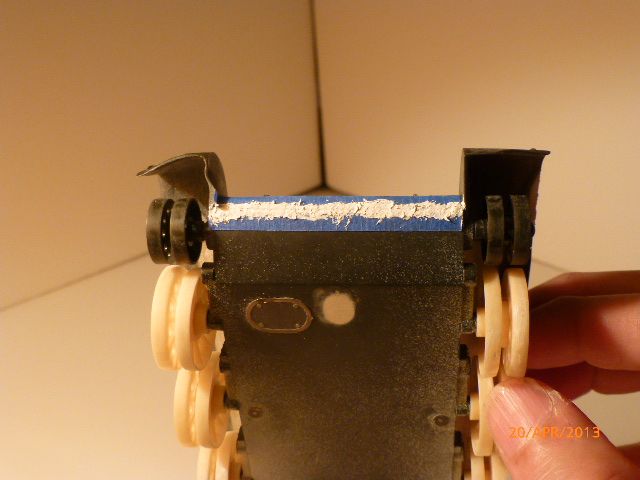 I added a weld to the front end....using the puddy/tape method or whatever you call that mess!  I added some details on lower hull from an old Eduard set for a Zvesda T-34 just to add something to the otherwise drab plastic. Thanks for looking... Paul |
|
|
|
Post by bbd468 on Apr 20, 2013 23:05:00 GMT -5
Hello Paul, Great build man! Nice upgrades and custom scritch'n scratch work.  Gary |
|
deafpanzer
Administrator
Member since: June 2012
"Never tell your story to a deaf man"
Posts: 21,154
Member is Online
MSC Staff
|
Post by deafpanzer on Apr 21, 2013 8:29:32 GMT -5
Great work with upgrades... it will be one real good looking tank!
|
|
pt109
Full Member
Member since: April 2013
Stop staring at me! heheheh
Posts: 491
|
Post by pt109 on Apr 28, 2013 22:28:12 GMT -5
Hi Guys, I thought I'd add a few photos...primer is on! Here they are, however, I found a few problems (which is good once the primer coat is on right?): First the photos:  This one at least shows the cast effect I added to the turret better...primer still a little light on the wheels though, I will just spray another coat tomorrow.  Rear end a little dark though.  This one revealed an obvious flaw, the turret top plate near the left rear side has a small gap...thought I glued that sucker good! HEHEH These Russian turrets were really roughly cast as hopefully you can see here.  In this one a little green from the cast effect is showing on the mantlet but no biggie, just another primer pass should remedy that. This shot also shows the flamethrower mantlet detail...and the lower front weld.  And here, meet the boss my buddy Jesse (typical female!) sitting on a delicious pizza box for comfort....I already ate the pizza! She's beautiful and very big heheh! A wheel from the left side broke of with the axle so I'll have to fix that one, the second one that broke already. So a couple probs but I should be ok soon, I'm still working on the tracks, man what a pita they are, so much clean up. Well, thanks for looking, Paul |
|
|
|
Post by TRM on Apr 29, 2013 5:22:06 GMT -5
Looking nice there Paul! Always a couple oops from time to time. Looks like you have a handle on them!! Turret looks spot on!!!!
|
|
|
|
Post by Tojo72 on Apr 29, 2013 7:49:54 GMT -5
looks good,moving right along
|
|
deafpanzer
Administrator
Member since: June 2012
"Never tell your story to a deaf man"
Posts: 21,154
Member is Online
MSC Staff
|
Post by deafpanzer on Apr 29, 2013 9:52:03 GMT -5
Great pic of the cat and the pizza box! Looking real good primed!!! |
|
|
|
Post by wbill76 on Apr 29, 2013 20:11:28 GMT -5
Primer's great for revealing flaws before it's too late. Couldn't help but chuckle that your cat is sitting on a 'rising crust' pizza box...I suppose that's a new level of comfort! |
|
|
|
Post by bullardino on Apr 30, 2013 1:51:22 GMT -5
Great progress, the cast surface is really ace |
|
|
|
Post by Leon on Apr 30, 2013 4:30:19 GMT -5
Paul,your making great progress on this.Agree with Luigi on the cast surface. |
|
pt109
Full Member
Member since: April 2013
Stop staring at me! heheheh
Posts: 491
|
Post by pt109 on May 18, 2013 12:15:16 GMT -5
Hi Guys, First, I apologize for not updating sooner.... Just a small update to let all that are interested know, I had some bigger issues with the primer coat than I originally thought. Seems I had a few areas around the rear engine grill and where the brass rods were (replaced the grab holds)...the primer(Tamiya grey) wasn't adhering great to the brass handles, so I had to re-sand some areas. I just shot some more primer to cover these areas better so hopefully I can base coat tomorrow...the wheels are primed and ready to go. I will be trying something a little different, I think I will add some of the weathering (dried mud and dusty effect) before the base coat on the lower hull etc. Not sure why but I want to try this technique to see if it works ok, the idea here is to limit the base coat needed on lower hull, but it's all experimentation at this point! I'm gonna try using some pigments and stains on the lower hull. The crew is pretty close to being finished as well... Maybe I'll shoot a photo showing the present look, we'll see.... Thanks again for any and all comments...Paul |
|
|
|
Post by TRM on May 18, 2013 12:25:53 GMT -5
Looking forward to seeing the piccies when you get around to it!! The thought of applying some mud/texture prior is a great idea!! Trying new things is what it's all about!!!
|
|
Deleted
Member since: January 1970
Posts: 0
May 14, 2024 9:31:30 GMT -5
May 14, 2024 9:31:30 GMT -5
|
Post by Deleted on Jun 4, 2013 8:30:18 GMT -5
Looking great Paul!
|
|
pt109
Full Member
Member since: April 2013
Stop staring at me! heheheh
Posts: 491
|
Post by pt109 on Jun 8, 2013 23:00:32 GMT -5
Hi Guys, Well, It's been too long since an update so here goes finally! As I said earlier if you've been following along...I decided to add some mud affects before the camo: But first:  Just having some fun...I'm drinkin tea...  So, here's the basic idea using Hydrocal and some Woodland Scenics stuff that's like twigs and some static grass...I wanted a dried mud affect since the setting is supposed to be Kursk, 1943. Sorry the photo is a little blurry.  Front view, added to fenders and a little splashing on the glacis.  I think this one gives a better overall impression.... Thanks for lookin'...Paul |
|


 keep it up!