Return_To_Kit_Form
Full Member
   Dec 2013 MoM Winner
Member since: December 2012
Posts: 325
Dec 10, 2012 23:52:30 GMT -5
Dec 10, 2012 23:52:30 GMT -5
|
Post by Return_To_Kit_Form on Apr 27, 2013 5:05:48 GMT -5
As I mentioned in my other two build threads, I am currently on a campaign to clear the shelf of those projects that have sat around for years going no where, and vowing never to start another kit until they were all done. You know the ones. You see it on the shelf and pull it down, push it around the bench for a time contemplating whatever it needs to get finished. Then put it back and decide that catching up on TV feels like a better idea. My 222 dragged on that way until I recently decided that it was finished (or so I thought) and have started work again on a Star Wars Venator. For those who live in NSW Australia, the Illawarra Plastic Modellers Association comp is on the 4th and 5th of May. I have never entered a serious comp beore and thought I might give the 222 a whirl to see how I go. Mind you it is a bit of a drive from here and I was almost not going to bother driving up there just to enter one kit. But on friday morning while I was out for a run I hit on the idea of entering a new build in and OOB category and completing it within two weeks. Now for a bloke like me that gets maybe one kit done a year this is a big deal.... THE KIT:The kit is an old boxing of the Italeri SdKfz 234/4 that I picked up a few years ago for the princely sum $10.00, as for a mate of mine that had the other three Italeri kits in his stash (and he's not worried about accuracy). He gave it back to me recently along with a few other kits, as he like to stitch me up with more 1/35 armour anytime I make noises about my next build being sci-fi. I have the Dragon offering in the stash and was going to off load this kit, but decided to hang onto it in the off chance that my wife may one day show and interest. But the reality is that is probably never going to happen. So it is now the subject of by speed build challenge. THE RULES: After looking up the entry details to the IPMA entry rules I have realised that there is no OOB category. Still, I am stubborn and have decided to press on regardless. In the meantime I'll be operating under the following self imposed rules: 1) Must be completed by 04MAY13 2) Absolutely OOB. N enhancements, third party additions, accurising etc. The only thing I'll be doing is drilling out the MG-42 barrel. 3) Must no interfere with normal family time. 4) as soon as it feels like work, and I am not having any fun I am cutting this away. The idea is to complete something fast, and have fun doing it. No getting bogged down is accuracy and detail, no AMS. Just a fun, fast build. DAY ONEAs son as I got home I had a chat to my wife about it so that she knew what I was trying to achieve, and as soon as I could I started cutting parts free of the sprue. I had to go out in the afternoon but later that evening I was able to set up a few basic tools in the lounge room and continue to cut and prep parts while we all watched a bit of Telly. So after about six hours of work I had all parts cut and most prepped ready for assembly.   The tan wheels are from the spares box from and will help cut down on prep time  Stand by for day two. Cheers, Brett T |
|
|
|
Post by Leon on Apr 27, 2013 6:33:38 GMT -5
I'll be sitting in the front row waiting for the show to begin.  |
|
|
|
Post by wbill76 on Apr 27, 2013 10:21:38 GMT -5
Unfortunately your pics aren't showing, could be an issue with your hosting provider? Sounds like a fun challenge!
|
|
afvfan
Senior Member
   
Member since: December 2012
Bob
Posts: 1,772
Dec 10, 2012 17:32:38 GMT -5
Dec 10, 2012 17:32:38 GMT -5
|
Post by afvfan on Apr 27, 2013 12:00:35 GMT -5
Though not as nice as some of the newer versions, this one still can be built up to a pretty nice looking model. It'll be interesting to see what you do with it.
|
|
Return_To_Kit_Form
Full Member
   Dec 2013 MoM Winner
Member since: December 2012
Posts: 325
Dec 10, 2012 23:52:30 GMT -5
Dec 10, 2012 23:52:30 GMT -5
|
Post by Return_To_Kit_Form on Apr 27, 2013 17:16:31 GMT -5
DAY TWO:The full on attack continues. With so much parts prep already done it is mostly just a case of gluing the bits together, and the conclusion of day two sees all of the suspension and most of the gun and shield assembled. Cleaning up eight of those wheels would have taken ages as I know they don't fit that well, having the tan ones from another Italeri kit really helped speed things along. There are few sink holes that I will have to fill on the lower suspension arms, as well as the usual seam on the barrel etc. My original plan called for almost all of the assembly to be completed this weekend, with painting done through the week and painting through this week. Sheesh it going to be tough. I have a few crappy pics of progress so far, but as you can expect I am concentrating on finishing rather than mucking about too much taking photos.  and here I am test fitting major assemblies  Wish me luck.
|
|
|
|
Post by dupes on Apr 27, 2013 17:46:09 GMT -5
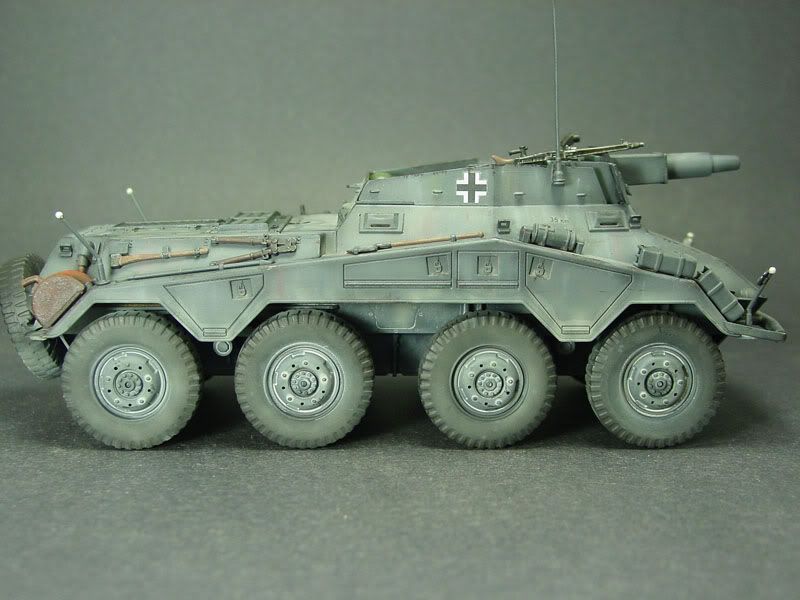
The Italeri kits certainly can build up well...wish I had the two that I'm still missing to do a complete collection.  This one built by my former girlfriend (now wife) and mostly painted and weathered by me. Yes, it's panzer gray. Yes, the Italeri instructions said to paint it so. No, I did not confirm the fact that no 234/anythings were ever painted PG. Which is a shame, because they look badass that way! |
|
|
|
Post by imatanker on Apr 27, 2013 19:18:27 GMT -5
Brett,the hull fit issue seems to run through all the Italeri puma kits   To save you some time,here's how I fixed it,it's very high tech.   Hope that helped,model on Man,Jeff T. |
|
|
|
Post by bbd468 on Apr 27, 2013 20:14:40 GMT -5
Hey Brett, looks like a fun challenge. Bring it on man...im in! Nice start fella.  Gary |
|
Return_To_Kit_Form
Full Member
   Dec 2013 MoM Winner
Member since: December 2012
Posts: 325
Dec 10, 2012 23:52:30 GMT -5
Dec 10, 2012 23:52:30 GMT -5
|
Post by Return_To_Kit_Form on Apr 28, 2013 8:18:36 GMT -5
Thanks Guys. Jeff I could'nt work out why your lower hull was so different to the one I have until I realised yours in 1/72. Ha ha but I used your trick when I glued the hull today. DAY THREE:Day three and I have done a lot of the really fiddly stuff. Just have to do soem minor filling and add a dew final peices and it'll be ready for paint. Here I have test fitted the fenders which have all the jerry cans and tools added but aren't glued in place.  Cheers, Brett |
|
|
|
Post by TRM on Apr 28, 2013 8:34:12 GMT -5
That is the stuff right there!!! Looking like you are in good shape now!! I smell paint coming soon!!!
|
|
|
|
Post by deafpanzer on Apr 28, 2013 9:49:20 GMT -5
Looking good!!! Glad you took care of the fitting problem... love 'em 234s!
|
|
|
|
Post by wbill76 on Apr 28, 2013 10:43:07 GMT -5
Rolling right along, keep at it Brett!  |
|
|
|
Post by imatanker on Apr 28, 2013 15:13:01 GMT -5
Brett,it was 1/48th,doesn't matter though,your build is looking real nice. I am thinking about a 1/72nd 234 to match the bigger one  Jeff T. |
|
multicam
Senior Member
   
Member since: January 2012
Nate
Posts: 2,039
Jan 10, 2012 14:35:41 GMT -5
Jan 10, 2012 14:35:41 GMT -5
|
Post by multicam on Apr 28, 2013 23:37:09 GMT -5
Nice work, Brett. This'll be a fun one to watch.
|
|
Return_To_Kit_Form
Full Member
   Dec 2013 MoM Winner
Member since: December 2012
Posts: 325
Dec 10, 2012 23:52:30 GMT -5
Dec 10, 2012 23:52:30 GMT -5
|
Post by Return_To_Kit_Form on Apr 29, 2013 15:00:51 GMT -5
Well while there are no pictures, day four finished with me ready to spray primer. Not sure if I'll make it!
I'll post some pics tonight when I get home from work.
|
|
|
|
Post by Leon on Apr 29, 2013 16:26:38 GMT -5
Looking good Brett.Keep up the fine work.
|
|
Return_To_Kit_Form
Full Member
   Dec 2013 MoM Winner
Member since: December 2012
Posts: 325
Dec 10, 2012 23:52:30 GMT -5
Dec 10, 2012 23:52:30 GMT -5
|
Post by Return_To_Kit_Form on Apr 30, 2013 8:57:35 GMT -5
DAY FIVE:The midnight oil continues to burn on the blitz build. She's now primed and had a mud texture added to jazz it up just a little. The mud looks a tad overdone but I'll fix that during the next session.  A very rough first shot of dark yellow has been shot. Hopefully by tomorrow I will have the base coat finished and at least one of the camoflage colours on. I am pretty sure I'll do this in the three colour scheme.   Cheers, PreviewBrett
|
|
|
|
Post by bbd468 on Apr 30, 2013 9:18:07 GMT -5
Paint looks nice Brett! I like the preshade showing thru a bit...well done! Keep pluggin away man, you'll make it!  Gary |
|
ironhand6
Full Member
  
Member since: March 2013
Posts: 280 
|
Post by ironhand6 on Apr 30, 2013 10:20:19 GMT -5
Great idea Brett. I too suffer from the "what to build, what to build" conundrum. I think you are doing great on a kit that would otherwise sit for ages.
|
|
|
|
Post by dupes on Apr 30, 2013 12:40:44 GMT -5
Whoah, nice! I don't think the mud is overdone at all.
|
|
|
|
Post by imatanker on Apr 30, 2013 16:11:54 GMT -5
Go Brett Go.Go Brett Go  You're in the home stretch now and looking great. Jeff T. |
|
|
|
Post by Leon on Apr 30, 2013 16:18:01 GMT -5
Looking good in paint Brett.Agree with Dupes on the mud.Not over done at all.  |
|
|
|
Post by wbill76 on Apr 30, 2013 20:17:02 GMT -5
And we have paint and it's good! Just a small word of caution going by what you have and haven't painted, don't fall into the trap of 'red primer' on the gun barrel. If you want to leave it unpainted, German gun barrels received a dark gray (almost black) lacquer-based heat-resistant primer because the normal red oxide primer couldn't take the heat, literally, from extended firing of the gun.  |
|
Return_To_Kit_Form
Full Member
   Dec 2013 MoM Winner
Member since: December 2012
Posts: 325
Dec 10, 2012 23:52:30 GMT -5
Dec 10, 2012 23:52:30 GMT -5
|
Post by Return_To_Kit_Form on May 1, 2013 7:42:23 GMT -5
Thanks for the heads up Bill. I think I came upon a couple of threads discussing that very issue on the various fora the other day when I briefly looked into red oxide primer. Truth be told the barrel wasn't painted because that's where my oafish hands were holding the gun while I tried to squirt paint in all the nooks and cranny's at other end. DAY FIVEI managed to get the green for the tri colour scheme on. Time for bed I'm tired and will out off adding the brown until tomorrow.     Cheers, Brett |
|
ironhand6
Full Member
  
Member since: March 2013
Posts: 280 
|
Post by ironhand6 on May 1, 2013 10:37:15 GMT -5
nice camo. just right and not overdone. watching you build this makes me want to crack open my iterali puma. Got any ideas for how to display her?
|
|
|
|
Post by deafpanzer on May 1, 2013 14:18:34 GMT -5
Great job on the camo!!!! Always liked that camo scheme!
|
|
Return_To_Kit_Form
Full Member
   Dec 2013 MoM Winner
Member since: December 2012
Posts: 325
Dec 10, 2012 23:52:30 GMT -5
Dec 10, 2012 23:52:30 GMT -5
|
Post by Return_To_Kit_Form on May 2, 2013 4:29:22 GMT -5
G'day Ironhands, you could try something like this. These are in progress pics of an Italeri 234/3 I built some time ago. I'm not happy with it and plan on redoing this same vignette with a Dragon version at some point. Mainly because I was never happy with how the water in the creek turned out.   |
|
|
|
Post by Leon on May 2, 2013 4:52:56 GMT -5
Great update Brett.Keep up the fine work.
|
|
ironhand6
Full Member
  
Member since: March 2013
Posts: 280 
|
Post by ironhand6 on May 2, 2013 9:52:26 GMT -5
man that's nice bertt. had you not said anything I wouldn't have known that this was an iterali kit. its very dynamic.
|
|
|
|
Post by dupes on May 2, 2013 10:10:51 GMT -5
That IS cool. How much work did you have to do to the suspension to get it to look like that?
|
|


