Hinksy
Full Member

Member since: June 2012
THE ENGLISH LIONHEART - HINKSY!
Posts: 1,016
Jun 22, 2012 16:46:21 GMT -5
Jun 22, 2012 16:46:21 GMT -5
|
Post by Hinksy on Jul 12, 2013 6:40:05 GMT -5
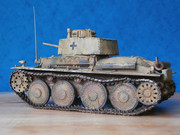
Hi fellas, Having recently acquired a couple of kits that are going to be painted in DY and Panzer Grey I decided to try the AK Modulation kits and bought one for DY and one for Grey. The first attempt will be made on my current WIP Bronco Pz.II Ausf.D which will be painted a standard German Grey using the kit. The box shows on the back what can be achieved in 6 'steps' but there are no proper instructions so I'm a bit  at the minute. I know Andy Deafpanzer and Gary have used the German Grey Kit and both have obtained great results - Gary's current wip Pz.IV is looking killer! I'm fine with doing a normal primer and adding dark pre-shade lines but it's after that where I'm wondering how best to proceed? I know these paints will dry very quickly so should I be looking to complete the entire job in one air brush session? I'd have said yes but having researched further in magazines etc. I'm seeing modellers masking around hatches and highlighting the hatches or other guys have simply applied the lightest final colour with a dry-brush and not an air brush. Is there a SBS on this technique to follow that someone could knock together for me? That would be great - this is my kit:  I'll also be using the grey kit on this new purchase below and the DY kit on a Dragon Pz.IV G and StuG III G: I'll also be using the grey kit on this new purchase below and the DY kit on a Dragon Pz.IV G and StuG III G:  I hope to have the basic assembly of the Bronco Pz.II completed by next weekend then ready for paint. Cheers guys, Ben  |
|
|
|
Post by bbd468 on Jul 12, 2013 13:21:15 GMT -5
Hello brother Ben, First off, I love the kits you have and I myself want to build a SIG.33 Pz. pretty bad after watching Johnt do his. Ill be watching yours.  On the AK CM set, i used the back of the box as a reference to start and just used my own judgment on other areas to create some effects. I used AK Colors 161, 162, 164, and finished with 166. Now i thought it looked cool but i wasnt satisfied with it so i had to spray a Light filter to tone it down and blend. Had i to do over again i would use in this order. AK colors, 162, 164, and highlight with 165 and leave it there...thats up to you though. I didnt do any masking at all just free handed it all. The only thing i used extra was an index card ont the top turret line to guard against over spray. I didnt lay the card on the turret but let it hover over the line just a bit. Heres what i mean. 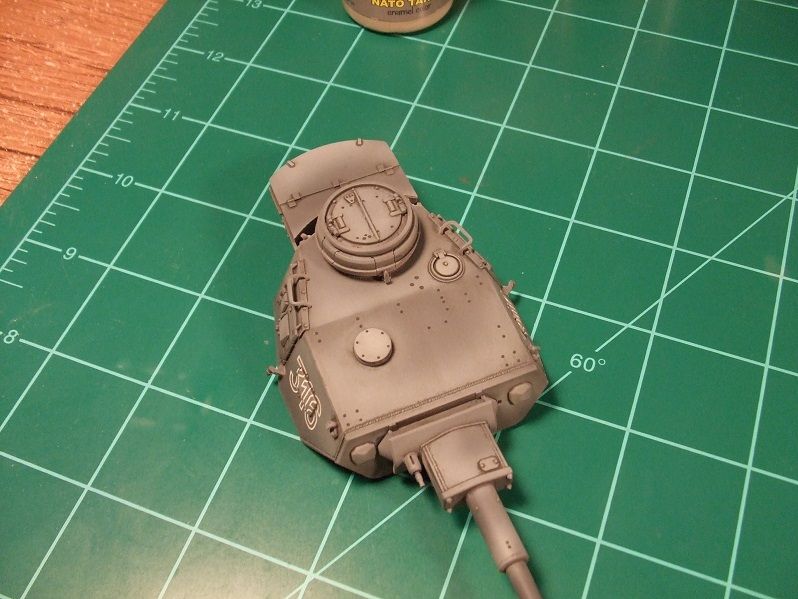 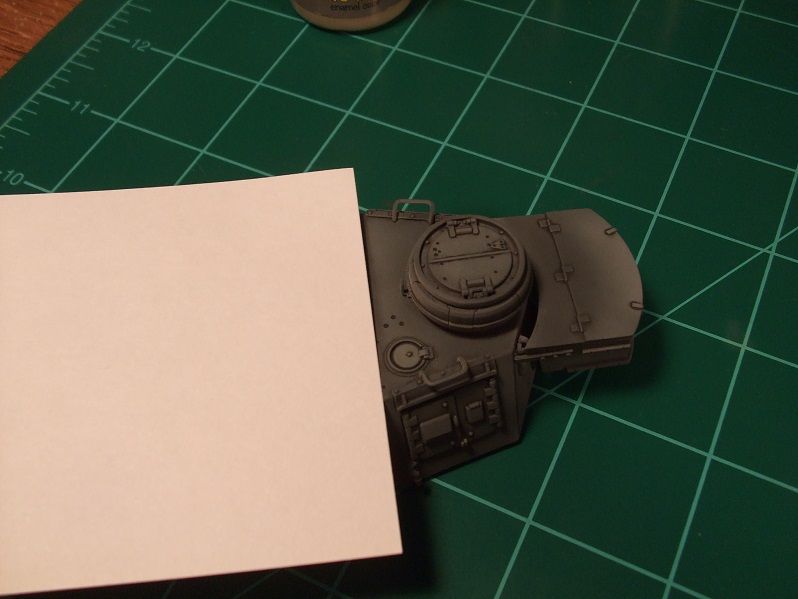 I also used 91% iso alcohol along with a bit of the AK thinner along with a bit more psi. to get the flow and atomization i like to work with. I definitely practice on and old model or the like to get a fell of the paint. Me being a Tamiya guy, it sprays much different. It didnt have any drying issues and went on pretty smooth and seamed to adhere very nicely. Ben i sure hope that helps and ill be around if ya need to holler. Good Luck!  Cheers, Gary |
|
Hinksy
Full Member
Member since: June 2012
THE ENGLISH LIONHEART - HINKSY!
Posts: 1,016
Jun 22, 2012 16:46:21 GMT -5
Jun 22, 2012 16:46:21 GMT -5
|
Post by Hinksy on Jul 12, 2013 17:32:53 GMT -5
Brilliant Gary, Was the whole job done over a serious of days or just over one 'session'? Did you prime it, basecoat it and leave it for day or whatever to dry or did you get it all done in one go? You did a great job on that Pz.IV of yours so it's something I'll be using as a sort of visual guide. I like the card used when painting the turret - that will help a lot. I've seen the photos you took after that final light misting - that really worked very well. I'm a couple of weeks off painting yet so I'll probably drop you a pm before then. Cheers brother Gary! Ben |
|
|
|
Post by bbd468 on Jul 12, 2013 17:55:03 GMT -5
Hiya Ben, I reckon i left out that bit of important info huh.....sorry bro!  I primed with Tamiya surface primer thinned with Lacquer thinner. I let the primer dry overnight till the next day around 10:00 AM. Probably dried for 12-14hrs. When i did the paint job i did it all in one session. Just stopped long enough to snap pics. There ya go brotha! Cheers, Gary |
|
|
|
Post by TRM on Jul 12, 2013 18:35:58 GMT -5
Hey Ben!! Can't wait to see you have at this. I am just about done constructing a II myself! I am all excited to paint! Gary is spot on on his methods and usage of the AK Stash! I rarely mask anything for this stuff. Sometime I use a post-it or business card or small plastic card like the Master of Ye Ole Kiltutu! I tend to go with what I think will work in a set, not the whole thing. 3 maybe 4 is all that is needed. I like the dry brush thought of the highlight or shine! Will blend nicely I think. I will use a brush and try to keep it random, but again, Gary is not steering you wrong...Filters and washes...they are your friend, not food! LOL!! Slid a Shark Tales reference in there...dopy!! LOL!! Here is a free hand: 1/72 Pz.III 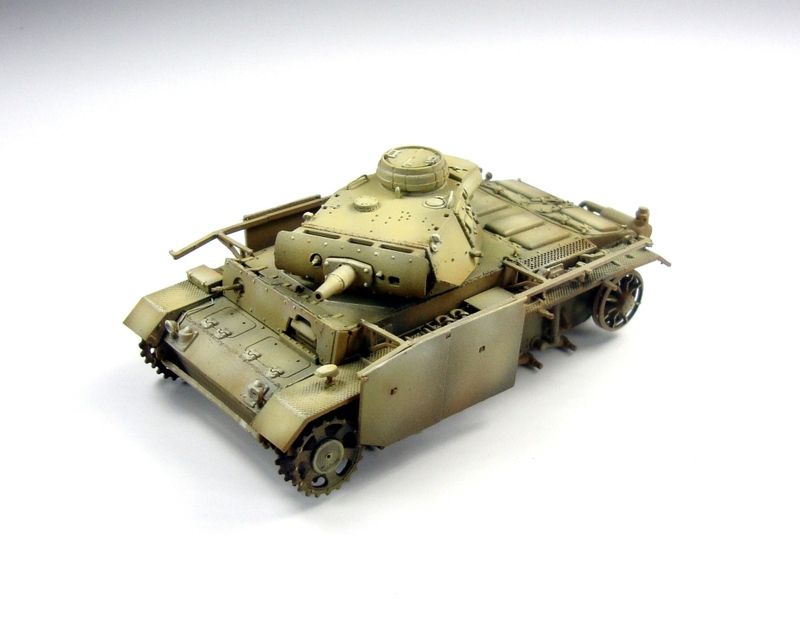 I will just keep blending until I am happy with it. Thin coats built up are the way to go. You do not need a lot of paint to make the effect work. Play around is the best way to get the feel. |
|
Hinksy
Full Member
Member since: June 2012
THE ENGLISH LIONHEART - HINKSY!
Posts: 1,016
Jun 22, 2012 16:46:21 GMT -5
Jun 22, 2012 16:46:21 GMT -5
|
Post by Hinksy on Jul 13, 2013 7:28:54 GMT -5
Great stuff Gary and TRM! Lovely work on that little Panzer btw TRM! I've just sat down to carry on with the build - I reckon I should have the basic assembly done and dusted today. Cheers guys, Ben |
|
|
|
Post by TRM on Jul 13, 2013 7:40:48 GMT -5
That sounds like a plan Ben!! |
|

 at the minute.