|
|
Post by 406 Silverado on Dec 9, 2011 8:23:51 GMT -5
|
|
paulh.
Senior Member
   
Member since: November 2011
build, fail, learn, succeed - ENJOY
Posts: 2,389
Nov 15, 2011 15:54:51 GMT -5
Nov 15, 2011 15:54:51 GMT -5
|
Post by paulh. on Dec 9, 2011 13:24:32 GMT -5
Thanks for that Rob. I think the picture at the start is one of Dirks also.
|
|
paulh.
Senior Member
   
Member since: November 2011
build, fail, learn, succeed - ENJOY
Posts: 2,389
Nov 15, 2011 15:54:51 GMT -5
Nov 15, 2011 15:54:51 GMT -5
|
Post by paulh. on Dec 10, 2011 17:04:08 GMT -5
|
|
|
|
Post by robbo on Dec 10, 2011 17:08:27 GMT -5
Wow Paul smashing work mate a blinder to kick off with
|
|
|
|
Post by 406 Silverado on Dec 10, 2011 17:08:36 GMT -5
the primer is always a great start. Yep love that pic too
|
|
paulh.
Senior Member
   
Member since: November 2011
build, fail, learn, succeed - ENJOY
Posts: 2,389
Nov 15, 2011 15:54:51 GMT -5
Nov 15, 2011 15:54:51 GMT -5
|
Post by paulh. on Dec 12, 2011 17:33:42 GMT -5
Base coat followed by a couple of passes wityh lifecolour rust colours; 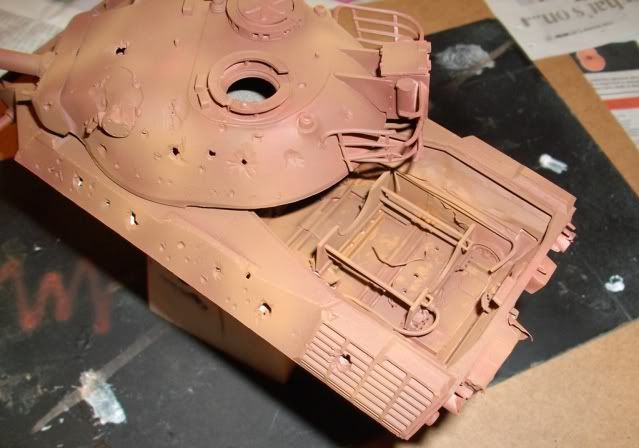 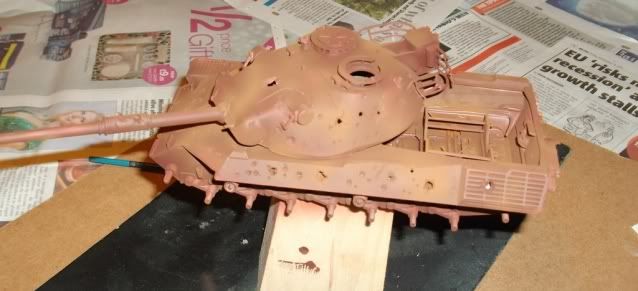 Might be just a ligthing issue but it doesn't quiet look as I hoped  so I,m hoping a couple of passes with some more Tamiya Brown will sort this out before some filters. Hey -ho lets see what happenss then...  |
|
|
|
Post by TRM on Dec 12, 2011 17:49:37 GMT -5
Still looking good Paul! Lighting might be playing some part here. Are you thinking your a bit light?
Possible a few coats with some dark filter/washes might solve this...
other than that...
IMHO, I would really thin out the Tamiya brown, maybe 50/50 add a couple drops of black and a couple hull red. Giving you the dark rusty tone (mix to eye). Spray the corners and jogs, crevices...more or less shadowing. Then maybe thin out the mix just a little more and mist the whole thing a couple times. your first paint job should filter through a bit. Should blend nicely.
Keep it rolling, it still is looking tops my friend!!
|
|
paulh.
Senior Member
   
Member since: November 2011
build, fail, learn, succeed - ENJOY
Posts: 2,389
Nov 15, 2011 15:54:51 GMT -5
Nov 15, 2011 15:54:51 GMT -5
|
Post by paulh. on Dec 12, 2011 17:59:28 GMT -5
Thanks for the advice Ted.
I'll give all of that a go - Cheers
P
|
|
|
|
Post by TRM on Dec 12, 2011 18:10:40 GMT -5
Cool!  Please post the progress shots!!! ;D This is definitely an interesting one brotha'!!  (shh....btw, "T" is Todd..our little secret...LOL!!!!Each one of the guys here thinks it's something different though...hush, hush) (shh....btw, "T" is Todd..our little secret...LOL!!!!Each one of the guys here thinks it's something different though...hush, hush)  |
|
paulh.
Senior Member
   
Member since: November 2011
build, fail, learn, succeed - ENJOY
Posts: 2,389
Nov 15, 2011 15:54:51 GMT -5
Nov 15, 2011 15:54:51 GMT -5
|
Post by paulh. on Dec 12, 2011 18:23:34 GMT -5
|
|
|
|
Post by 406 Silverado on Dec 12, 2011 18:31:31 GMT -5
Might be the lighting but it's a bit too bright....especially if using the LC rust paints. You can go by what T said, which is what I do. OR go with the darkest LC rust color and add a few drops of the next lightest color. This will give you the right base rust to work with.
Ted...Todd....we know who you are buddy...LOL
|
|
paulh.
Senior Member
   
Member since: November 2011
build, fail, learn, succeed - ENJOY
Posts: 2,389
Nov 15, 2011 15:54:51 GMT -5
Nov 15, 2011 15:54:51 GMT -5
|
Post by paulh. on Dec 13, 2011 4:50:40 GMT -5
Thanks Rob, Had another look at her this morning before work and I think it was the lighting - definately darker in the flesh,  I think she still needs to be darkened down a bit more - so that's the job for tonight.  We live and learn  P |
|
paulh.
Senior Member
   
Member since: November 2011
build, fail, learn, succeed - ENJOY
Posts: 2,389
Nov 15, 2011 15:54:51 GMT -5
Nov 15, 2011 15:54:51 GMT -5
|
Post by paulh. on Dec 13, 2011 17:03:59 GMT -5
Well it definately was the lighting- but I have still re-applied a darkened base coat -as per advice, and it does look better  Cheers guys  Sorry no pics at the mo. Going to leave it all overnight and try some new patch coats with LC rust shades tomorrow- wish me luck  P |
|
paulh.
Senior Member
   
Member since: November 2011
build, fail, learn, succeed - ENJOY
Posts: 2,389
Nov 15, 2011 15:54:51 GMT -5
Nov 15, 2011 15:54:51 GMT -5
|
Post by paulh. on Dec 14, 2011 18:55:54 GMT -5
Following respray, tonight was HS time. A liberal coating of the stuff followed by a couple of light passess with LC faded olive drab. Once dry got stuck inot my first propper attempt at this technique. It worked in-so-far-as, I'm reasonably happy with it at this point  but still an awful lot to do :: so it should start taking shape soon(ish). 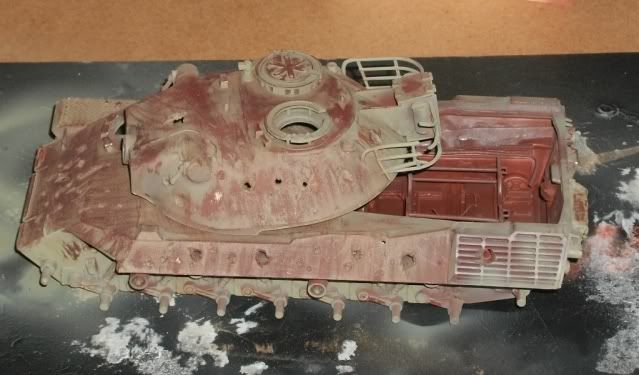 Lighting makes it look worse than it is-I'll try and sort something out over the holidays so I can take some reasonable pics. All comments welcomed folks  I know its a bit late, but should I be sealing each layer  |
|
|
|
Post by TRM on Dec 14, 2011 20:29:53 GMT -5
Hiya Paul!! I too think the lighting is playing a little bit of a trick on you . The deep base color inside the rear of the beast looks to be pretty decent coloring. It can be a daunting task to chip chip chip away at something, but the time spent on them can be well worth the effort!
As for sealing, I would only seal the base before your layering and chipping/rubbing. Once you get to a point where you want to lay a nice dark filter, wash or any type of weathering is when you might want to pop a clear flat coat on it. This will protect everything up until that point.
Keep it rolling over there!!
|
|
paulh.
Senior Member
   
Member since: November 2011
build, fail, learn, succeed - ENJOY
Posts: 2,389
Nov 15, 2011 15:54:51 GMT -5
Nov 15, 2011 15:54:51 GMT -5
|
Post by paulh. on Dec 15, 2011 4:33:47 GMT -5
Cheers Tim   Obviously need (and want ) to put some additional colour & shading etc into the engine space- washes for the corners and maybe some very limited residual "engine compartment off-white".  I'll need to touch up a few break thru' primer spots- and then I think I'll seal 'cause always get carried away and do way too much.   Just realised I've not even perimed thwe running gear- what a numpty. At least I have made up extra base colour. Bad idea trying to do this around Christmas- too much else to do. |
|
|
|
Post by 406 Silverado on Dec 15, 2011 9:01:11 GMT -5
Hey Paul, sorry I missed the last update. The color does look better , even with the bright pics. Basically what T said is correct. You are on the right track and it should all start to fall into place as you go.
No biggie about the running gear..I do that all the time. The tracks get forgotten too.
Keep at it...the fun has just started bud.
|
|
paulh.
Senior Member
   
Member since: November 2011
build, fail, learn, succeed - ENJOY
Posts: 2,389
Nov 15, 2011 15:54:51 GMT -5
Nov 15, 2011 15:54:51 GMT -5
|
Post by paulh. on Jan 2, 2012 16:17:59 GMT -5
The more I looked at this over the holidays the more disatisfied I became with it all - even without the bad lighting  Too much of the top coat removed and also too monochromic  Using the HST, I put on a coat of Vallejo MA dark tank yellow, followed by aother HS layer covered with LC faded olive drab as before. Whilst it might not be obvious in the pics there is now more tonal variation I've also given the engine bay a go-over with some various filters and MIG pigments. Tonights job is to seal it with gloss coat before washes and some chipping. 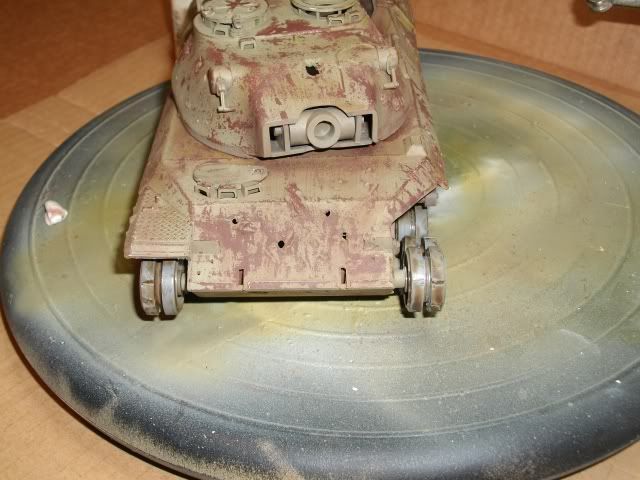 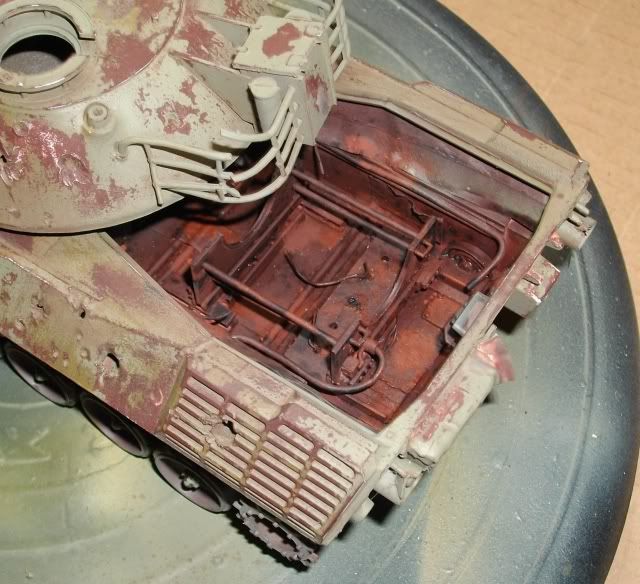 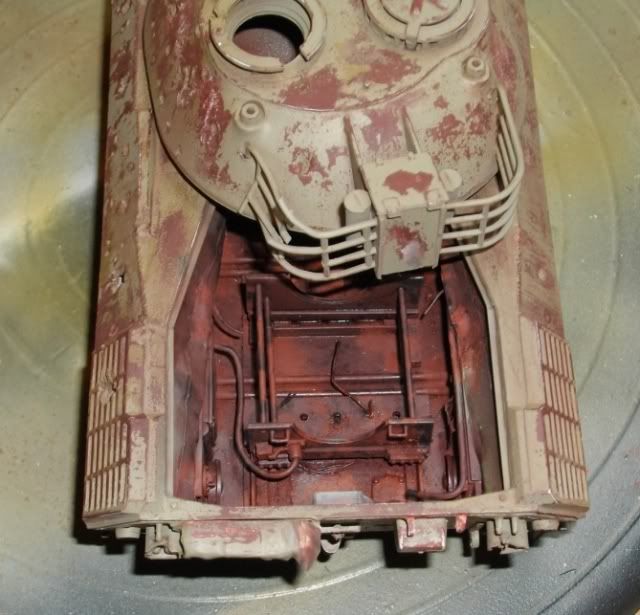 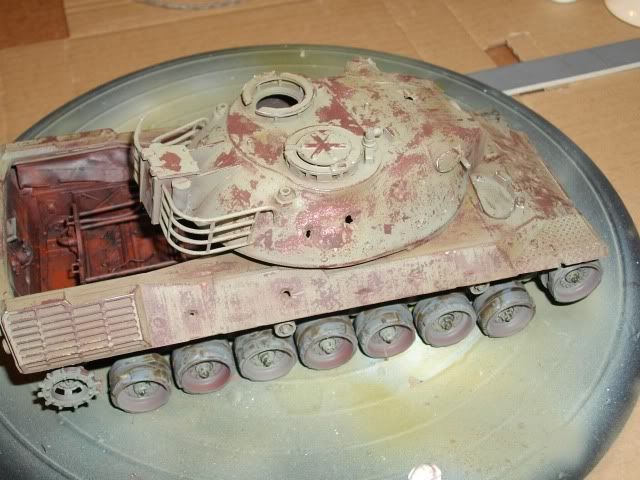 ACW  P |
|
|
|
Post by armorguy on Jan 2, 2012 17:11:31 GMT -5
I'd say the same as Dicky did, in general it looks good to me, and it's never too late for some tonal variation. Keep going Paul, it'll come together !
|
|
paulh.
Senior Member
   
Member since: November 2011
build, fail, learn, succeed - ENJOY
Posts: 2,389
Nov 15, 2011 15:54:51 GMT -5
Nov 15, 2011 15:54:51 GMT -5
|
Post by paulh. on Jan 2, 2012 17:15:16 GMT -5
Cheers jackwagon. thanks for the input- much appreiciated  Take your point Re; Colours -I'm hoping that washes and filters might even things out somewhat - or maybe not...  RE: BTR I'm looking to try and make something that looks something like a BTR out of the Glencoe monstrosity I have  Cheers also Guy P |
|
|
|
Post by 406 Silverado on Jan 2, 2012 17:26:47 GMT -5
Paul she's looking good bud, especially the motor comp. Yes the layering does add the it, and breaks up the mono look to the paint and rust. Once you start adding more layers and weathering it will look even better.
|
|
paulh.
Senior Member
   
Member since: November 2011
build, fail, learn, succeed - ENJOY
Posts: 2,389
Nov 15, 2011 15:54:51 GMT -5
Nov 15, 2011 15:54:51 GMT -5
|
Post by paulh. on Jan 3, 2012 8:45:46 GMT -5
Rob, Chris, - thanks both.
Never got around to putting a sealing coat on last night- thats the job for tonight.
One question though: should it be a gloss or flat sealing coat- or doesn't it matter?
regards
P
|
|
|
|
Post by wouter on Jan 3, 2012 11:09:18 GMT -5
Hiya Paul, nice work so far mate. Lovely work on the HS tech. Up and ready for some weathering ey
I usually use a satin coat before the weathering, though I know some people who use a flat coat. Depends on the order which you do things. I usually start with some filters and pinwashes and for me the satin coat works best
Cheers
|
|
paulh.
Senior Member
   
Member since: November 2011
build, fail, learn, succeed - ENJOY
Posts: 2,389
Nov 15, 2011 15:54:51 GMT -5
Nov 15, 2011 15:54:51 GMT -5
|
Post by paulh. on Jan 3, 2012 11:14:18 GMT -5
Hi Wouter,
Thats helpful. Thank you.
p
|
|
|
|
Post by 406 Silverado on Jan 3, 2012 11:34:32 GMT -5
Paul you can add a flat clear to seal things. It's not really needed unless your using a lot of enamels and oils and not letting it fully cure. But even then it shouldn't affect the layers, just don't make it too wet. Also if you alternate between enamels/oils and acrylics a sealer isn't really needed. Alternating between the two mediums will let you add the layers without having to wait too long for drying. I would do some alternating layers then let it CURE for a day or so. Then any further weathering will not affect what you have already done.
Keep in mind that doing a rusted up tank does not mean that once you've added rust and chips that you can't add more later. In fact it is more accuarate and realistic. Think about it. !! medal does not just rust at one point in time and that's it. Paint will chip and rust forms over time, so you will have old rust with weathering on it, then newer chips and rust next to it. By adding more fresher chips and rust later will give more layering and depth to the paint and rust.
Just keep at it and add more here and there. Remember variation. This is important, and you don't want every panel looking the same. Some panels may have much more rust than paint, especially as jackwagon mentioned, flat areas accumulate more water and thus rusts more. You can add pooled bright rust in these areas and the nooks.
Hope all this blah blah helps some how.
|
|
paulh.
Senior Member
   
Member since: November 2011
build, fail, learn, succeed - ENJOY
Posts: 2,389
Nov 15, 2011 15:54:51 GMT -5
Nov 15, 2011 15:54:51 GMT -5
|
Post by paulh. on Jan 3, 2012 14:18:54 GMT -5
Rob, thank you very much  I've finally realised that when it comes to finishing- speed is the enemy  |
|
paulh.
Senior Member
   
Member since: November 2011
build, fail, learn, succeed - ENJOY
Posts: 2,389
Nov 15, 2011 15:54:51 GMT -5
Nov 15, 2011 15:54:51 GMT -5
|
Post by paulh. on Jan 5, 2012 7:25:42 GMT -5
No pics at the mo -posting during my lunchbreak- but will post some up later tonight once I'm home. Well she's had a few filters of black and burnt umber oil, along with some MIG standard rust pigments (though these seem to have got lost in it all  ) This was left for 24 hours and followed up with a second (unintended) slightly heavier filter(? more of a wash really). Much of this second coast was removed with a clean, dampened brush. Looking back I think my base coat had a touch too much red in it (It was a mix of Tamiya Hull Red, Black & Brown)- so it's going to take some considerable and judicous use of some more filters to try and sort that.  I'm thinking of using some orange and ochre based filters next- would those that know abbout these things consider that to be useful to try and correct that redness as she stands? Appreciate a pic is probably needed to make an informed comment on this. Thanks in anticipation P |
|
paulh.
Senior Member
   
Member since: November 2011
build, fail, learn, succeed - ENJOY
Posts: 2,389
Nov 15, 2011 15:54:51 GMT -5
Nov 15, 2011 15:54:51 GMT -5
|
Post by paulh. on Jan 5, 2012 17:27:01 GMT -5
Having given things 24 hrs to settle down another look has me changing my mind on the Redness issue.  , so tonights job was some selective filters and washes to hopefully start brining out the rusty end of things. I've used a mix of camium red, cadmium orange and yellow ochre. I've definately taken off more than remains but now looking at the pics I think I still need to take some more off  As always gents any and all constructive comments are graciously welcomed. 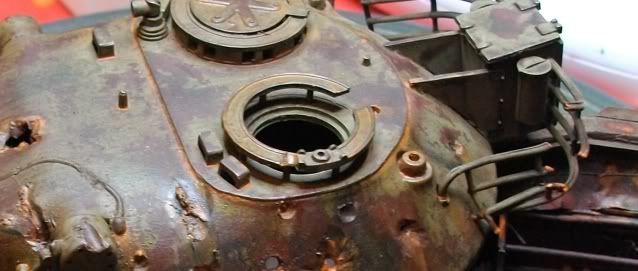 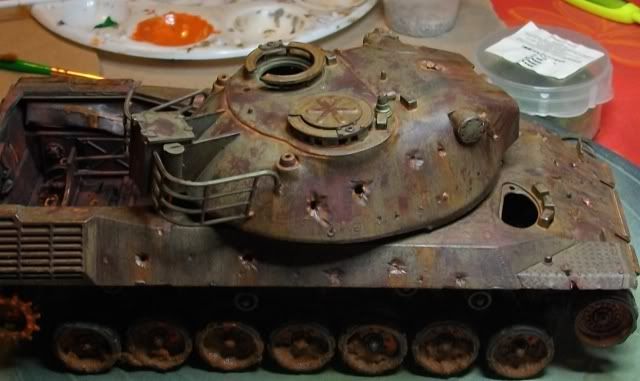 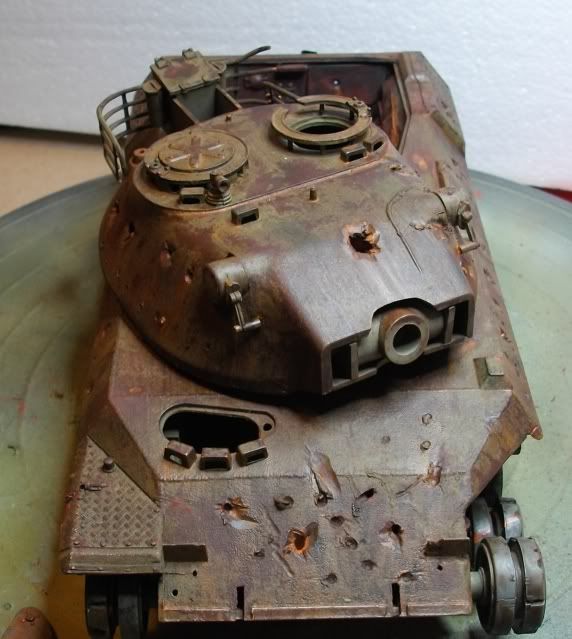 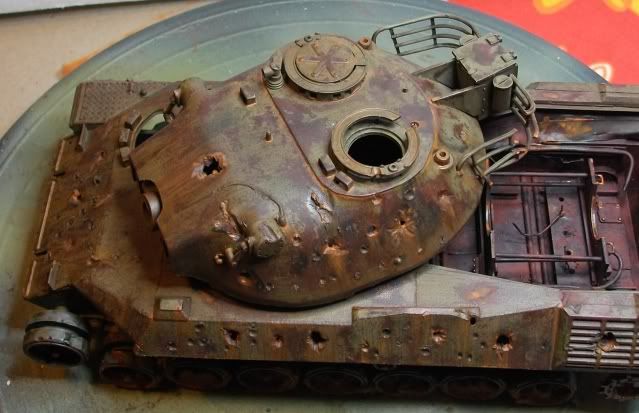 Cheers all P |
|
paulh.
Senior Member
   
Member since: November 2011
build, fail, learn, succeed - ENJOY
Posts: 2,389
Nov 15, 2011 15:54:51 GMT -5
Nov 15, 2011 15:54:51 GMT -5
|
Post by paulh. on Jan 9, 2012 18:20:44 GMT -5
May not be overly obvious, but the Cat has now had a filter of 502 Abtielung Green Grass. Still ooks a bit wet/shiny in places, but its comming together. Trying to build up a slime type coat in some of the deeper creases and corners, though I may have gone OTT in one or two spots. I think another light filter with orange/ochre will be the next thing. 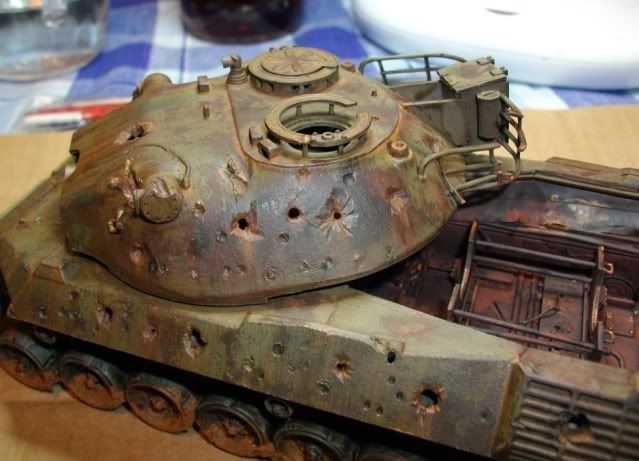 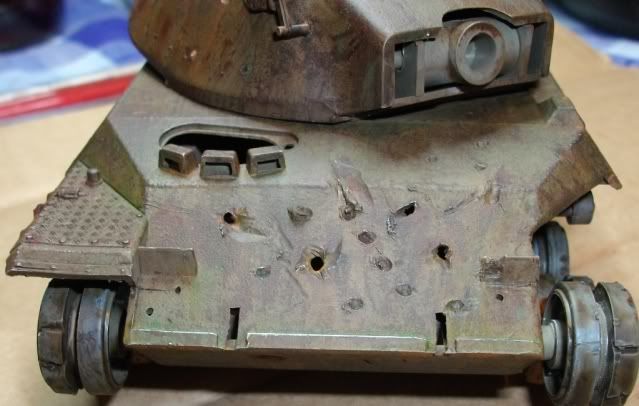 P |
|
|
|
Post by 406 Silverado on Jan 9, 2012 19:23:02 GMT -5
Looking sharp Paul. As you have noticed, the layers add depth to the model and you can play with the colors more until it's the way YOU like it. Once you have the paint and rust to where you like and want it, you can add some light dusting to the horizontal areas. This will break up all the green and rust and also add contrast.
|
|