|
|
Post by bullardino on Sept 5, 2013 4:57:48 GMT -5
You were driven to the dark (waters) side, but what a nice job, Bill  BTW, I see you and Todd at least use a blue kind of tape to mask, what is it? |
|
|
|
Post by wbill76 on Sept 5, 2013 10:10:23 GMT -5
MF, no big-scale ships for me! That was Gary who, briefly, was entertaining that notion.  Luigi Luigi, thanks for stopping by! The blue tape is standard 3M brand Blue Painter's Tape. It's sold here in the US all over and comes in different widths, I have two different types that I use primarily, what you see on the hull is the wider tape (2" I think?). It's designed to mask things for house painting but works great for models and is inexpensive...a single roll will last a very long time when you're using it only for model building. 
|
|
|
|
Post by bullardino on Sept 5, 2013 10:28:20 GMT -5
Thanks a lot Bill, I'll check my DIY favourite shops to see if I can get some, Tamiya tape isn't cheap although works great  |
|
|
|
Post by bbd468 on Sept 5, 2013 10:49:45 GMT -5
Another nice update Bill.  I want you to know im starting to crave a ship build!!! Its your fault Mr.!   |
|
|
|
Post by Deano on Sept 5, 2013 15:09:47 GMT -5
Wow Bill , uber detailing there , and I thought I was mad building 1/72 !!! lol
Deano
|
|
|
|
Post by wbill76 on Sept 5, 2013 17:19:23 GMT -5
Luigi, I hear you on that! Things that are 'specialized' for the hobby generally cost more as a result...even if the same result can be achieved with a cheaper non-hobby designated identical item.  Gary Gary, the real blame lies with Rob. Would never have considered this without his evil influence.  Deano Deano, it's a whole different world dealing with 1/350 vs. 1/35, my normal scale, but I'm having fun with it. Do it all the time though? Nah...I'll be ready to deal with 'normal' parts again after this for sure. 
|
|
|
|
Post by wbill76 on Sept 8, 2013 20:54:04 GMT -5
This latest update is a big one so let's dive right into it! In order to finish off the AA gun deck, it was necessary to assemble more AA guns of the single 20mm and double 37mm variety. This is covered under Step 1 of the instructions and the parts involved are tiny. I didn't bother with the PE hand wheels and little crew shoulder pads for the 20mm guns as there was no way to handle them without knocking those delicate parts off. Two of the 20mm guns are destined for the AA deck, one for the aft main gun deck, and the fourth one forward of the bow dual gun turret. 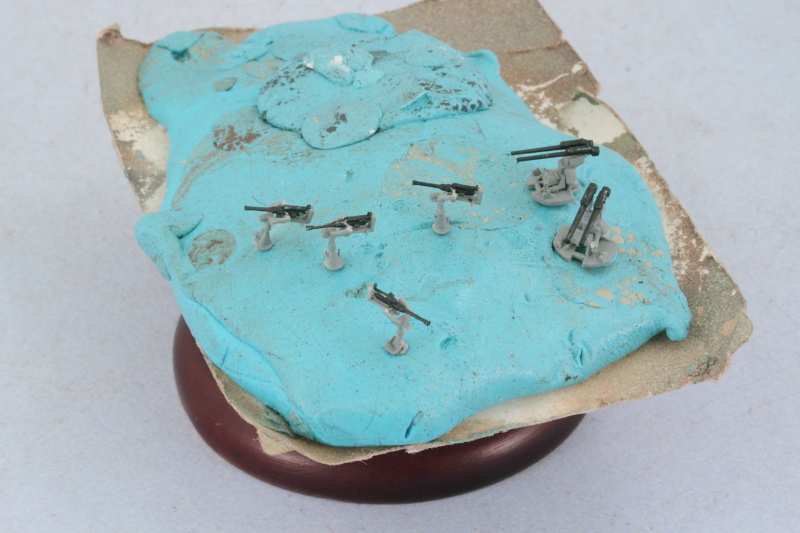 The aft smokestack received its white top and some soot weathering courtesy of black artist pastels before it was added to the AA gun deck. The searchlight was installed on its platform and the AA guns added as well. I had to position the two 20mm guns a little creatively as they didn't quite clear the searchlight tower if aimed at 90 degrees as called for in the instructions. 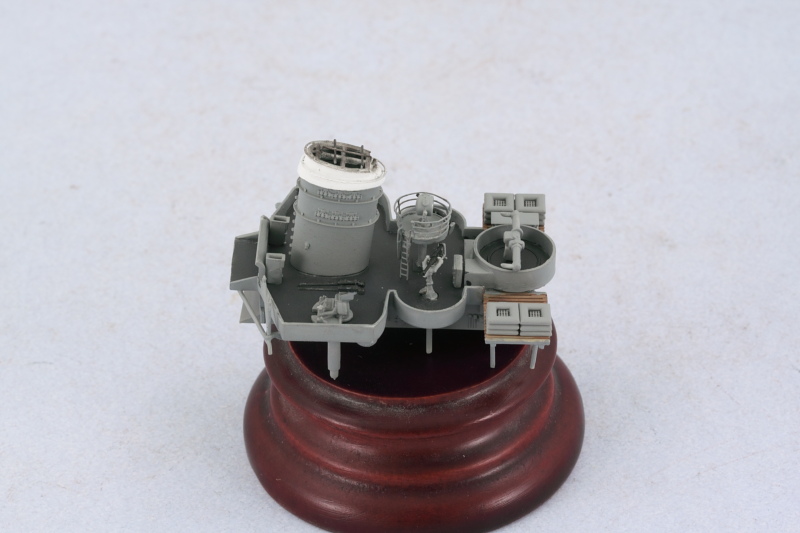 At the same time I had airbrushed the stack and the AA gun deck I had also airbrushed the torpedo launchers and the main gun turrets. Those all got a test fit to see that everything was playing nice with each other before moving on forward to the bridge deck and main smokestack. 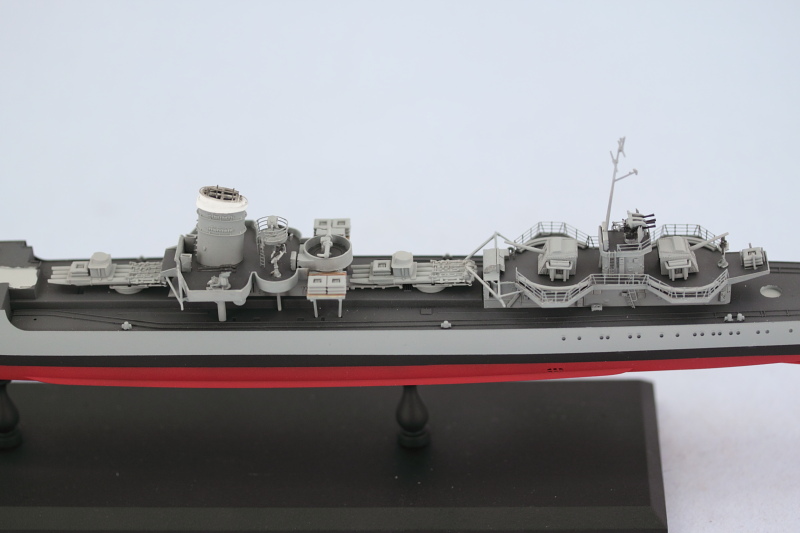 The bridge deck is a multi-layer affair covered under Steps 4-7. The wood portions had been airbrushed with a 50-50 mix of MM enamel Panzer Dunkelgelb/Light Gray and allowed to thoroughly cure. Then a light wash of enamel MM Leather was applied followed by varying layers of artist pastel application using raw umber, burnt umber, and yellow ochre to create some variation in the wood look/feel. The Dragon design of how the parts go together allows the two different deck levels to be kept separate from each other if you're careful in the assembly process and use the wood floors as a support while you build up the separate panels of the raised portions. I opted for the PE version of the radar antenna because it looks so much better than the solid one-piece styrene alternative provided in the kit. As a side note, the front plate of the superstructure base that fits into the main deck isn't called out in the instructions but can be found as part E3, the only part used from that sprue for this particular kit. 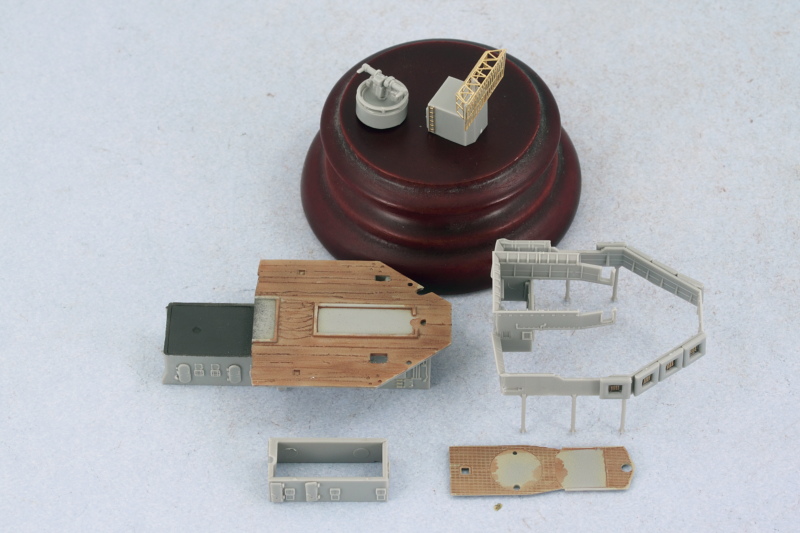 Steps 2 and 3 deal with the main mast and all of its various details. One of the support legs was broken on the sprue so it will get a full repair later on as it's too delicate to work with at this point in the build. Later on in the build when I test fit the mast into the deck, the PE ladder proves to be too long and has to be trimmed back vs what you see in the photo below to allow the mast to sit at the right height, so fair warning at this point to others attempting the same project in the future! 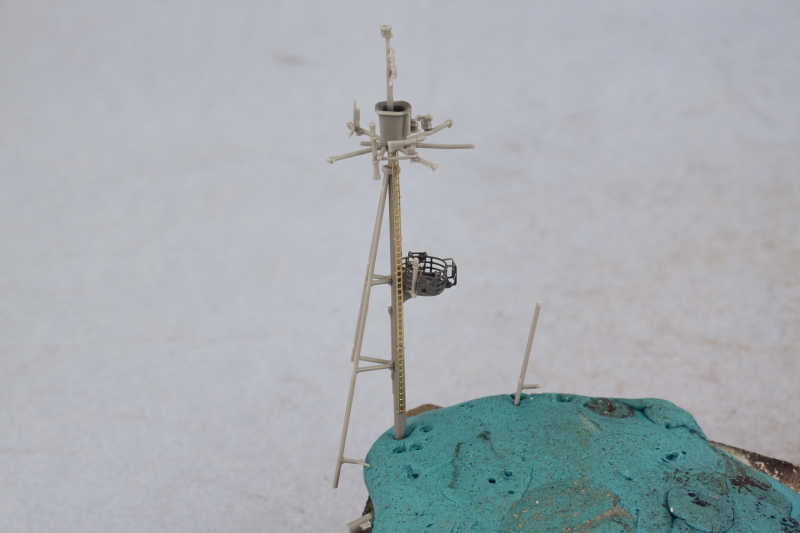 While the mast set up, I worked on the main smokestack as called for in Step 8. The PE screen/flap combinations have to be added as individual pieces and then lined up together to create the full arrangement. The instructions don't call out the rear panel screen/flap PE part, it's MB27, so don't overlook it in the process. The Eduard set provided the railing for the small lookout platform on the smokestack and the Dragon PE was used for the tiny railings/guards on the stacks itself. A minor CA mishap when attempting to fit the top-most ring rendered that part unusable and required me to do some sanding repair work but otherwise no lasting damage resulted. 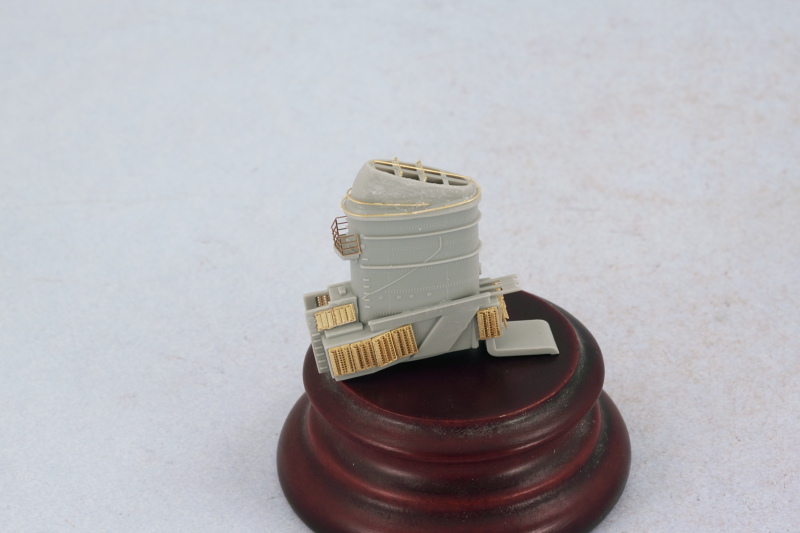 All of the bridge deck components were airbrushed and then the bridge assembled first with all of its added components along with Eduard ladders and railings where appropriate. The smokestack component was then joined up with the bridge and the mast installed. Once the mast had set, the repair was accomplished with the missing leg so it had some support at both the bridge and the smokestack to help stabilize it. 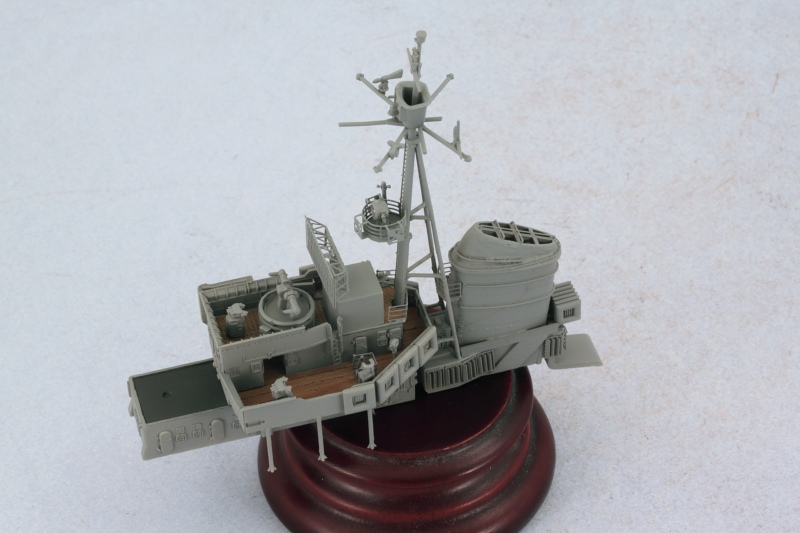 So this is where things stand right now, still a lot more work to do in the details department! 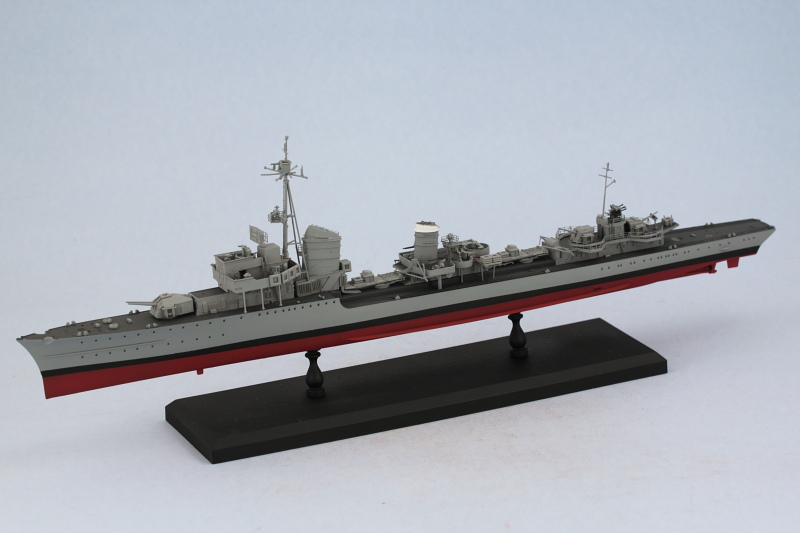 |
|
|
|
Post by deafpanzer on Sept 8, 2013 20:58:11 GMT -5
Great update... starting to look like a destroyer now. NIce work on the little AA guns too! Bet you are happy 49ers won... even tho you should be rooting for Cowboys RIGHT NOW! LOL
|
|
|
|
Post by wbill76 on Sept 8, 2013 21:11:37 GMT -5
Great update... starting to look like a destroyer now. NIce work on the little AA guns too! Bet you are happy 49ers won... even tho you should be rooting for Cowboys RIGHT NOW! LOL Thanks Andy. Guess that means I don't need to watch the game that I DVRd on Uverse and was just about to start watching so I could do my normal build time at the bench!  J/K, I will still watch it even though I now know the outcome...but please, for future games, please don't spoil it for me. I'm trying to use technology to my advantage to get the most out of the weekend!  |
|
|
|
Post by TRM on Sept 8, 2013 21:19:23 GMT -5
LOL...one more thing to blame on the deaf guy from the mid-West!!  I can only emulate what Andy said here Bill! This is fantastic! This has been big fun to follow along on this one!! Looking forward to next Sunday!!! |
|
|
|
Post by deafpanzer on Sept 8, 2013 21:53:13 GMT -5
LOL! I don't DVR games... it will never work! I will do my best...
|
|
|
|
Post by 406 Silverado on Sept 8, 2013 22:13:36 GMT -5
Just caught the update on FB. LOVE all the detailing Bill. The painting is the slow process but well worth it in the end.
|
|
|
|
Post by Leon on Sept 9, 2013 3:35:19 GMT -5
That is looking fantastic Bill.Nice work on the AA guns and great save on the mast leg.   |
|
|
|
Post by bullardino on Sept 9, 2013 5:50:23 GMT -5
Yep, fantastic job, Bill. It looks a very nice base for future weathering  |
|
pantherf..-Email Not Valid
Full Member
  
Member since: July 2013
"Best Job I've Ever Had"
Posts: 1,253 
|
Post by pantherf..-Email Not Valid on Sept 9, 2013 5:58:14 GMT -5
Whoa! The last time I looked in there were only a few pieces, a railing and such. Now I see a completed hull and masts... must have been the work of Garys elves again because its football season and I didn't expect it to be this far ahead in the build.  But it all looks good Bill!  Jeff |
|
|
|
Post by wbill76 on Sept 9, 2013 10:30:03 GMT -5
T, that list will never end I think!  Glad you're enjoying the ride with me.  Andy Andy, never fear, it was just poor timing on your part in your response as I was just about to get up from the computer when I got the email alert of the response...and it showed just enough of your post to let the cat out of the bag. Still fun game to watch. I don't ever root for the Cowboys just so you know.  Rob Rob, yep, very different approach required vs. building an armor kit but I'm having fun with it. The details can really draw you in if you're not careful...I've long since stopped saying 'this will only take a minute!' with anything related to this project.  Leon Leon, thanks! The patient was in critical condition for a little while but once I figured out it could be saved later on if I waited a bit, that made things much easier. Luigi, agree with you there, going to be fun weathering this little tin-can! Jeff, not really completed, all those 'modules' are just dry-fit in place for now. I need to have access to the main deck for a lot of the detail work still to be done on it, so that last pic makes it look like it's further along than it is...but still, a lot of progress no question! This thing is very deceptive in terms of how much time it sucks down to do various things! 
|
|
|
|
Post by wbill76 on Sept 9, 2013 12:18:14 GMT -5
Thanks Dicky! It's been a blast so far, so much tiny little stuff that you'll develop hunch-back syndrome at the bench if you're not careful. Have to get up and take frequent breaks, remember not to lean to far back away from the bench to avoid feeding carpet monster, etc. more than usual on this project.  |
|
thug626
Senior Member
   
Member since: January 2013
Posts: 2,035
Jan 15, 2013 13:05:28 GMT -5
Jan 15, 2013 13:05:28 GMT -5
|
Post by thug626 on Sept 10, 2013 0:39:21 GMT -5
Hello Bill,
That is truly some stupendous work. Nice save on the stack!
Dave
|
|
|
|
Post by armorguy on Sept 10, 2013 1:18:05 GMT -5
Bill, that's a nice one my friend ! Superfine detailing will make this one look a stunning eyecatcher ! I'm gonna check this entire thread, lovely !
|
|
Deleted
Member since: January 1970
Posts: 0
Nov 25, 2024 18:42:43 GMT -5
Nov 25, 2024 18:42:43 GMT -5
|
Post by Deleted on Sept 10, 2013 1:20:01 GMT -5
nice work old chap the details are awesome
|
|
Deleted
Member since: January 1970
Posts: 0
Nov 25, 2024 18:42:43 GMT -5
Nov 25, 2024 18:42:43 GMT -5
|
Post by Deleted on Sept 10, 2013 6:57:54 GMT -5
Amazing! Don't know how you can work with tweezers and a Micro-Scope! 
|
|
|
|
Post by wbill76 on Sept 10, 2013 9:54:17 GMT -5
Dave, thanks! Dragon designed this one with a lot of engineering precision but also some very tiny and delicate parts. Thank goodness for the Optivisor!  AG AG, glad to have you along for the ride! Pete, there's a lot packed into this kit. For example the kit includes 5 tiny PE 'horns' per mine (there are 10 mines) as an option...one I have a strong feeling I'm not going to be attempting, but you never knoe!  Bruce Bruce, this is the first time I've worked in this scale other than when I was a kit but it's not that much different from 1/35 armor. Just have to go slower, use the right tools, and plan things out a little more.  Thanks for the comments!
|
|
Tojo72
Forum Moderator      Sept '24 Showcased Model Awarded
Member since: November 2012
Posts: 5,326
Member is Online
MSC Staff
|
Post by Tojo72 on Sept 10, 2013 11:09:48 GMT -5
Looking real good Bill
|
|
|
|
Post by wbill76 on Sept 10, 2013 12:18:01 GMT -5
Thanks Anthony! Making good headway one bit at a time.  |
|
|
|
Post by wbill76 on Sept 10, 2013 15:32:36 GMT -5
Ah the limits of technology...spell check isn't perfect!  Yes, I was assembled as a child out of spare parts and left over styrene, explains a lot don't it!  |
|
ogrejohn
Full Member
   Oct '23 Showcased Model Awarded
Member since: June 2012
Go away or I shall taunt you a second time!
Posts: 1,302
Jun 1, 2012 17:33:59 GMT -5
Jun 1, 2012 17:33:59 GMT -5
|
Post by ogrejohn on Sept 10, 2013 18:06:49 GMT -5
It's really looking great Bill!
|
|
|
|
Post by wbill76 on Sept 10, 2013 18:07:51 GMT -5
Dicky, that's why I always keep a bottle of Testor's Extra Thin handy!  OJ OJ, thanks for popping in! 
|
|
|
|
Post by bbd468 on Sept 10, 2013 18:20:44 GMT -5
Nice updates Brother Bill! Are you using an Optivisor to do the wee PE parts? Their so TINY!  |
|
|
|
Post by wbill76 on Sept 10, 2013 19:21:25 GMT -5
Nice updates Brother Bill! Are you using an Optivisor to do the wee PE parts? Their so TINY!  Yes. No way I could work on this, especially with the paint and clean-up work, without the Optivisor. My wife keeps giggling and mentioning scenes from 'Honey I Shrunk The Kids'!  |
|
|
|
Post by fightnjoe on Sept 12, 2013 18:18:43 GMT -5
bill it looks fantastic. very clean and crisp. beginning to avoid things around here. that arizona sits on the shelf yet and i dont have the skill to do it right.
joe
|
|