|
|
Post by Leon on Oct 1, 2013 16:36:35 GMT -5
Nice start on the track-age Tony.  |
|
Tony Thunder
Full Member
  
Member since: January 2012
Posts: 591
Jan 30, 2012 18:22:10 GMT -5
Jan 30, 2012 18:22:10 GMT -5
|
Post by Tony Thunder on Oct 14, 2013 10:48:45 GMT -5
Bench is cleared and so we begin! First up with any resin kit everything is scrubbed with Vim scouring powder and left to dry. 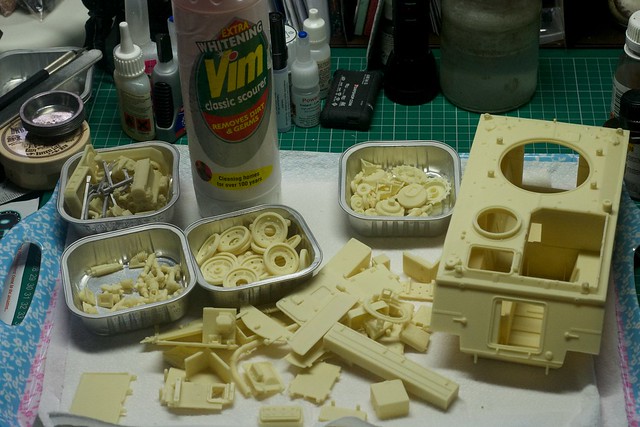 DSC_3645 DSC_3645 by TonyThunder, on Flickr This pic does not show the smaller detail parts the white metal and the etch. I have decided to start with the Suspension and running gear. Parts scrubbed cleaned up and ready to go...... 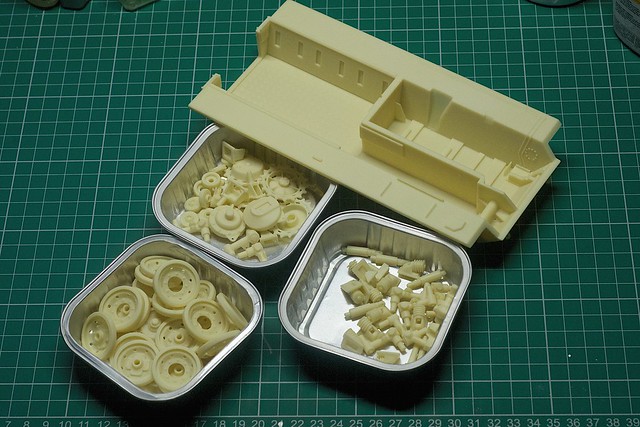 DSC_3650 DSC_3650 by TonyThunder, on Flickr More to follow........................... Tony  |
|
|
|
Post by dupes on Oct 14, 2013 10:59:36 GMT -5
Excellent! Question, though - why 1/24? Is that the "usual" scale for that company? Just wondering why not 1/35 to go along (a weird enough scale on it's own) with all of the other available armor kits.
|
|
Tony Thunder
Full Member
  
Member since: January 2012
Posts: 591
Jan 30, 2012 18:22:10 GMT -5
Jan 30, 2012 18:22:10 GMT -5
|
Post by Tony Thunder on Oct 14, 2013 11:28:30 GMT -5
Hi Dupes, Kit Form Services is owned and run by Howard Whitehead (a former British Army RecceMech) has been in business as a kit and conversion specialist for 1/24 scale trucks for over 25 years. About five years ago he decided to introduce a selection of classic military vehicles and rather than compete with company's such as Accurate Armour, Firing Line or Cromwell models decided to stick with what he knows best. Because of the larger scale more detail and refinement is necessary and I suppose that adds to the appeal. Its been a pretty successful venture so far! More detailed information can be found hereTony  |
|
|
|
Post by dupes on Oct 14, 2013 11:36:25 GMT -5
Man, they've got a pretty impressive lineups of kits! A little spendy, but they sure look top-notch.
Makes sense now about the scale.
|
|
|
|
Post by wbill76 on Oct 14, 2013 12:16:38 GMT -5
Off and running Tony! Looking forward to seeing this one come together.
|
|
|
|
Post by bullardino on Oct 14, 2013 13:57:17 GMT -5
Hooray, it has started  |
|
|
|
Post by Leon on Oct 14, 2013 19:11:21 GMT -5
Looking forward to your first pics Tony.  |
|
pantherf..-Email Not Valid
Full Member
  
Member since: July 2013
"Best Job I've Ever Had"
Posts: 1,253 
|
Post by pantherf..-Email Not Valid on Oct 14, 2013 19:24:53 GMT -5
Jeff - Resin kits are not as hard as you think, just a slightly different technique maybe but nothing too hard. Tony  Oh, hey Tony! This old dude has built PLENTY of resin projects... they're just not as easy as styrene.  Looking forward to your build! Jeff |
|
Tony Thunder
Full Member
  
Member since: January 2012
Posts: 591
Jan 30, 2012 18:22:10 GMT -5
Jan 30, 2012 18:22:10 GMT -5
|
Post by Tony Thunder on Oct 15, 2013 9:42:25 GMT -5
Started with the lower hull. Suspension arms fitted along with bump stops and lifting rings. Shocks fitted and pinned to suspension arm using brass household pins cut down. 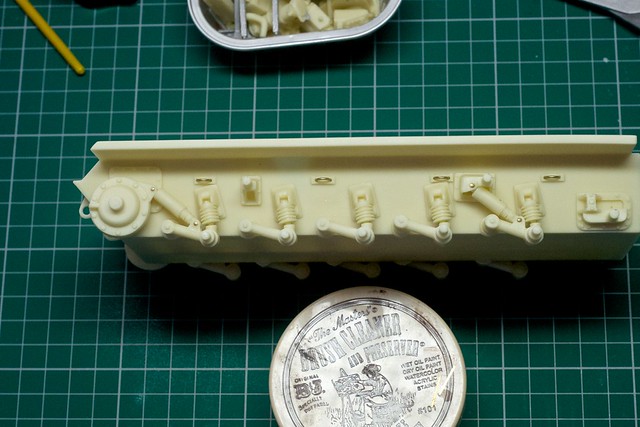 DSC_3652 DSC_3652 by TonyThunder, on Flickr 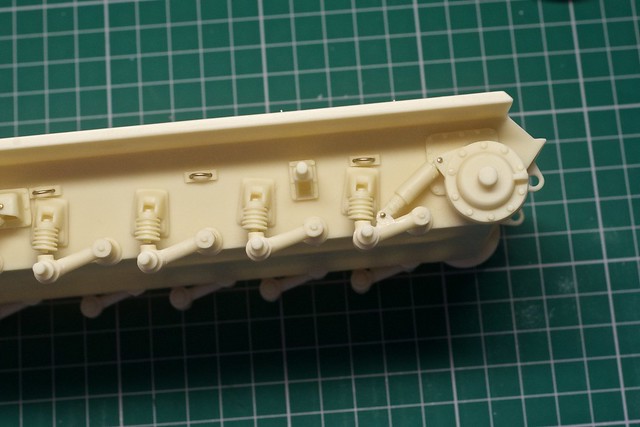 DSC_3656 DSC_3656 by TonyThunder, on Flickr 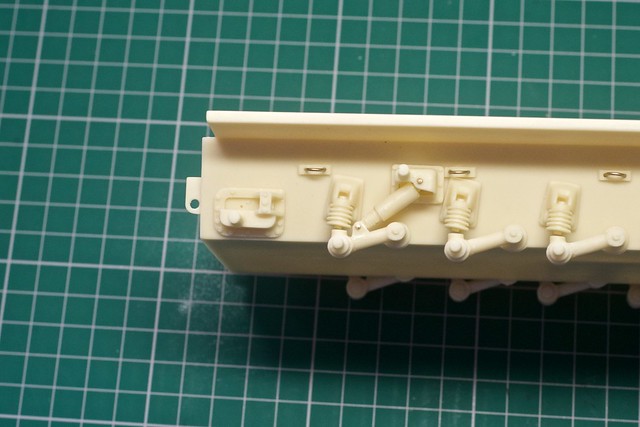 DSC_3655 DSC_3655 by TonyThunder, on Flickr You can see a small gap between the bump stop and suspension arm but this will close when weight of completed model is bearing down on it. Sprockets and road wheels etc won't be installed until after paint. As ever ACW Tony  |
|
|
|
Post by deafpanzer on Oct 15, 2013 9:55:58 GMT -5
Lower hull looking good! Am afraid to ask how much it is going to weight when it is done...
|
|
|
|
Post by bullardino on Oct 15, 2013 10:17:15 GMT -5
Nice start, Tony  |
|
merseajohn/
Full Member
  
Member since: January 2012
Posts: 464
Jan 20, 2012 18:11:55 GMT -5
Jan 20, 2012 18:11:55 GMT -5
|
Post by merseajohn/ on Oct 15, 2013 16:26:27 GMT -5
Nice work Tony, I don't envy you with those tracks!
|
|
Tony Thunder
Full Member
  
Member since: January 2012
Posts: 591
Jan 30, 2012 18:22:10 GMT -5
Jan 30, 2012 18:22:10 GMT -5
|
Post by Tony Thunder on Oct 15, 2013 16:47:33 GMT -5
Thanks for the kind comments gents. The tracks are probably the biggest pain and consequently I am assembling a few links at a time and hopefully should have them finished by the time I need to install them (thats the plan anyway). A quick update: The drivers seat and controls assembled  DSC_3662 DSC_3662 by TonyThunder, on Flickr  DSC_3657 DSC_3657 by TonyThunder, on Flickr  DSC_3664 DSC_3664 by TonyThunder, on Flickr More tomorrow  |
|
|
|
Post by bullardino on Oct 16, 2013 0:48:50 GMT -5
I agree, it doesn't look comfy. Another very nice job in progress, Tony  |
|
Tony Thunder
Full Member
  
Member since: January 2012
Posts: 591
Jan 30, 2012 18:22:10 GMT -5
Jan 30, 2012 18:22:10 GMT -5
|
Post by Tony Thunder on Oct 16, 2013 2:43:55 GMT -5
Yeah, you are right about the seat. One thing I noticed is that the seat is longer than the back rest which throws the proportions out some what. The driver can get in/out either through his hatch or through the crew compartment. I think it was designed that way because the back rest which folds back and flat is directly in front of the commanders seat. If it was longer it would probably snag. Dicky - All wire and plastic rod is provided to build the kit. Tony  |
|
macmcconnell.
Full Member
  
Member since: December 2011
Posts: 1,238
Dec 11, 2011 12:07:33 GMT -5
Dec 11, 2011 12:07:33 GMT -5
|
Post by macmcconnell. on Oct 16, 2013 3:07:19 GMT -5
Hi Tony
Its me small guy .lol just started mine last night what a kit its stunning heres a tip don't know if you know My Hobby world type stores flower arranging section has loads of pre colored wire black red yellow ect real handy.
Mac
|
|
Tony Thunder
Full Member
  
Member since: January 2012
Posts: 591
Jan 30, 2012 18:22:10 GMT -5
Jan 30, 2012 18:22:10 GMT -5
|
Post by Tony Thunder on Oct 16, 2013 3:15:26 GMT -5
Hello Mac  Mac thanks for that, I've just wired the batteries using bright yellow wire (black would be better!)  Will have to have a look. I intend to display the power pack O/S the vehicle, what about you? Tony |
|
|
|
Post by Leon on Oct 16, 2013 3:28:48 GMT -5
Impressive start Tony,i'm liking this.   |
|
macmcconnell.
Full Member
  
Member since: December 2011
Posts: 1,238
Dec 11, 2011 12:07:33 GMT -5
Dec 11, 2011 12:07:33 GMT -5
|
Post by macmcconnell. on Oct 16, 2013 7:10:25 GMT -5
Tony yes the same mines being done for my Bruv Noel sadly he can't build anymore so this will be the command Ambulance he drove at BATUS. he also sent me 2 x ferrets and 2 x Saladin's..............not much work.
Must say kit is bang on great build quality.
Mac
|
|
|
|
Post by wbill76 on Oct 16, 2013 14:55:23 GMT -5
Would hate to be the driver sitting in that seat contraption for too long of a spell! nice progress Tony.
|
|
Deleted
Member since: January 1970
Posts: 0
Nov 29, 2024 4:47:27 GMT -5
Nov 29, 2024 4:47:27 GMT -5
|
Post by Deleted on Oct 16, 2013 15:12:58 GMT -5
Bill,although there were restraint belts fitted,back in the day,the drivers never used them,so they could better ride the bumps etc,when travelling cross country.The seats weren't too uncomfortable,but there again you wouldn't normally expected to drive for long periods,and as I said before,because you were moving about all the time,the bum didn't get too numb!!!  ;)Have to say though,the seat base looks out of proportion to the back. |
|
Tony Thunder
Full Member
  
Member since: January 2012
Posts: 591
Jan 30, 2012 18:22:10 GMT -5
Jan 30, 2012 18:22:10 GMT -5
|
Post by Tony Thunder on Oct 16, 2013 15:38:35 GMT -5
Hi chaps! Thanks Richard! What Chris says is correct, the seat base does look out of proportion to the seat back but it was designed that way for a reason. Here are some pics that I took whilst at War and Peace this year. Pic 1 Sorry about the angle but this was hanging out of the drivers hatch and was an opportunity to get the whole seat in view. What is obvious is that the seat is much longer than you would expect given the size of the back rest. 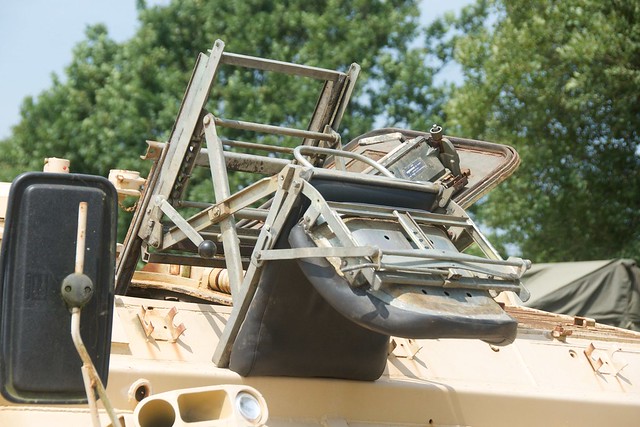 DSC_2870 DSC_2870 by TonyThunder, on Flickr Pic 2 This is a view from the back into the drivers area showing the seat back folded completely flat for drivers access/egress. To the right of the seat back you can seee the commanders seat in the upright position. notice how close they are. The drivers seat back was shortened so that it would not snag commanders seat.  DSC_3013 DSC_3013 by TonyThunder, on Flickr Pic 3 A clearer view of drivers seatback and commanders seat position. 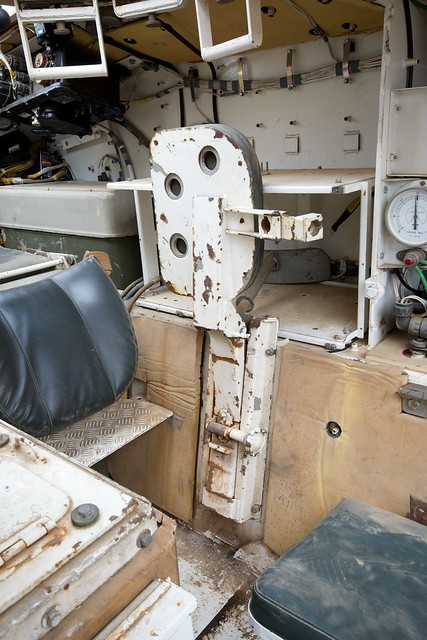 DSC_3023 DSC_3023 by TonyThunder, on Flickr Hope that makes sense Tony |
|
Tony Thunder
Full Member
  
Member since: January 2012
Posts: 591
Jan 30, 2012 18:22:10 GMT -5
Jan 30, 2012 18:22:10 GMT -5
|
Post by Tony Thunder on Oct 16, 2013 16:00:54 GMT -5
This evenings update.  More detail added to driver/commander positions. Wiring added from radio distribution box to distribution link box. Radio, battery box, batteries just dry fitted for now. As ever ACW Tony  DSC_3666 DSC_3666 by TonyThunder, on Flickr 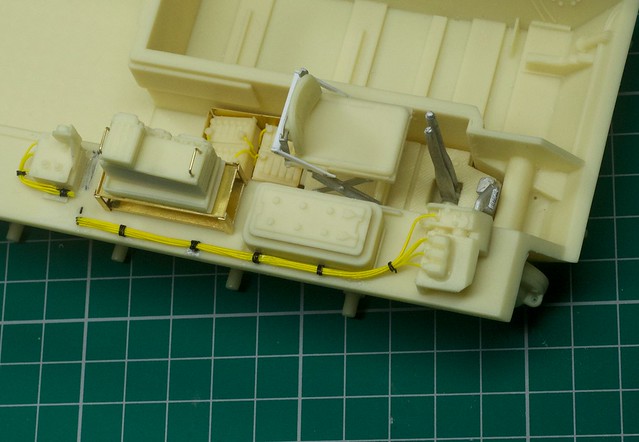 DSC_3669 DSC_3669 by TonyThunder, on Flickr  DSC_3670 DSC_3670 by TonyThunder, on Flickr |
|
Tony Thunder
Full Member
  
Member since: January 2012
Posts: 591
Jan 30, 2012 18:22:10 GMT -5
Jan 30, 2012 18:22:10 GMT -5
|
Post by Tony Thunder on Oct 16, 2013 16:57:54 GMT -5
Yes mate. 0.3mm coloured copper wire couple of turns dab of CA and Bobs your whatsit !  |
|
Deleted
Member since: January 1970
Posts: 0
Nov 29, 2024 4:47:27 GMT -5
Nov 29, 2024 4:47:27 GMT -5
|
Post by Deleted on Oct 16, 2013 17:03:59 GMT -5
Seems to be a bit of an anomaly here....Larkspur radio,on an alleged post 1980 vehicle?...Just asking?  |
|
|
|
Post by bullardino on Oct 17, 2013 1:15:09 GMT -5
Great wiring, Tony. It adds a lot  |
|
danb.
Reviews member     March 2013 MoM Winner
Member since: November 2011
Posts: 2,808
Nov 17, 2011 9:22:52 GMT -5
Nov 17, 2011 9:22:52 GMT -5
|
Post by danb. on Oct 17, 2013 3:56:48 GMT -5
Wow amazing job Tony that resin looks super detailed keep up the good work
Dan B
|
|
|
|
Post by Leon on Oct 18, 2013 19:26:21 GMT -5
Tony,really like what your doing with the interior  .Keep up the great work.  |
|
Tony Thunder
Full Member
  
Member since: January 2012
Posts: 591
Jan 30, 2012 18:22:10 GMT -5
Jan 30, 2012 18:22:10 GMT -5
|
Post by Tony Thunder on Oct 19, 2013 17:25:35 GMT -5
An update, Before I can continue with the interior I need the base coats down, so thats what I did. Hull interior primed then given a coat of Mode Air silver. 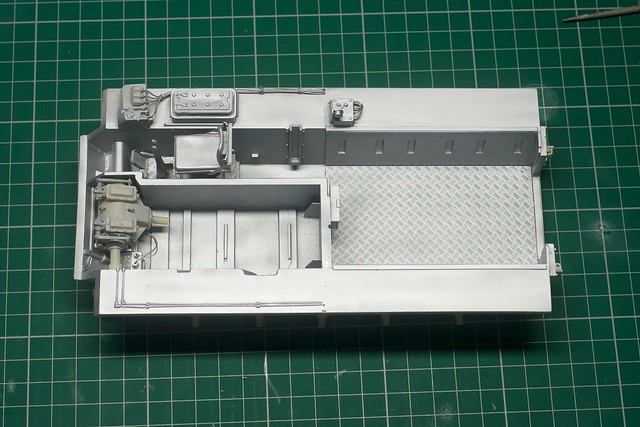 DSC_3675 DSC_3675 by TonyThunder, on Flickr 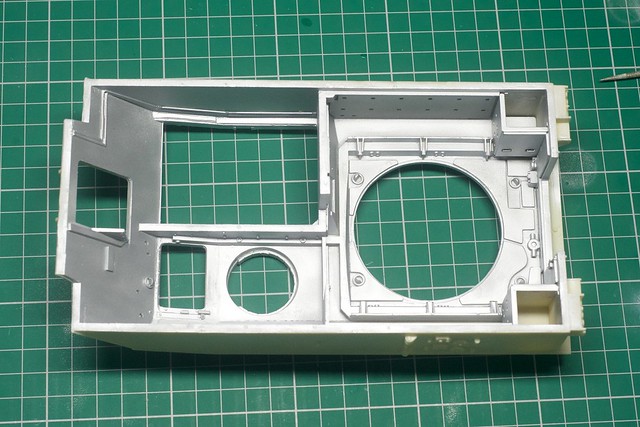 DSC_3678 DSC_3678 by TonyThunder, on Flickr I then brush painted the padded sections Model Air Sand Yellow and painted details previously installed. 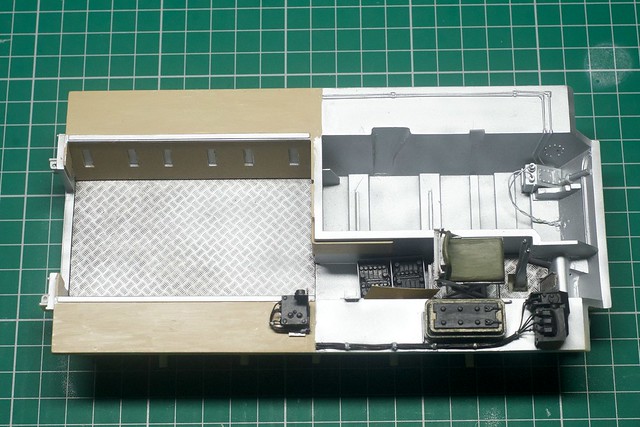 DSC_3684 DSC_3684 by TonyThunder, on Flickr 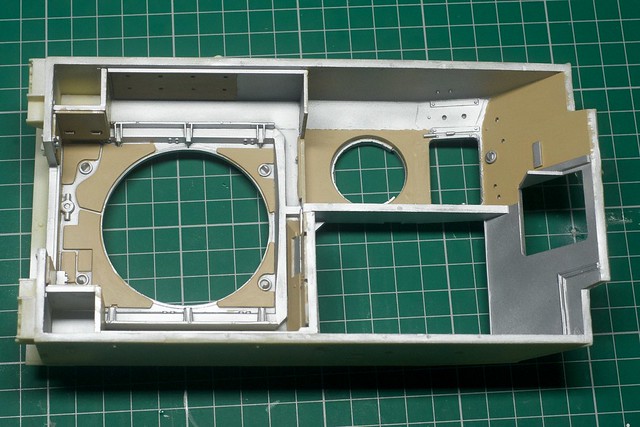 DSC_3688 DSC_3688 by TonyThunder, on Flickr Predrilled and then painted interior parts ready for installation and cabling along with extinguishers  DSC_3681 DSC_3681 by TonyThunder, on Flickr Fitted workable hinges and painted rear seats. painted drivers and commanders seating. 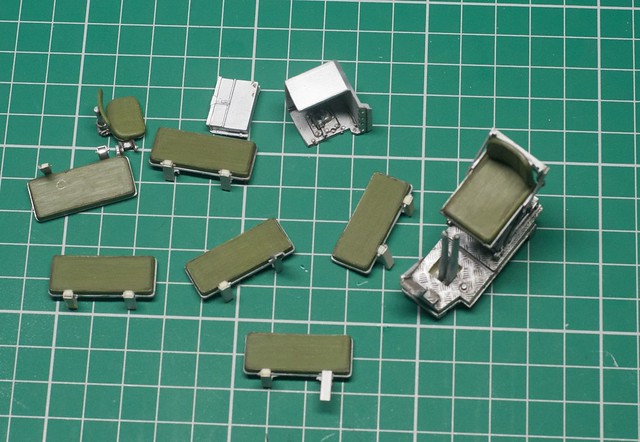 DSC_3690 DSC_3690 by TonyThunder, on Flickr Hopefully tomorrow I'll get a chance to put it all together! As ever ACW  Tony |
|