Deleted
Member since: January 1970
Posts: 0
Nov 27, 2024 13:10:01 GMT -5
Nov 27, 2024 13:10:01 GMT -5
|
Post by Deleted on Mar 11, 2014 1:35:40 GMT -5
I'm really liking the looks of this one already .
|
|
maschinenkrueger
Reviews member     Jan & Dec 2014 MoM Winner
Member since: June 2012
You want MaK with that?
Posts: 836
Jun 7, 2012 9:50:05 GMT -5
Jun 7, 2012 9:50:05 GMT -5
|
Post by maschinenkrueger on Mar 11, 2014 9:55:49 GMT -5
Masking sux. That's why all my camos are freehand.
The disc camo is a wicked cool effect but it must have been so time consuming at the factory.
|
|
Marcel du Long
Full Member
  
Member since: August 2013
Posts: 331
Aug 22, 2013 13:25:03 GMT -5
Aug 22, 2013 13:25:03 GMT -5
|
Post by Marcel du Long on Mar 11, 2014 14:40:13 GMT -5
Thnx folks!  I wonder why they applied this pattern, they must have had too much time. At least the Tamiya box art & instructions are way more inspiring.  Just finished the yellow areas. Still need to do the barrel and some small retouching with a brush and then I consider the disc camo done.  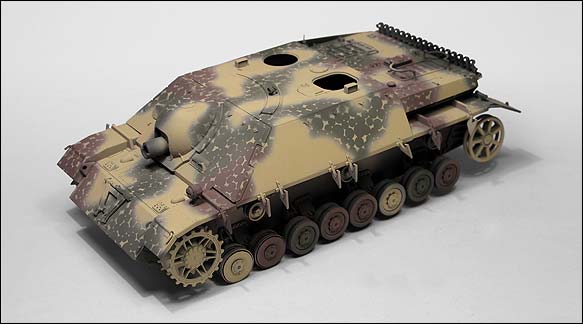 Next step will be a hi-lighting and postshading. Bye, marcel. |
|
Deleted
Member since: January 1970
Posts: 0
Nov 27, 2024 13:10:01 GMT -5
Nov 27, 2024 13:10:01 GMT -5
|
Post by Deleted on Mar 11, 2014 15:22:56 GMT -5
wow! that looks superb!
|
|
danb.
Reviews member     March 2013 MoM Winner
Member since: November 2011
Posts: 2,808
Nov 17, 2011 9:22:52 GMT -5
Nov 17, 2011 9:22:52 GMT -5
|
Post by danb. on Mar 11, 2014 15:38:15 GMT -5
Love that camo keep up the hard work Marcel  Dan B |
|
|
|
Post by wbill76 on Mar 11, 2014 15:58:00 GMT -5
The added yellow really makes this scheme work Marcel, looking good!
|
|
Marcel du Long
Full Member
  
Member since: August 2013
Posts: 331
Aug 22, 2013 13:25:03 GMT -5
Aug 22, 2013 13:25:03 GMT -5
|
Post by Marcel du Long on Mar 12, 2014 6:19:44 GMT -5
Thnx folks, great you like it! Exact my though as well. Although I didn't like the big yellow area on the left front side the post shade works well there so I'm glad with the result. Post-shade job done with my airbrush loaded with a very diluted Tamiya dark brown mix. 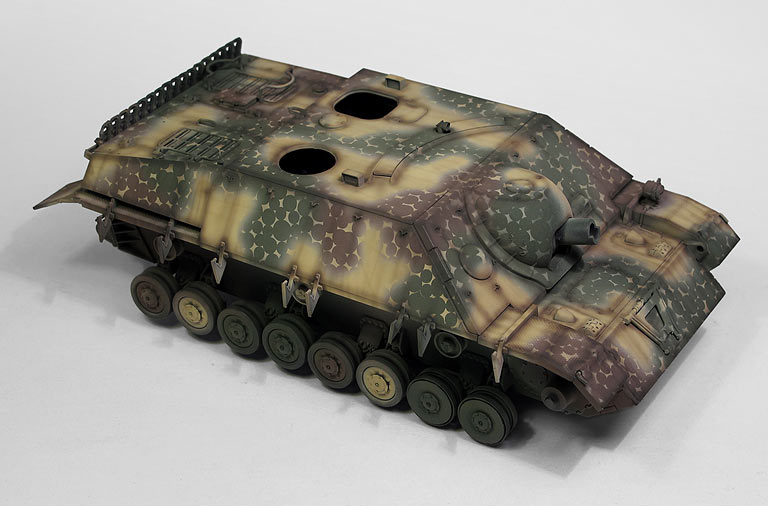 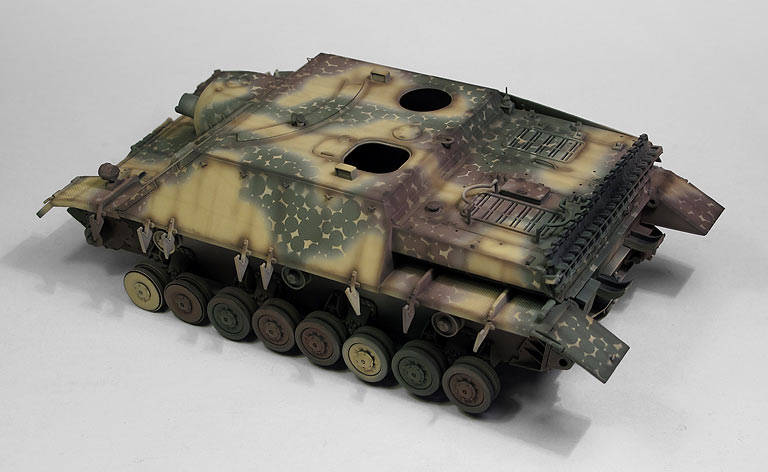 The return rollers & road wheels are not post shade yet. Two more pics of the post shade here. Bye, Marcel. |
|
elco
Full Member
   July & Oct 2014 MoM Winner
Member since: May 2013
MOY 2014 Winner
Posts: 660 
|
Post by elco on Mar 12, 2014 6:43:37 GMT -5
Wow this gives a whole new dimension to the camo, i like it al lot. It looks..raw. Nice job. Looking forward to the rest of the weathering  |
|
|
|
Post by bullardino on Mar 12, 2014 9:43:57 GMT -5
Post shade really adds to the overall appearance. Magnific stuff, Marcel.
|
|
maschinenkrueger
Reviews member     Jan & Dec 2014 MoM Winner
Member since: June 2012
You want MaK with that?
Posts: 836
Jun 7, 2012 9:50:05 GMT -5
Jun 7, 2012 9:50:05 GMT -5
|
Post by maschinenkrueger on Mar 12, 2014 10:07:58 GMT -5
That big yellow blog caught my eye too. Can you put a cross there to break up the area? I like the asymmetry but would the area behind the missing armor plate have the same camo pattern?
The post shading really added some depth Marcel.
|
|
|
|
Post by tonylee-Rest In Peace on Mar 12, 2014 10:29:08 GMT -5
Excellent just outstanding effect.  Tony lee |
|
|
|
Post by deafpanzer on Mar 12, 2014 10:52:16 GMT -5
I am in awe.... stunning work... another great update!
|
|
|
|
Post by wbill76 on Mar 12, 2014 19:55:03 GMT -5
Nice result with the post shading Marcel, that's some tight AB work for sure.
|
|
danb.
Reviews member     March 2013 MoM Winner
Member since: November 2011
Posts: 2,808
Nov 17, 2011 9:22:52 GMT -5
Nov 17, 2011 9:22:52 GMT -5
|
Post by danb. on Mar 13, 2014 2:21:47 GMT -5
Fantastic idea on the preshade after the camo gives the tank much more depth im with Kruger on the camo idea behind where the shurzen would go i think it would look right to be all Dunkelgelb then you could fade the green onto this? is the shurzen going to be missing in that area on the final build? keep up the hard work and im lovin ya blog  Dan B |
|
afvfan
Senior Member
   
Member since: December 2012
Bob
Posts: 1,772
Dec 10, 2012 17:32:38 GMT -5
Dec 10, 2012 17:32:38 GMT -5
|
Post by afvfan on Mar 13, 2014 3:35:45 GMT -5
I've no problem with the camo areas behind the skirts. This is obviously a factory paint scheme (I can't imagine any field shop doing this disc camo) and the skirts probably would not have even been mounted yet when the tank was painted. As for the skirts, here's a little food for thought. There's photo evidence of some vehicles even having their camo pattern carried over on to the inside walls of the armor.
|
|
maschinenkrueger
Reviews member     Jan & Dec 2014 MoM Winner
Member since: June 2012
You want MaK with that?
Posts: 836
Jun 7, 2012 9:50:05 GMT -5
Jun 7, 2012 9:50:05 GMT -5
|
Post by maschinenkrueger on Mar 13, 2014 9:10:20 GMT -5
Hey, I was just wondering. I have no evidence one way or the other.
But... whatever. Kudos for such a fantastic job so far.
|
|
|
|
Post by bbd468 on Mar 13, 2014 20:18:32 GMT -5
Man, that is some impressive post shading right there. Bloody fantastic!  |
|
Marcel du Long
Full Member
  
Member since: August 2013
Posts: 331
Aug 22, 2013 13:25:03 GMT -5
Aug 22, 2013 13:25:03 GMT -5
|
Post by Marcel du Long on Mar 14, 2014 3:44:37 GMT -5
Thnx a lot folks! I just putted the balkenkruez & white outlined red id numbers on and that does look quite cool.  Pictures will follow... Although I really like the idea of a camo "interruption" behind the missing skirt and don't feel this is necessary at this moment. The still to add tools & figures will do a lot for the overall appearance and I will consider such a camo "interruption" after these elements are installed. Cheers, marcel. |
|
|
|
Post by TRM on Mar 14, 2014 5:09:43 GMT -5
Nicely done so far Marcel!!
|
|
desertrat
Full Member
  
Member since: October 2013
Posts: 934 
|
Post by desertrat on Mar 14, 2014 14:27:50 GMT -5
WOW!!! love the camo!!
|
|
reserve
Senior Member
   
Member since: July 2012
Si vis pacem para bellum
Posts: 2,372
Jul 11, 2012 9:11:45 GMT -5
Jul 11, 2012 9:11:45 GMT -5
|
Post by reserve on Mar 14, 2014 15:02:38 GMT -5
I may be wrong, but I have the impression that these vehicles were not much more than an armored box with a cannon, would this account for a lack of exterior detail?
I'd never have known this kit is a dog by looking at what you've done with it
Regards,
Mark
|
|
Deleted
Member since: January 1970
Posts: 0
Nov 27, 2024 13:10:01 GMT -5
Nov 27, 2024 13:10:01 GMT -5
|
Post by Deleted on Mar 14, 2014 17:04:19 GMT -5
very nice indeed the shading looks excellent
|
|
Marcel du Long
Full Member
  
Member since: August 2013
Posts: 331
Aug 22, 2013 13:25:03 GMT -5
Aug 22, 2013 13:25:03 GMT -5
|
Post by Marcel du Long on Mar 15, 2014 4:50:54 GMT -5
Thnx Mark. A good paintjob will cover a lot.  Finished airbrushing the barrel and putted some decals on. Inner side of the hatches still needs to be done as well as the black primed muffler. 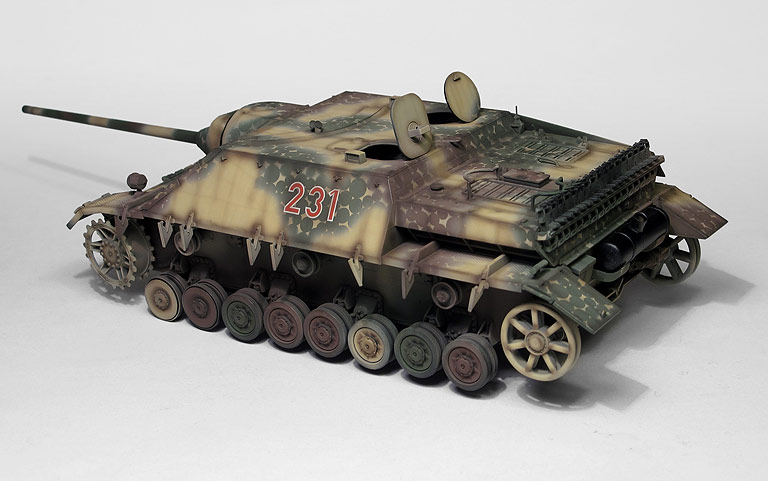 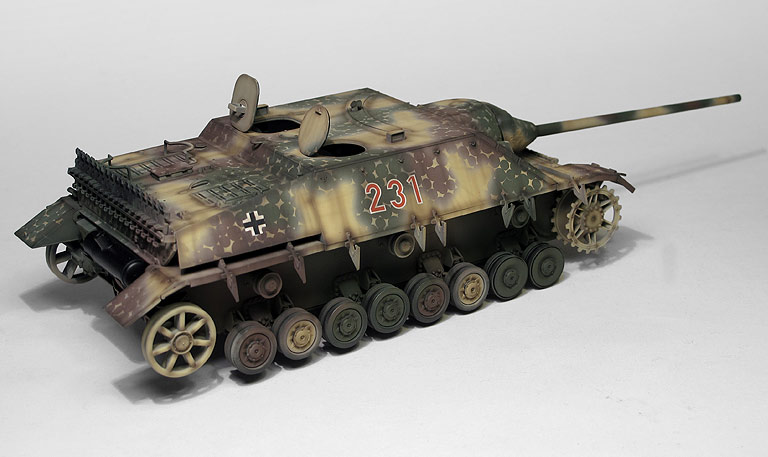 Don't know yet if I continue with this one or continue with my Orange Morris truck. Next step for this one is sealing with a varnish & detail painting. Cheers, Marcel. |
|
|
|
Post by bullardino on Mar 15, 2014 4:53:04 GMT -5
Great progress Marcel. Whichever you'll choose, it'll be fun  |
|
|
|
Post by wbill76 on Mar 15, 2014 13:54:06 GMT -5
Looking good with the markings on Marcel, very nice.
|
|
danb.
Reviews member     March 2013 MoM Winner
Member since: November 2011
Posts: 2,808
Nov 17, 2011 9:22:52 GMT -5
Nov 17, 2011 9:22:52 GMT -5
|
Post by danb. on Mar 15, 2014 15:14:08 GMT -5
Please continue with this its off the scale fella you could chuck it in a comp now and it would score gold  Dan B |
|
panzerconor.
Full Member
  
Member since: April 2013
My cat's breath smells like cat food.
Posts: 176 
|
Post by panzerconor. on Mar 15, 2014 20:27:15 GMT -5
I've been silently watching from day 1 and I must agree, I'd love to see you keep this one running  -Conor |
|
Marcel du Long
Full Member
  
Member since: August 2013
Posts: 331
Aug 22, 2013 13:25:03 GMT -5
Aug 22, 2013 13:25:03 GMT -5
|
Post by Marcel du Long on Mar 23, 2014 4:15:31 GMT -5
Thnx folks for those flattering words! Started weathering this one. All done with Liquitex acrylic inks. 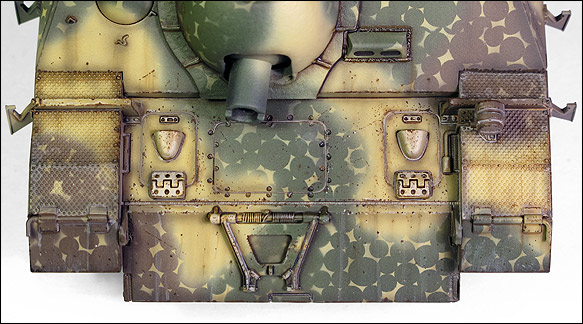 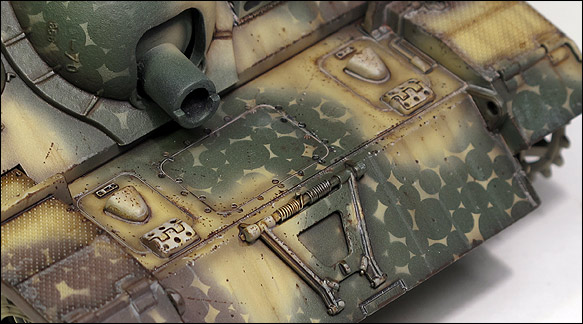 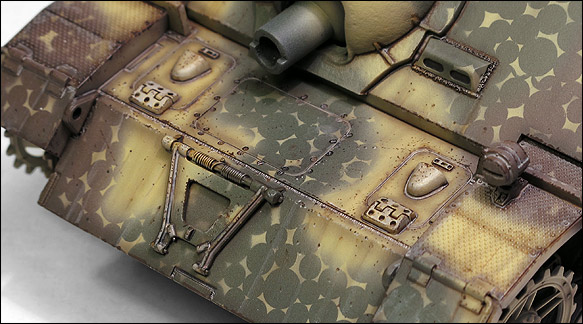 The front plate & fenders are almost finished (I guess) so the weathering front is moving to the top deck & sidewalls. Cheers, Marcel |
|
desertrat
Full Member
  
Member since: October 2013
Posts: 934 
|
Post by desertrat on Mar 23, 2014 4:42:33 GMT -5
`***@@ ... speechless!!!
|
|
AndyArgent.
Senior Member
    Aug 2013 MoM Winner
Member since: November 2011
Andy Bodge Argent - Aug 2013 MoM Winner
Posts: 1,746
Nov 17, 2011 17:09:43 GMT -5
Nov 17, 2011 17:09:43 GMT -5
|
Post by AndyArgent. on Mar 23, 2014 4:52:09 GMT -5
Marcel i have just spotted this and read through.Excellent job you are doing on this ,but then i love all your work.Allways wanted to build one of these Jagdpanzers allso.Cracking paint and weathering.I have never seen the preshade go on after the paintjob is done.works a treat.
|
|