|
|
Post by wbill76 on Jul 23, 2014 14:29:16 GMT -5
Andy, throw that calendar out the window! The days of 'Sunday Only' updates is out the window at least for the foreseeable future.  I hear you on DAK schemes...the Tropen layouts provide some different looks for sure.  Terry Terry, thanks as well! The MKs do the job nicely even if they are a bit time consuming to assemble. In the end they behave just like the rest of the vehicle in terms of painting and finishing, so that's always a huge plus in my book. Ben, don't look too hard at your kit...you might be tempted to forget about your wingy adventure!  Enjoy your time away buddy. 
|
|
panzerman75.
Full Member
  
Member since: February 2012
Posts: 292
Feb 19, 2012 1:07:13 GMT -5
Feb 19, 2012 1:07:13 GMT -5
|
Post by panzerman75. on Jul 23, 2014 20:53:38 GMT -5
Hey Bill love the stug shes a beaut I really like the DAK color on it beautiful job once again
Phil
|
|
|
|
Post by wbill76 on Jul 24, 2014 13:08:30 GMT -5
Thanks Phil! Trucking right along with this one slowly but surely.  |
|
elco
Full Member
   July & Oct 2014 MoM Winner
Member since: May 2013
MOY 2014 Winner
Posts: 660 
|
Post by elco on Jul 24, 2014 16:01:15 GMT -5
Looking good, love the paintjob and i am curious to see how you gonna weather this DAK Stug!
|
|
|
|
Post by TRM on Jul 24, 2014 17:06:28 GMT -5
Seems I missed that last update Bill!! Sorry 'bout that!! Nicely done!! Great pre-shade and the camo is sweet! Looking forward to the wash!!  |
|
|
|
Post by wbill76 on Jul 24, 2014 17:47:04 GMT -5
Elco, the weathering for this one requires a little different mindset since the colors are already so light...have to give it some careful thought but the wheels are already turning.  T T, glad you got caught up!  The pre-shade did the trick nicely...I tend to not use that technique when a camo pattern is involved but since the colors here are so light, it helps add just a little more depth at least. 
|
|
|
|
Post by richardcraig-Email Not Valid on Jul 25, 2014 9:12:57 GMT -5
Great job on the cammo scheme ... I have to wonder if all F8s were painted in the African scheme or were there some painted gray first and just some 8020 added over it to break up the gray... I know I have seen the earlier F with the grey base coat .. 1942 is a weird time for german cammo colors ..Just thinking and scheming out loud..
Rick
|
|
|
|
Post by wbill76 on Jul 25, 2014 11:20:07 GMT -5
Great job on the cammo scheme ... I have to wonder if all F8s were painted in the African scheme or were there some painted gray first and just some 8020 added over it to break up the gray... I know I have seen the earlier F with the grey base coat .. 1942 is a weird time for german cammo colors ..Just thinking and scheming out loud.. Rick 1942 can be an unusual time depending on the vehicles, the theater, and the time in question. F/8s were produced for only a limited time, Sept-Dec 1942 for example and all would've been delivered from the factory in panzer gray. Tropen schemes weren't applied at the factories but instead were added at the delivery depots in Italy (for vehicles destined for N. Africa) or elsewhere. There are cases of vehicles originally intended for Tropen areas that were diverted to the Eastern Front for example as well as vehicles in southern Russia that qualified for use of the Tropen scheme based on the unit commander's discretion...and that, in turn, creates a lot of interesting results that we've seen pop up in different photographic sources over the years!  F/8s continued to serve of course after the switchover to Dunkelgelb and would've been repainted in the field accordingly...so the whole range of possibilities exists depending. 250 F/8s were produced but only 6 were ordered to N. Africa (4 made it, the other two were lost when their transport was sunk en route in the Med), so my choice of subject is a pretty rare beast as a result. |
|
|
|
Post by richardcraig-Email Not Valid on Jul 25, 2014 15:37:35 GMT -5
Hi Bill ... That's what I thought but I have read that they now think many vehicles were painted directly in the desert colors at the factory and no longer had the grey base coat.. Some say that no PanzerIV F2 and Gs were ever painted grey but all came out in the desert colors until the change over in 43 . I had an F2 on my desk and was hoping to chip away at the desert scheme but have had my doubts raised as to the grey under the cammo colors.. I'm so confused!! (well that's normal for me but...)
|
|
DennisM
Full Member
  
Member since: January 2012
Posts: 214
Jan 24, 2012 8:18:54 GMT -5
Jan 24, 2012 8:18:54 GMT -5
|
Post by DennisM on Jul 25, 2014 15:43:51 GMT -5
I have to say that your pictures are awesome. What do you use for a camera setup?
Oh yeah the Stug looks great too!
|
|
|
|
Post by wbill76 on Jul 25, 2014 16:49:30 GMT -5
Hi Bill ... That's what I thought but I have read that they now think many vehicles were painted directly in the desert colors at the factory and no longer had the grey base coat.. Some say that no PanzerIV F2 and Gs were ever painted grey but all came out in the desert colors until the change over in 43 . I had an F2 on my desk and was hoping to chip away at the desert scheme but have had my doubts raised as to the grey under the cammo colors.. I'm so confused!! (well that's normal for me but...) That's a pretty startling claim to make regarding Pz IVs...especially given the number of photos out there of G's in particular clearly showing pz gray under white wash.  If I've learned one thing when it comes to discussing German armor, it's 'never say never' in terms of finishes and vehicles!  Dennis Dennis, thanks as well! I use a Canon Rebel T1I on a tripod fitted with a macro lens and shoot in a standard photo light tent with four positionable light sources (desk lamps with flexible necks) as my normal rig. Here's a photo to show what I mean: 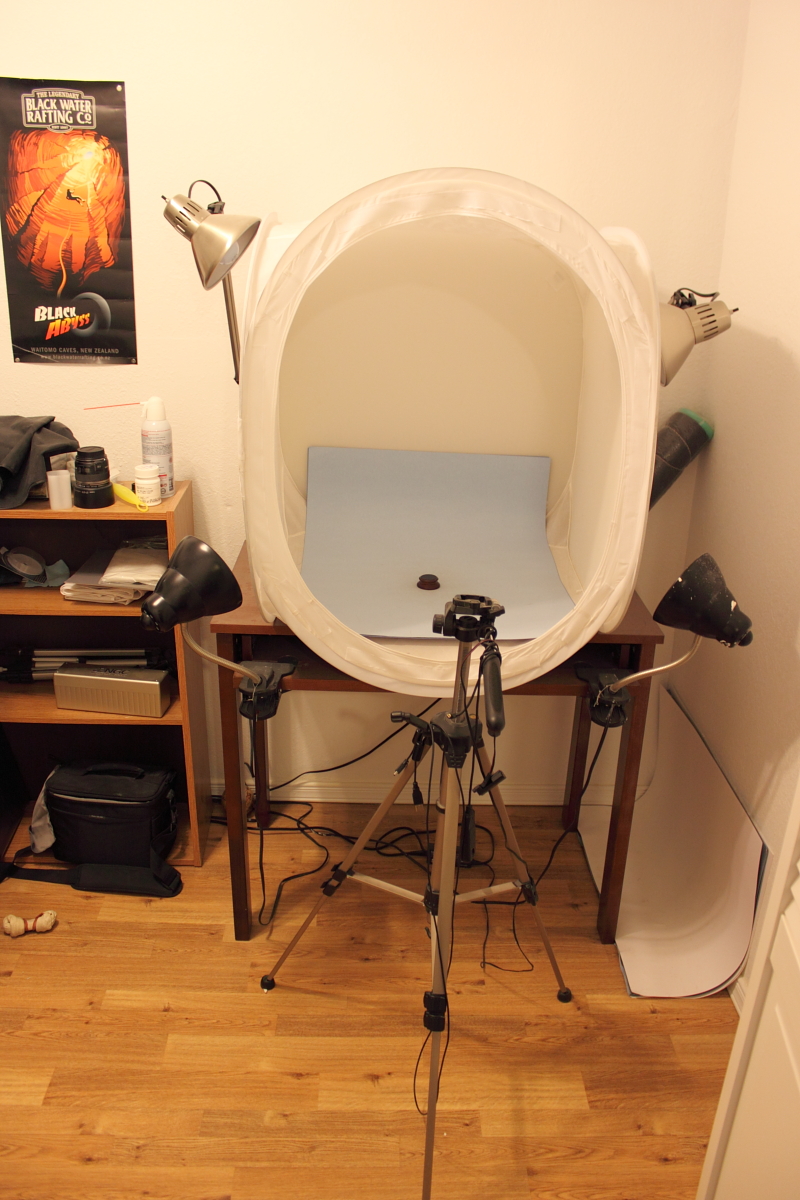 |
|
|
|
Post by wbill76 on Jul 26, 2014 15:36:35 GMT -5
Managed to get all the on-board equipment squared away over a couple of sessions of hand detailing for the various parts. For metal portions, I used a combination of MM non-buffing Metalizer Gunmetal and a light dry-brushing of MM enamel Steel. For the wood portions, I used a base of 50/50 Dunkelgelb/Light Gray followed by a thin wash of MM enamel Leather and some burnt umber artist pastels to provide some variation. I also opted to detail the fire extinguisher and jack in panzer gray to add a little color in those areas on the fenders as well. All the tool clamps were detailed with their necessary colors to match the camo scheme depending on where they installed on the vehicle. Then it was time to fit it all in place along with the spare road wheels on the engine deck. The tool arrangement on the right fender is very tight and it's critically important that the jack be positioned just right in relation to the block and S-hooks in particular, so the careful work done earlier in test fitting paid off. 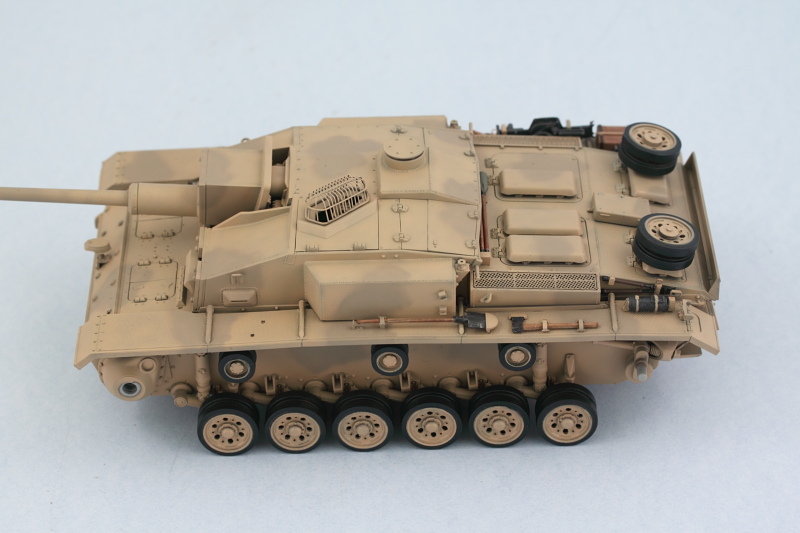 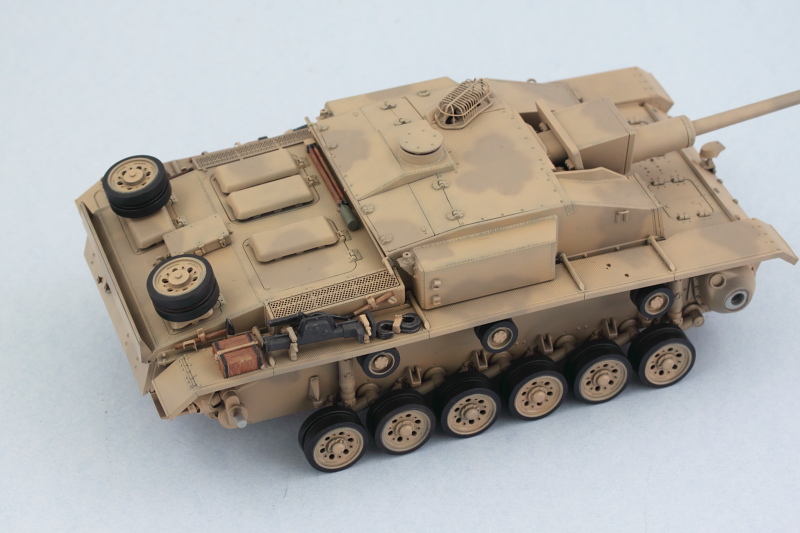 Next up will be paying some attention to the lower hull and suspension as a 'pre weathering' step and getting the tracks ready for paint. |
|
|
|
Post by Leon on Jul 26, 2014 15:57:10 GMT -5
Looking really good Bill.Nice work on the tools.  |
|
|
|
Post by wbill76 on Jul 26, 2014 16:16:13 GMT -5
Thanks Leon!  |
|
Hinksy
Full Member
  
Member since: June 2012
THE ENGLISH LIONHEART - HINKSY!
Posts: 1,016
Jun 22, 2012 16:46:21 GMT -5
Jun 22, 2012 16:46:21 GMT -5
|
Post by Hinksy on Jul 27, 2014 7:50:59 GMT -5
Hey Bill, Looking sweet! I wish I'd left the Casemate roof off my build now as getting that damn gun assembly to fit nearly cost me my sanity  Lovely work buddy - keep it up! Ben  |
|
|
|
Post by wbill76 on Jul 27, 2014 15:41:03 GMT -5
Hey Bill, Looking sweet! I wish I'd left the Casemate roof off my build now as getting that damn gun assembly to fit nearly cost me my sanity  Lovely work buddy - keep it up! Ben  I hear you there Ben! Dragon chose an 'interesting' way to get all of the casemate parts together. The key part is that you managed it!  |
|
DeafStuG
Full Member
  
Member since: May 2013
..
Posts: 1,283 
|
Post by DeafStuG on Jul 27, 2014 18:06:08 GMT -5
Good Job and very neat work.
|
|
|
|
Post by wbill76 on Jul 28, 2014 12:44:09 GMT -5
Thanks Jeremy! Getting one step closer to the finish line with this one.  |
|
|
|
Post by wbill76 on Jul 28, 2014 19:56:16 GMT -5
Worked on the tracks and suspension a bit in preparation for the weathering stages later on. I created some scuffing/chipping by stippling some Panzer Schwarzgrau on the hull and sprocket and idler. The contact surfaces on the idler and the sprocket teeth were treated to some non-buffing Metalizer Steel followed by some dry-brushed Burnt Umber to create their look. A test fit with the MK runs showed that 93 links per side on both side did the trick just right for sag. 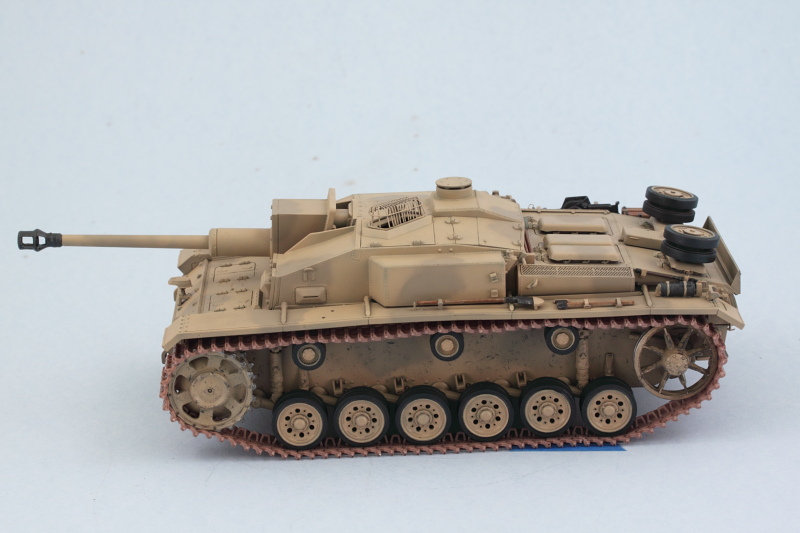 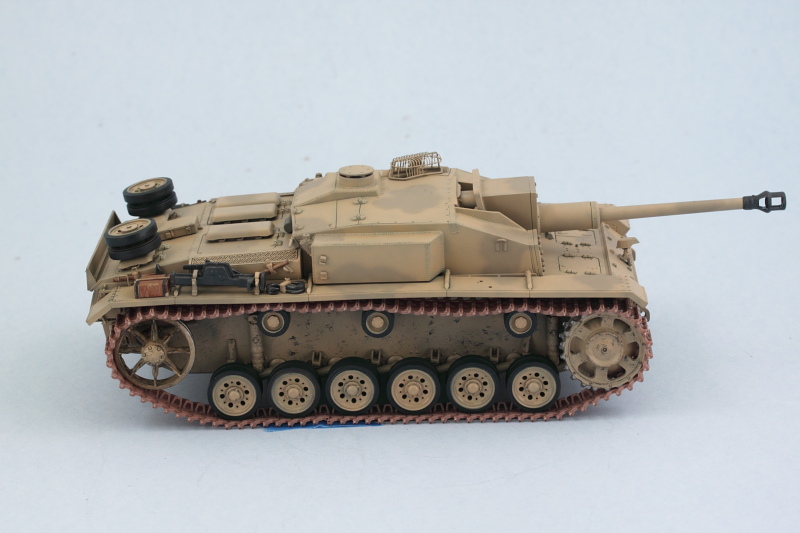 I also used a 10/0 pointed brush to paint the gunner's sight with some MM non-buffing metalizer Gunmetal through the birdcage, then touched up the exterior of the cage so it once more matched the hull. Laid down a sealing coat of acrylic Future floor polish, let that air dry for about an hour, then added the simple vehicle markings. The reference photo showed an 'A' on the rear hull plate, so I added that by cutting one off the kit-supplied 'name' decals as an added touch. 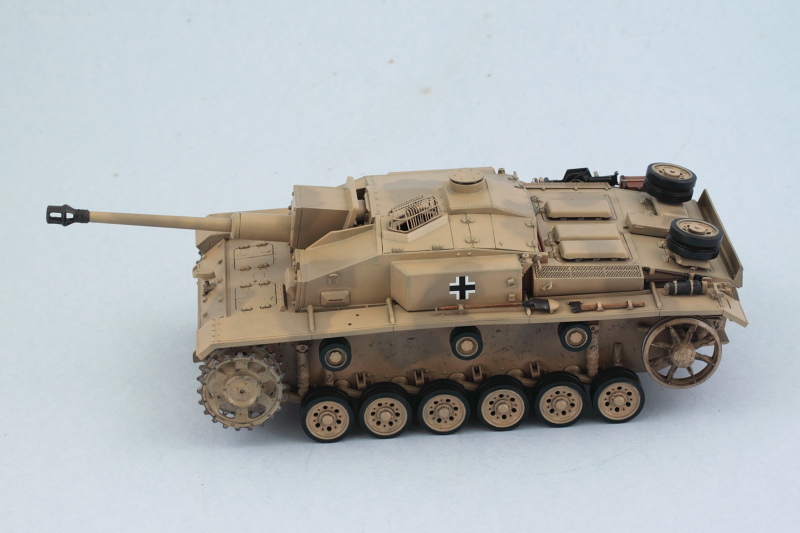 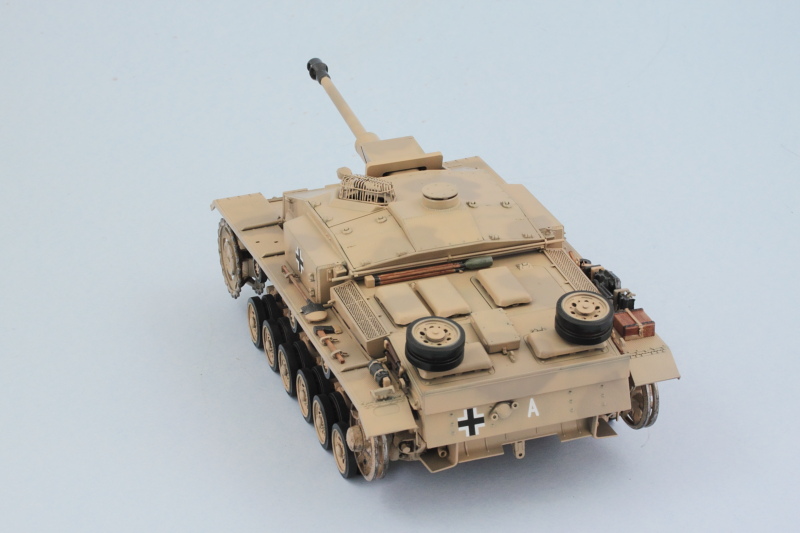 Applied a 2nd coat of Future over the decals after they had thoroughly set to seal them in, will let that cure for a good 24 hours before starting in on the filters and weathering. |
|
|
|
Post by TRM on Jul 28, 2014 20:49:37 GMT -5
Oh is this looking really nice Bill!! Those filters and washes are going to just bring everything out nicely!! Always a treat to watch you work my friend!!
|
|
|
|
Post by wbill76 on Jul 29, 2014 13:21:20 GMT -5
Thanks T! Moment of truth has arrived in terms of making sure that camo scheme doesn't totally disappear in the weathering process.  |
|
|
|
Post by wbill76 on Jul 29, 2014 16:38:44 GMT -5
Today's efforts took a little bit of a detour...I had planned to start on the filters and weathering but when I started in on the front left fender, the paint started to lift...so that means I either a) the Future didn't fully cure since we've had some high humidity due to some rain storms or b) I didn't get it on solid enough around the raised pattern or some combination of the two! So after a momentary panic, the colors were re-sprayed over the affected area and it will get some time to fully cure for sure before work continues. So the detour instead led me to work on the tracks. These were airbrushed with MM Burnt Umber for their base coat, then heavily dry-brushed with MM Steel. Last but not least they got a wash of Raw Umber to prep them for later pigment weathering. 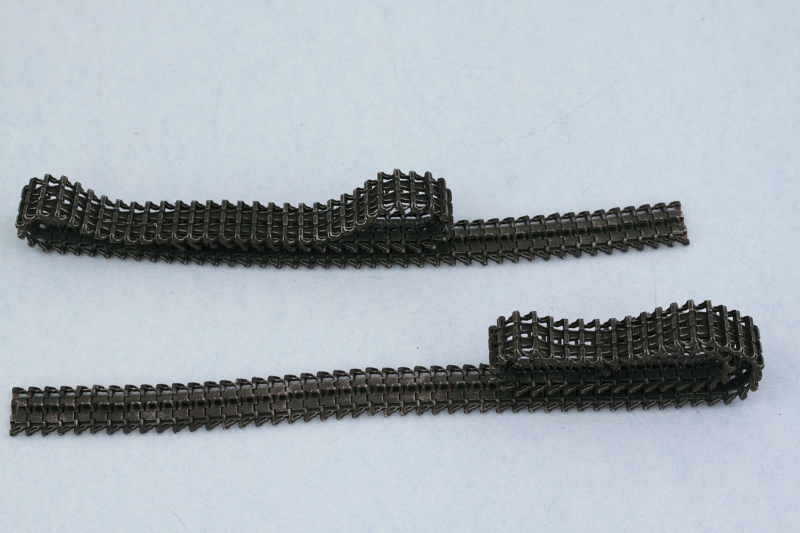 The spare track run for the rear tailgate was given the same treatment but also got some extra attention in the form of an MM Rust wash followed by various rust-colored artist pastels. The tailgate has a lip that runs around the top edge that was designed to match up with retaining pins that held the run in place. Dragon didn't include those in the kit, so I scratched up a pair using some thin sheet styrene and some 0.5mm diameter solder. 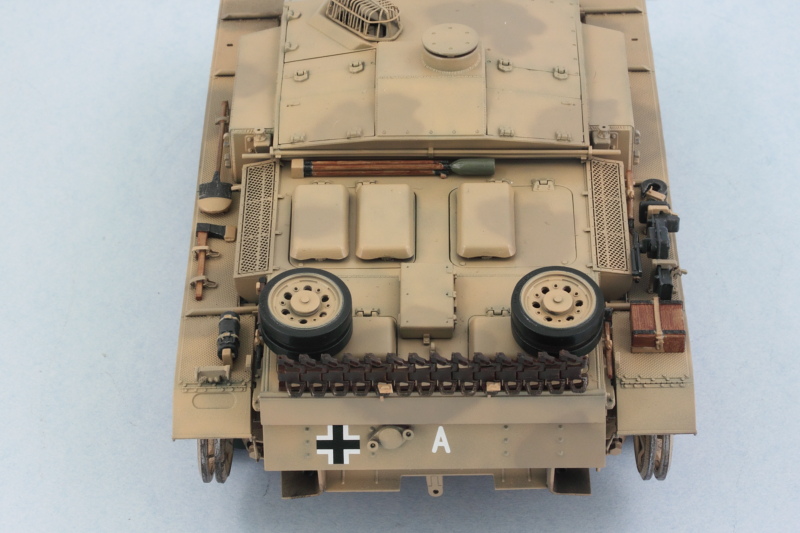 Fingers crossed that round 2 with the Future/weathering goes according to plan.  |
|
|
|
Post by Leon on Jul 29, 2014 18:50:02 GMT -5
Tracks are looking good Bill,hope your 2nd round with the Future goes ok.   |
|
DeafStuG
Full Member
  
Member since: May 2013
..
Posts: 1,283 
|
Post by DeafStuG on Jul 29, 2014 19:04:05 GMT -5
Looking good and nice detail at rear.
|
|
|
|
Post by wbill76 on Jul 29, 2014 19:37:45 GMT -5
Thanks Leon! Fingers crossed!  Thanks as well Jeremy, very close to the finish line now with this one. |
|
|
|
Post by wbill76 on Jul 30, 2014 17:40:29 GMT -5
All the stars aligned today so I was able to start in on the weathering. First step was an overall wash of thinned MM enamel Panzer Schwarzgrau. Normally I would use Raw Umber in this step but since the colors are so light to begin with, I used the gray instead to avoid overpowering the scheme. 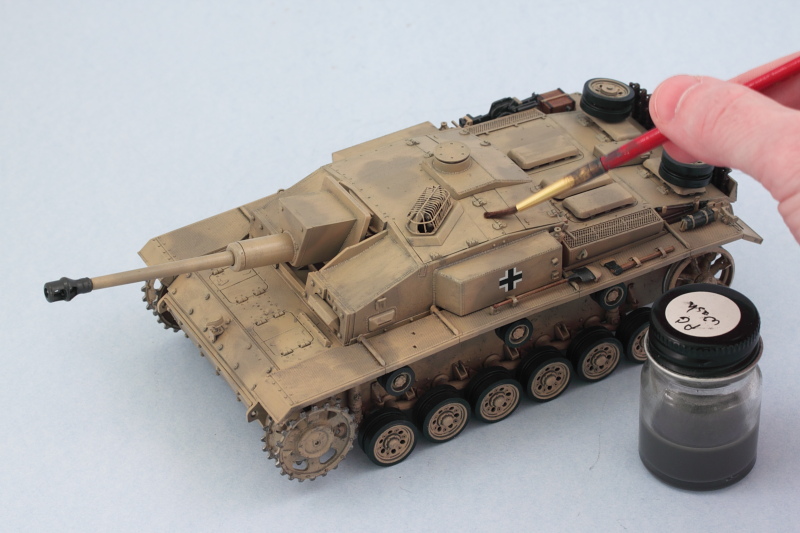 Next came the dot filters. I used Raw Sienna and Flat White and blended the dots using a square tip shader/blender brush lightly dampened with thinner. Since the enamel dots will dry quicker than oils, I worked in small sections at a time progressing from the front of the vehicle to the rear in stages. 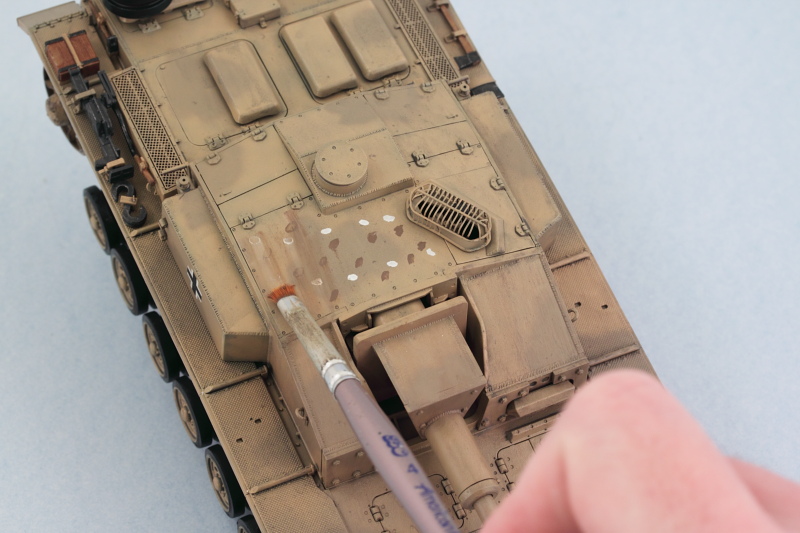 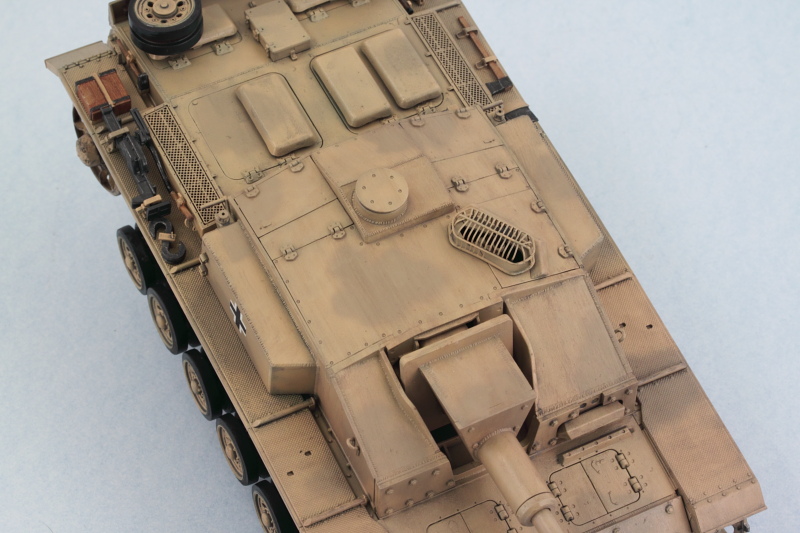 After a few hours, the whole vehicle from the fenders upward got the filter treatment. The lower hull and suspension received only the Panzer Schwarzgrau wash since the pigment weathering will deal with those areas later. 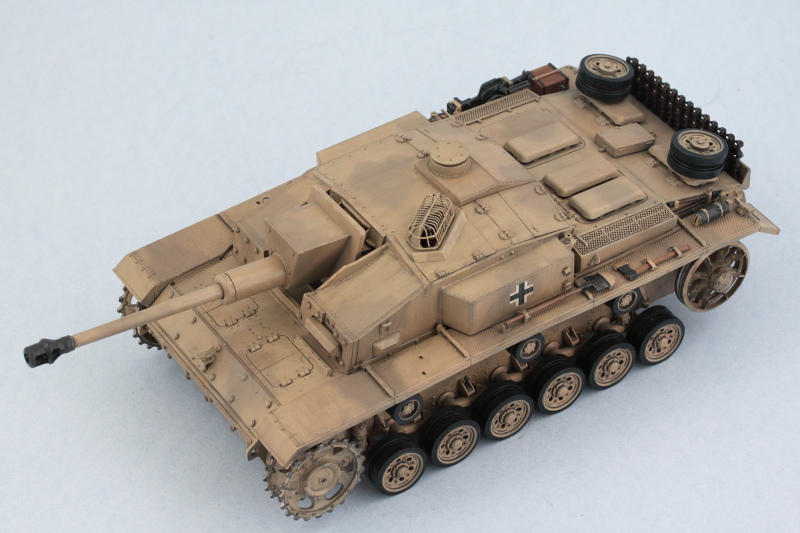 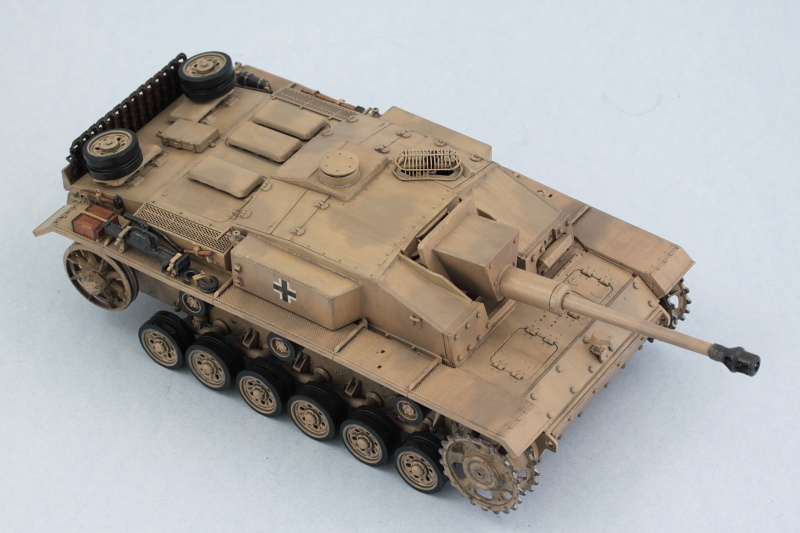 Pin wash will come next to help pop out the details a bit more. |
|
|
|
Post by Teabone on Jul 30, 2014 18:21:58 GMT -5
Looking good as always Bill you are another of those good painter guys. I have the same observation about oil and the slow drying time. I have always been afraid of the enamels drying and not blending well before I'm finished, do you always use enamel?
Bones
|
|
detailfreak
Full Member
  
Member since: July 2012
Crazy Swede
Posts: 371
Jul 28, 2012 15:12:35 GMT -5
Jul 28, 2012 15:12:35 GMT -5
|
Post by detailfreak on Jul 30, 2014 23:54:24 GMT -5
Hi Bill ... That's what I thought but I have read that they now think many vehicles were painted directly in the desert colors at the factory and no longer had the grey base coat.. Some say that no PanzerIV F2 and Gs were ever painted grey but all came out in the desert colors until the change over in 43 . I had an F2 on my desk and was hoping to chip away at the desert scheme but have had my doubts raised as to the grey under the cammo colors.. I'm so confused!! (well that's normal for me but...) That's a pretty startling claim to make regarding Pz IVs...especially given the number of photos out there of G's in particular clearly showing pz gray under white wash.  If I've learned one thing when it comes to discussing German armor, it's 'never say never' in terms of finishes and vehicles!  Dennis Dennis, thanks as well! I use a Canon Rebel T1I on a tripod fitted with a macro lens and shoot in a standard photo light tent with four positionable light sources (desk lamps with flexible necks) as my normal rig. Here's a photo to show what I mean:  geez thought I was stareing down a damn crapper there fer a split second |
|
406 Silverado
Global Administrator     
Member since: November 2011
Posts: 10,213
Member is Online
MSC Staff
|
Post by 406 Silverado on Jul 31, 2014 5:33:21 GMT -5
Been following this build here and on FB and as always, very nice building and painting. Good the see the weathering started. Keep her going Bill.
|
|
|
|
Post by TRM on Jul 31, 2014 10:25:46 GMT -5
Love this part Bill!! Weathering is the bestest best FUN!!! Looking great!
|
|