|
|
Post by wbill76 on Sept 22, 2014 18:04:33 GMT -5
Looks like a pretty productive session there T! Nice work with the tracks in particular.
|
|
|
|
Post by Leon on Sept 22, 2014 18:38:08 GMT -5
Only an hour and a half to do both runs of tracks? That's not too bad at all. Todd!!!!Dupes took the words right out of my mouth.Tracks look great.   |
|
|
|
Post by eastrock on Sept 28, 2014 2:23:20 GMT -5
agree with the tracks!!! and Bradley progress looks promising  Cheers!!! |
|
bigjohn
Reviews member    
Member since: December 2011
John Hale
Posts: 3,438
Dec 21, 2011 2:17:45 GMT -5
Dec 21, 2011 2:17:45 GMT -5
|
Post by bigjohn on Sept 28, 2014 7:18:53 GMT -5
|
|
|
|
Post by deafpanzer on Sept 29, 2014 13:23:15 GMT -5
Mr T even allowed me to "fondle" his Bradley when I crashed his place last week! I thought it looked great and I might get that kit if I ever am in mood to build a Bradley...
|
|
|
|
Post by TRM on Oct 3, 2014 22:29:41 GMT -5
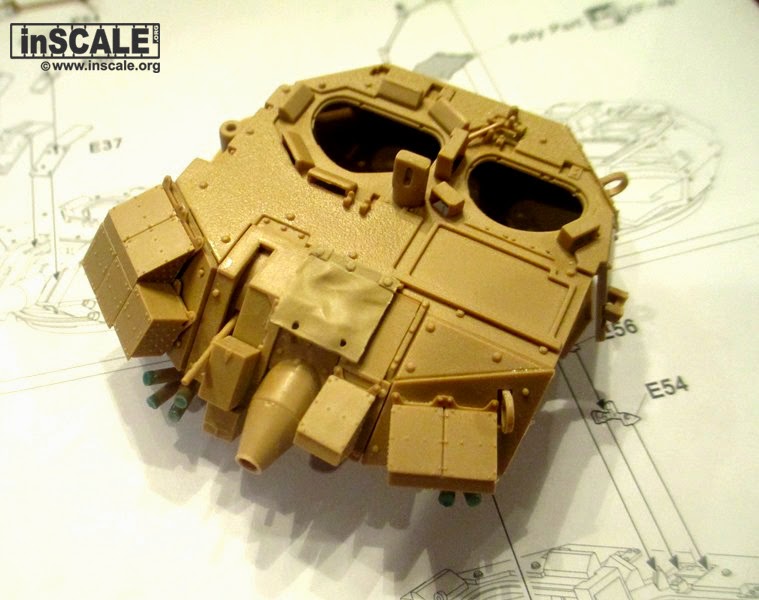
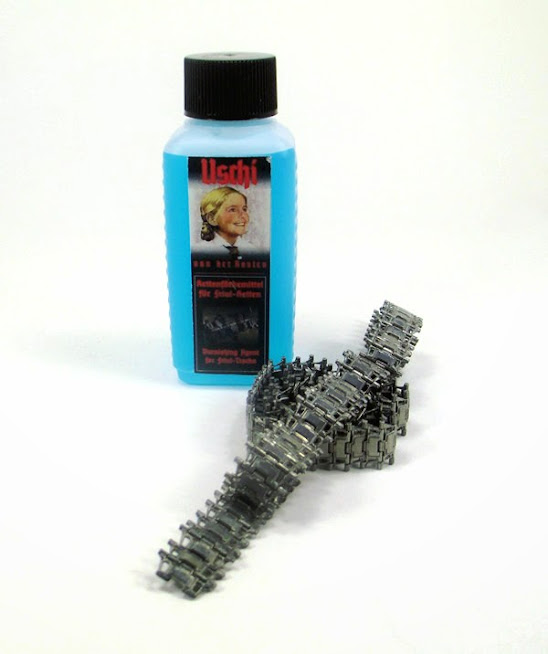
Thanks fellas, I really appreciate you all tuning in on this one and all the kind words! Well its time for a little update!! I had a little downtime due to show last week but I managed to pick up the pace a bit and move this along. The rear drop gate door went together well. This door, like all of the hatches, can me placed open or closed; in fact in most cases left operational with a little care. I would hope that at some point Orochi might offer a full interior judging from the inside of all of the doors and hatches have interior detailing.   The ERA brackets needed some clean up due to the attachment points.      The turret construction went together rather easy. There was only two areas that I ran into an issue. The first is the dust flap above the mantlet. This is a rubberized poly piece and nicely rendered;however, do not use too much thin cement...LOL!! I did and it melted....  As a result of melting the flap, I whipped one up from a little bit of foil.  The second issue was there seems to be one small piece missing from the kit. This is located on the right side of the turret basket. This is barely seen as the panoramic sight mount cover most of the opening. This was easily dealt with by adding a little bit of styrene sheet.   I decided to break up the ERA's on one side. This single block will be offset a bit from the others.  So with that, things are ready to go to the booth!  I have left a couple pieces off to make the painting a little easier in the end game.   For the keen eyed, the blue caps on the end of the smoke grenade tubes is an application of Vallejo's masking. These tubes are sometimes open and sometime with black rubber caps installed. I figured the masking might make a quick and dirty addition to replicate the rubber caps.   So this one is sitting in front of the booth waiting some priming at the moment. I also picked up some Uschi burnishing fluid to treat the tracks to a little blackening.  This is slated to happen as early as tomorrow. Thanks for taking the time to swing by!! |
|
Deleted
Member since: January 1970
Posts: 0
Nov 26, 2024 13:54:50 GMT -5
Nov 26, 2024 13:54:50 GMT -5
|
Post by Deleted on Oct 3, 2014 23:09:34 GMT -5
Ohhh that built up very nicely Todd . Clean and crisp build . Did you make your own antenna bases ? Meng has a new M3A3 interior kit announced but no idea if it could fit into the Orochi kit .
|
|
|
|
Post by imatanker on Oct 4, 2014 3:02:22 GMT -5
Great update Bud. That looks awesome. I'll be interested in how that burnishing fluid works.
|
|
|
|
Post by Leon on Oct 4, 2014 4:13:41 GMT -5
Really making great progress Todd.Nice fix on the dust flap.  |
|
|
|
Post by TRM on Oct 4, 2014 4:49:39 GMT -5
Thanks Carl! I butchered the Voyager US Antenna Set just using the springs and the top part. Seemed to work out okay. Better than the molded parts as they are real springs. Worth the effort as the - antenna set was under $5 from Hobby-Space.
Thanks Jeff! A little SBS is planned on the fluid to help out the cause! Should have this up soon my friend!!
Thanks Leon! Kind of funny actually. The piece melted faster than acetone on a styrene cup!!
|
|
|
|
Post by bullardino on Oct 4, 2014 12:34:45 GMT -5
I was rather sure I had seen this one. Great job so far, I'm curious to see how Uschi's stuff works.
|
|
|
|
Post by TRM on Oct 4, 2014 13:26:12 GMT -5
Thanks Luigi!! Happy Birthday ...again!! Heading down in a few to get started on the tracks...will update when I get them done!!  |
|
|
|
Post by TRM on Oct 4, 2014 21:50:51 GMT -5
How the tracks are blackened.... Hope it helps a bit!  |
|
bbrowniii
Full Member
  
Member since: March 2012
If you are not part of the solution, you are part of the precipitate.
Posts: 1,239
Mar 25, 2012 22:08:04 GMT -5
Mar 25, 2012 22:08:04 GMT -5
|
Post by bbrowniii on Oct 4, 2014 22:35:42 GMT -5
Well this is just cool! Nicely done T!
|
|
Deleted
Member since: January 1970
Posts: 0
Nov 26, 2024 13:54:50 GMT -5
Nov 26, 2024 13:54:50 GMT -5
|
Post by Deleted on Oct 5, 2014 1:37:28 GMT -5
Oh that was a cool video Todd !  |
|
|
|
Post by eastrock on Oct 5, 2014 1:38:11 GMT -5
Progress looks great, with a keen eye for details nothing escapes a modeler  |
|
|
|
Post by imatanker on Oct 5, 2014 7:13:33 GMT -5
Is dem yo fat fingers in that vid T?  Stuff looks like it works pretty well. Don't like the Acetone part though. Can anything else be used to clean the tracks prior to dunkin' them? Great vid Bud. Awesome music too  |
|
|
|
Post by TRM on Oct 5, 2014 7:43:37 GMT -5
Thanks fellas! Jeff, Yes....and yes! While I can't control the size of my hands, I can control what is or is not used to clean the tracks. The tracks can be cleaned with soap and water if you are looking for the most noninvasive method. The tracks will need to be completely dry and free from any detergent as that will act as a neutralizer to the oxidizing agent in the burnishing fluid. Denatured alcohol can be used as well or anything that will remove oils from fingerprints, dirt and even mold releases left behind form the casting process. I use Acetone as it cleans quickly and thoroughly as well as dries extremely fast. Plenty of ventilation is needed...but then again, the fumes dissipates rather quickly as well. 10 min. out on the porch and the job is done. Every one has a different level of sensitivity and/or tolerances when it comes to fumes. Mine is quite high typically. It is best to err on the side of caution and have proper ventilation or personal protection equipment (PPE) Here is the kicker....Where I can sit in a room of solvent based liquid applied roofing material while someone would using a can of Rustoleum and holding a rag wet with lacquer thinner under my nose and be unaffected...(not that I actually would stay in the room btw) I can't stand in a Yankee Candle Shop for more than 3.5 minutes...this is the length I can actually hold my breath before passing out. How do I know this...I do this all the time picking up gift cards for the wife.  |
|
|
|
Post by imatanker on Oct 5, 2014 8:36:21 GMT -5
HaHaHaHa. I know exactly what you're saying about the "Candle Store". I get Her gift cards online.  Holy crap, you can hold your breath 3.5 minutes? I'd be out cold after a minute.  Thanks for the info Pal. Good to know that something else can be used for those of us with a more delicate constitution.  |
|
|
|
Post by TRM on Oct 5, 2014 9:06:08 GMT -5
Always a way to skin that proverbial cat my friend!! I do feel the Acetone cleans a bit deeper but again, this comes down to being safe and comfortable with what you want to use. As for the holding the breath part...LOL..many years of practice...and like the big fingers...big lungs I guess. Of course as of late I have resorted to the online mode of purchase....but no one can ever be too prepared!!  |
|
|
|
Post by deafpanzer on Oct 5, 2014 20:45:10 GMT -5
Catching up... I was very fortunate to fondle it FEW times if I am correct. Jeez, I have to add it to my wish list. You are not helping me at all!! Looking SHARP... can't wait to see it painted soon!
|
|
|
|
Post by TRM on Oct 5, 2014 20:48:36 GMT -5
Thanks Andy!! It was a pleasure to let you Fondle it while you were here!!  The model that is!! LOL!! |
|
|
|
Post by dupes on Oct 5, 2014 21:22:59 GMT -5
Paint! Paint! Paint! And don't forget to clean your airbrush after. Heh.  |
|
|
|
Post by TRM on Oct 5, 2014 21:26:55 GMT -5
Hitting that soon Dupes...LOL!! I am fairly certain it was the heat form the projector...never seen 3 AB's not work before...2 of which were Kromes!!  |
|
garywintin.
Junior Member
 
Member since: April 2014
Posts: 50 
|
Post by garywintin. on Oct 5, 2014 21:57:38 GMT -5
This is a full kit? I thought it was some kind of just add one parts for the MENG upcoming M3A3
|
|
|
|
Post by TRM on Oct 5, 2014 22:24:06 GMT -5
Yup...a kit on its own! Here is my review of the kit: inscale.org/public/?p=10517
|
|
|
|
Post by dupes on Oct 6, 2014 8:54:47 GMT -5
Hitting that soon Dupes...LOL!! I am fairly certain it was the heat form the projector...never seen 3 AB's not work before...2 of which were Kromes!!  Blame the projector? Sure, I guess you could go that route...  |
|
|
|
Post by TRM on Oct 6, 2014 9:00:19 GMT -5
Hitting that soon Dupes...LOL!! I am fairly certain it was the heat form the projector...never seen 3 AB's not work before...2 of which were Kromes!!  Blame the projector? Sure, I guess you could go that route...  LOL...sounds crazy but that things was blowing some serious heat right onto that work surface...The AB's worked like a charm before and after!! Oh well, next time I won't sit in front of that thing!!  |
|
|
|
Post by dupes on Oct 6, 2014 9:02:26 GMT -5
Whatever story makes you feel better.   |
|
|
|
Post by TRM on Oct 6, 2014 9:08:17 GMT -5
 I needed to try and keep your attention any way I could!! LOL!!!! |
|