|
|
Post by wbill76 on Oct 6, 2014 15:15:07 GMT -5
Man, so many parts for the turret but it looks perfect! Perfect fitting! Thanks Andy! I'm really impressed with the way Meng designed all of these parts to go together. When I showed the turret to my wife she didn't believe it was made out of separate pars until I showed her the instruction diagram!  |
|
|
|
Post by wbill76 on Oct 8, 2014 18:59:59 GMT -5
Made some more progress on the little FT-17, this time in the suspension department. I decided to build up the suspension units one side at a time since the elements that you construct in Step 8 are 'handed' between the left and right side and I didn't want to cause any confusion there. I started with the A and B components needed for the left side and also assembled the return roller frame. Lots of care is needed when gluing the frame halves together so that the rollers remain free to rotate. Adding the metal pin and frame supports at the front is also a little challenging but works out in the end with a little patience. When assembling the road wheel elements, I found it easiest to assemble the frame halves and wheels together first, then add the top support arm portion before the glue had set up. This way you could flex the tops open to accept the pins without having the whole thing come apart in the process. The biggest time-consuming element in this step is cleaning up the two sprue connection points per road wheel and return roller as they have very delicate rims that intersect with the connection points. 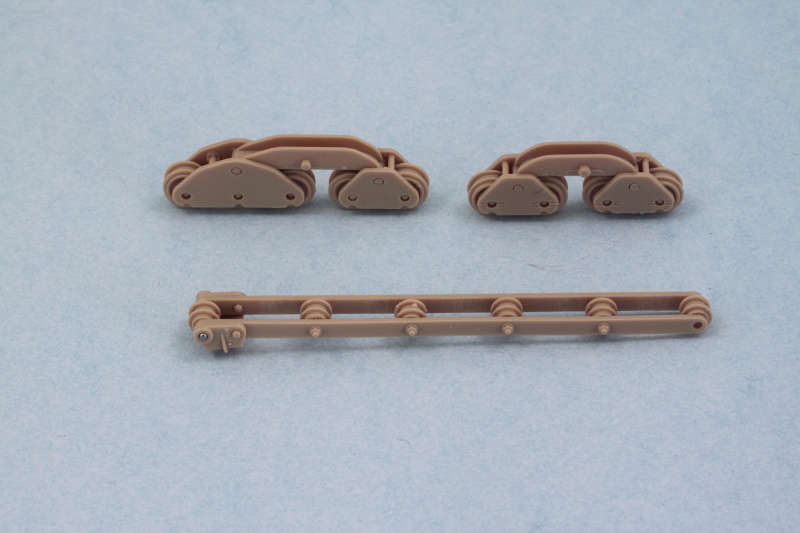 Step 9 assembles the full suspension unit using the components from the previous step. It's possible to assemble it and leave the suspension fully workable if you use the top part of the unit to help hold the sides together. Again, a very tricky assembly process that will leave you wishing you had another hand to help out but the end result produces a very nicely detailed assembly. Once the top and sides were firmly together, I added the support base for the return roller frame and used the kit-supplied steel spring and some CA glue to ensure it sat at the right height and angle to match up with the large idler. 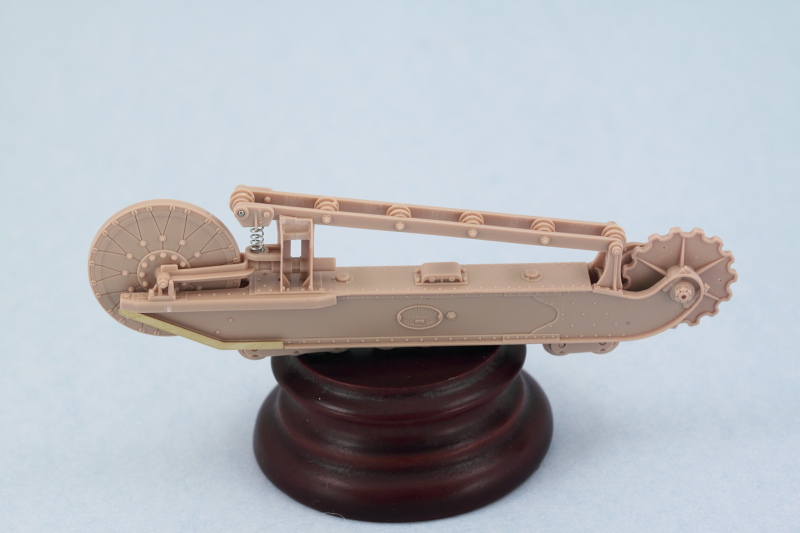 Once I'd figured out the little tricks and traps by doing the first unit, the second one for the right side took only half as long to pull it together. 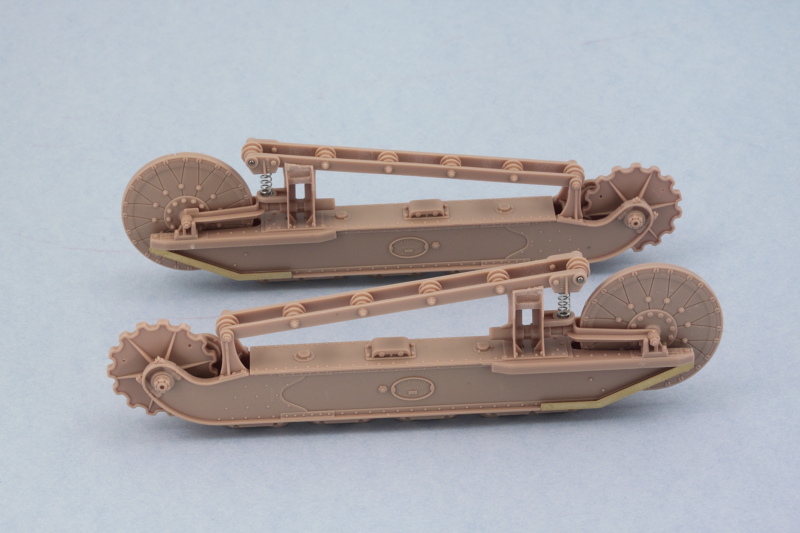 Given how complex this all is and how the suspension relates to the hull, I'm seriously considering leaving them separate for painting to make it easier to get everything covered and also make life simpler in terms of applying a camo pattern. Next up are the exterior details for the hull! |
|
|
|
Post by Leon on Oct 8, 2014 19:18:38 GMT -5
Nice work on the suspension Bill!!A lot of nice detail there.  |
|
Deleted
Member since: January 1970
Posts: 0
Nov 24, 2024 6:48:10 GMT -5
Nov 24, 2024 6:48:10 GMT -5
|
Post by Deleted on Oct 8, 2014 22:41:54 GMT -5
Very nice looking fit Bill .
|
|
|
|
Post by TRM on Oct 8, 2014 23:14:41 GMT -5
More fantastic work Bill!! Great looking lower end!! Worth every bit of the hassle getting it together!!  |
|
|
|
Post by wbill76 on Oct 9, 2014 12:01:58 GMT -5
Thanks Leon and Carl! Todd, Meng did a great job in the detail department. 45 parts per side for those suspension components will do that I guess!  |
|
|
|
Post by deafpanzer on Oct 9, 2014 15:29:28 GMT -5
WOW! They look great... especially the coiled springs! Did they come with the kit too? Bet you know how to speak Frenchy by now?  |
|
|
|
Post by wbill76 on Oct 9, 2014 15:34:30 GMT -5
WOW! They look great... especially the coiled springs! Did they come with the kit too? Bet you know how to speak Frenchy by now?  Bonjour mon ami!  Springs came with the kit, which I thought was really nice since trying to replicate those effectively in styrene would be a real pain. |
|
|
|
Post by deafpanzer on Oct 9, 2014 15:35:31 GMT -5
Wish all kits do this... molded or plastic springs always look nasty!
|
|
Prop Duster
Full Member
  
Member since: January 2013
just learned to spell CA. workin' on PE now.
Posts: 242
Jan 27, 2013 19:17:30 GMT -5
Jan 27, 2013 19:17:30 GMT -5
|
Post by Prop Duster on Oct 9, 2014 19:20:23 GMT -5
Been hidein' behind this wall just watchen  . Boy oh boy that looks like a humdinger of a model. Plus add'n in your skill and we got a winner |
|
|
|
Post by wbill76 on Oct 10, 2014 12:49:43 GMT -5
Thanks Steve! Should see some paint flying on this guy in the not too distant future.  |
|
|
|
Post by wbill76 on Oct 11, 2014 16:44:54 GMT -5
Returning to the hull details, I went all the way back to Step 3 and added the details required for the left side of the hull. The kit includes a metal strut and spring for the front part of the suspension and the key to getting this in at the right height is the spring itself and the 'cap' styrene part that sits on top, D11. D11 doesn't sit snugly on top of the strut, so I glued the strut and spring into the housing with CA first and then added D11 to the top after to ensure it lined up correctly with the suspension module and wouldn't cause any fit issues along the way. Tow hooks and large box and rack were also added to round things out. 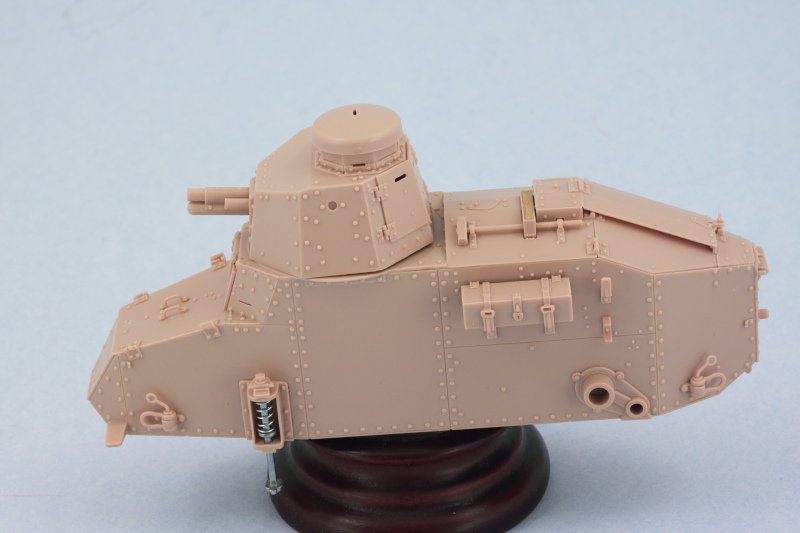 Process was repeated for the right side in Step 5 but I left off the exhaust muffler for the time being as that will be detailed and installed after painting. 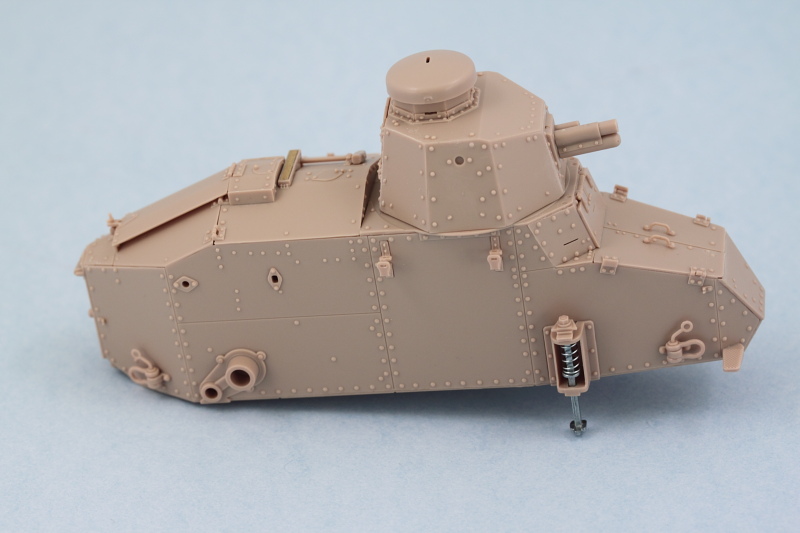 And just to be sure that 'stumpy' here would sit properly with the suspension modules in place, a dry-fit was in order! The test fit shows that when the time comes to glue the modules in place I'm going to have to be a little careful that they sit level as there's a slight tendency for the top to want to bow in slightly since there really isn't anything on the top side to prevent that by way of connection points. 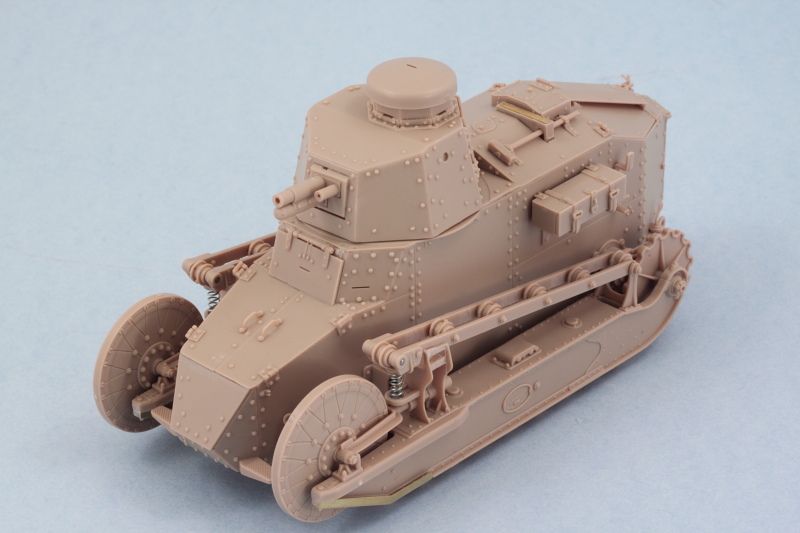 The next item of interest were the tracks which are dealt with in Step 12. The kit provides click-able individual tracks that will produce workable tracks of 32 links per side. I found in the assembly process though that I had to keep a sharp eye out for tiny amounts of flash around the hinge points as if those weren't caught the links would fit together almost rigidly or require too much force that could snap off the small pins. Fortunately the kit provides plenty of extra links so it wasn't a huge deal when a couple got sacrificed in this learning step. 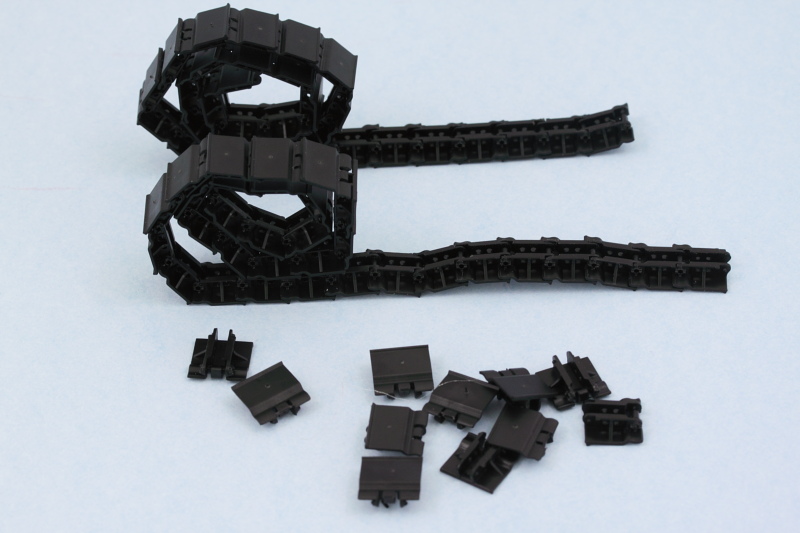 A quick test fit with the suspension modules showed everything playing nice and 32 links working out perfectly. Connecting up the ends of the runs once the tracks have been painted and weathered may be a little challenging...I may just remove one or both of the pins on those final links and just rely on gluing the links together to secure the runs, have to see when the time comes. 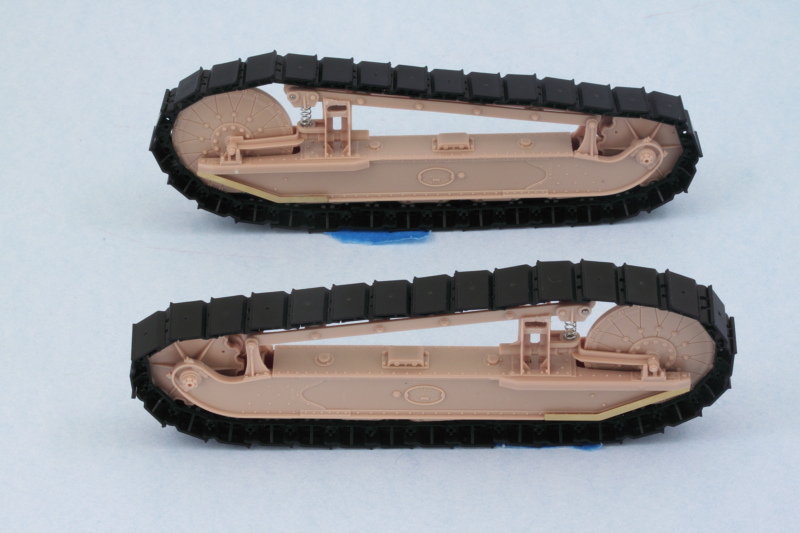 The last remaining area needing attention was the rear hull and the un-ditching tail covered in Step 11. I'm not 100% sure, but I think the PE placards (parts W5) should be placed only if you're doing the American WW1 version of this kit so be mindful of that as the instructions don't make any kind of distinction there. Since I am doing the American version, these were installed with Gator Grip glue so I could have some work time to get them properly positioned/straight relative to the areas they install into. The folded up tarp that installs over the X brace on the tail is left off for now and will be added after painting. 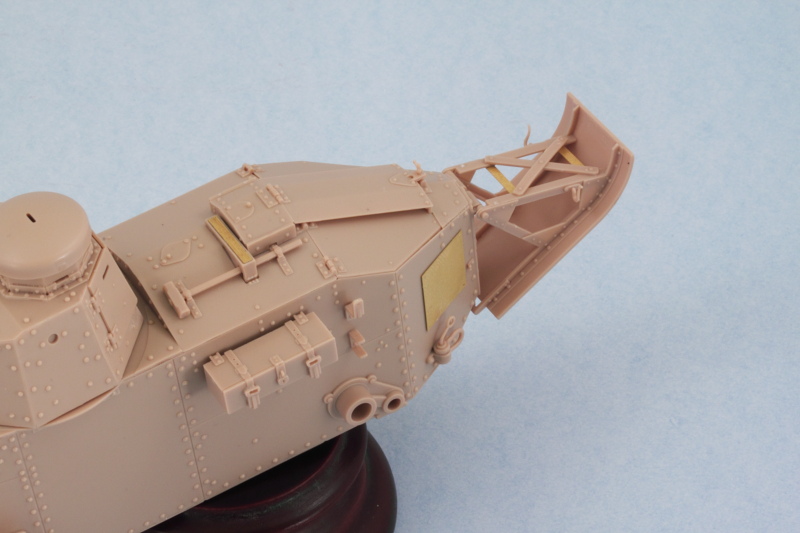 Just to satisfy my curiosity, I did a full mock-up with the suspension elements and tracks and I'm now 100% convinced that painting the suspension separately and installing after is the right way to go on this little guy. 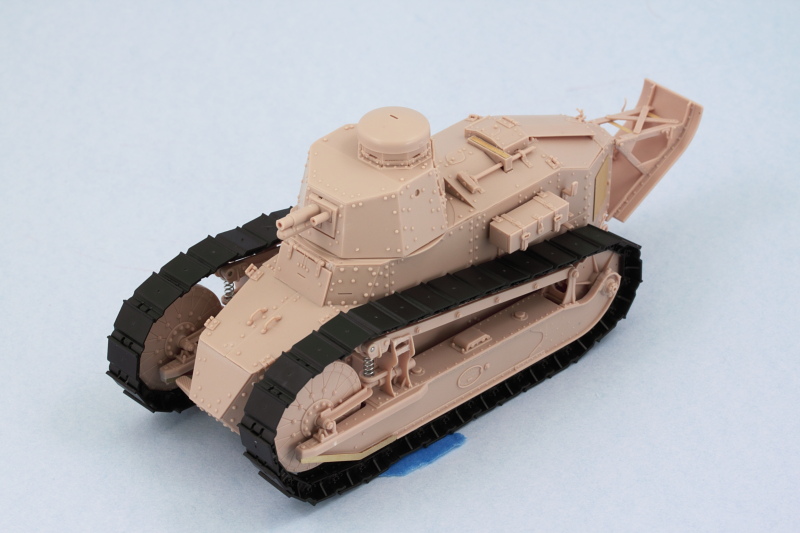 |
|
|
|
Post by Leon on Oct 11, 2014 17:01:04 GMT -5
Great progress today Bill!Everything is looking good.   |
|
|
|
Post by wbill76 on Oct 11, 2014 19:13:39 GMT -5
Thanks Leon! Actually starting to look like a tank as opposed to just an armored coffin!  |
|
|
|
Post by deafpanzer on Oct 11, 2014 21:42:58 GMT -5
Love the look of its tracks... you are so close!
|
|
bigjohn
Reviews member    
Member since: December 2011
John Hale
Posts: 3,438
Dec 21, 2011 2:17:45 GMT -5
Dec 21, 2011 2:17:45 GMT -5
|
Post by bigjohn on Oct 11, 2014 21:44:32 GMT -5
Sweet!!!
Looks like a very nice "little" kit!
|
|
|
|
Post by wbill76 on Oct 12, 2014 10:18:29 GMT -5
Andy, the tracks are a definite 'signature' feature of this vehicle, going to be fun painting and weathering them for sure. BJ, thanks as well buddy! It's little but with lots of surface area and rivets to play with even so! 
|
|
Prop Duster
Full Member
  
Member since: January 2013
just learned to spell CA. workin' on PE now.
Posts: 242
Jan 27, 2013 19:17:30 GMT -5
Jan 27, 2013 19:17:30 GMT -5
|
Post by Prop Duster on Oct 13, 2014 0:35:31 GMT -5
Looking real good, especially the mock up. say, is that blue coolant leaking out from under the track in the last photo?  ......never mind, I'll go be good now.
|
|
|
|
Post by bullardino on Oct 13, 2014 12:24:05 GMT -5
Progress looks great Bill.
The styrene looks a bit pinkish, am I right or are the pics that make it look so?
|
|
|
|
Post by wbill76 on Oct 13, 2014 17:23:56 GMT -5
Steve, yep, those folks at 3M need a stern talking to!  Thanks Lui! The styrene's actually a tan color. Reminds me of Tamiya stuff actually!
|
|
|
|
Post by wbill76 on Oct 15, 2014 16:29:25 GMT -5
I've started in on the painting process and the first order of business was laying down a primer coat of Testors Model Master enamel Italian Dark Brown via airbrush. 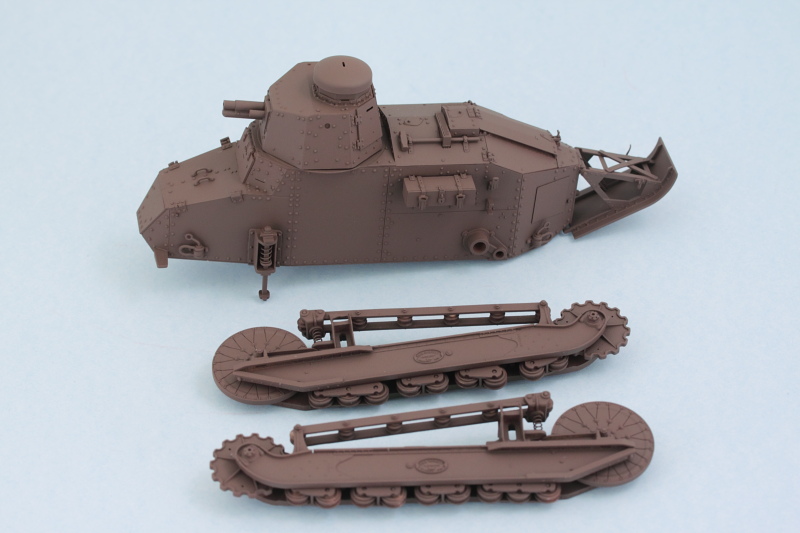 I let that set up overnight and then, since I'm applying a three tone camo and the yellow part of the pattern seems to be the most dominant, I applied the yellow portion as a base coat to work off of. I used a 50-50 mix of MM enamel Dunkelgelb/Light Gray as it will not doubt darken during the weathering process. 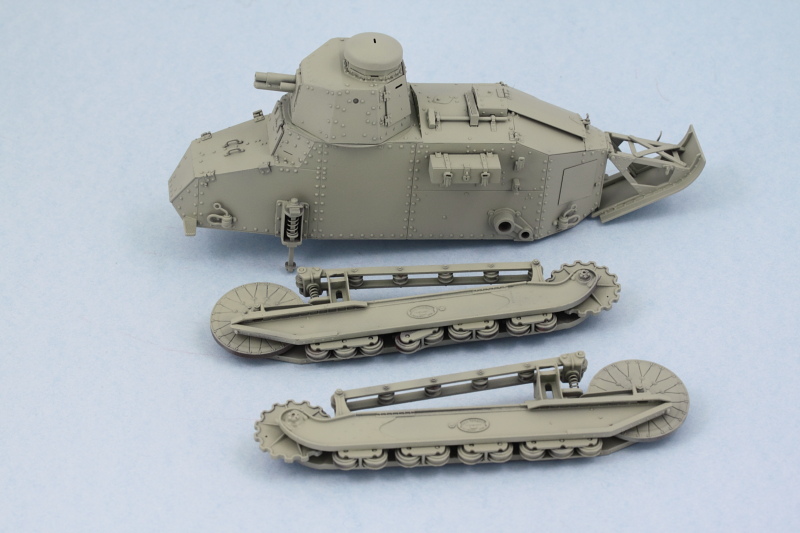 This will get the chance to set up just like the primer as I don't want to take any chances with paint lifting when I mask off the areas for the brown and green areas of the scheme. In the meantime, I decided to give the kit-included base a try. It assembles pretty easily and has a nice cross brace at the bottom that helps hold everything together and give it some rigidity. I did have to employ small amounts of putty in a couple of spots on some of the joins and of course sanding was called for to smooth everything down on all four sides but nothing major. 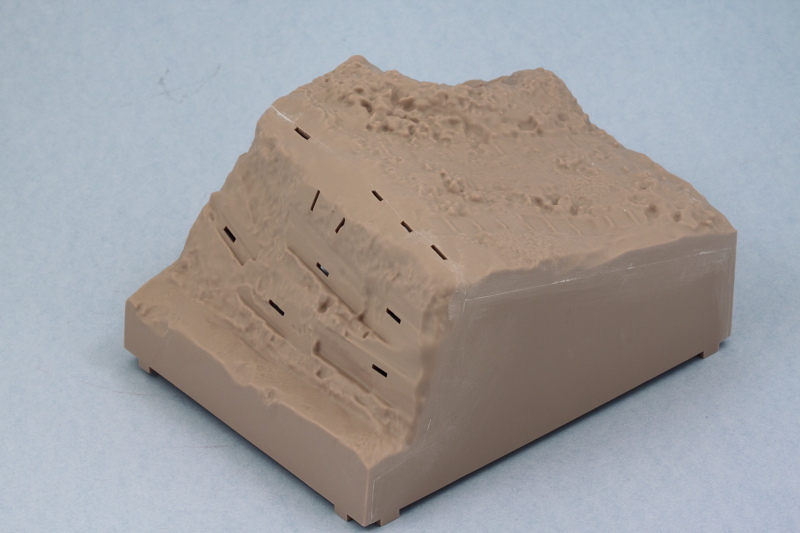 Since I had the airbrush out, I decided to also paint the base. A primer coat of Italian Dark Brown came first, then some highlights using MM enamel Afrikabraun, and an overall filter/mist coat of MM enamel Raw Sienna. It's a little hard for the camera to pick up all the subtleties but it produced a nice starting point to work from that will get further refinement with pigments and dry brushing later on. I will admit to a sudden craving for chocolate cake though...can't imagine why! 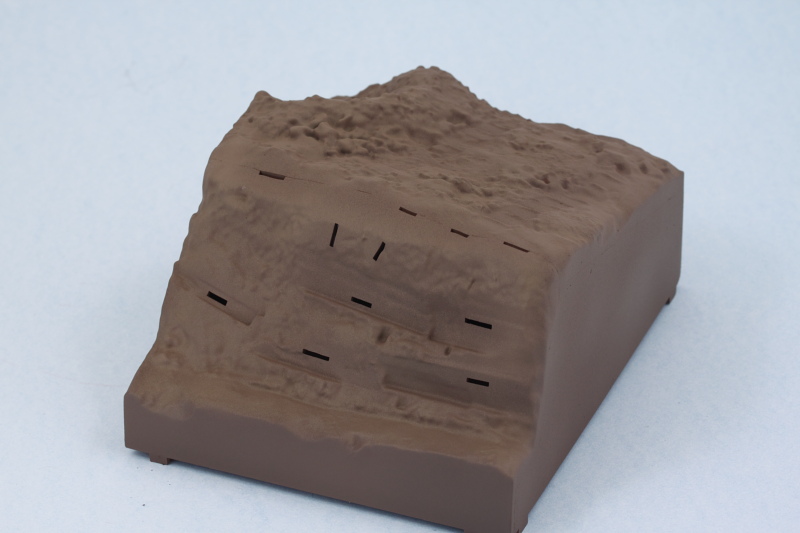 That's where things stand at the moment, next up of course will be getting that camo pattern on the vehicle and then finalizing the suspension installation. |
|
|
|
Post by deafpanzer on Oct 16, 2014 9:52:36 GMT -5
WOW! I didn't know the kit comes with a base too. LOL Excellent paint job!
|
|
|
|
Post by TRM on Oct 16, 2014 10:14:14 GMT -5
Some nice work as usual Bill!! Paint looks great to start with!! The base is a new one on me too!! Very interesting!!
|
|
|
|
Post by wbill76 on Oct 16, 2014 12:07:33 GMT -5
Thanks Andy and Todd! What Meng did in this kit is they swapped out the interior stuff that was in the earlier kit and replaced it with the little trench dio base. Not a bad bargain IMHO, so figured I would give the base a shot and see what I could do with it.
|
|
|
|
Post by wbill76 on Oct 16, 2014 17:18:39 GMT -5
First stage in applying the camo pattern is complete! I'm using the kit's finishing guide for an American tank at Verdun in October 1918 that sports a hard-edged three-tone scheme, so the first order of business was marking out the green areas. I used some 'worms' of poster blue tack putty rolled out and pressed down with a wooden toothpick to create the masks. 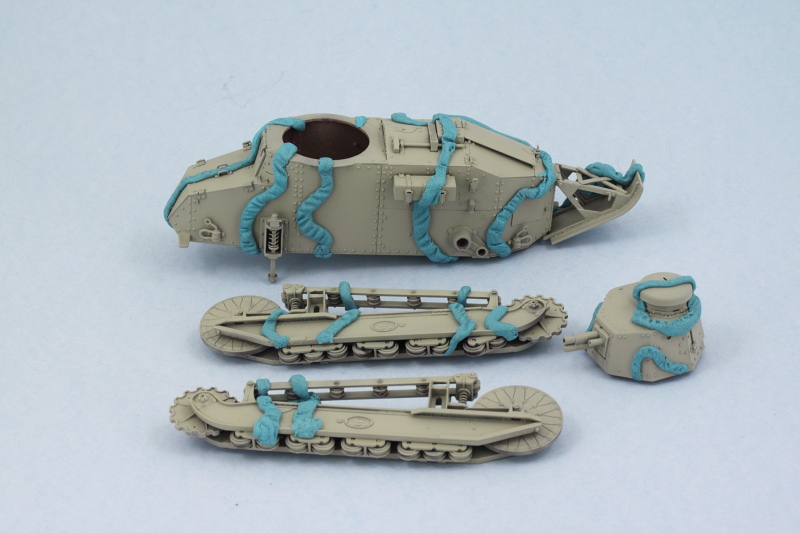 Some Model Master enamel Khaki was airbrushed at low pressure using a fine detail tip. After sitting for a couple of hours to touch dry, I removed the blue-tack to see how it turned out. 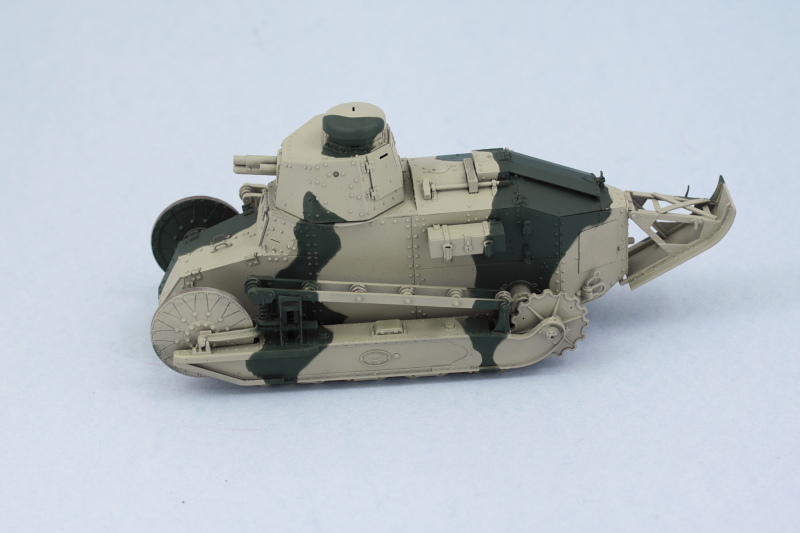 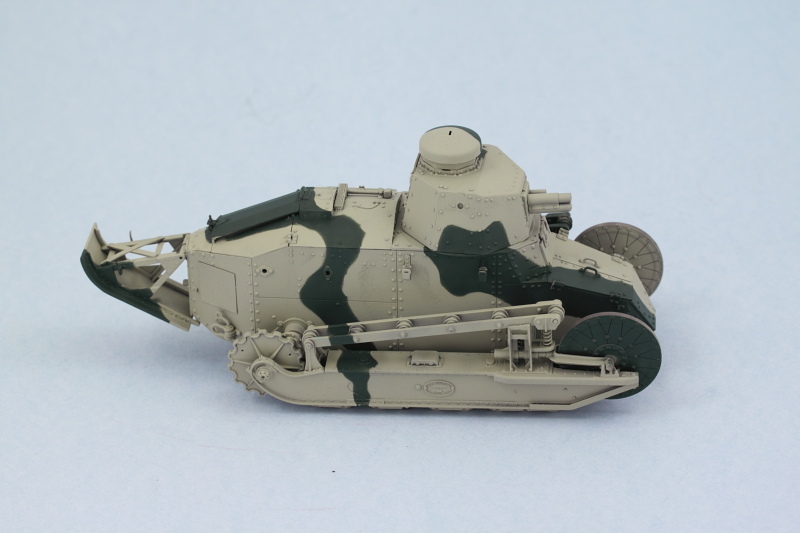 So far, so good, just some tiny areas that might need touch-up later on. Next up will be the red-brown portion. |
|
|
|
Post by wbill76 on Oct 17, 2014 17:00:17 GMT -5
Got the rest of the camo pattern on today with the red-brown portions. Same drill as with the green, I used the blue-tack approach to mask off the appropriate areas first. 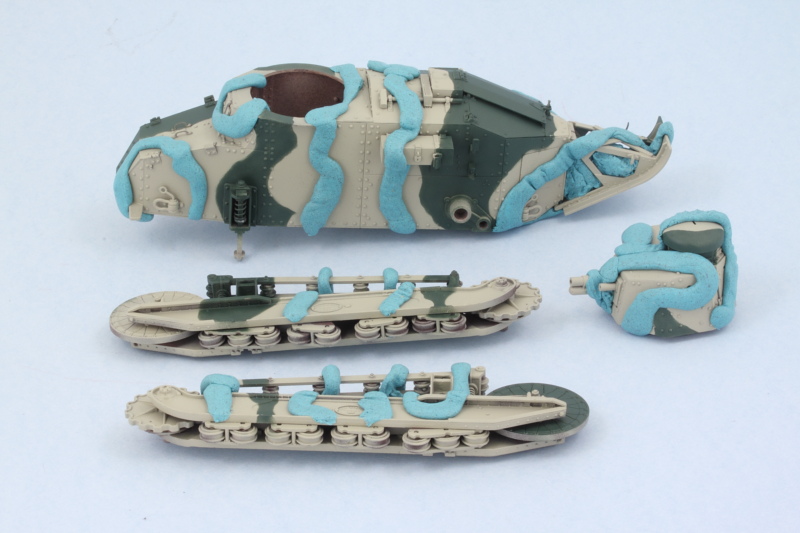 Out with the airbrush and a mix of 50-50 MM enamel Military Brown and Leather did the trick in no time.  After doing some light touch-ups here and there with the base coat, I sprayed a mist/filter coat of heavily thinned base coat color to tie the scheme all together and fade the scheme a bit. 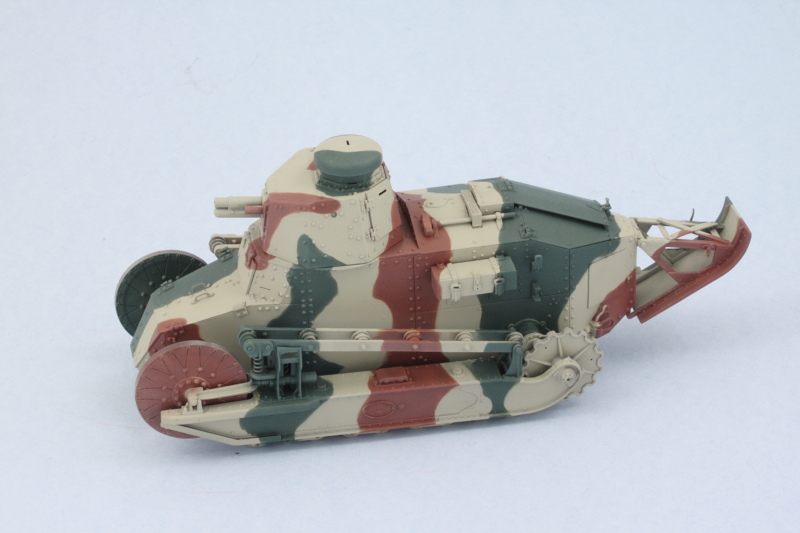 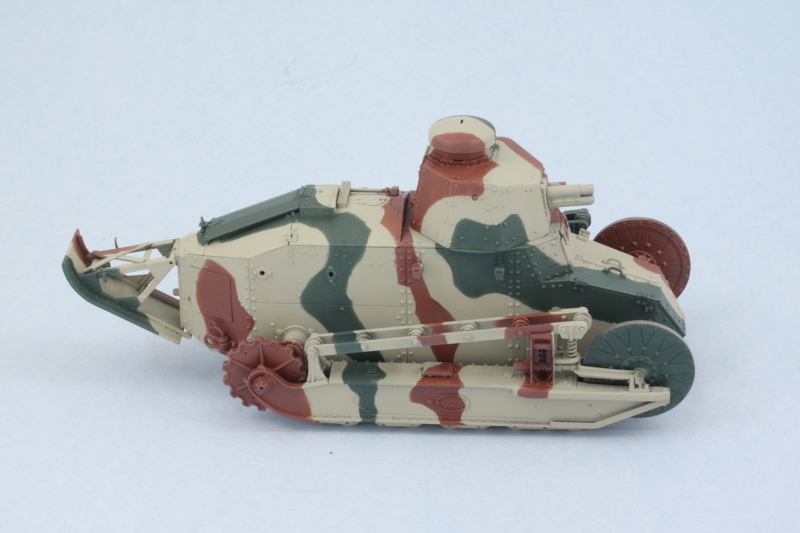 Once the tracks are on it will help break up the pattern some as well and provide some additional visual contrast. |
|
|
|
Post by Leon on Oct 17, 2014 17:12:15 GMT -5
WOW!!!! Awesome job on the camo Bill,looks really good as does the base.  |
|
|
|
Post by wbill76 on Oct 17, 2014 19:31:10 GMT -5
Thanks Leon! She's rolling along nicely now.
|
|
Deleted
Member since: January 1970
Posts: 0
Nov 24, 2024 6:48:10 GMT -5
Nov 24, 2024 6:48:10 GMT -5
|
Post by Deleted on Oct 17, 2014 23:43:55 GMT -5
Super looking camo Bill ! I always enjoy how your camo looks !
|
|
|
|
Post by TRM on Oct 18, 2014 6:43:48 GMT -5
She is looking swell there Bill!! That camo look awesome!! Getting close to that weathering time again!!  |
|