|
|
Post by TRM on Dec 9, 2014 15:02:46 GMT -5
Nope...you're still in Jeff!! Build and have fun!!! Gonna be a while for me anyway. I have to paint the inside, assemble, paint again and then weather!! Always time!!
|
|
|
|
Post by deafpanzer on Dec 9, 2014 15:13:19 GMT -5
There's no deadline... just keep it rolling and alive for us to enjoy!
|
|
|
|
Post by wing_nut on Dec 9, 2014 16:20:11 GMT -5
Very important function Marc. It holds my box of tissues down so I can pull them out one handed.   Todd... Major update AND organized? What the hell man? OK, this is weird. Both sides of the idler has the "male" locating ridge molded in. I checked the part and sheet a dozen times... these are the "correct" parts. Too wide. I sanded both down (no pic) and they appear to be prefect.   I took a couple of track links off the sprue to compare to the idler and there is flash in 3 places and 2 mold gates to clean up. THEN... the pins don't really hold for the workable track. Having just gone trough that with the 1/48 Tiger I... BTW, at 1/35 the 38(t) links are WAY smaller... I am not doing that again. I knew I had a box a tiny Fruil tracks somewhere but they turned out to be PZ III/IV links. Viddy my little droogies what I did find at the back of the drawer...  Good in a way because that set i bought recently... not my best soldering job on the fenders. Piss poor actually. But Now I have MG and some other stuff too.  And I bough this so long ago it's like I git it for free |
|
|
|
Post by TRM on Dec 9, 2014 16:54:23 GMT -5
LOL!! Nice find Marc!! Wish I could find stuff like that hiding at the back of my drawers...usually old paint that seeped out of its jar and stuck to the bottom taking a few parts and tools with it!!  Nice work on the idlers too! Keep it coming!!! Bill...the obligatory Pz. Wheel Tree Farm...fitting this time of year, don't ya think?  I am banging around some ideas for a small base right now.... 
|
|
|
|
Post by Leon on Dec 9, 2014 17:14:17 GMT -5
Nice wheel tree farm Todd! I think they need a little color.  |
|
bbrowniii
Full Member

Member since: March 2012
If you are not part of the solution, you are part of the precipitate.
Posts: 1,235
Mar 25, 2012 22:08:04 GMT -5
Mar 25, 2012 22:08:04 GMT -5
|
Post by bbrowniii on Dec 9, 2014 18:56:34 GMT -5
Wow, tons of progress to see. Looking great guys.
I've made good progress on the engine and radiator. After some miss-steps (some my fault, some the fault of Dragon instructions.... so my fault??) I decided to skip the interior. I include the engine, which is what I've been working on. Minimal bench time this week so finding time to do an update is tough. Hope to do a pic upload tonight.
|
|
|
|
Post by TRM on Dec 10, 2014 0:59:11 GMT -5
Boyd - Not sure any of the side-steps were your fault!! In doing the same kit you are, I think I found around 5 discrepancies of various types...labeling and what not...I think I have become numb to the DML mis-directions to where I don't even give it a second thought anymore. Still a solid kit if you ask me!! Except for the hull issue you had...mine was a bit warped as well! Okay...sneaking this one in before I hit the hay for the night!! It was inevitable, some paint needs to fly before this thing can actually go together!!  I tagged a bunch of other parts as well, so everything on the interior is pretty much ready for a squirt!!  I also pulled out some base material, figured I would figure out something to sit this on as I go here... If time permits tomorrow, I will try and work on the interior detailing and get this ready to button up! Sadly I have chosen NOT to open the engine bay! There is plenty of nice detailing in there...but just not this time!! Into a bag they go and saved for another day!! I think the bed is calling me now!! |
|
|
|
Post by dupes on Dec 10, 2014 13:16:33 GMT -5
|
|
|
|
Post by dupes on Dec 10, 2014 13:18:10 GMT -5
Looks great by the way! Plugging away on mine - bogged way down trying to figure out the proper assembly/paint order that will give me the highest percentage chance of keeping my PE-attached fenders ON the vehicle versus OFF. That and scratching some replacement parts for crappy/missing parts in the kit.  |
|
|
|
Post by TRM on Dec 10, 2014 13:59:08 GMT -5
As for the primer...if that is the number and the exact bottle you have, it is an older one. The newer version looks like this 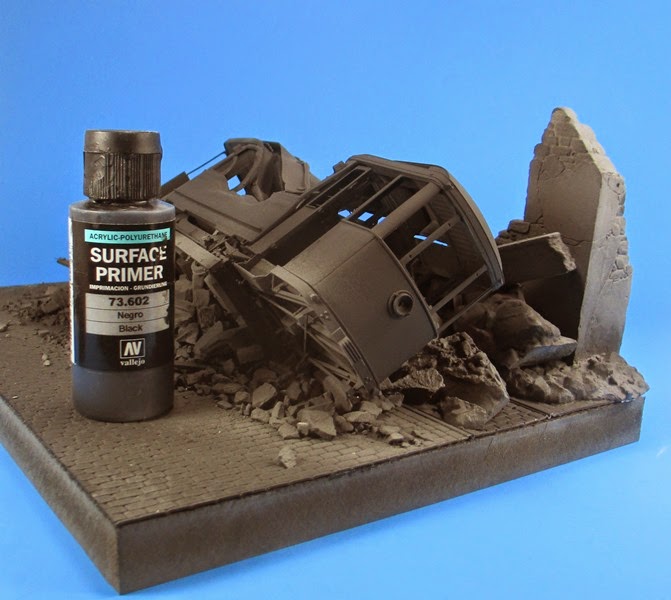 This does not mean yours is bad. The standard questions come next ...even though I know the answer to some of them.... - Are you thinning the primer at all? - What is the surface you are trying to cover? (Styrene, Resin, PE) - What is your psi set at? - Is the surface Clean (hand oils, relief powders) - How thick is the coats you are applying? - Are you waiting for the primer to cure? (12 - 24 hours) - Conditions at the time of application? (raining, snowing, excessive heat) Any one of these thing can wreak havoc on any primer applied. Just for record I... - Thin the black about 1 drop thinner (actually the airbrush cleaner)to 4 to 5 drops of primer - All surfaces - I shoot 12 to 15psi but as low as 6 to 8psi on anything thinned more than usual - I do not typically wash any surfaces ...ever! I have been know to hit PE with lacquer thinner or denatured alcohol first sometimes. - I run my primer in 1 to 2 evenly thinly applied coats where often I can still see coloring of the plastic through the primer as the primer still bonds if covering. - While I don't always wait for the cure time, I do more often than not when it comes to PE and resin as they need the extra bonding time during the cure. - Don't typically paint when it is raining out or when it is too humid as this can really screw with things. I have to suspect there is a couple of things happening here...the coats might be a little thicker and the cure time is not being reached before handling. Under a full cure you should be able to scratch away at the primer with your nail and it not come off. If the surface is dirty or not fully cured it will peel for sure! Pheew....sorry about that!! |
|
bbrowniii
Full Member
Member since: March 2012
If you are not part of the solution, you are part of the precipitate.
Posts: 1,235
Mar 25, 2012 22:08:04 GMT -5
Mar 25, 2012 22:08:04 GMT -5
|
Post by bbrowniii on Dec 10, 2014 18:52:35 GMT -5
Alright, here I go, my next update with pics... So, as I mentioned, I have (tentatively) decided to skip the fighting compartment and just button this one up. However, I have decided to do the engine compartment details. Of course that was before I got started.... First, I should say, the Dragon engine is really nicely detailed. Since I have now 100% committed to do an total OOB build, it is nice to see this level of detail in the kit. That said, let me talk about the instructions. For example:  I draw your attention specifically to part D16. Do you see where Dragon suggests it should be attached? Now, look at this photo:  Does it appear that D16 actually goes ANYWHERE CLOSE to where Dragon indicates it should go...  Pressing on, I did manage to get the engine together (although, to get it into the engine compartment with all the other bits and pieces, I had to pop a couple parts off, but those will be easy - famous last words - to add when the engine is in place). So, here is the completed product. Even without any additional TLC, I think it looks the part:   So now on to the next... challenge. There are two box thingy's that go on either side of the engine compartment. They are rectangular in shape and (I assume) house some sort of mechanical gizmos - I'm sure you mechanically inclined guys have a better idea what the house - but, after I installed the firewall, I tacked them into place to shoot some primer and get ready for paint.... but something just did not look right. At first, I could not figure it out, then I realized, there are two framed areas on the firewall that these are supposed to slip into, but the ones I had simply sat too high. WAY too high. If you look at the pic, the one on the left has been sanded to fit (or close to it), the one on the right is as it came off the sprue. There is about an 1/8" extra ring of plastic around these things. You can actually see the demarcation line. I'm not sure what happened, but it was certainly fun to spend half an hour sanding and fitting sanding and fitting sanding and fitting....  Next was the radiator and fan. HOLY ejector pins batman!!  Most of these will be invisible, but I did throw some Squadron green into the three at the top, since you would be able to look down and see them with the engine hatches open. Finally, I moved on to some of the kit PE. I started work on the battery box. On the good side, the PE is really nice, and easy to work with. I hope to get some extra soldering practice in on this, since a lot of the parts will be hidden from view. The box has six legs on it (the pieces in the upper right of the photo - still linked together on the fret), which have folded quite nicely and will give me an opportunity to try to solder them to the underside. If I screw it up, no one will be the wiser.... Well, I guess you guy will, since I'm sure I'll share my struggles with you (but let's cross fingers and hope for no struggles!!).  So, while the battery box itself is nice, there is one problem (sorry no pic, I'll get one). The battery piece itself seems WAY TOO small, compared to the PE frame that is supposed to hold it. I'll have to dig through some reference pics, but there is close to 1/8" clearance around the edges of the actual battery piece and the bottom of the frame that should hold it. Hmmmmm.... |
|
bbrowniii
Full Member
Member since: March 2012
If you are not part of the solution, you are part of the precipitate.
Posts: 1,235
Mar 25, 2012 22:08:04 GMT -5
Mar 25, 2012 22:08:04 GMT -5
|
Post by bbrowniii on Dec 10, 2014 18:55:24 GMT -5
Holy smokes!!! That second pic of the engine I posted is pretty darn blurry. Sorry fellas!!
PS I forgot to mention, most of these parts have been run through the paint booth for a coat of primer. Hope to get some paint laid on the engine compartment and start to detail these parts in the next day or so...
|
|
|
|
Post by Leon on Dec 10, 2014 19:05:29 GMT -5
Nice work on the engine and PE Boyd. |
|
|
|
Post by TRM on Dec 10, 2014 22:55:07 GMT -5
Nice bit O'work there Boyd!! Nice to see you having a go at one of the two....like me...LOL!!! Good luck on the battery stand!!
|
|
|
|
Post by dupes on Dec 11, 2014 10:30:28 GMT -5
- Are you thinning the primer at all? - What is the surface you are trying to cover? (Styrene, Resin, PE) - What is your psi set at? - Is the surface Clean (hand oils, relief powders) - How thick is the coats you are applying? - Are you waiting for the primer to cure? (12 - 24 hours) - Conditions at the time of application? (raining, snowing, excessive heat) Any one of these thing can wreak havoc on any primer applied. Just for record I... - Thin the black about 1 drop thinner (actually the airbrush cleaner)to 4 to 5 drops of primer - All surfaces - I shoot 12 to 15psi but as low as 6 to 8psi on anything thinned more than usual - I do not typically wash any surfaces ...ever! I have been know to hit PE with lacquer thinner or denatured alcohol first sometimes. - I run my primer in 1 to 2 evenly thinly applied coats where often I can still see coloring of the plastic through the primer as the primer still bonds if covering. - While I don't always wait for the cure time, I do more often than not when it comes to PE and resin as they need the extra bonding time during the cure. - Don't typically paint when it is raining out or when it is too humid as this can really screw with things. This is perfect! Let me fire off some answers: No I am not thinning at all. Assumed it was "pour and shoot". In this case it was just styrene, no PE or resin. PSI is almost always 12 for me. Indeed clean - I wipe down all of my builds with an alcohol-dipped swab before painting (oils, cat hair). Coat thickness - see below. Cure time - see below. Conditions - very dry. I'm guessing that my issues have to do with thickness of the primer coat, lack of thinning, and cure time before handling - every other variable seems to be good. My basement this time of year is only 40-45% humidity (according to the dehumidifier which only turns on between May-Sep). If anything I have issues with paint drying TOO fast and getting a bit pebbly. I'll try to shoot multiple very light coats next time and see if my adhesion improves. |
|
|
|
Post by TRM on Dec 11, 2014 10:41:20 GMT -5
Thanks for the info Dupes. I would say try thinning a little and dust on a couple light coats and let cure and see if that helps. Drying too fast, I don't think, is the issue as I have been using a hairdryer to speed things up for a while and typically won't have an issue until I put too much down or over-handle the piece.
Good luck, let me know how things turn out!
|
|
|
|
Post by dupes on Dec 11, 2014 11:17:19 GMT -5
As I don't have the proprietary Vallejo Airbrush Cleaner, what else can I use to thin this stuff? Is it water based? Alcohol?
|
|
|
|
Post by TRM on Dec 11, 2014 11:25:48 GMT -5
Go with water for starters! If you feel the need to break the surface tension at all try making up a mixture of water and dish soap or window cleaner. I don't have a proportionally accurate mix rate on the dish soap as it is an old trick still used by a few, sorry. I can look to see what I can come up with on that. As for the window cleaner...10:1 water to cleaner for starters. As I mentioned a couple posts back, I use the AB cleaner as thinner. The surfactant in the cleaner seems to help suspend the paint nicely. There are a couple different size bottles sold. Use it for thinning and not cleaning to get the longest use from it...cost effectiveness! |
|
|
|
Post by TRM on Dec 11, 2014 15:11:41 GMT -5
Okay, I think things are pretty much set on the interior...for now anyway! I may still add another wash or two, but honestly, after it all comes together, not too much can be seen without a penlight. I won't bore you guys with to many of the application junk...so here is where it stands.   This start to disappear rather quickly once the top goes on. All goo, it is only meant to take that hollow feeling out of it!    So that is that for the moment. I have since taken everything apart one last time to check things and like I said up top, maybe add a wash or two in there. So I guess it is time to start thinking on slinging some color soon!! Oh yeah, and working on the base!! Oh...I was all excited when the mail showed up today and there was my package from RB Model with my MG barrels...Only to instantly be saddened as there was a small mis-step on the order....seems the "35B14" Czech barrels turned into "35B14" BMP Aerials on the trip over form Poland...LOL!! All good! I have LAWAYS had excellent service form the folks over at RB and it looks like a simple mistake easily corrected soon. |
|
|
|
Post by wbill76 on Dec 11, 2014 17:18:55 GMT -5
Barrels = Aerials...I can see that happening! Nice progress all around here gents.  |
|
|
|
Post by dupes on Dec 11, 2014 19:14:46 GMT -5
Holy cow, man...I think you missed a couple of updates along the way!!
|
|
|
|
Post by TRM on Dec 11, 2014 22:21:43 GMT -5
Thanks Bill! LOL!! These things do happen from time to time!! You had me looking back through the pages Dupes!! I never skipped anything!! Just left out some pics of the paint steps is all!! Pretty straightforward - Clear coat, chipping medium, paint, paint again, chip paint back, add camo Black Brown chipping, used Black and White set to paint interior, make some washes with the same set, take pics, move on!!  |
|
afvfan
Senior Member

Member since: December 2012
Bob
Posts: 1,772
Dec 10, 2012 17:32:38 GMT -5
Dec 10, 2012 17:32:38 GMT -5
|
Post by afvfan on Dec 11, 2014 23:58:13 GMT -5
Nice work on the interior, T. ....and the PE work is great!
|
|
|
|
Post by TRM on Dec 12, 2014 7:28:51 GMT -5
Thank Bob!!! Appreciate it!!! All that other fun stuff should start soon!!! (I hope) |
|
|
|
Post by wing_nut on Dec 12, 2014 8:44:00 GMT -5
"HOLY BUILD FEST BATMAM" Crikey you guy are rally going at it. Todd, I wonder when that brief moment in time when your parts made that transformation from one to the other and were actually "barriels". Some progress here. The upper hull is going to start to slowly come together soon so starting on more interior details. Armament is together and all will be painted white and the details picked out individually.  I guess when a company isn't around any more and your missing a whole sprue "G" you're just TS outta luck. Just a tiny sprue but it ALL the interior sides of all the vision blocks. The driver's side became a cut out ( that decision was made for me  ) A couple will have to just do without. I plan to take care of another that's on the left side of the cupola by making another cut out that will takes out that block and will extend across the open hatch and down the back side (oh goody, what fun  ) Nothingglued in eyt so tose gaps will be gone Please be gone   |
|
afvfan
Senior Member
Member since: December 2012
Bob
Posts: 1,772
Dec 10, 2012 17:32:38 GMT -5
Dec 10, 2012 17:32:38 GMT -5
|
Post by afvfan on Dec 12, 2014 13:33:22 GMT -5
I do believe you just found out the reason the kit was a "$15 show special"!  Before you do anything serious, you might want to put a feeler out in the "wanted" section. Maybe there's someone out there who has the kit with no plans on doing the interior who'd be willing to donate that sprue to you. |
|
|
|
Post by TRM on Dec 12, 2014 16:18:15 GMT -5
Wow, sorry to hear about the blocks not being in the kit Marc! Thinking Bob hit the proverbial nail on the head with the kit! Still, everything is looking superb! Nice bit of work on the pea shooter!! As for that time frame between the laid out parts and where it sits...pretty much in real time. Once things were primed I broke some rules and never waited for the cure jumping to detail painting. If it helps, the top and turret are still apart right now. Good news, was I heard back from RB and they are sending me the barrels straight away. So with any luck I will see them in the next week or so. |
|
|
|
Post by TRM on Dec 13, 2014 20:38:18 GMT -5
|
|
afvfan
Senior Member
Member since: December 2012
Bob
Posts: 1,772
Dec 10, 2012 17:32:38 GMT -5
Dec 10, 2012 17:32:38 GMT -5
|
Post by afvfan on Dec 13, 2014 22:07:20 GMT -5
Eek!! Where'd all that nice shiney stuff go?  Nice work with the hub. |
|
|
|
Post by TRM on Dec 14, 2014 8:57:51 GMT -5
Sorry to hid the shiny stuff Bob, think it was inevitable though! Thanks! Got some color flying!! Hope to have some pics of that at some point too!! |
|


 And I bough this so long ago it's like I git it for free


 Nice work on the idlers too! Keep it coming!!!


 ) Nothingglued in eyt so tose gaps will be gone Please be gone


 Nice work with the hub.