|
|
Post by dierk on Mar 30, 2014 13:29:17 GMT -5
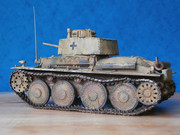
Hello everybody, When I spotted this kit for 15.50 euro, I just couldn't say no - bargains are one of my many weaknesses... This kit has very few inaccuracies, and the ones it has are easily eradicated using one of Neil Stokes' recepies.  I'm adding a few PE bits and pieces from eduard and Voyager - I was going to add PE mudguards, but they were both out of stock and (more off-puttingly) more expensive than the kit. So, damage to the mudguards was created old-school by thinning the plastic until it was translucent and then going at them with pliers.  Bit of dry-fitting going on:  The eduard PE set is supposed to be specifically for the Ehkranami, but the mudguard struts are not all skeletal the way they should be, so I'm using the kit parts, which really aren't bad at all:  I'm also adding a bit of stowage from TANK. The MG is from Miniart - slightly modified to fit the eduard mounting. NOw I've got to figure out a way how I can assemble the tracks and then remove them for painting - I really don't like painting tracks in situ. Thanks for looking, any comment - as always - welcome, Dierk |
|
|
|
Post by bullardino on Mar 30, 2014 15:13:43 GMT -5
Count me in, I have two KV series tank in my stash and I want to do one this year  |
|
|
|
Post by wbill76 on Mar 30, 2014 20:17:57 GMT -5
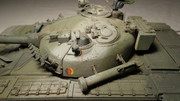
Neat choice of subject Dierk! This is one of the ones I've always liked due to those giant hex bolts...going to look great under paint and with some weathering for sure.
|
|
|
|
Post by dierk on Mar 31, 2014 7:01:37 GMT -5
Count me in, I have two KV series tank in my stash and I want to do one this year I'm sure you know Neil Stokes' site - seems to me what he doesn't know about KVs isn't worth knowing - but just in case you don't: www.4bogreen.com/kv-series/recipesNeat choice of subject Dierk! This is one of the ones I've always liked due to those giant hex bolts...going to look great under paint and with some weathering for sure. Same here Bill - crude Russian engineering at its best! Still haven't decided if it's going to be 4bo, or winter camo. Got a neat winter camo technique. Any preferances? Cheers, Dierk |
|
threadbear
Full Member

Member since: December 2011
Recovering my modelling enthusiasm!!'
Posts: 138
Dec 18, 2011 8:31:37 GMT -5
Dec 18, 2011 8:31:37 GMT -5
|
Post by threadbear on Mar 31, 2014 7:05:18 GMT -5
Looking good, I had a Trumpeter KV1 when they first came out. I sold it but now wish I still had it as it was a fantastic kit!
Grahame
|
|
pantherf
Full Member
Member since: July 2013
"Best Job I've Ever Had"
Posts: 1,253 
|
Post by pantherf on Mar 31, 2014 7:22:41 GMT -5
This is my favorite of the KV's with it's spaced armor. This version is also available in the 1/16 Heng Long RTR tank.
Looks like you are off to a great start!
Jeff
|
|
|
|
Post by bullardino on Mar 31, 2014 7:51:47 GMT -5
I already knew it, our eight legged friend had already linked me that one Thanks anyways, I had forgotten its recipes |
|
Deleted
Member since: January 1970
Posts: 0
May 6, 2024 12:23:43 GMT -5
May 6, 2024 12:23:43 GMT -5
|
Post by Deleted on Mar 31, 2014 13:56:09 GMT -5
nice looking model watching with interest
|
|
|
|
Post by deafpanzer on Mar 31, 2014 14:14:11 GMT -5
You have my attention!!! Dig those oversized bolts & nuts on the turret!!!!
|
|
|
|
Post by rbaer on Mar 31, 2014 16:29:33 GMT -5
I like these Trumpy KVs, they build nice, reasonably accurate, and a nifty tank to boot.
I built one a few years ago, and have one in the stash that I've been thinking about plowing in to, just to get something ready to paint without having to re-do and correct all kinds of stuff.
Watching!
|
|
|
|
Post by Deano on Mar 31, 2014 20:35:03 GMT -5
This is one cool version of the KV-I , I think its the huge hex bolts that do it ....nice clean work buddy!
|
|
|
|
Post by dierk on Apr 1, 2014 6:36:32 GMT -5
Looking good, I had a Trumpeter KV1 when they first came out. I sold it but now wish I still had it as it was a fantastic kit! Grahame Thanks for joining Grahame (and everybody else!) - nothing to stop you from getting another one, when they are available for less than 20 quid including postage. This is my favorite of the KV's with it's spaced armor. This version is also available in the 1/16 Heng Long RTR tank. Looks like you are off to a great start! Mine too, Jeff. I really enjoyed the build, unlike the Trumpeter GAZ I recently built this one isn't overly fussy on the detail and the fit is true shake-and-bake. You have my attention!!! Dig those oversized bolts & nuts on the turret!!!! Makes me think of Steam Punk Thumbs Up! I like these Trumpy KVs, they build nice, reasonably accurate, and a nifty tank to boot. I built one a few years ago, and have one in the stash that I've been thinking about plowing in to, just to get something ready to paint without having to re-do and correct all kinds of stuff. Watching! I know what you mean! Brings back memories of the good old days. Just one thing: normally I'm the first to rip into indy links, when link and length would do, but in this case I'd have really preferred indies, as the kit has all the bolt holes for the return-roller mounting, so I'd be easy to build it with one missing. There's just no pleasing me... (hammer hit) This is one cool version of the KV-I , I think its the huge hex bolts that do it ....nice clean work buddy! Cheers Deano - definitely my favourite version of this tank. My second model on returning to the hobby was a KV - the Tamiya kit...I didn't know any better at the time. Learnt a bit since then, so this should be an improvement. Primer's on, today I'll start on the paint job. More soon. Thanks for looking and any comments welcome. To infinity the airbrush, and beyond. Cheers, Dierk |
|
|
|
Post by rbaer on Apr 1, 2014 10:56:36 GMT -5
They're one of the last great model bargains left.
Squadron had a few of them on sale for under $15 the other day, and I think the one in my stash was purchased for under $10, also from Squadron. The first one I did was purchased at Skyway Hobbies in Seattle for list price, still a very reasonable $25.
|
|
vlpbruce
Full Member
Member since: March 2013
Posts: 1,463
|
Post by vlpbruce on Apr 1, 2014 11:34:13 GMT -5
Love this version of the KV. I'll be on this one.
By the way, when I use the tracks like these, I put the wheels on with white glue. Then I assemble the tracks. The whole thing should come off with a little water where the wheels meet the arms. I normally don't even have to try to get the wheels off of the tracks after that, they aren't attached. After it's all painted, the suspension goes back together with a little CA.
I hope this helps.
|
|
|
|
Post by dierk on Apr 2, 2014 3:59:25 GMT -5
Love this version of the KV. I'll be on this one. By the way, when I use the tracks like these, I put the wheels on with white glue. Then I assemble the tracks. The whole thing should come off with a little water where the wheels meet the arms. I normally don't even have to try to get the wheels off of the tracks after that, they aren't attached. After it's all painted, the suspension goes back together with a little CA. I hope this helps. Thanks Bruce - if only you had posted this a few days ago...I've tacked on the mudguards with a tiny bit of CA so I can remove them after painting. I did the same with the mud scrapers using masking fluid. The mud scrapers are the main reason for going this way, as I couldn't think my way around how to remove the drive-wheels once the scrapers are fitted permanently. So I'm going to paint the tank first, and then assemble the tracks. Not easy to see in these pictures, but after the primer I added some shading by using white mixed whith black. Darker on the lower hull, especially under the mudguards getting gradually lighter on vertical surfaces becoming lighter still on horizontal ones:   Once dry a pin-wash was aplied:   Followed by streaking grime:   Then it was time to the first coat of heavily diluted 4BO - approximately 10 drops of paint to 1ml destilled water:   I know it looks a bit crap at this point - but trust me: after a few more coates (4 - 5) it'll look the dog's danglies (hopefully). My main problem using this technique is being patient enough to wait for the coates to dry between applications (patience is a virgin  ) More soon I hope - and, as always, comments welcome. Thanks for looking, Dierk |
|
|
|
Post by deafpanzer on Apr 2, 2014 7:45:38 GMT -5
Great update! Very interesting approach applying streaks before painting. You have my attention as usual!
|
|
vlpbruce
Full Member
Member since: March 2013
Posts: 1,463
|
Post by vlpbruce on Apr 2, 2014 9:33:56 GMT -5
Looking good. Keep up the good work.
|
|
|
|
Post by bullardino on Apr 2, 2014 10:00:12 GMT -5
Nice technique, but not my ideal one. Not that I lack in patience, but I can't spray decently such a thin layer... Looking forward to seeing more |
|
|
|
Post by wbill76 on Apr 2, 2014 15:19:54 GMT -5
Looking good Dierk! Thin coat approach is one that does require patience but looks like it's paying off on this one for sure.
|
|
|
|
Post by dierk on Apr 3, 2014 4:39:34 GMT -5
Nice technique, but not my ideal one. Not that I lack in patience, but I can't spray decently such a thin layer... Looking forward to seeing more I hear you - the thin layers can be a git! Problems with pooling and not covering vertical surfaces. I use fairly low pressure and a distance of at least 20cm from the model. Thanks for your kind words Andy, Bruce and Bill. Another couple of coats went on: Second:  And third:   Time for a cup of imported Yorkshire Tea (google eye) and then I'll bung on another coat. Cheers, Dierk |
|
Hinksy
Full Member
Member since: June 2012
THE ENGLISH LIONHEART - HINKSY!
Posts: 1,016
Jun 22, 2012 16:46:21 GMT -5
Jun 22, 2012 16:46:21 GMT -5
|
Post by Hinksy on Apr 3, 2014 6:23:47 GMT -5
Wow! This certainly looks very different - and VERY cool!  I'm not quite sure what this method is but them coats must be super thin to allow streaking grime to show through after several coats? 10 drops of green to 1ml distilled water? What's this method called? Sorry if I'm being dumb here! Looking great - BIG BOLTS are killer! Ben |
|
|
|
Post by ceresvesta on Apr 3, 2014 7:57:08 GMT -5
I am in! I built the same kit a while ago and it was a blast. As you.ve said minor innacuracys but not so much.
I like the path you've taken Dierk, result are very interesting.
|
|
|
|
Post by rbaer on Apr 3, 2014 9:58:39 GMT -5
Yes, very interesting. And I have to say, around my house, patience is anything BUT a virgin...... Did I say that out loud? |
|
Deleted
Member since: January 1970
Posts: 0
May 6, 2024 12:23:43 GMT -5
May 6, 2024 12:23:43 GMT -5
|
Post by Deleted on Apr 3, 2014 12:40:37 GMT -5
yes it is an interesting method nice job
|
|
vlpbruce
Full Member
Member since: March 2013
Posts: 1,463
|
Post by vlpbruce on Apr 3, 2014 16:29:37 GMT -5
Awesome paint work. I have never seen this technique before. Love the results.
|
|
|
|
Post by deafpanzer on Apr 3, 2014 16:32:02 GMT -5
It amazes me how different methods we all use here... it looks great! Thanks for sharing with us!
|
|
|
|
Post by dierk on Apr 4, 2014 5:49:35 GMT -5
Wow! This certainly looks very different - and VERY cool! I'm not quite sure what this method is but them coats must be super thin to allow streaking grime to show through after several coats? 10 drops of green to 1ml distilled water? What's this method called? Sorry if I'm being dumb here! Looking great - BIG BOLTS are killer! Ben Thanks for the kind comments, Ben. I read about this method in a German modelling magazine - one of the few good things about spending time back in Gemermany - according to the article it was developed by a Spanish modeller called Jose Luis Lopez. And I have no idea what it is called. If I had to come up with a name for it, I think 'layer-technique' might be appropriate? I've been practising this technique for my last couple of builds and it's slowly getting there - still get the occasional problem with the paint pooling. I am in! I built the same kit a while ago and it was a blast. As you.ve said minor innacuracys but not so much. I like the path you've taken Dierk, result are very interesting. Yes, I really enjoyed the build as well, Phil - almost the perfect kit: inexpensive, fairly accurate and easy to put together. Yes, very interesting. And I have to say, around my house, patience is anything BUT a virgin...... Did I say that out loud? Yes, you did - and the world is a better, more intruiging place for it lol Thanks for your support Pete, Bruce. It amazes me how different methods we all use here... it looks great! Thanks for sharing with us! Variety is the spice of life. After my nice cup of tea, yesterday...4th layer:   I reckon another 2 - 3 layers should do the trick - and if it turns out horrible, I'll give it a white-wash - another method I came across in Modell Fan, stangely using a product unavailable in Gemermany. Spitting feathers - I must be tea-hydrated. Thanks for looking and more soon. Dierk |
|
|
|
Post by bullardino on Apr 4, 2014 10:23:53 GMT -5
I think Lopez calls this the black and white technique, as the base is in B/w. Nice progress on this one, I think it'll be a treat in the end |
|
|
|
Post by wbill76 on Apr 4, 2014 14:33:23 GMT -5
Can definitely see the progression between the layers, looking very good so far!
|
|
mel
Full Member
Member since: March 2012
Posts: 206
Mar 11, 2012 21:33:07 GMT -5
Mar 11, 2012 21:33:07 GMT -5
|
Post by mel on Apr 5, 2014 6:30:52 GMT -5
Nice results and a very innovative technique! Sorry if you've already mentioned it; but, what kind of paint are you using?
|
|