sturmbird
Full Member
  
Member since: June 2012
Posts: 1,406
Jun 21, 2012 13:51:45 GMT -5
Jun 21, 2012 13:51:45 GMT -5
|
Post by sturmbird on Mar 28, 2016 15:19:06 GMT -5
Managed to get some airbrush work in on the interior. I started with a base coat of Testors Model Master enamel Russian Armor Green. This did double-duty as a primer coat and let me check all my sanding to see if everything was going in the right direction. 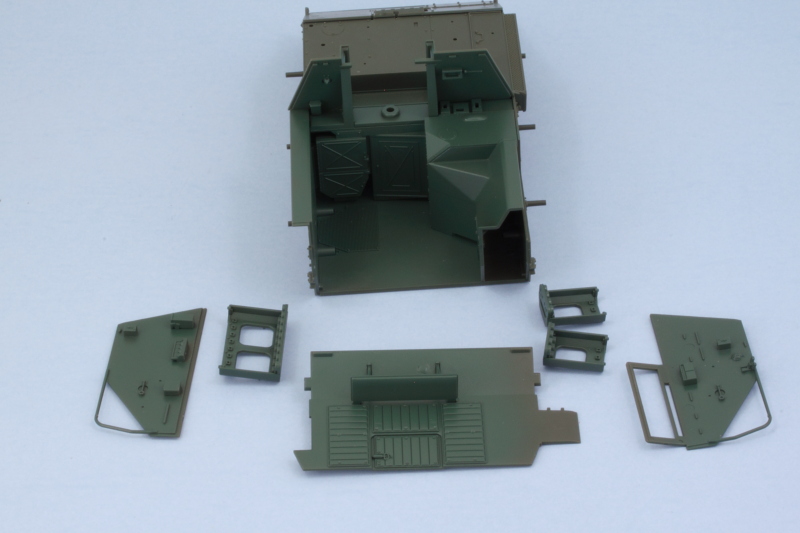 I've never been quite happy with this particular color right out of the bottle, it's got a kind of 'minty' green hint to it, so I tried something a little different. I mixed up a custom color using a 50/50 ratio of the MM enamel Russian Armor Green and Olive Drab FS34087. This was sprayed at low pressure over the previous coat to build up the finish. As an unintended side effect, I think I might have come up with a pretty close match to the kit's original plastic color.  It's also hard to photograph it accurately, but in hand it came out along the lines I was after. 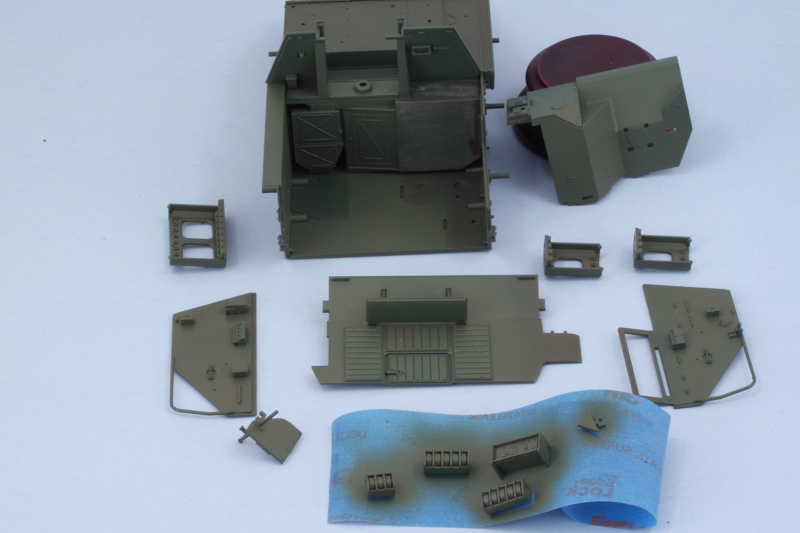 Now to let that cure a little bit and then start in on the actual detailing and weathering of the interior so I can get it all together. Well I for one was kind of wondering how you planned on painting the track buttoned up. Now I see you took the route I thought about. gary |
|
martslay
Full Member
  
Member since: February 2016
Posts: 1,113 
|
Post by martslay on Mar 28, 2016 15:22:41 GMT -5
It is good that there are no unclear inscriptions. Eternally Soviet/Russian inscriptions print with mistakes.  Your the guy I want ask this question to. Is the basic hull the T-70 light tank fielded by the USSR in WWII? If so lets hope and pray that Tamiya follows suite with a T-70 tank!! gary Yes, SU-76M was based on the chassis of the T-70 light tank. Miniart does remarkable model of this tank for a long time. Cheers, Martin |
|
sturmbird
Full Member
  
Member since: June 2012
Posts: 1,406
Jun 21, 2012 13:51:45 GMT -5
Jun 21, 2012 13:51:45 GMT -5
|
Post by sturmbird on Mar 28, 2016 15:31:19 GMT -5
Your the guy I want ask this question to. Is the basic hull the T-70 light tank fielded by the USSR in WWII? If so lets hope and pray that Tamiya follows suite with a T-70 tank!! gary Yes, SU-76M was based on the chassis of the T-70 light tank. Miniart does remarkable model of this tank for a long time. Cheers, Martin I have an early and a late Miniart T-70 in my stash. Both kits have A.M. tracks and metal gun barrels. Have not done anything as the road wheels and turrets are not right. Hear that Vector (KSL) makes a resin turret and new wheels. One of these days I'll get the project started again. gary |
|
|
|
Post by wbill76 on Mar 28, 2016 15:46:12 GMT -5
Really no other way that I could see to do it Gary given all the detail that has to go in that compartment.  Glad to have you along!  |
|
vlpbruce
Full Member
  
Member since: March 2013
Posts: 1,463 
|
Post by vlpbruce on Mar 28, 2016 18:21:52 GMT -5
keeps getting better and better Bill.
|
|
|
|
Post by wbill76 on Mar 28, 2016 18:49:00 GMT -5
Thanks Bruce! Spent some time on the hull with the airbrush today. First order of business involved masking off the fighting compartment so I could touch up things a bit and blend stuff together. I applied a base coat of MM enamel Russian Armor Green to the hull. I used some blue tack poster putty to hold the fenders in place and get an idea of where the shadowed areas would be. 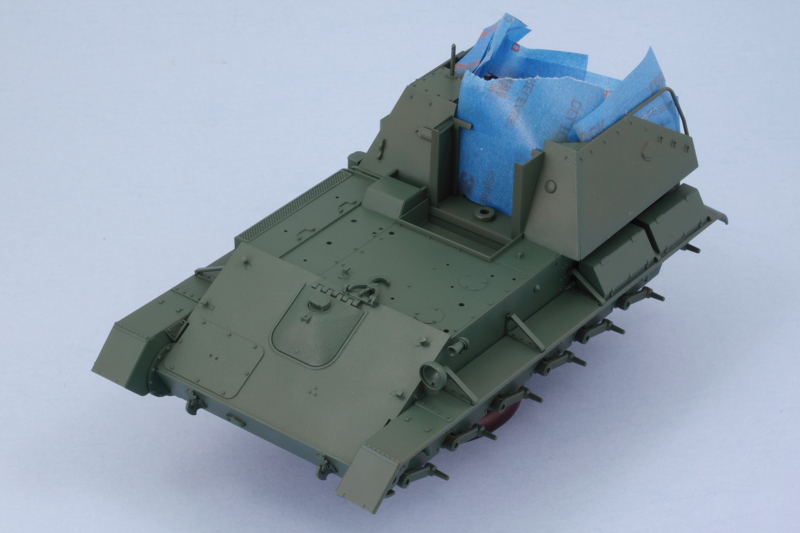 Road wheels, idlers, and sprockets got some attention as well. I airbrushed MM enamel Gunmetal for the rubber portions then used a circle template to mask the hubs. The Russian Armor Green base coat was airbrushed first followed by a 50/50 mix of OD/Russian Armor Green to get it to the desired color to go with the rest of the hull. 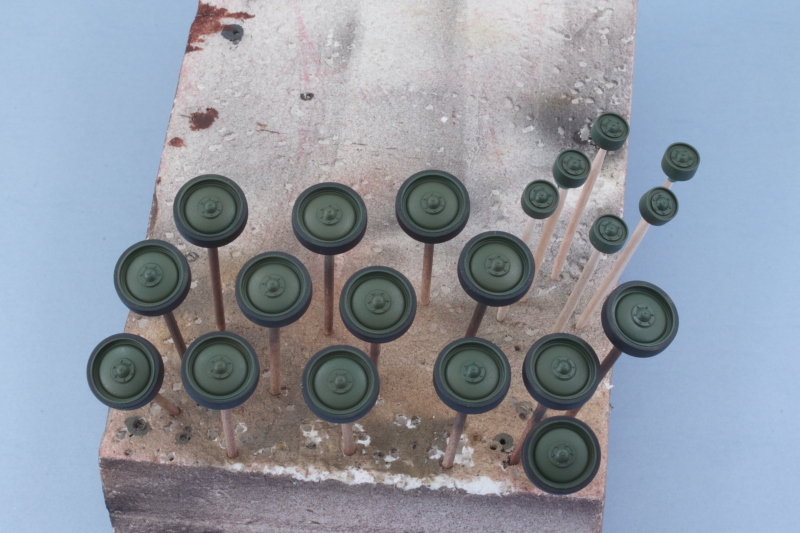 Speaking of which, I used the 50/50 OD/Russian Armor Green mix to shift the color tone of the base coat and provide some variation in the overall look. This was applied at low pressure, approximately 10 psi, and working section by section up close. The fenders were popped off and worked on separately, one nice advantage to having them remain loose until after the tracks are on. 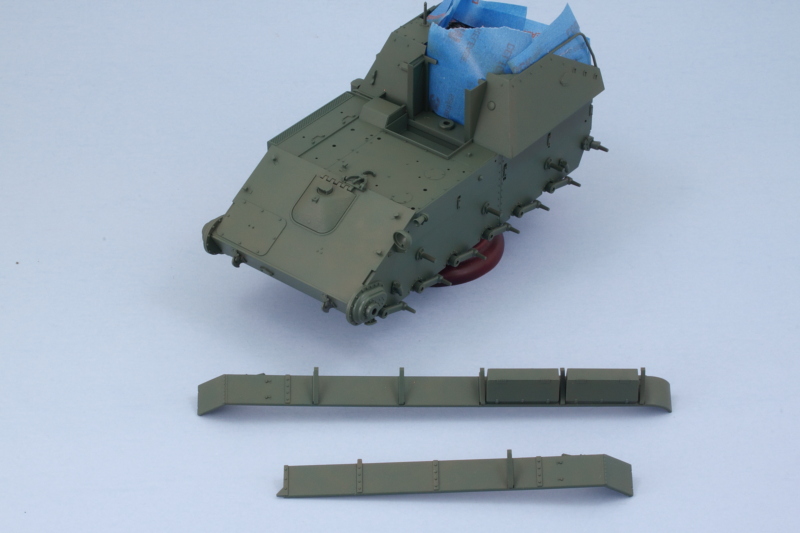 I dry fitted the fenders and removed the masking tape from the compartment to be sure that everything was looking like it all belonged on the same vehicle. I made a couple of small adjustments in a couple spots. Here's where things stand before I start on the gun.  Still plenty to do! |
|
|
|
Post by Leon on Mar 28, 2016 19:14:09 GMT -5
Painting looks really good Bill!  |
|
|
|
Post by wbill76 on Mar 28, 2016 19:33:22 GMT -5
Thanks Leon!  |
|
martslay
Full Member
  
Member since: February 2016
Posts: 1,113 
|
Post by martslay on Mar 29, 2016 0:47:09 GMT -5
Yes, SU-76M was based on the chassis of the T-70 light tank. Miniart does remarkable model of this tank for a long time. Cheers, Martin I have an early and a late Miniart T-70 in my stash. Both kits have A.M. tracks and metal gun barrels. Have not done anything as the road wheels and turrets are not right. Hear that Vector (KSL) makes a resin turret and new wheels. One of these days I'll get the project started again. gary Also 'ZIP complekt' firm does the big range of sets for T-70, T-70m. If it is necessary, I can send them to you.   35007 T-70M (late)  35002 T-70 production of factory No. 38  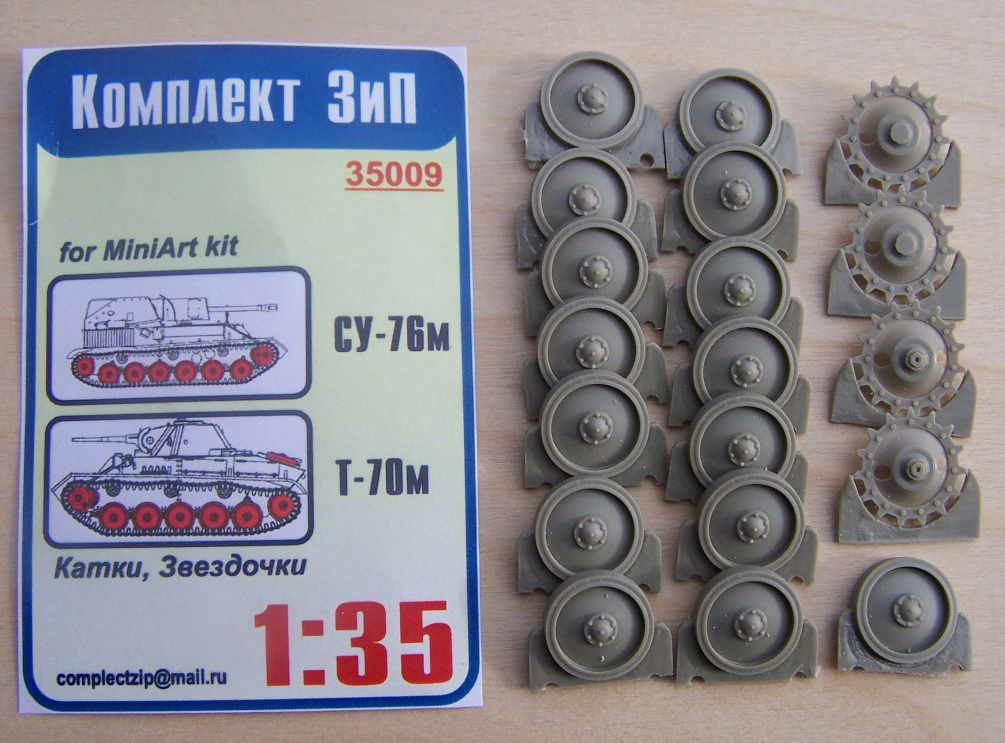 Bill Bill excuse for garbage in a subject. It won't repeat. |
|
martslay
Full Member
  
Member since: February 2016
Posts: 1,113 
|
Post by martslay on Mar 29, 2016 0:49:04 GMT -5
Already well looks! Good luck!  |
|
|
|
Post by dierk on Mar 29, 2016 5:54:39 GMT -5
Looking good Bill! I may have to get myself one of these - but I should really build more and buy less  |
|
|
|
Post by wbill76 on Mar 29, 2016 9:14:21 GMT -5
No problem Martin, all good info for people interested in this family of vehicles!  Looking good Bill! I may have to get myself one of these - but I should really build more and buy less  Resistance is futile Dierk!  |
|
|
|
Post by mrt51 on Mar 29, 2016 10:13:36 GMT -5
Looking good Bill!
|
|
|
|
Post by wbill76 on Mar 29, 2016 11:12:28 GMT -5
Thanks Terry!
|
|
|
|
Post by wbill76 on Mar 29, 2016 17:34:09 GMT -5
It was finally time to tackle the main event, ZiS-3 76.2mm gun. There are 6 steps in the instructions devoted to getting it together. Starting in Step 26, the three-part breech is assembled and added to the main gun barrel. The step also adds the breech block but I left it off, for now, to make it easier to paint and detail it later. The parts go together nicely with just a little bit of sanding necessary to get the joins to disappear. 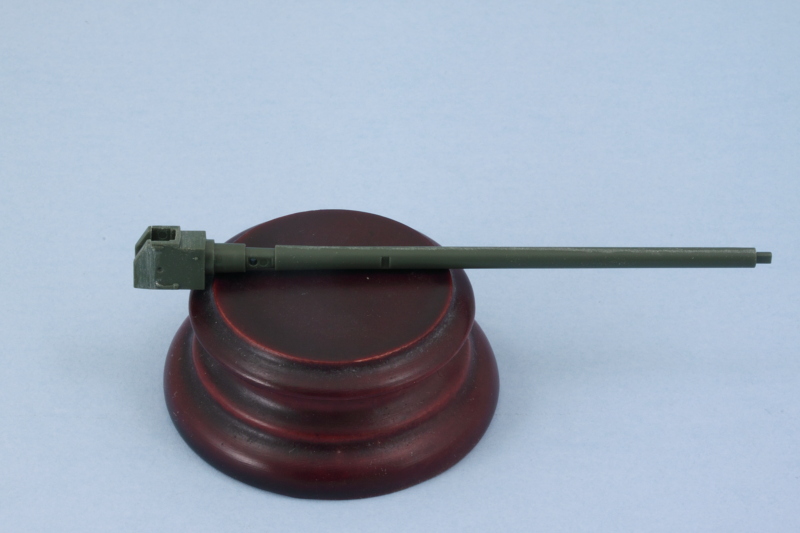 Step 27 adds the recoil mechanisms and slide tray. A polycap goes in between the recoil portions and is what allows the gun to hold its position and remain elevatable. The recoil guard had some small ejector marks that needed to be removed on its inside face and I also added the block activation lever mechanism as called for. This can only be positioned one way, with the block closed, due to the use of 2 locating pins to get it in the right spot. 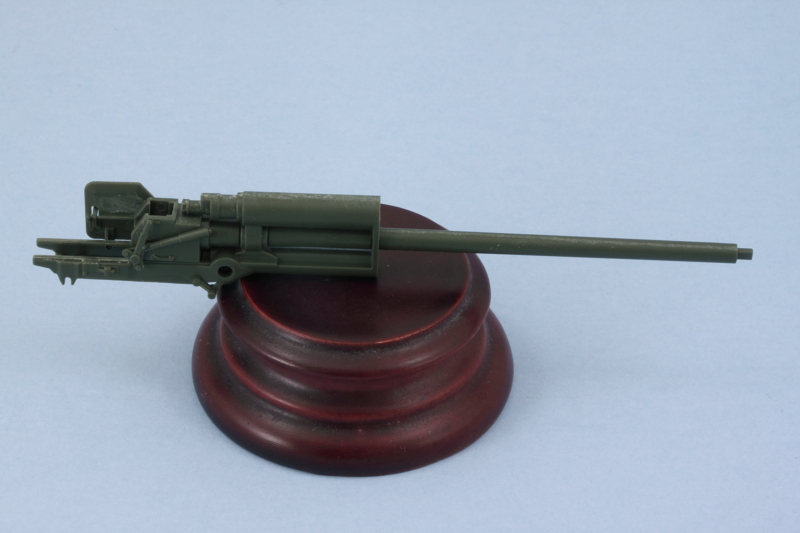 Step 28 continues the assembly with the addition of the side supports for the gun mount and the mount post that supports the gun in the hull. It also adds the part of the gun under the recoil tray that includes the rear part of the travel lock. 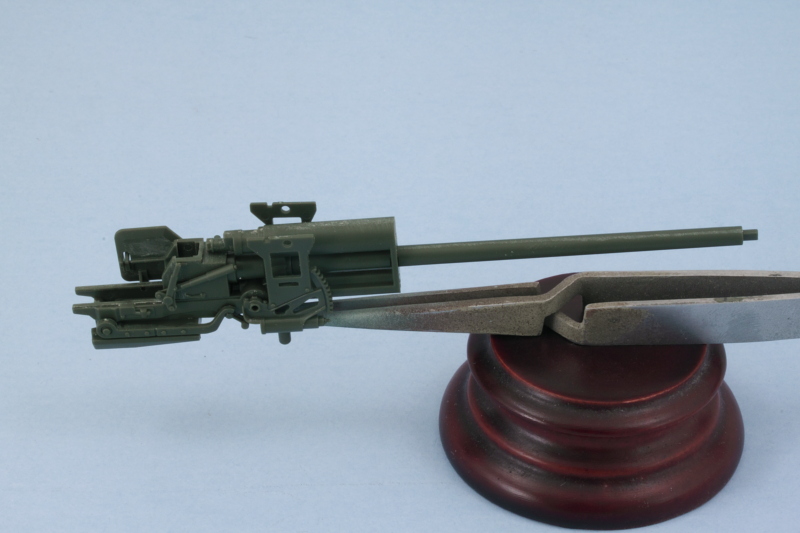 Step 29 is a fairly simple one, it adds the small support tabs for the mantlet sides as well as the elevation and traverse mechanisms along with their hand wheels. I left the wheels off for the time being to make it easier to paint the gun and its details and will add them later. It's also important to note here that the smaller wheel, C77, has to be positioned just so in order for the gunner's hand to match up with it if you plan to use the kit-supplied figures. The instructions include a little 'note direction' callout to help with this but it's not an exact thing to try to eyeball without the gunner already built to help you out.  I also left off the gunner's sight but will add that later on. 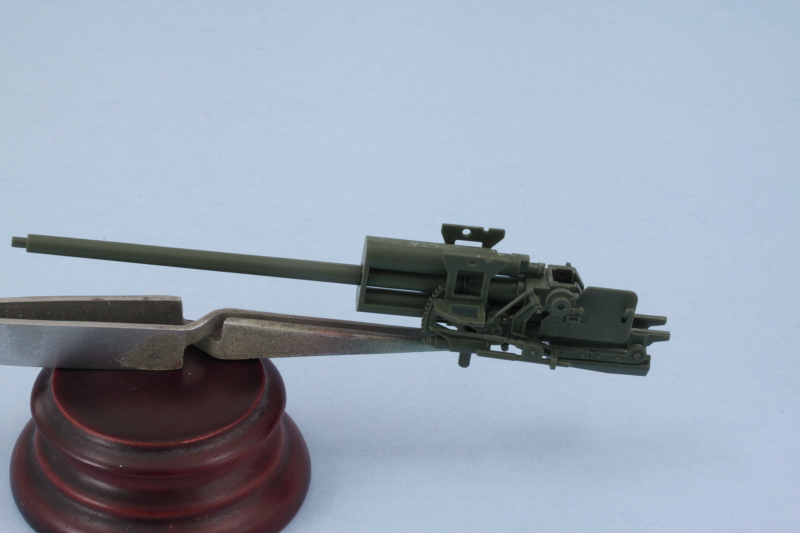 Step 30 adds the sides and top of the armored mantlet for the gun. I used a little bit of finger pressure to flex the sides in just a touch to mate up properly with the top and applied liquid glue so it would grab and create a solid join. 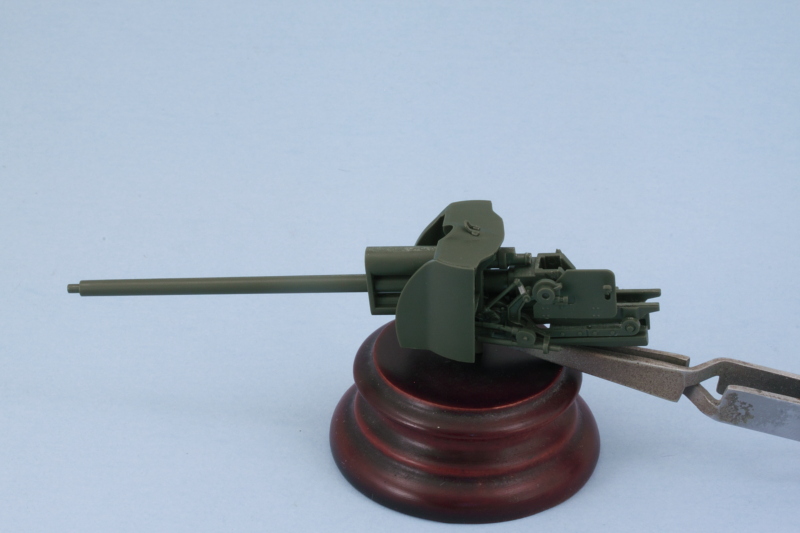 Step 31 assembles the external armored covers for the recoil mechanism and the front plate for the mantlet. I assembled the two halves of the cover first, then added the front plate, then added it all to the mantlet front plate. Just a tiny amount of putty was needed at the top to close up a small gap with the weld seam that's molded on the mantlet front plate. 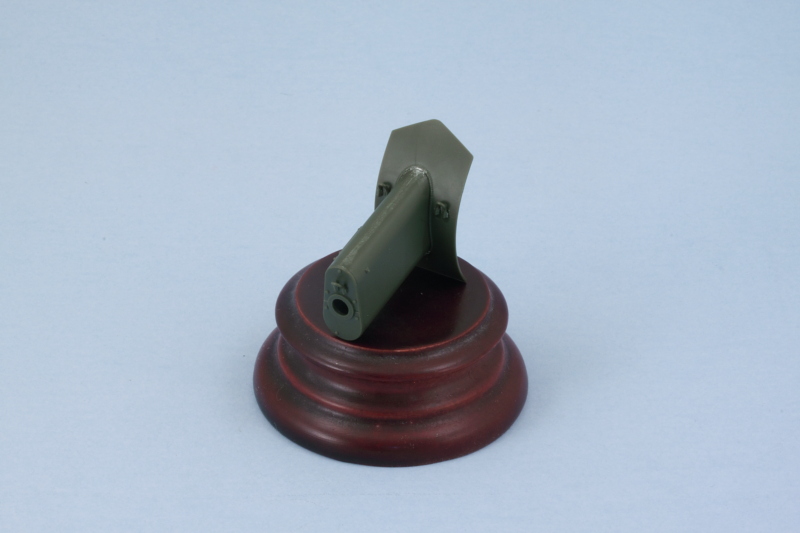 The step also calls for the assembly of the muzzle brake. This is a split-half arrangement, but careful use of liquid glue and some light sanding took care of the small join seam. The recoil cover and mantlet front aren't meant to be glued onto the gun and instead rely on a tight friction fit to keep it in place while still allowing the gun to elevate. The instructions give you a heads-up on this by clearly telling you NOT to glue the curved plate to the rest of the mantlet structure. 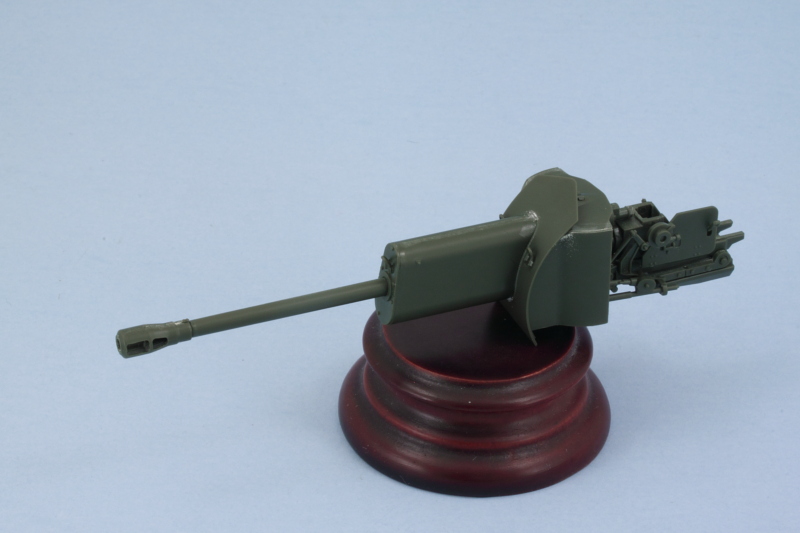 Step 33 has you install the gun into place using the polycap and that also allows you to pull the gun in and out for test fitting before committing to the final installation. Step 35 assembles the mantlet top armor that locks the gun into place out of 3 different pieces that all fit together to create the spaced plate arrangement. A quick check with the gun shows everything lining up like it should. It also showed me that I had missed one of the lifting eyes on the engine access hatch on the front hull, so that got checked off while I was at it. 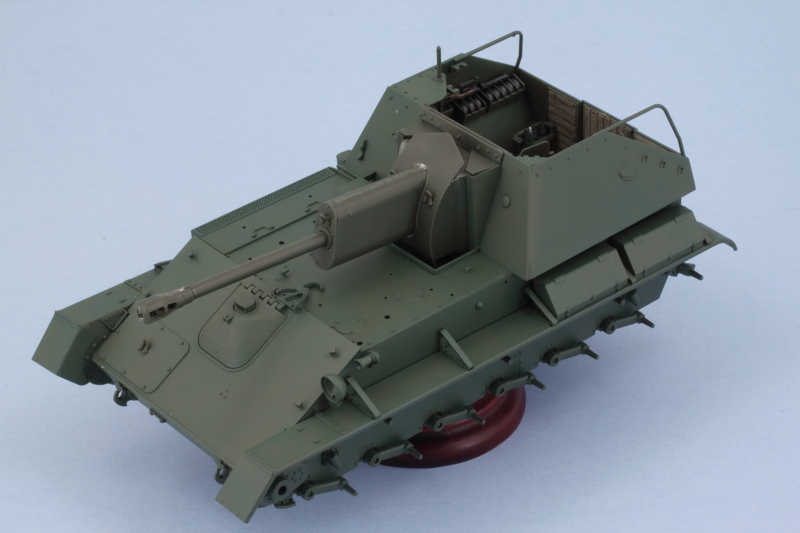 That meant it was time for paint! I airbrushed the gun assembly using the same process on the hull. 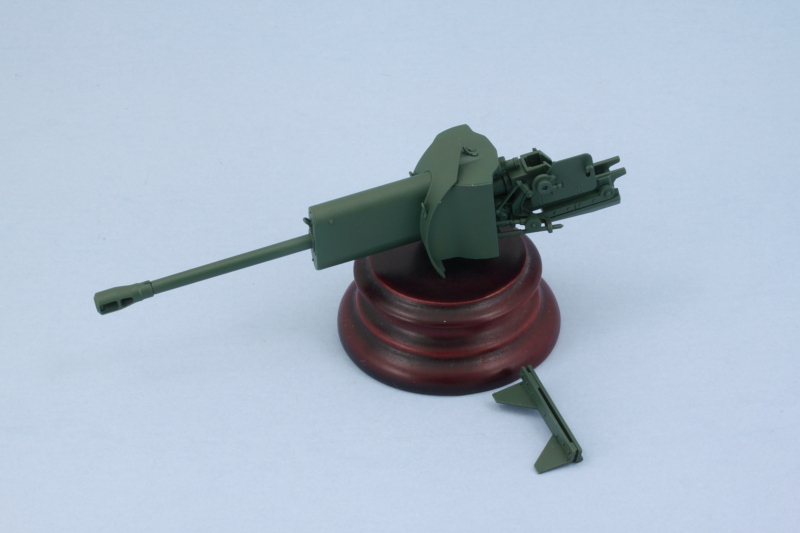 Since this was the last time I had planned to have the airbrush set up with the hull colors, I placed the gun and mantlet cover and checked for consistency. After some minor changes and adjustments, it all looks like it belongs to the same vehicle!  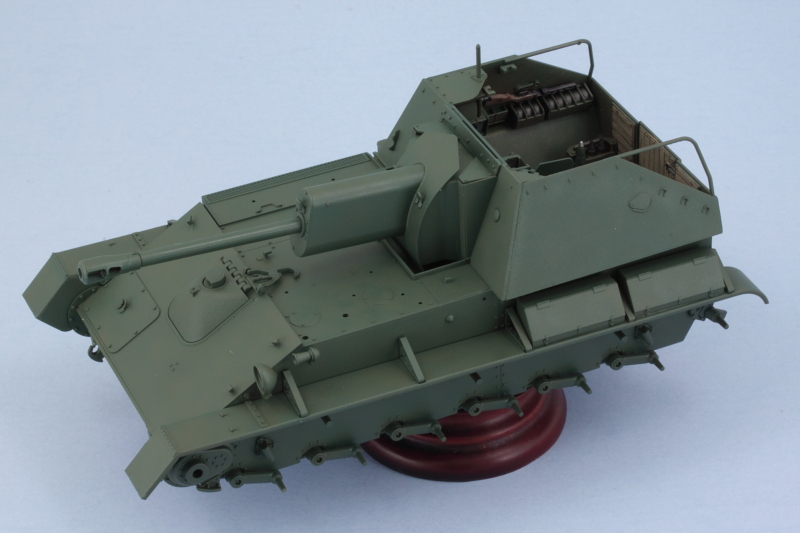 Next up will be dealing with all the hull equipment that needs to go on the main deck and other spots. |
|
|
|
Post by Leon on Mar 29, 2016 17:45:42 GMT -5
Nice work on the gun Bill and great job on the paint match up!   |
|
vlpbruce
Full Member
  
Member since: March 2013
Posts: 1,463 
|
Post by vlpbruce on Mar 29, 2016 18:02:50 GMT -5
Great work pal. She's coming along nicely.
|
|
|
|
Post by wbill76 on Mar 29, 2016 18:23:39 GMT -5
Thanks Leon and Bruce! I know I'm getting close to the end as I've already emptied 2 whole sprues...that would never happen with a Dragon kit.  |
|
martslay
Full Member
  
Member since: February 2016
Posts: 1,113 
|
Post by martslay on Mar 30, 2016 1:17:03 GMT -5
Looks good! Tamiya is famous for easy assembly. True 'pleasure' can be taken from the MENG 9A52-2 SMERCH model. Enormous quantity of details.  |
|
|
|
Post by dupes on Mar 30, 2016 5:52:03 GMT -5
Man...making short work of this one, Bill!
|
|
reserve
Senior Member
   
Member since: July 2012
Si vis pacem para bellum
Posts: 2,372
Jul 11, 2012 9:11:45 GMT -5
Jul 11, 2012 9:11:45 GMT -5
|
Post by reserve on Mar 30, 2016 9:11:47 GMT -5
Mighty purty sir
Regards,
Mark
|
|
|
|
Post by wbill76 on Mar 30, 2016 10:21:00 GMT -5
Martin, you're right about Tamiya. No complaints on the engineering and fit for sure on this one! Dupes, building OOB certainly has some advantages!  Mark Mark, doing my best in this strange land of 4BO! 
|
|
|
|
Post by dierk on Mar 30, 2016 10:55:51 GMT -5
Looking very good Bill - I'll have to try that OOB malarkey one of these days  "in this strange land of 4BO!" Welcome to my world!  |
|
|
|
Post by wbill76 on Mar 30, 2016 11:05:49 GMT -5
Looking very good Bill - I'll have to try that OOB malarkey one of these days  "in this strange land of 4BO!" Welcome to my world!  It definitely speeds up the build process, no doubt about it! The Tamiya kit could benefit from a little PE in spots like the air intake on the engine deck for example. We are working to keep balance in the universe after all.  |
|
maschinenkrueger
Reviews member     Jan & Dec 2014 MoM Winner
Member since: June 2012
You want MaK with that?
Posts: 836
Jun 7, 2012 9:50:05 GMT -5
Jun 7, 2012 9:50:05 GMT -5
|
Post by maschinenkrueger on Mar 31, 2016 17:32:34 GMT -5
You are making rapid progress of this Bill. Very nice work. Great attention to the details and paint.
I'll wait for a canvas cover for the fighting compartment first before I tackle this one ;-)
|
|
|
|
Post by wbill76 on Mar 31, 2016 17:34:13 GMT -5
You are making rapid progress of this Bill. Very nice work. Great attention to the details and paint. I'll wait for a canvas cover for the fighting compartment first before I tackle this one ;-) Thanks Brian! That's one way to make life easier when it comes to dealing with the interior I guess!  |
|
|
|
Post by wbill76 on Mar 31, 2016 19:00:23 GMT -5
I spent the day working mostly on the gun's details so I could get it installed permanently into the compartment. That involved working on several different areas including the gunner's sight. The kit part has solid faces all around, so I used a micro-drill to open up both the eyepiece portion and the top sight opening itself. I also used the same approach as with the fighting compartment to weather the rear parts of the gun and mount to get them to match up. 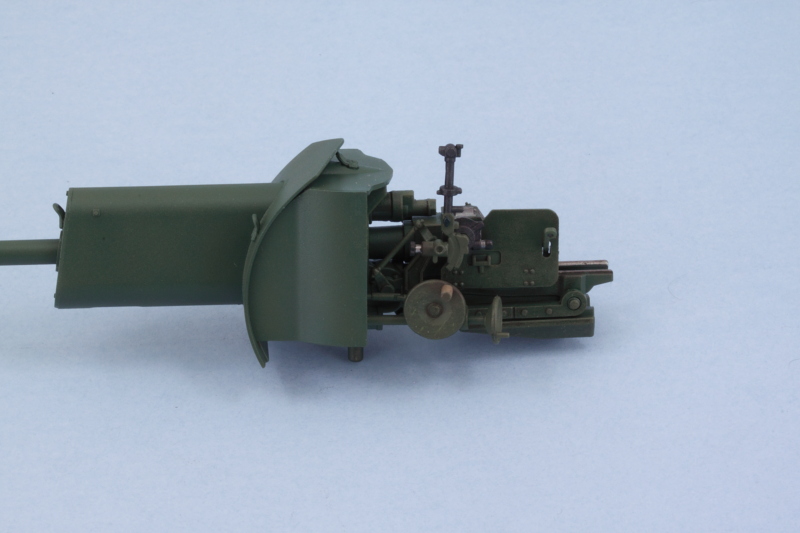 Detail work also included getting the breech block painted and installed and the bare metal surfaces on the recoil sled picked out. 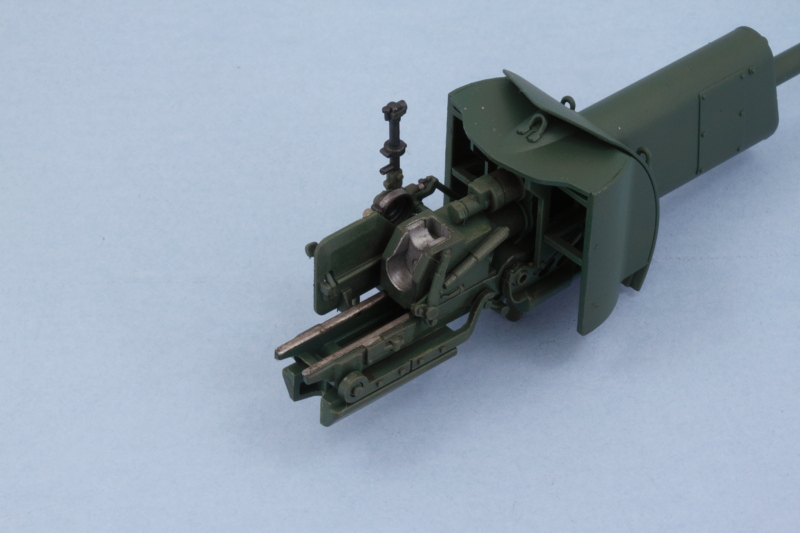 With the gun now detailed, I installed it permanently into position. I made sure to firmly press the gun all the way down into the polycap's mount since it needs to be down far enough not to cause any interference with the top mantlet piece that locks it all in place. A little bit of liquid glue around the triangle portions of the mantlet piece and some careful gentle finger pressure got it all joined together. Once I had that done, I also worked on detailing the 3 periscopes that go into the fighting compartment. The kit parts are molded in one piece in the green styrene, not clear, and had an ejector mark on one side that had to be dealt with. To simulate the clear faces, I applied some enamel Steel followed by a dose of Tamiya Clear Smoke. Tamiya does include a clear sprue in the kit (oddly enough, only 1 of the 8 parts on that sprue actually gets used, the headlight lens) but I don't think it's really designed for this kit per se. The clue is that the sprue includes 4 sets of goggles that have no possible use on this vehicle or its figures, so perhaps they just repurposed it from another kit or set? Either way, it wouldn't have been hard to have clear periscopes for a little more detail potential since they are so prominent in the fighting compartment. 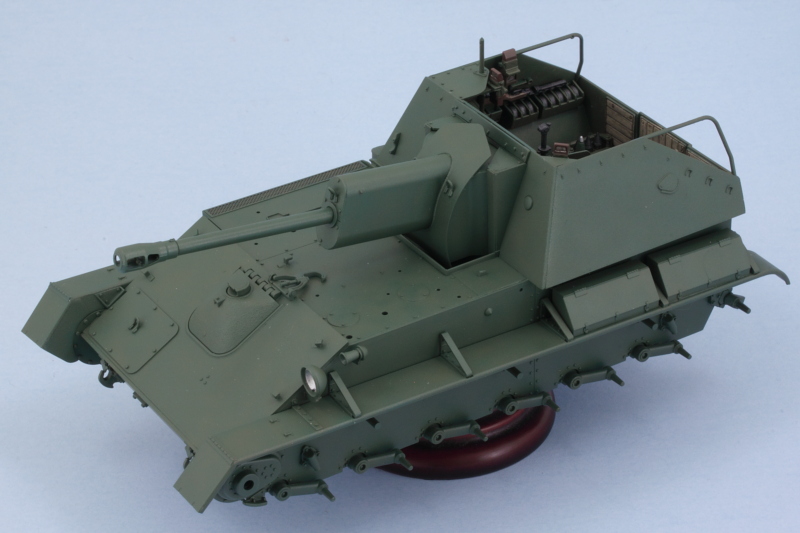 I also started on the hull details by working on the side air intake. This is molded solid with a grill pattern so I used a thinned wash of MM enamel Gunmetal to darken up the spaces in the mesh pattern. A careful drybrushing of the 50/50 OD/Russian Armor Green with a small square tip blender brush brought the mesh pattern back out so it would have some depth (or the best possible simulation of it at any rate) to its look. 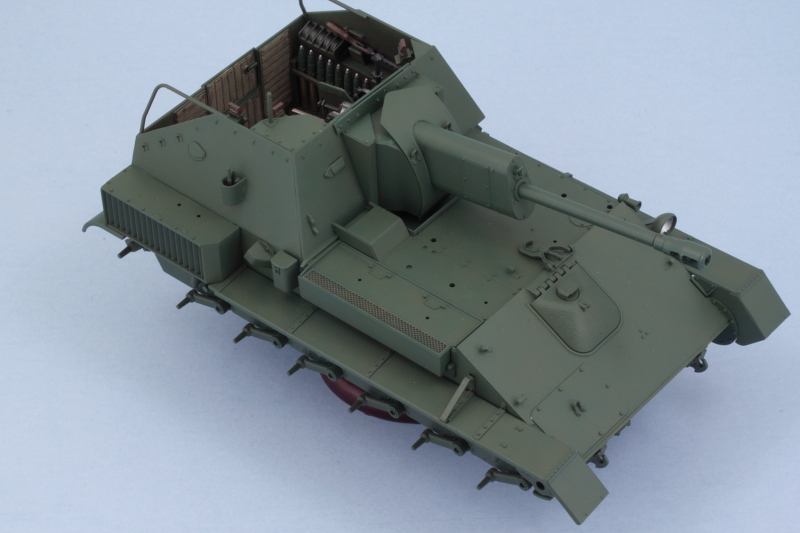 Tools and the exhausts are next! |
|
vlpbruce
Full Member
  
Member since: March 2013
Posts: 1,463 
|
Post by vlpbruce on Mar 31, 2016 19:15:32 GMT -5
Great progress as usual my friend.
|
|
|
|
Post by wbill76 on Mar 31, 2016 20:15:22 GMT -5
Thanks Bruce! Plugging away a little bit at a time!  |
|
|
|
Post by dierk on Apr 1, 2016 4:39:40 GMT -5
Looking good Bill - really like your style of blogging (almost as much as I like my own  ) |
|