|
|
Post by Tojo72 on Apr 23, 2016 7:23:13 GMT -5
Very nice Bill,love that 3 color camo.
|
|
|
|
Post by wbill76 on Apr 23, 2016 11:48:24 GMT -5
Martin, Marc, Anthony and Leon, thanks for the comments as always!  Wouts Wouts, you've got a full plate at the moment for sure!  You can take comfort in knowing that Yamato has planes of its own.  Stunning paint Bill! Always happy to learn something new, I have heard of face-, finger- and brush-painting, but how does hand painting work?   Very simple Dierk, start with your standard issue hand, insert a brush into the hand in the least comfortable pose imaginable, then attempt to get even paint coverage in places no one will ever see. Rinse and repeat as required. Voilà!  Got to love the English language...of the three examples you cited as hearing of, one refers to the surface being painted and the other two refer to the tools used to apply the paint. So you can do finger painting with face painting quite easily but I wouldn't recommend trying it the other way around. 
|
|
|
|
Post by dierk on Apr 23, 2016 11:52:29 GMT -5
Thank you for confirming my suspicions Bill!  "Got to love the English language" Indeed you do, send anyone who doesn't round to mine and I'll make them  |
|
|
|
Post by wouter on Apr 23, 2016 15:36:58 GMT -5
Wouts, you've got a full plate at the moment for sure!  You can take comfort in knowing that Yamato has planes of its own.  More than full indeed, so no planes any soon ^^. No planes for Yamato btw, one her final trip she didn't carry planes nor extra boats...Following your Corsair build will do for the time being  Cheers |
|
|
|
Post by wbill76 on Apr 23, 2016 15:45:21 GMT -5
Wouts, you've got a full plate at the moment for sure!  You can take comfort in knowing that Yamato has planes of its own.  More than full indeed, so no planes any soon ^^. No planes for Yamato btw, one her final trip she didn't carry planes nor extra boats...Following your Corsair build will do for the time being  Cheers That makes sense considering it was a one-way trip...no need for those things under that condition.  |
|
|
|
Post by wbill76 on Apr 23, 2016 17:29:33 GMT -5
Not a huge update this time around due to having to do some pruning work on a large elm tree that grows in my front yard. That time of year!  I did get the prop painted and detailed though despite the little detour. Airbrushed MM enamel Flat Black, then hand painted the hub with MM enamel Intermediate Blue. The kit calls for the hub to be red but from what I've gathered, that was true only for the VMF-111 markings option and the VF-17 that I'm going with had the blue hub. Careful masking and some airbrushed MM enamel RLM 04 Gelb added the tip markers. 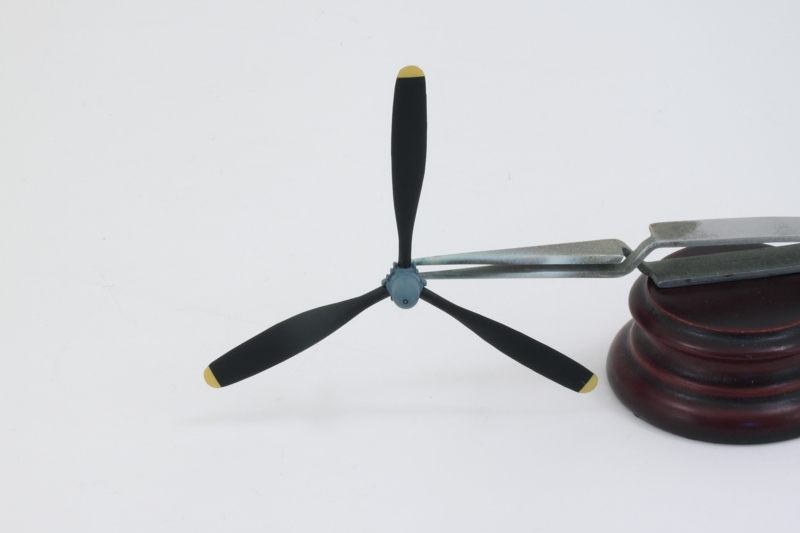 Looks right at home when combined with the engine. The polycap mount design makes it a breeze to pop it on and off as needed. 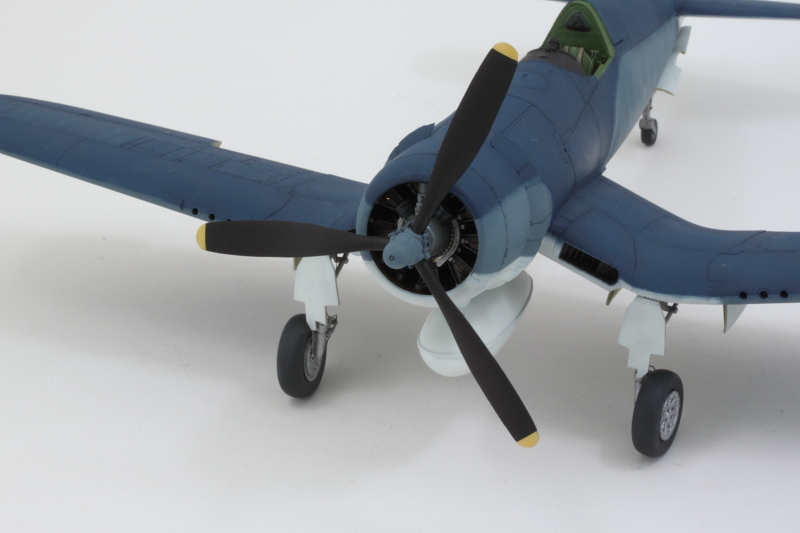 Next up will be some Future treatment to get ready for the multiple decal sessions that this will call for. I'll keep the prop separate to make life easier during the Future and decal stages as it's kind of big and 'snag prone' as a result. |
|
|
|
Post by wouter on Apr 23, 2016 23:24:03 GMT -5
Good to see the prop mounted, now she's really a plane  Love the way Tamiya and some other manufacturers work with those polycaps. Sure has it's pros! Cheers |
|
|
|
Post by wbill76 on Apr 24, 2016 12:24:26 GMT -5
Good to see the prop mounted, now she's really a plane  Love the way Tamiya and some other manufacturers work with those polycaps. Sure has it's pros! Cheers I agree Wouts, definitely makes life easier in many respects. Plus it also leaves the prop able to turn so you can twirl it around and make rumbling engine noises when no one's around.   |
|
|
|
Post by wbill76 on Apr 25, 2016 21:27:47 GMT -5
|
|
|
|
Post by dierk on Apr 26, 2016 2:09:30 GMT -5
Looking good Bill! Shame I missed your previous update - could've said 'it's starting to look like a prop-er plane'  |
|
martslay
Full Member
  
Member since: February 2016
Posts: 1,113 
|
Post by martslay on Apr 26, 2016 2:22:58 GMT -5
Looks good Bill! Very much it is pleasant to me!
|
|
|
|
Post by wing_nut on Apr 26, 2016 6:27:28 GMT -5
Nice! That qualifies as "Styagra"
|
|
|
|
Post by Leon on Apr 26, 2016 6:51:39 GMT -5
Nice work on the decals Bill!
|
|
|
|
Post by wbill76 on Apr 26, 2016 10:21:04 GMT -5
Martin, Leon, and Marc, much appreciated gents!  Looking good Bill! Shame I missed your previous update - could've said 'it's starting to look like a prop-er plane'  Never let a good pun go to waste Dierk! 
|
|
jsteinman
Full Member
  
Member since: March 2013
Posts: 735
Mar 24, 2013 9:29:10 GMT -5
Mar 24, 2013 9:29:10 GMT -5
|
Post by jsteinman on Apr 26, 2016 10:36:08 GMT -5
Yummy - and PSP too!
|
|
|
|
Post by dierk on Apr 26, 2016 12:23:30 GMT -5
Never let a good pun go to waste Dierk!  Or a bad one for that matter  |
|
|
|
Post by wbill76 on Apr 26, 2016 12:43:11 GMT -5
Thanks John! The PSP was a nice find, it's molded in black styrene with very good detail. And much cheaper at $6 a pop than trying to do it with PE that's for sure!  |
|
|
|
Post by wouter on Apr 26, 2016 12:45:41 GMT -5
Strangely enough, one of the more 'relaxing' stages to do on an airplane, the decs  Gives is so much more character now. Looking very very good there Bill! Cheers |
|
|
|
Post by wbill76 on Apr 26, 2016 19:01:35 GMT -5
Strangely enough, one of the more 'relaxing' stages to do on an airplane, the decs  Gives is so much more character now. Looking very very good there Bill! Cheers Thanks Wouts! Always adds so much to an aircraft.  |
|
|
|
Post by wbill76 on Apr 26, 2016 19:01:50 GMT -5
Made some good progress today on the base for the Corsair. I had picked up a nice piece of finished plywood that measures 11.75 inches square from Hobby Lobby as the foundation. Next, I had to figure out how to make the best use of the Eduard PSP bases since they measure 9.75 by 6.5 inches. That's why I ordered 2, I knew that no matter how I did the layout, one wasn't going to be enough on its own. After fiddling around with it, I decided to place the PSP portion at a slight angle and marked that out on the base so I could cut the two pieces accurately and maintain the needed end result. Since the PSP sections are hollow, I knew some supports would be needed to keep it level, so I drilled some holes in the wood and CA glued some short lengths of sprue in strategic locations to serve as props. 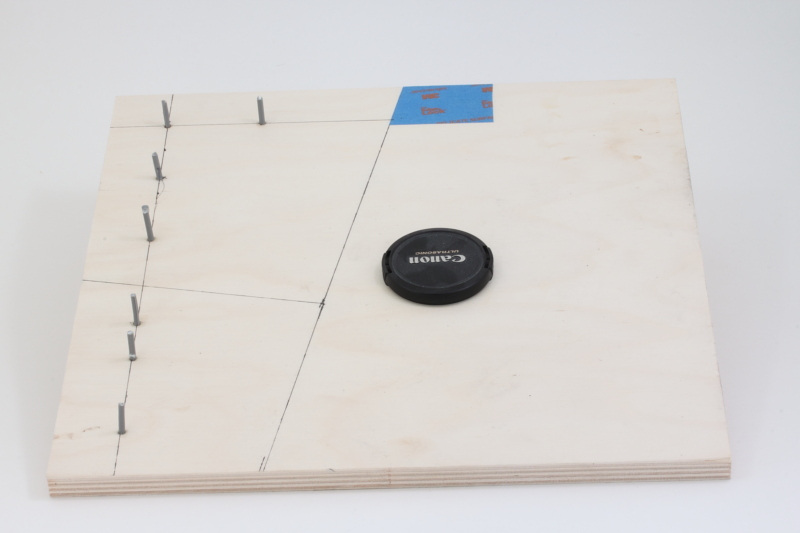 After some careful measurements, I used masking tape to define the angles I needed to cut on the two different sections and set to work with a razor saw. 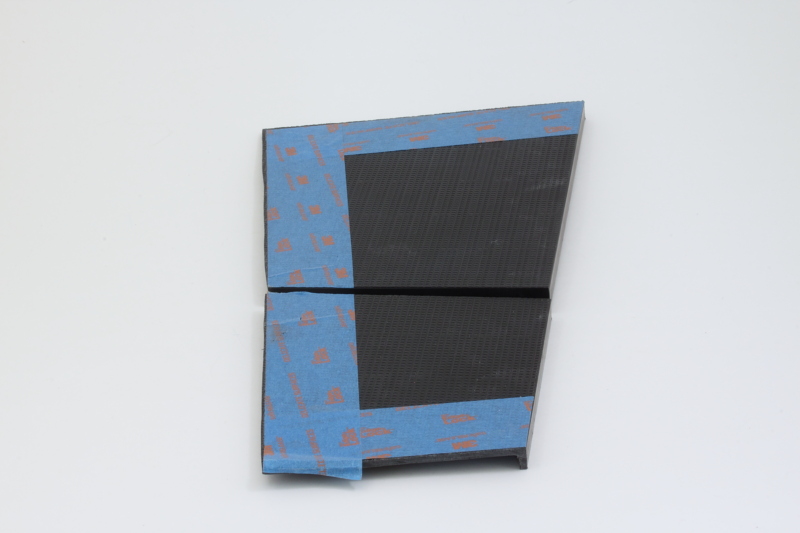 No matter how you slice it, there was going to be a slight gap between the two sections due to how they were molded. Rather than try to join the styrene sections into a single unit, I decided to use the base to my advantage. The bottom section was placed first with CA glue then the top was added. Clamps and liquid glue secured the sections to the support posts and some white styrene rod of different lengths was used to fill the gap in between. 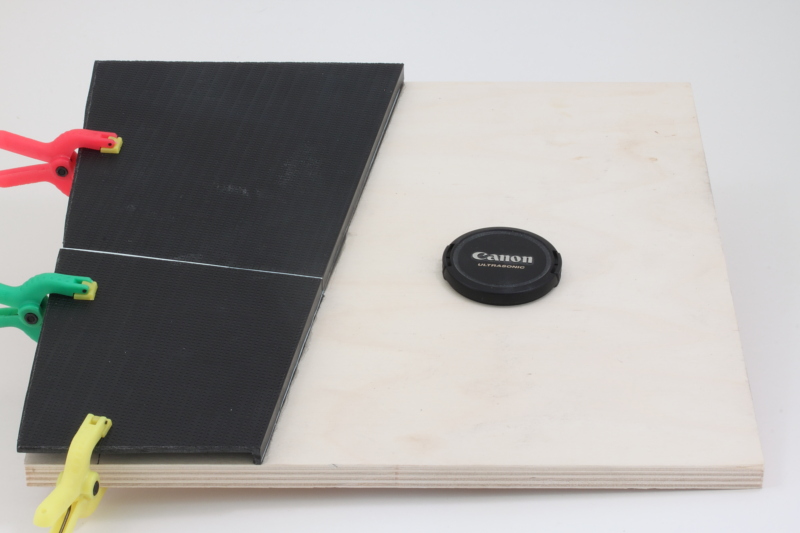 Strip styrene was glued to the exposed edges to blank them off and some putty and sanding down to the section join. I had deliberately left a slight overhang all around when I made the razor saw cuts to make life a little easier vs. trying to get it perfectly flush to the wood base. 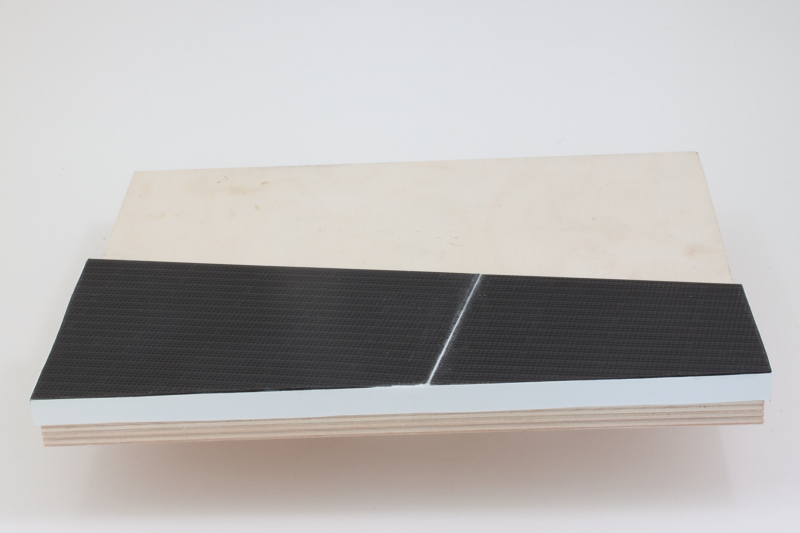 Here's how it will look when the rest of the base is complete in terms of how the Corsair will sit. 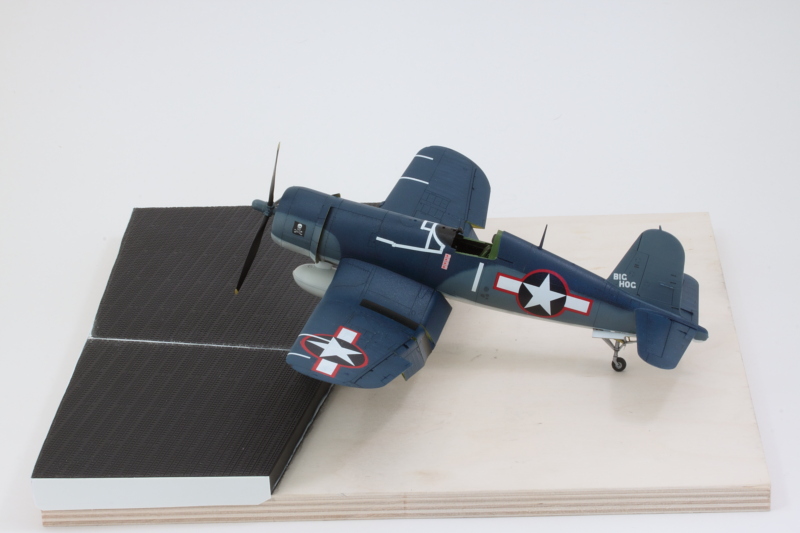 This is the reference I'm using for inspiration, hopefully, I can pull off a similar look with the rest of the base since it will be essentially sand/dirt. 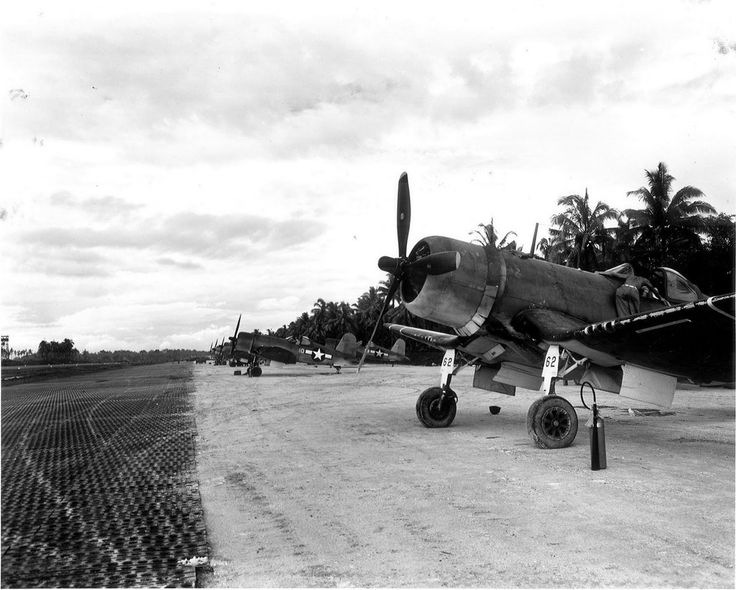 Still plenty to do!  |
|
|
|
Post by Leon on Apr 26, 2016 19:36:02 GMT -5
Nice start on the base Bill! I like the idea you have for it.  |
|
|
|
Post by wbill76 on Apr 26, 2016 19:48:00 GMT -5
Thanks Leon! Plugging away on it. The photo was a nice find.
|
|
TomN.
Full Member
  
Member since: August 2013
Posts: 143 
|
Post by TomN. on Apr 26, 2016 22:53:08 GMT -5
That's looking great Bill!!
May I ask where you found the Eduard PSP?
Tom
|
|
|
|
Post by wbill76 on Apr 26, 2016 23:06:20 GMT -5
That's looking great Bill!! May I ask where you found the Eduard PSP? Tom Thanks Tom! It's something that Eduard still produces, I actually found mine through Amazon of all places. Eduard sells it directly on their site as well. HTH! |
|
TomN.
Full Member
  
Member since: August 2013
Posts: 143 
|
Post by TomN. on Apr 26, 2016 23:53:41 GMT -5
Great! Thanks for the info Bill!
Tom
|
|
|
|
Post by dierk on Apr 27, 2016 3:07:23 GMT -5
Love your idea for a base Bill! Looking good  |
|
|
|
Post by wbill76 on Apr 27, 2016 9:41:21 GMT -5
Love your idea for a base Bill! Looking good  Thanks Dierk! My wife says it's funny how I keep making excuses to play in the dirt.  |
|
|
|
Post by armorguy on Apr 27, 2016 10:05:26 GMT -5
I had a lot to catch up here, sorry for not being as present as usual my friend, I was working in my garden last week and there's still a lot to do.
But let's talk about the plane now. The colors look spot on, decals look flawless and the base will be a perfect presentation for the model. Please don't forget to add the wheel dust tracks on it, it will be a stunning detail brotha Bill !
|
|
|
|
Post by wbill76 on Apr 27, 2016 11:00:51 GMT -5
I had a lot to catch up here, sorry for not being as present as usual my friend, I was working in my garden last week and there's still a lot to do. But let's talk about the plane now. The colors look spot on, decals look flawless and the base will be a perfect presentation for the model. Please don't forget to add the wheel dust tracks on it, it will be a stunning detail brotha Bill ! It's that time of year AG! The season demands yard, garden, and other types of work.  I had the same thought about those wheel dust tracks, will have to give it some thought to see how best to replicate it. |
|
|
|
Post by deafpanzer on Apr 28, 2016 17:00:57 GMT -5
The bird really looks GREAT!!! And now you are making the whole build even better with a cool looking base...
|
|