|
|
Post by deafpanzer on Dec 27, 2016 13:51:33 GMT -5
AWESOME!!! You are halfway I think... LOL
|
|
|
|
Post by wbill76 on Dec 27, 2016 18:12:11 GMT -5
AWESOME!!! You are halfway I think... LOL Just about Andy, now it's just a matter of getting all the components together...then painting...then decals...the aircraft world's version of road wheels!  |
|
|
|
Post by wbill76 on Dec 27, 2016 18:32:11 GMT -5
More progress today, I started in with the fuselage pod clean-up after it had a chance to set up overnight. I used Squadron white putty to fill a couple of gaps in different spots and also to help remove a slight step that occurred on the top near the cockpit edge. That step was a by-product of the locator pin that originally was there getting broken off back at the very beginning when I did the first dry-fits. I had used a small copper clip to try to minimize that and it was partly successful with the putty taking care of the rest. I also noticed that the egg-shaped antenna that goes on the pod underside relies on a cutout to fit...but the instructions never tell you to open up the spot required on the pod halves. I removed the little mount tab so it would sit flush and added it (the instructions also erroneously label it as part F55, there are two different ones on the F sprue to choose from, F60 or 61) flush to the underside halfway between the little smaller antenna and the radar operator's access hatch. Speaking of that hatch, it was also installed along with the ammo access doors for the 20mm gun bay. 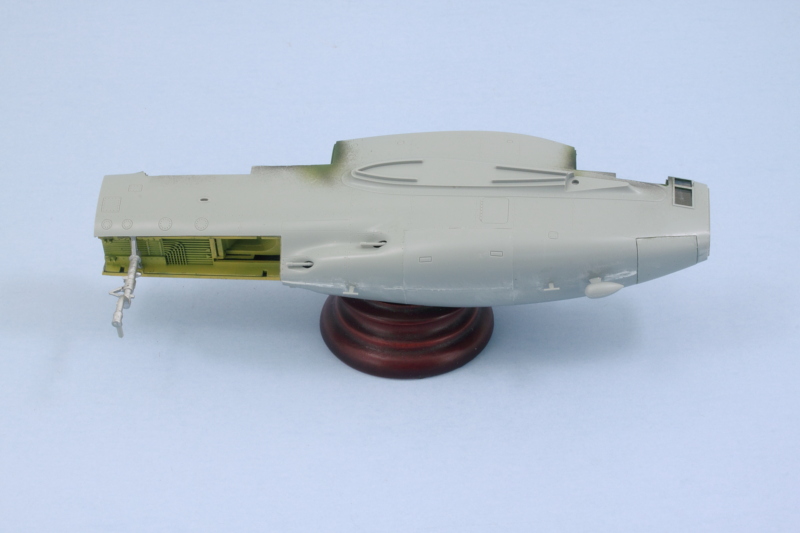 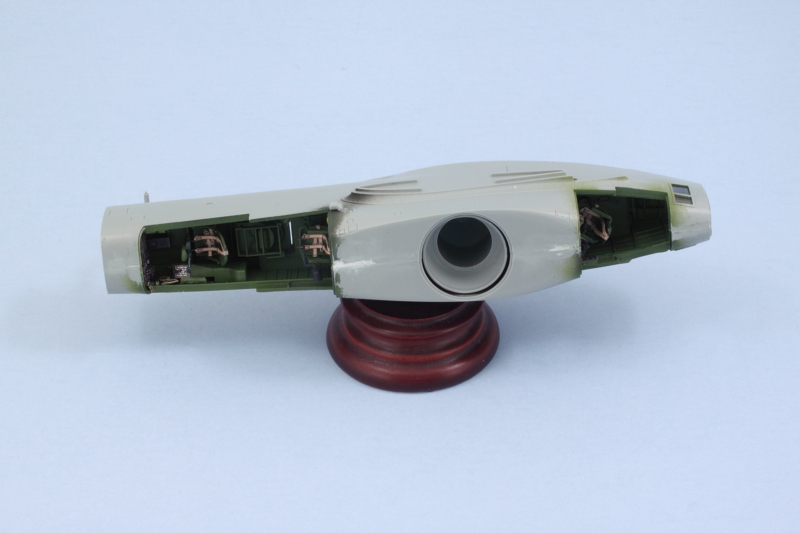 EDIT: EDIT: I was flipping through reference photos in the Squadron In Action book for something else on this build and it suddenly jumped out at me that the little egg-shaped antenna wasn't present on the underside of any of the P-61 variants pictured and the photos of one of Lady in the Dark's squadron mates, The Spook, clearly shows a 'clean' profile on the pod behind the hatch. So that got me wondering, and I found this photo of Lady in the Dark captioned as being on Ie Shima in 1945. 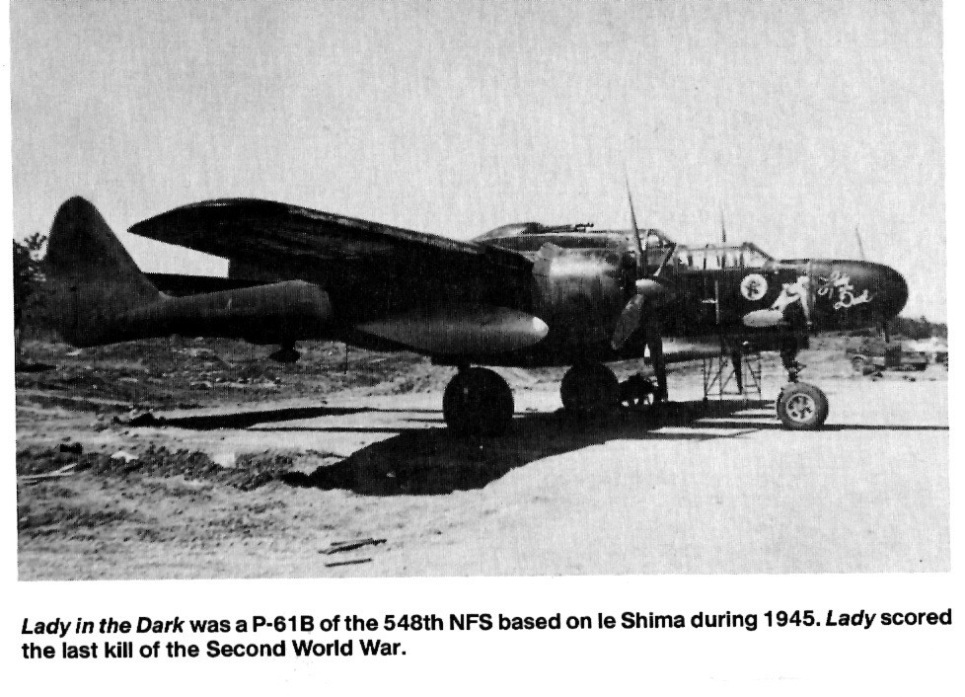 It shows an egg-shaped antenna, but on the boom, not the pod! That would explain, I guess, why there are 2 in the kit but they are never mentioned in the instructions. I'm guessing they took the place of the blade antennas at some point that are on each boom, but not 100% sure as the reference book never shows them or mentions them. So with that now known, I removed it from the pod and sanded it back clean. 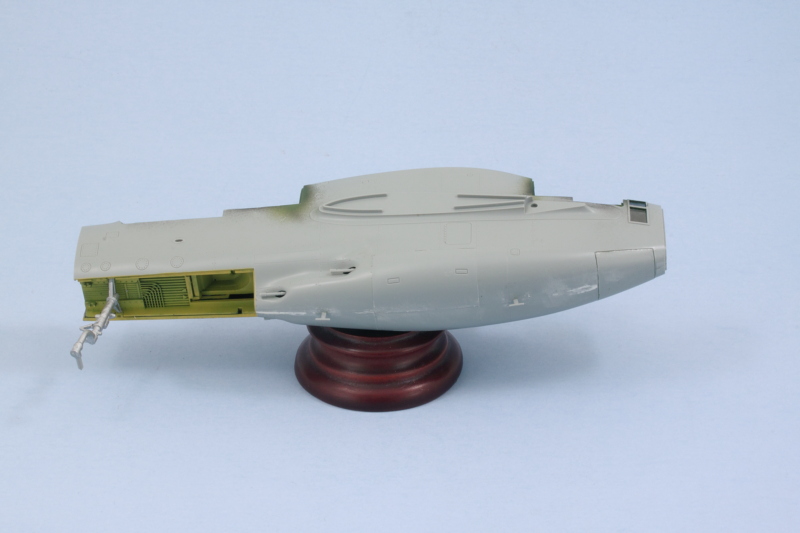 Next major item on the list is the twin tail booms. I used liquid glue to join the boom halves together starting at the front and working my way back using finger pressure along the way to get a solid join. I did a quick check with the main landing gear and it's just possible to slide the gear in and out of the pin slots, so that will make life a lot easier from a painting/finishing standpoint. Rudders were assembled around the hinge points on each boom and I also added the PE intake screens to the undersides of each boom. Light sanding on the join seams was all that was needed to clean them up. 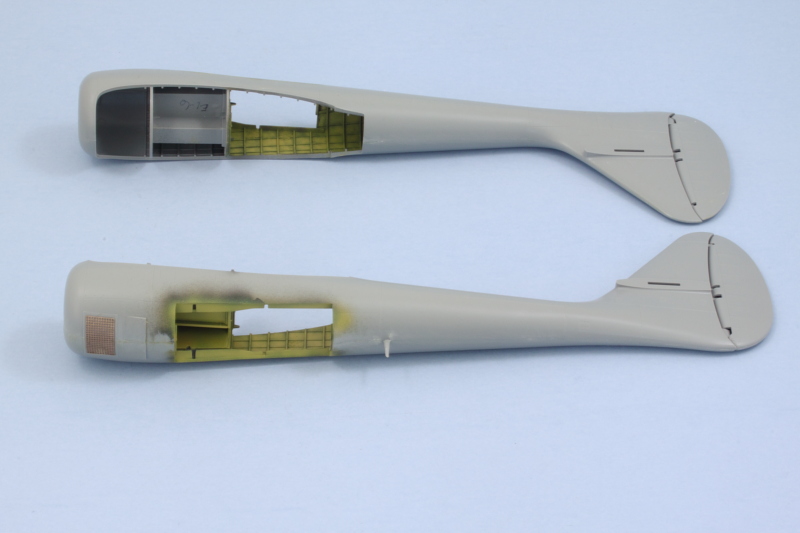 Time for the big plunge, adding the booms to the wings. It's important to keep the booms straight so that they attach to the correct wing so I had marked the tops of the gear bays so I could double-check that with the instructions before committing to the glue. Regular glue was applied to the engine nacelles so I could adjust the fit with the wing and then liquid glue was applied around the exterior of the seam to get it all solid. After holding it together with finger pressure so the glue could grab, I added a rubber band to the rear of the wing where it meets the boom for some extra help. There's a small gap on each wing in that area that will need some putty attention to fill but nothing too serious. 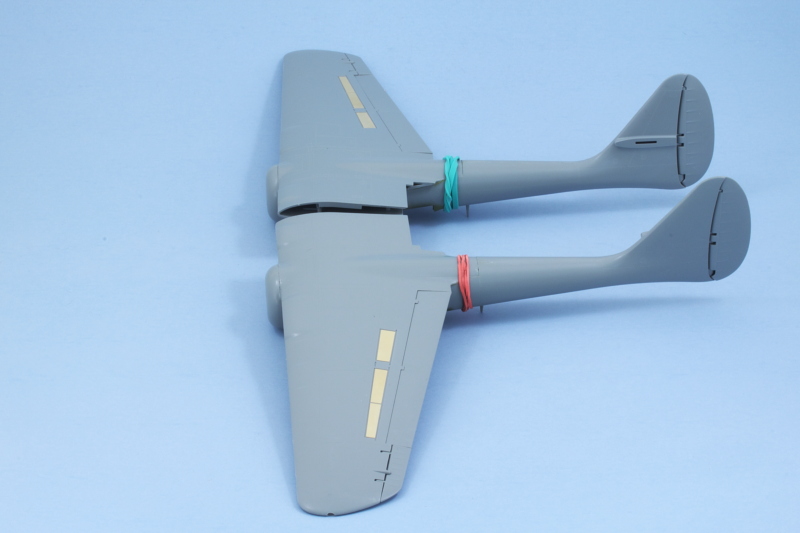 The P61 is a big bird, once the pod is added it's going to be fun handling it for both painting and photos! |
|
|
|
Post by Leon on Dec 27, 2016 18:48:02 GMT -5
Nice days progress Bill! Looks like things are playing nice so far.  |
|
|
|
Post by mustang1989 on Dec 28, 2016 16:50:08 GMT -5
First off, your progress is moving right along and looking fantastic. Secondly.................I'd hate to be the guy trying to get that dihedral right on the wings. That looks like fuuuuuuuuuuuuuuuuuuuuuuuuuuuuun!  |
|
|
|
Post by panzerjager2 on Dec 28, 2016 17:12:25 GMT -5
Once again VERY NICE WORK
|
|
|
|
Post by wbill76 on Dec 28, 2016 18:04:23 GMT -5
Thanks Leon and PJ, much appreciated! First off, your progress is moving right along and looking fantastic. Secondly.................I'd hate to be the guy trying to get that dihedral right on the wings. That looks like fuuuuuuuuuuuuuuuuuuuuuuuuuuuuun!  No kidding! Thankfully GWH designed the wings so that they connect to the fuselage pod in such a way that you don't have to worry about that. |
|
|
|
Post by wbill76 on Dec 28, 2016 20:53:20 GMT -5
One of the things I really like about this kit is that it includes an excellent solution to the tail-sitting problem by way of a very large and appropriate nose counterweight. The counterweight is a hefty chunk of cast white metal that is shaped to fit inside the radome nose perfectly in place of the radar gear. To secure it in place, I used CA gel around the weight at roughly its midpoint and slid it into the clear radome nose. This was followed by some 2-part Aves EpoxySculpt to ensure it wouldn't come loose and rattle around in the future and also would add a little more weight to fill up the nose proper. Once that had started to cure, I added the nose bulkhead to the pod and then installed the nose permanently in place with liquid glue so I could make sure it all lined up properly. Due to the heavy weight, I braced it up vertically inside the kit box and let gravity help out for an hour or so while the glue firmly set. 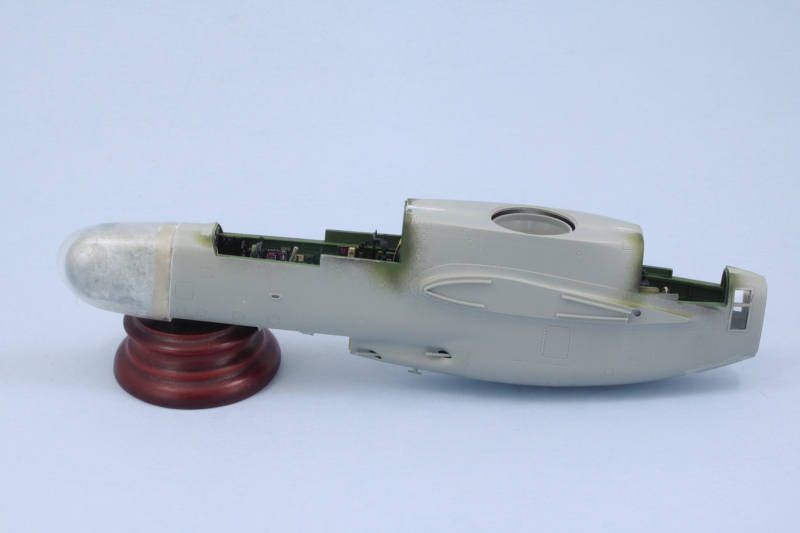 I had debated whether or not to fit the pod to the wings before working on all the canopy glass or after, so I did some test fits to see how it would all play together to help make up my mind. The fit is good but not perfect, so that made the decision for me as handling is much simpler with the pod separate, especially since there are multiple parts needed to get the cockpit and radar operator areas' glazing done. The kit has the option to pose portions of both the forward and rear areas open but these will be closed up for my build. To facilitate that, I installed the large portions in place first with a combination of liquid glue and careful finger pressure to get it all to fit properly. I used latex gloves to prevent leaving any prints on the clear parts during their clean up and installation during this process, just had to be careful not to get any glue on the latex. 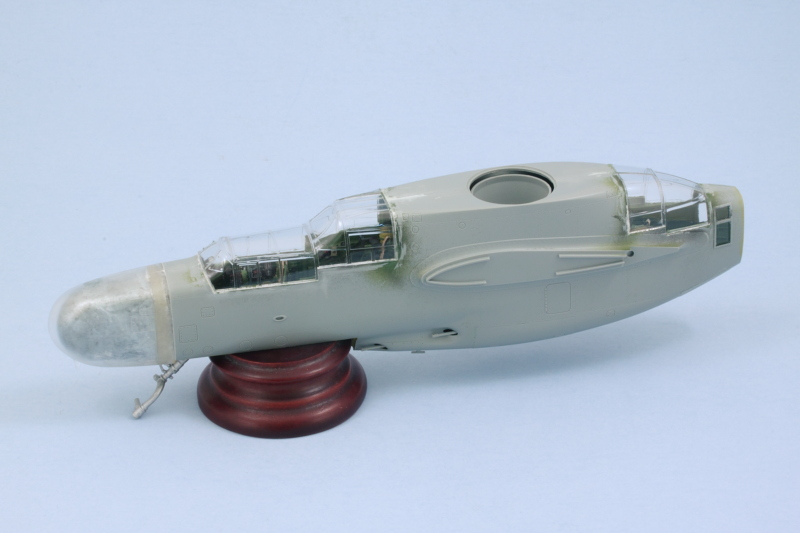 Some careful sanding and putty work was necessary in a couple of spots. I also painted up the small reinforcing strip for the clear tail cone and installed it in place as the last piece of the canopy work. To protect the clear parts and remove any imperfections created during the install and sanding clean up, I brushed on a coat of Future to all the exterior clear surfaces. I'll let that cure up overnight before I add the kit-suppled pre-cut masks over the glass areas. 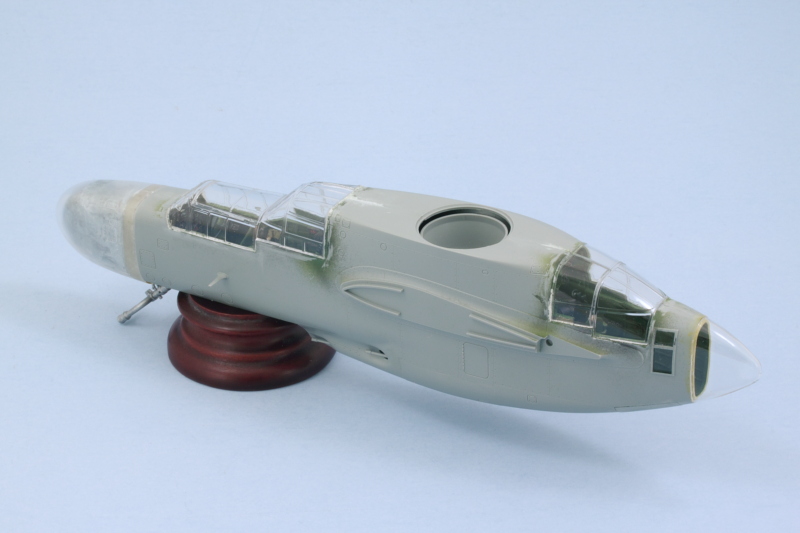 Last, but not least, I masked off the propeller blades with thin strips of masking tape to go around the compound curves and airbrushed some MM enamel Insignia Red for the hubs and cowl flaps. MM enamel Gelb was airbrushed for the tip markers as well. 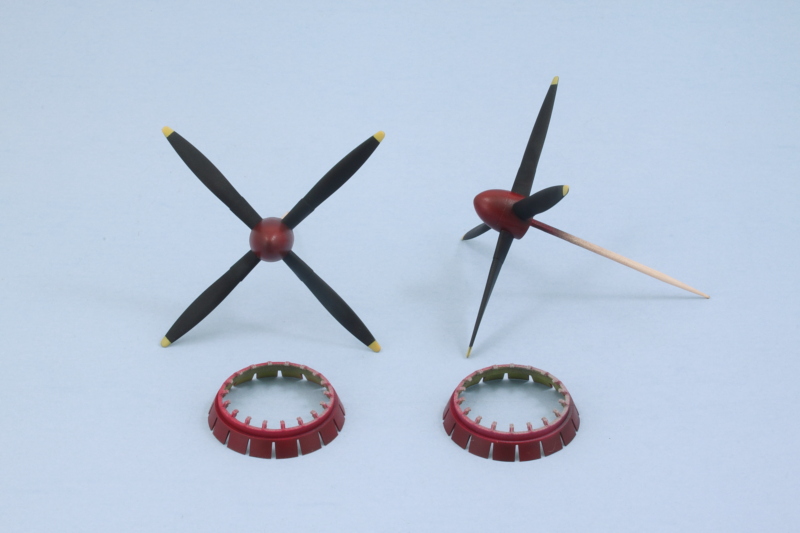 Tomorrow should see the whole thing come together in anticipation of throwing some Gloss Black at this baby. |
|
|
|
Post by wbill76 on Dec 30, 2016 17:52:30 GMT -5
Big push today towards the finish line as a follow-on to yesterday's work. I added the wings to the fuselage pod and let them set up overnight since the rear stabilizer needed the booms to be put under some slight tension to match up properly. A pair of rubber bands, liquid glue, and a little hand-holding later and it was all in place. 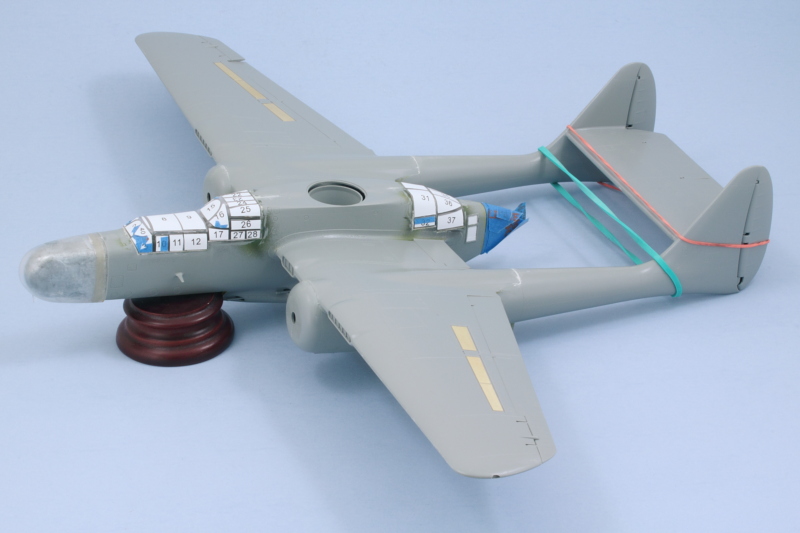 The last remaining structural detail was the quad-50 turret for the fuselage top, so that was taken care of as well. The assembly is a little tricky in terms of getting the guns lined up at the right elevation, each one has a little wiggle room in their mount so some patience is necessary to get all 4 sitting like they should. The instructions indicate that it should be able to rotate freely on top of the cylinder but mine sits very loose and will be glued down later after painting and detailing. 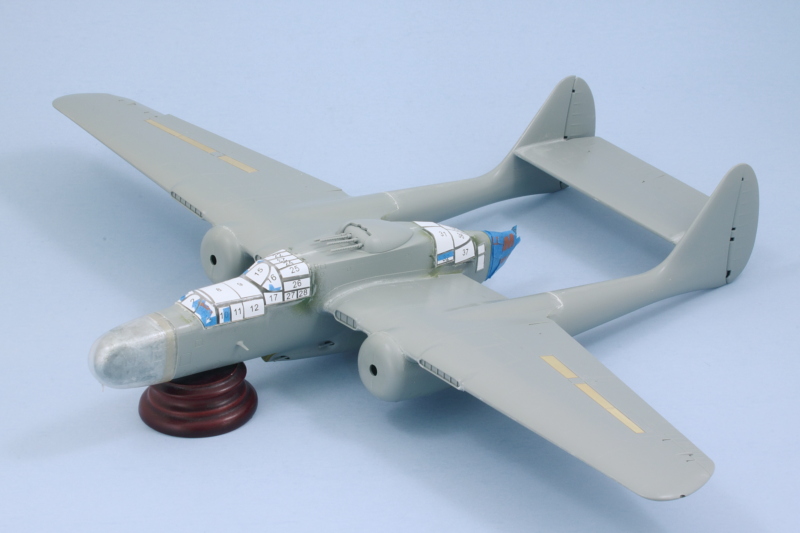 Speaking of paint, it was time to get the airbrush busy on the main paint work. I used MM enamel Flat Black as the overall basecoat color and built it up slowly using multiple thin passes. 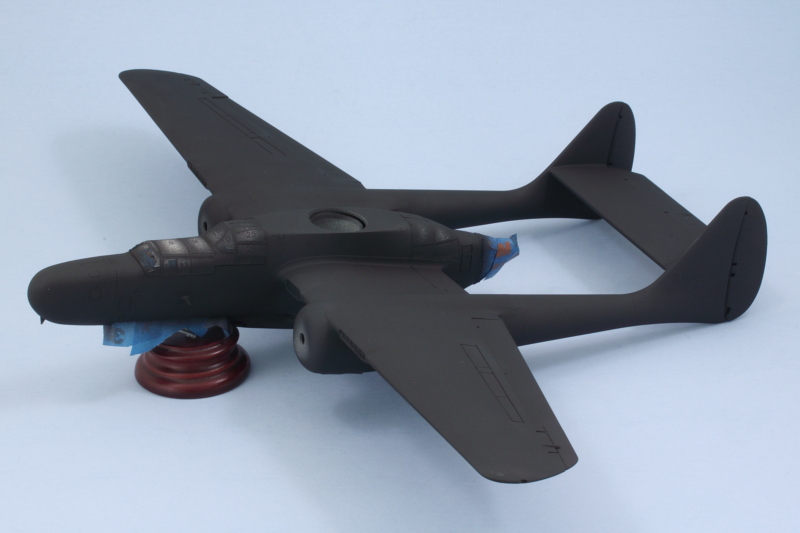 The Pacific environment wasn't kind to the gloss black finish on the P-61s and I wanted to produce a faded look, so I added a few drops of MM enamel Light Gray to the Flat Black to create a faded lighter shading coat. This was applied close-up, working a section at a time, and using the straight Flat Black as a pre-shade layer as well. 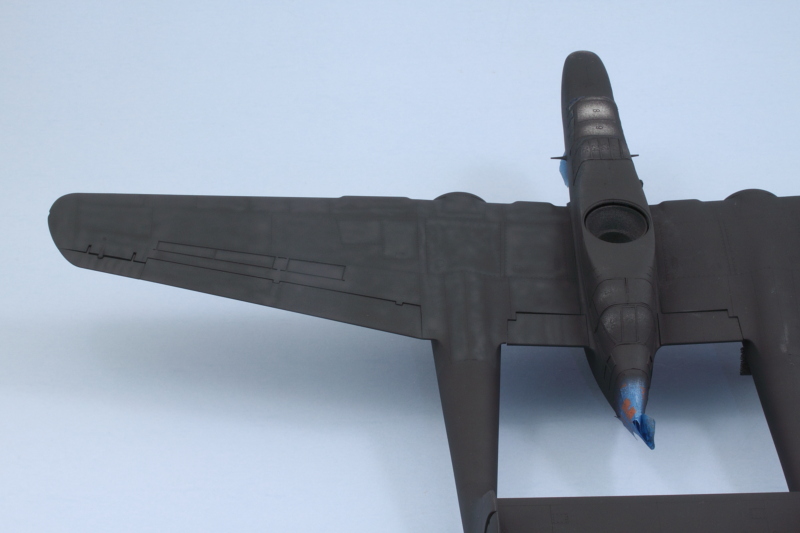 Takes a while, but it produces a nice result I think. It's subtle but what I was aiming for in the first place. Rather than try to do it with enamel Gloss Black, I will apply a Gloss varnish layer later on after the decals are in place to create the gloss finish to go with the faded look. 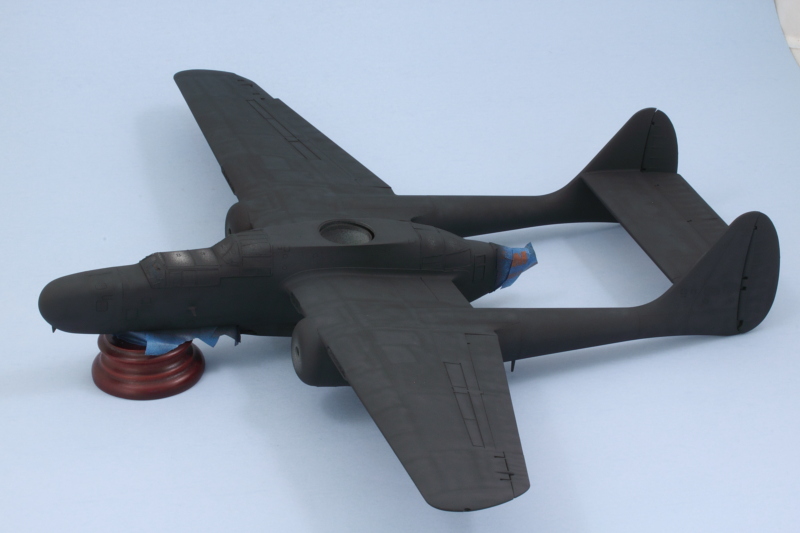 While I was at it, I also did the same work on the still separate pieces for the turret, gear doors, and engine cowls. 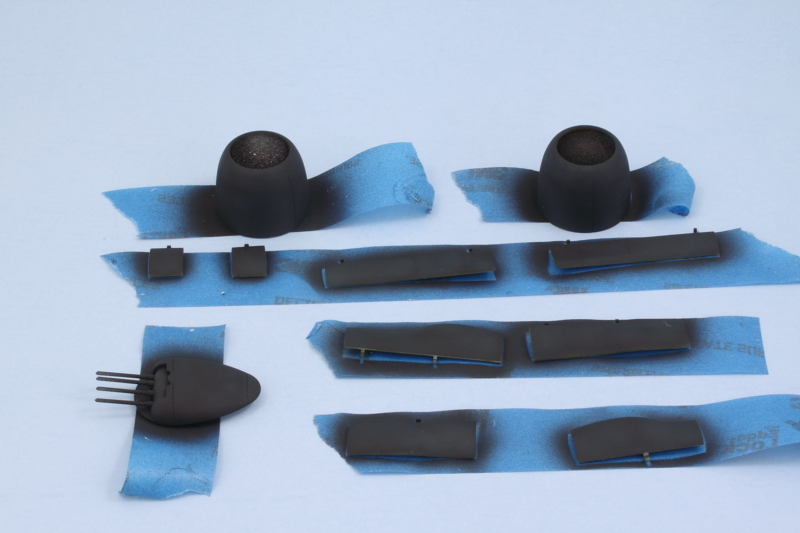 All that's left now is getting the landing gear together and detailing the engines, so moving right along! |
|
|
|
Post by dierk on Dec 31, 2016 8:54:17 GMT -5
Excellent progress Bill! Don't you just love it when new info comes to light after you've just added parts?  Nicely done! |
|
|
|
Post by wing_nut on Dec 31, 2016 9:13:06 GMT -5
SCHA-WING
|
|
|
|
Post by Leon on Dec 31, 2016 10:04:02 GMT -5
Nice progress Bill! I like that subtle fading.  |
|
|
|
Post by wbill76 on Dec 31, 2016 11:09:37 GMT -5
Thanks Marc and Leon! Excellent progress Bill! Don't you just love it when new info comes to light after you've just added parts?  Nicely done! Could've been worse...I could've opened up a hole in the fuselage to do it!  |
|
|
|
Post by dupes on Dec 31, 2016 11:46:47 GMT -5
This kit comes with it's own masks? Well that's pretty thoughful! I'm assuming that they're vinyl...did they adhere well to the curved bits?
|
|
|
|
Post by wbill76 on Dec 31, 2016 11:54:47 GMT -5
This kit comes with it's own masks? Well that's pretty thoughful! I'm assuming that they're vinyl...did they adhere well to the curved bits? There are two different versions of the kit, one 'standard' and one 'premium'. I have the premium kit, so I'm not sure if they were included in the standard kit off the top of my head. They are vinyl, very thin, and have pretty good adhesive properties...almost too good...have to be very careful with the placement! Didn't have any real problems getting them to handle the curved portions with a little patience and care in how you get them to lay down. The vinyl allows for a little bit of 'stretch' if you're careful with tweezers while applying them. Of course, I haven't removed them yet so we'll see how well they really performed in the only thing that matters!  |
|
|
|
Post by dupes on Dec 31, 2016 12:08:10 GMT -5
Hah...true, good point! I've yet to find vinyl masks that adhere to curves the way I'd like (flat surfaces are never an issue) when compared to Kubuki-style material.
|
|
|
|
Post by panzerjager2 on Dec 31, 2016 12:42:39 GMT -5
Looking awesome........ I really like that you're fitting the upper turret. Seems like that lil baby was taken off by most crews...
Can't wait to see more
|
|
|
|
Post by wbill76 on Dec 31, 2016 13:10:44 GMT -5
Looking awesome........ I really like that you're fitting the upper turret. Seems like that lil baby was taken off by most crews...
Can't wait to see more Thanks PJ! It wasn't a case of crew preference but rather supply shortages of the quad-50 turret. It was the same turret used on the B-29 and that production had priority, so a lot of the P-61As and many of the Bs didn't get the turret while others did as/when they were available. Definitely changes the look of the lines depending on whether it does or doesn't have it! |
|
|
|
Post by Tojo72 on Dec 31, 2016 13:53:55 GMT -5
All right now,we have a fuselage,looking good Bill.
|
|
|
|
Post by panzerjager2 on Dec 31, 2016 15:06:56 GMT -5
Thanks WildBill, I always thought it had something to do with aerodynamics? ? But what the hay, I used to jump out of airplanes not fly'em LOL ? But what the hay, I used to jump out of airplanes not fly'em LOL
|
|
|
|
Post by wbill76 on Dec 31, 2016 15:16:27 GMT -5
Thanks Anthony! Always good to see those familiar shapes start to appear after all this effort!  Thanks WildBill, I always thought it had something to do with aerodynamics? ? But what the hay, I used to jump out of airplanes not fly'em LOL ? But what the hay, I used to jump out of airplanes not fly'em LOL I didn't know a whole lot about the P-61 either until I started researching it for this project. Pretty interesting aircraft in many ways, the original turret design did have issues with buffeting when it was rotated in flight, so it got streamlined/refined along the way. One other side note that was interesting, they added a reinforcement strip to the clear tail cone out of fears that it would detach in a high-speed dive...now that would've made for a very interesting day for the radar operator I'm sure!  Instant air conditioning.  |
|
|
|
Post by panzerjager2 on Dec 31, 2016 15:24:33 GMT -5
VERY VERY cool info
Thank you
|
|
|
|
Post by wbill76 on Dec 31, 2016 21:26:01 GMT -5
Today's update is reflective of the amount of progress reached, so apologies for the semi-epic nature! A good way to cap off 2016 though as the Black Widow is very close now to the finish line. First order of business, the engines! I got the detail paint work done using non-buffing Metalizer Gunmetal for the cylinder heads and added the kit-supplied PE ignition wires and harness ring. The crankshaft case was detailed with Gunship Gray and the whole thing carefully assembled along with the cowl flap base. 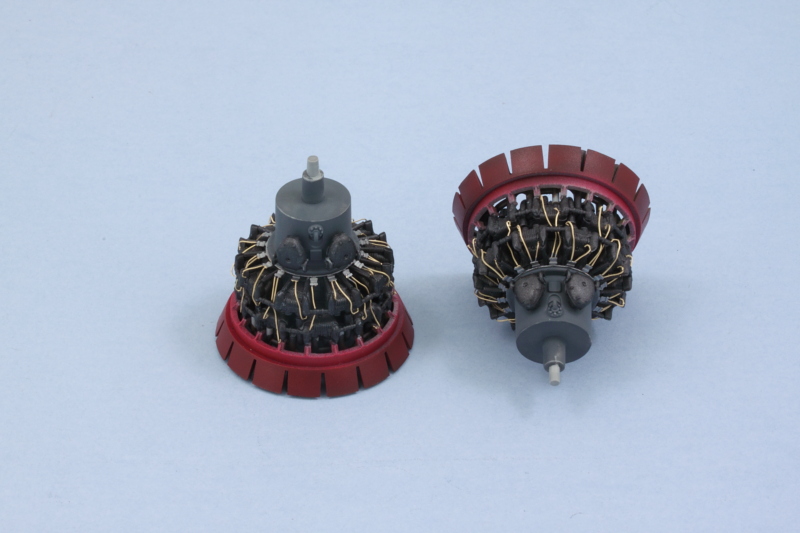 I modified the exhaust pipes by cutting down the long pipes that were meant to connect up to the front bank of cylinders as 1) they wouldn't fit otherwise due to the space constraints and 2) those pipes aren't visible anyway once it's all mounted. I applied a wash of MM enamel Leather over the Gunmetal to provide some burnt rust/oxidation to the exhausts themselves. 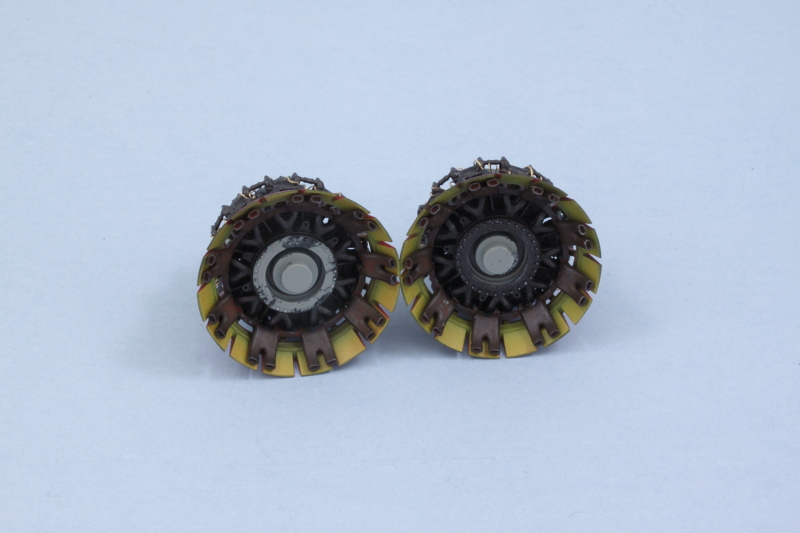 A quick test fit with the cowls showed everything was playing nice even if it all but disappears inside, we know it's there! 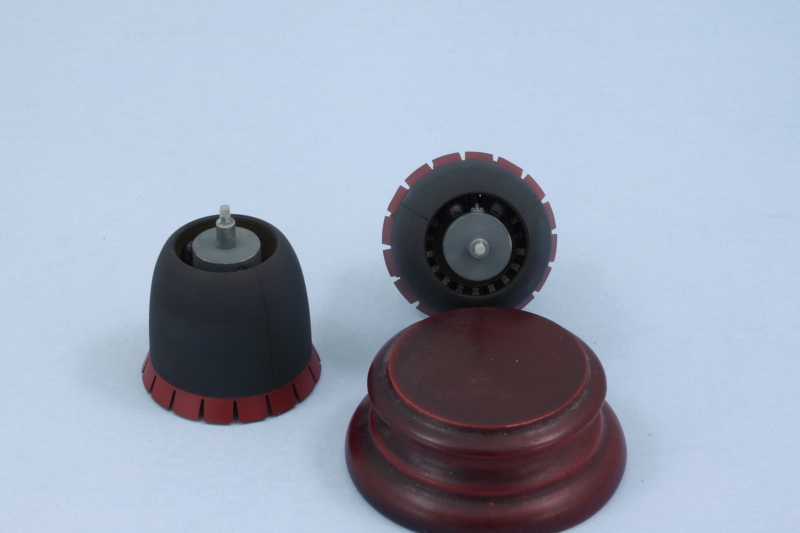 The cowls don't have any locating guides so I decided to fit the engines to the booms first so I could place the cowls in the correct alignment afterwards. Regular glue was used to help give it a little extra grab due to the relatively small contact surfaces involved. I also picked out the oil cooler intakes with some of the non-buffing Gunmetal while I was at it. 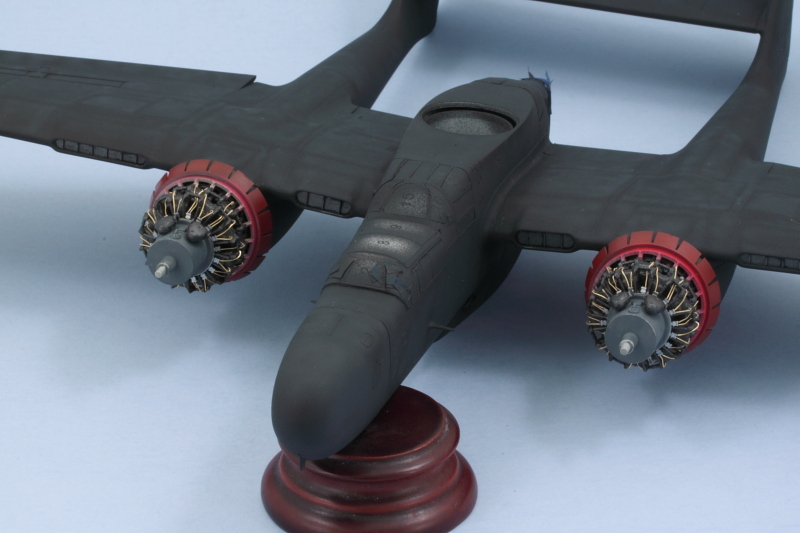 Once the engines had set solid, I added the cowls to both booms. I also picked out the .50-cals on the turret and the 20mm belly guns with the non-buffing Gunmetal and installed the turret permanently in place on top of the fuselage. 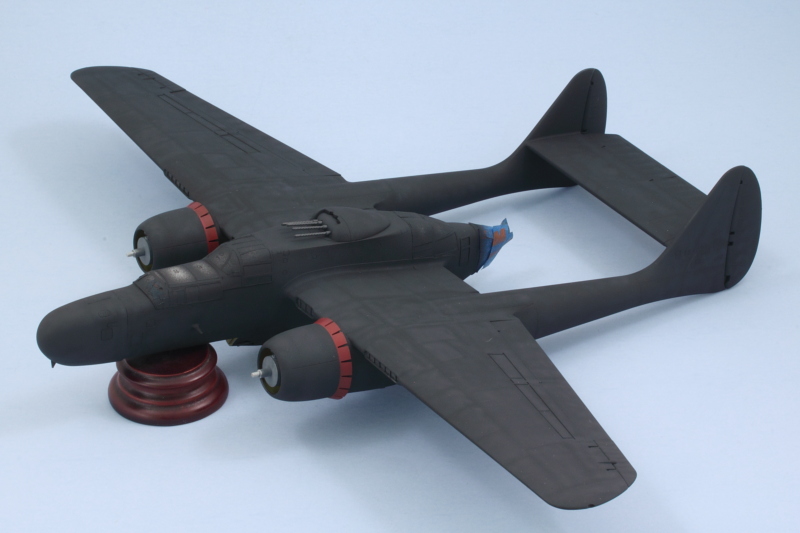 That left one very important area to deal with, the landing gear! The kit's tires are split half affairs for all three wheels, so I opted to replace them with some Eduard Brassin tires. The resin tires are one piece with separate hubs, so they were all cleaned up and the hubs handpainted separately with MM non-buffing Metalizer Steel. Eduard conveniently includes masks with the tires for two options, one where the hubs are in place and one not (very convenient!), and I used the separate mask option and airbrushed the tires with MM enamel Gunmetal. 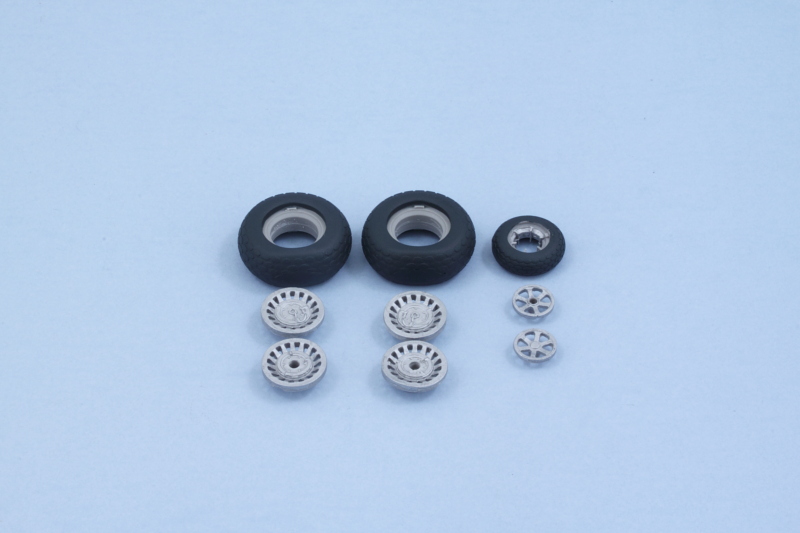 As with any aftermarket replacement, there's usually some degree of modification/work needed to make it play nice. For the wheel hubs, I had to open up their openings slightly with a drill bit/needle file combo before the kit strut axles would fit correctly. Not a big deal, just a lot of careful back and forth until the fit worked out. I fitted the gear first and did some test fits to make sure the flattened bottoms of the tires sat correctly in relation to each other. Once that was set, I added the opposite hub halves and then mounted all the gear doors. The doors were a bit of an exercise in patience as their contact points inside the bays aren't very big and some of the notches didn't quite fit properly, so careful trimming and gluing plus some strategic bracing and waiting for glue to set was called for to get all the doors in place. I also picked out the wing landing lights with some enamel Silver and will add the lenses in later as a final detail along with the wing tip lights when the time comes. Technically the doors aren't 100% accurate for the B since they were redesigned as cyclic doors to close up and only expose the strut post to prevent dirt/rocks/mud from getting slung up into the bay on rougher forward strips. GWH didn't completely redesign them though for the B in terms of allowing the longer side to clear the angled portion of the strut and close properly, so I ended up posing them all full open. Not a huge deal for me as it has the added benefit of showing off the detail work I did on the bays to begin with!  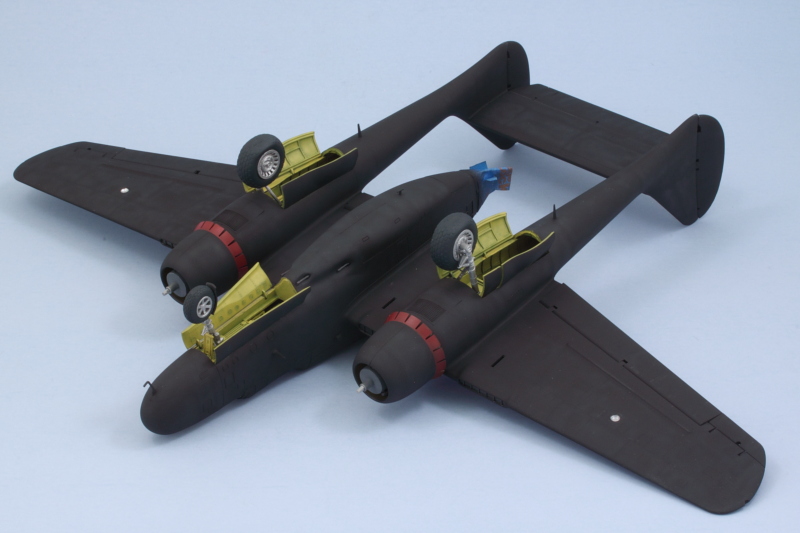 She's now up on her own two feet. I've left the props off, for now, to make it easier to handle her while adding the markings and also to give a little more room to work on removing the masks. 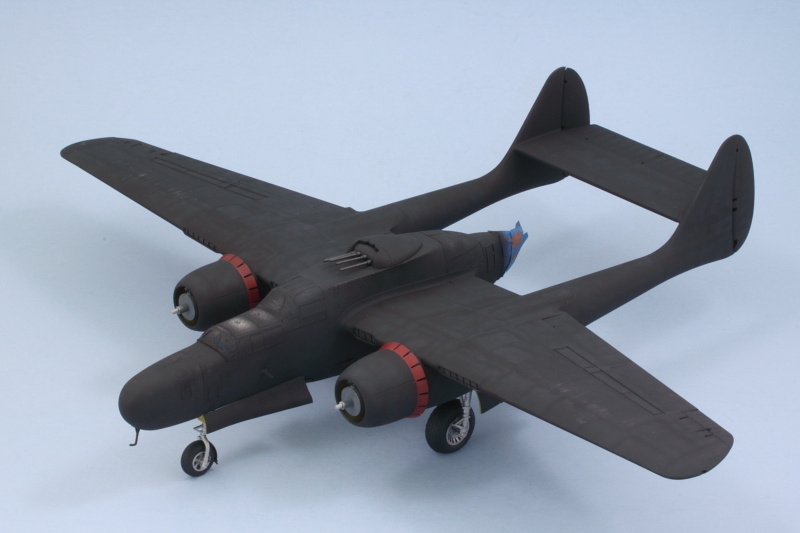 I've applied a coat of Future in anticipation of the decal work to come for tomorrow, going to be another busy round with lots of little tiny red stencils to add all over the place. |
|
joelsmith
Full Member
  
Member since: July 2012
There no winners in war, only survivors.
Posts: 1,404
Jul 5, 2012 22:33:58 GMT -5
Jul 5, 2012 22:33:58 GMT -5
|
Post by joelsmith on Dec 31, 2016 22:02:16 GMT -5
Yowza! Looking real good Bill. PS, congrats on your latest FSM article.
|
|
|
|
Post by wbill76 on Jan 1, 2017 0:31:59 GMT -5
Yowza! Looking real good Bill. PS, congrats on your latest FSM article. Thanks Joel! Having fun with it. The FSM article was a nice surprise, got my issue in the mail today in fact. |
|
Rick
Full Member
  
Member since: March 2013
what to build, what to build . . . Ok THAT one!
Posts: 854 
|
Post by Rick on Jan 1, 2017 9:47:17 GMT -5
Wow Bill. What s beauty. Really like how you've addressed the paint fade. That's been a big reason I haven't started my kit yet. A lot of other handy tips throughout your build too.
Rick
|
|
|
|
Post by wbill76 on Jan 1, 2017 9:55:26 GMT -5
Wow Bill. What s beauty. Really like how you've addressed the paint fade. That's been a big reason I haven't started my kit yet. A lot of other handy tips throughout your build too. Rick Thanks Rick! The pics out there of Pacific Black Widows in particular show lots of variation in the wear, so options abound in how far to go with it! Since I am building this one for my Dad, it's guided by what he wants with some input from me of course as well.  |
|
|
|
Post by Leon on Jan 1, 2017 10:36:28 GMT -5
WOW....Great progress Bill! Those engines look great and nice to see the Widow on her feet.  |
|
|
|
Post by wbill76 on Jan 1, 2017 11:44:23 GMT -5
WOW....Great progress Bill! Those engines look great and nice to see the Widow on her feet.  Thanks Leon! Today will be the fun of decals!  |
|
M1Carbine
Senior Member
    November '23 Showcased Model Awarded
Member since: November 2012
Posts: 1,730
Nov 16, 2012 2:49:11 GMT -5
Nov 16, 2012 2:49:11 GMT -5
|
Post by M1Carbine on Jan 1, 2017 11:56:27 GMT -5
Stunnig work Bill, looks freaking awesome.
Bob
|
|