jsteinman
Full Member
  
Member since: March 2013
Posts: 735
Mar 24, 2013 9:29:10 GMT -5
Mar 24, 2013 9:29:10 GMT -5
|
Post by jsteinman on Jan 1, 2017 16:24:11 GMT -5
AWSOME!
|
|
adt70hk
Forum Moderator     
Member since: November 2015
Currently attempting to build something decent!!! ;)
Posts: 2,831 
MSC Staff
|
Post by adt70hk on Jan 1, 2017 18:57:01 GMT -5
Bill
Sorry for being a bit behind in this. I've got to say some excellent work as always, not to mention an interesting history lesson on top.
Looking forward to seeing this one cross the finishing line.
All the best.
Andrew
|
|
|
|
Post by panzerjager2 on Jan 1, 2017 19:30:22 GMT -5
Bill,
One word
 Engines, and paint really look AWESOME
|
|
|
|
Post by wbill76 on Jan 1, 2017 19:33:03 GMT -5
Thanks Bob, John, and PJ! Much appreciated!  No worries Andrew, glad you popped in as it's almost, but not quite, done!  |
|
bish
Full Member
  
Member since: January 2013
Horatio Nelson 'I am a Norfolk man, and i glory in being so'
Posts: 555
Jan 13, 2013 8:57:43 GMT -5
Jan 13, 2013 8:57:43 GMT -5
|
Post by bish on Jan 1, 2017 19:36:11 GMT -5
Stunning job on the interior there Bill, great work.
|
|
|
|
Post by wbill76 on Jan 1, 2017 19:40:56 GMT -5
Thanks Bish! Spent all day working on the decals...makes you really appreciate the 'simple' decals of an armor kit.  |
|
|
|
Post by TRM on Jan 1, 2017 20:08:55 GMT -5
Hot stuff there Bill!! Sexy set of wings!! The black is killer....sets off the engine work nicely!!
|
|
bish
Full Member
  
Member since: January 2013
Horatio Nelson 'I am a Norfolk man, and i glory in being so'
Posts: 555
Jan 13, 2013 8:57:43 GMT -5
Jan 13, 2013 8:57:43 GMT -5
|
Post by bish on Jan 2, 2017 5:43:52 GMT -5
Thanks Bish! Spent all day working on the decals...makes you really appreciate the 'simple' decals of an armor kit.  Ye, got that right. 3 or 4 decals if your really unlucky while many aircraft have more than that in the pit. |
|
|
|
Post by wbill76 on Jan 2, 2017 10:07:31 GMT -5
Hot stuff there Bill!! Sexy set of wings!! The black is killer....sets off the engine work nicely!! Thanks Todd! Coming down the home stretch now.  |
|
|
|
Post by wbill76 on Jan 2, 2017 11:54:57 GMT -5
Yesterday was spent working on the decals and letting them dry overnight before they were sealed in with a 2nd pass of the Future to unify them with the finish and protect them going forward. The GWH decals mostly went on without issue but the toughest ones to deal with were the red walk-strip indicators. These had a tendency to want to tear even though they were already designed in 4 separate pieces/sections, so it was an exercise in patience to piece them all together. They responded reasonably well to the Solvaset I normally use but they did take a long time to settle in, so I had to be strategic in how I added the markings. I did all the big stuff first and then added the smaller stencils where appropriate. 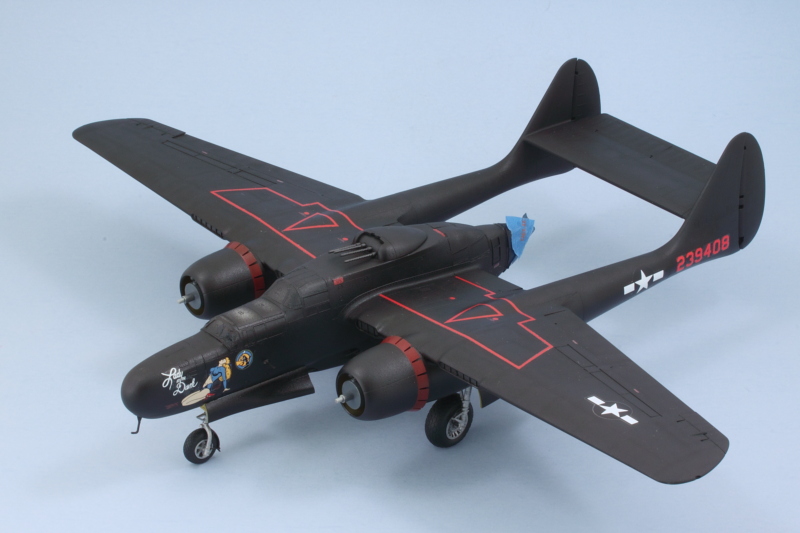 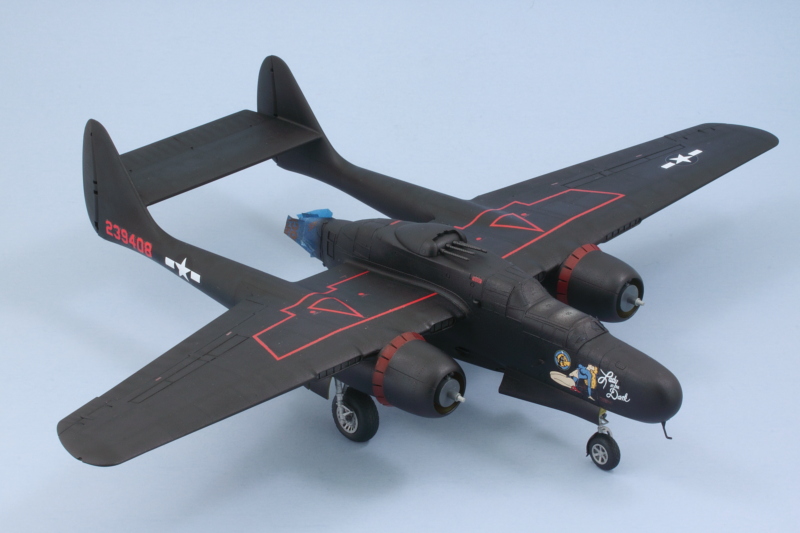 Not hard to see where the 'Black Widow' nickname comes from once the markings are on! I also added the stencils and maker's marks to the props. The stencil and round label are separate decals, so that meant a total of 16 decals but worth it to avoid having to conform single decals to the complex surfaces of the angled prop blades. 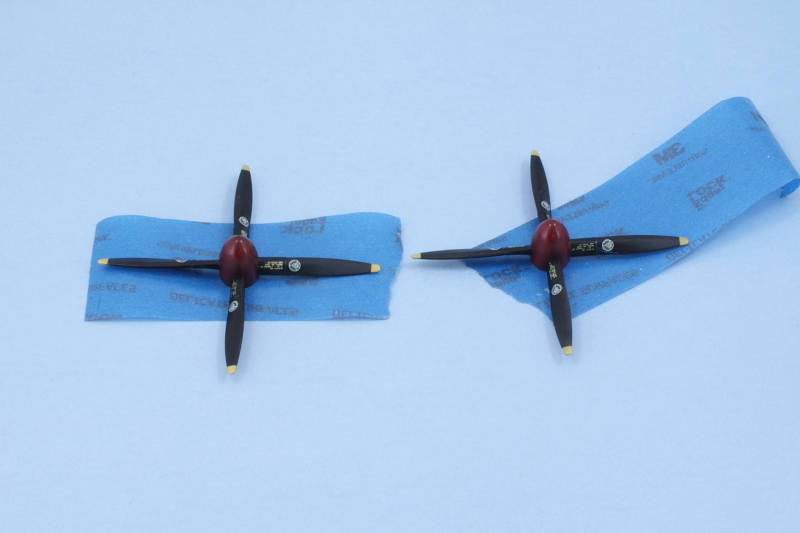 Will let that 2nd Future coat thoroughly dry and then it will be time to add some light weathering to show an aircraft in service but not too badly abused. |
|
|
|
Post by deafpanzer on Jan 2, 2017 12:40:01 GMT -5
Love those red markings!!!!!
|
|
Tojo72
Forum Moderator      Sept '24 Showcased Model Awarded
Member since: November 2012
Posts: 5,313
Member is Online
MSC Staff
|
Post by Tojo72 on Jan 2, 2017 12:46:54 GMT -5
Now that's really coming to life now.
|
|
|
|
Post by wbill76 on Jan 2, 2017 13:38:34 GMT -5
I had a feeling you would Andy! Thanks Anthony, final approach leg on this baby.  |
|
|
|
Post by Leon on Jan 2, 2017 14:40:56 GMT -5
Looking really sharp with the markings on Bill!  |
|
|
|
Post by panzerjager2 on Jan 2, 2017 14:53:22 GMT -5
I feel like Ezekiel Elliot saying "feed me more"
And YES I am a Cowboys fan
|
|
joelsmith
Full Member
  
Member since: July 2012
There no winners in war, only survivors.
Posts: 1,404
Jul 5, 2012 22:33:58 GMT -5
Jul 5, 2012 22:33:58 GMT -5
|
Post by joelsmith on Jan 2, 2017 15:08:40 GMT -5
Well, somebody has to root for them. I think they win in spite of Jerry Jones.
|
|
|
|
Post by wbill76 on Jan 3, 2017 15:19:14 GMT -5
Thanks Leon and PJ! Your wish is granted.  The weathering adventure started yesterday but was really a 2-day effort to get the dot filtering process done. You never truly appreciate the amount of surface area involved until you actually have to cover it all, slowly, one section at a time! I've been looking at different photos of P-61s in the Pacific to get an idea of how they weathered and decided to go with a dusty finish. Since 'Lady in the Dark' was based at Iwo Jima, that made things perfect. After all, the sand there is volcanic and a shade variation of black. 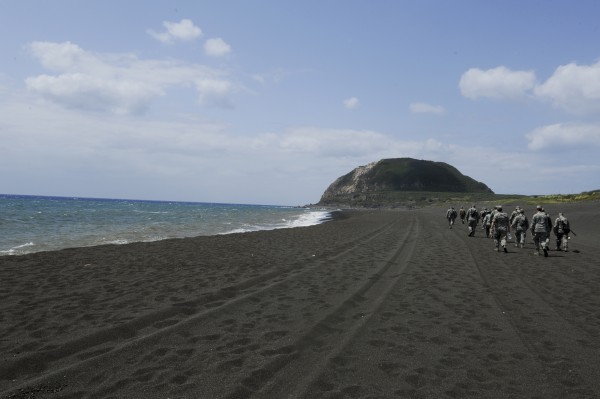 To that end, I mixed up a 90/10 mix of Flat Black and Light Gray to use as my filtering/fading shade and applied it as small dots along with small amounts of straight Light Gray dots to get the look I was after. The underside of the wing served as a nice little test area to get the ratios right. 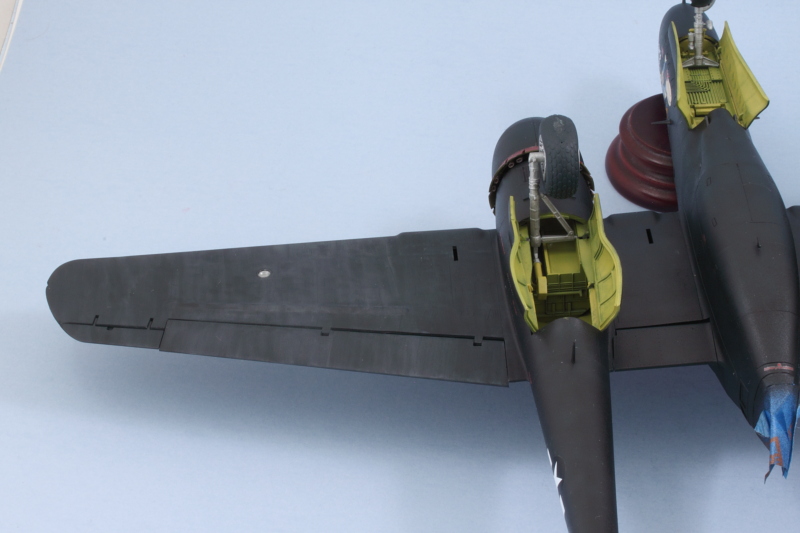 I worked with square tip blender brushes lightly dampened with thinner to blend the dots. Since they are enamels, they dry quickly so had to do it in small sections at a time working my way from wing tip to wing tip on the underside, including the booms, before I stopped for the night, saving the topside surfaces for the next day. I did the left-hand wing first so I could get a good feel for how it would all look and to match it up with the work I had done the day before for consistency. 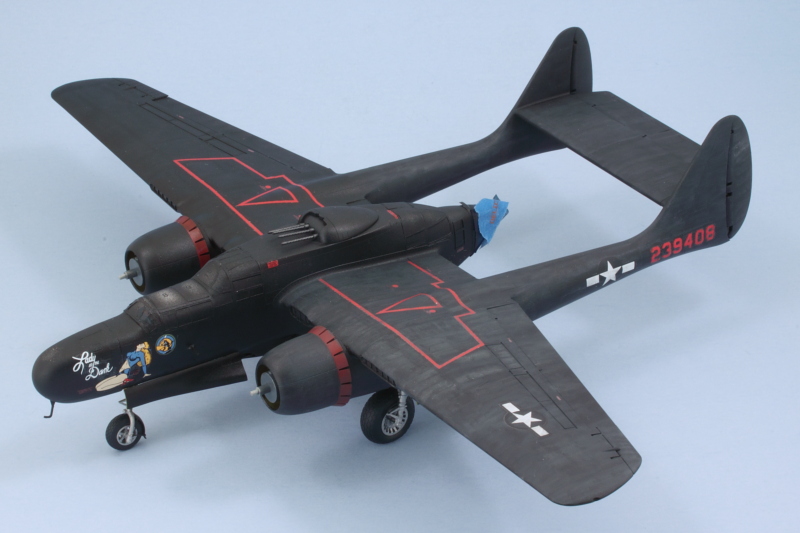 A total of 9 hours later, I had the whole surfaces faded/weathered. 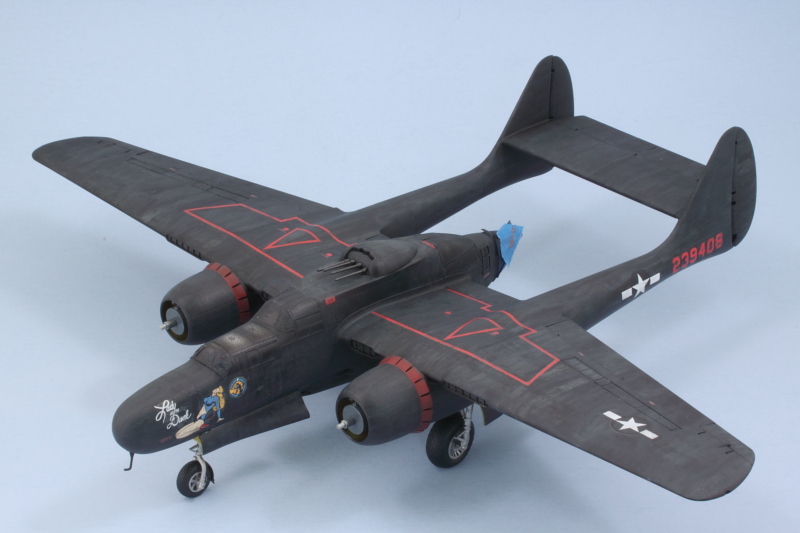 Will take a little bit of a break from the paint breather mask before starting in on the last phase, adding a pin wash to bring out some of the excellent panel detail. Almost there! |
|
joelsmith
Full Member
  
Member since: July 2012
There no winners in war, only survivors.
Posts: 1,404
Jul 5, 2012 22:33:58 GMT -5
Jul 5, 2012 22:33:58 GMT -5
|
Post by joelsmith on Jan 3, 2017 15:36:29 GMT -5
Looking real good Bill. Are you putting it on a runway base, or, a simple plaque?
|
|
|
|
Post by wbill76 on Jan 3, 2017 15:38:16 GMT -5
Looking real good Bill. Are you putting it on a runway base, or, a simple plaque? No base planned, just the aircraft. It's for my Dad and he has limited display space. Going to be fun figuring out how to ship it to him in Idaho!  |
|
adt70hk
Forum Moderator     
Member since: November 2015
Currently attempting to build something decent!!! ;)
Posts: 2,831 
MSC Staff
|
Post by adt70hk on Jan 3, 2017 16:44:18 GMT -5
Well done on the decals and weathering Bill. It's looking very good indeed.
And good luck in finding a way of getting it to your father in one piece.
Andrew
|
|
|
|
Post by Leon on Jan 3, 2017 17:12:54 GMT -5
Nice work on the weathering/fading Bill! Looking really good.  |
|
|
|
Post by wbill76 on Jan 3, 2017 17:58:12 GMT -5
Thanks Leon! Well done on the decals and weathering Bill. It's looking very good indeed. And good luck in finding a way of getting it to your father in one piece. Andrew I think it will all come down to the packaging...my initial idea is to suspend it between some foam blocks and then surround it with foam packing peanuts so that there aren't any 'voids'. That and keeping the props removable should reduce the chance of stuff breaking apart...maybe!  |
|
|
|
Post by panzerjager2 on Jan 3, 2017 18:03:00 GMT -5
Bill,
OUTSTANDING work.
Plus I love the beach photo from....is that Iwo Jima in the modern era?    ? ?
|
|
|
|
Post by wbill76 on Jan 3, 2017 18:07:37 GMT -5
Thanks PJ! Yes, that's Iwo today. |
|
bbrowniii
Full Member
  
Member since: March 2012
If you are not part of the solution, you are part of the precipitate.
Posts: 1,238
Mar 25, 2012 22:08:04 GMT -5
Mar 25, 2012 22:08:04 GMT -5
|
Post by bbrowniii on Jan 3, 2017 19:49:00 GMT -5
Great work, Bill. Love the P-61.
One of my Marine Corps buddies was fortunate enough to go to Iwo in....2004-ish. One of the first groups of US Marines to return since the war. He took sime great pics, and managed to.... acquire (against orders I suspect) a vial of that vilcanic sand. It's kinda strange stuff.... not quite dirt, not quite sand, not quite rock.... your build made me think if him for the first time in a while.
|
|
|
|
Post by TRM on Jan 3, 2017 19:54:09 GMT -5
Mmmmm...Nose Art!!  Looking the part there Bill!! |
|
|
|
Post by wbill76 on Jan 3, 2017 21:06:12 GMT -5
Thanks Todd! Just finishing up the little odds and ends now, just in time since I have to go back to work on Thursday!  Great work, Bill. Love the P-61. One of my Marine Corps buddies was fortunate enough to go to Iwo in....2004-ish. One of the first groups of US Marines to return since the war. He took sime great pics, and managed to.... acquire (against orders I suspect) a vial of that volcanic sand. It's kinda strange stuff.... not quite dirt, not quite sand, not quite rock.... your build made me think if him for the first time in a while. When I did the Google search for it, vials of the sand came up several times...I guess it's kind of a cottage industry! I can see why, it's basically a combination of pumace/ash/soil that built up over time and is definitely tied to history, but can you really know if it came from there if you didn't collect it yourself? We have kind of the same phenomenon here locally at the White Sands National Monument...you aren't supposed to remove any of the sand but it inevitably gets everywhere including your shoes, so you can gather up a decent amount just by accident depending.  |
|
Rick
Full Member
  
Member since: March 2013
what to build, what to build . . . Ok THAT one!
Posts: 854 
|
Post by Rick on Jan 3, 2017 21:57:01 GMT -5
Bill, that is frickin' awesome. I'm ready to vote for build of the year right now. That weathering is killer and extremely hard to look right on a black finish.
On a side note, I found out a year ago I have an uncle that went ashore on Iwo and saw the flag raising. His unit went in with 161 and pulled with 51 left alive. Growing up I had no idea. He is still alive with us today. What a generation.
Rick
|
|
|
|
Post by wbill76 on Jan 4, 2017 0:13:57 GMT -5
Bill, that is frickin' awesome. I'm ready to vote for build of the year right now. That weathering is killer and extremely hard to look right on a black finish. On a side note, I found out a year ago I have an uncle that went ashore on Iwo and saw the flag raising. His unit went in with 161 and pulled with 51 left alive. Growing up I had no idea. He is still alive with us today. What a generation. Rick Thanks Rick! You're right about the Greatest Generation. My wife's grandfather was wounded at Bastogne and she recently got a box of stuff that included his letters home and a bunch of other things like his draft notice. Very cool pieces of history. |
|
|
|
Post by wbill76 on Jan 4, 2017 11:52:33 GMT -5
I did a quick test with my planned pin wash as I suspected that it might not do what I wanted it to. Sure enough, even pure Flat Black wasn't strong enough relative to the other shades to produce any noticeable difference, so that was scrapped. I suppose if I used a much lighter shade it would'ver caused the panel lines to pop out but it would look strange IMHO against the fading work already done, so I left it as-is. After doing an airbrush test with both Model Master Semi-Gloss and full Gloss Lacquer on an old model that I keep around as a test subject, I opted for the full Gloss option. Normally I would use the spray van varieties for applying a sealing coat but I needed more control this time around and was pleased with how it performed through the airbrush. That meant it was time to remove the masks. I had no issues with how the masks performed, in fact they performed almost too well in terms of the adhesive on the vinyl. I had to work very carefully to lift the masks, a task made a little harder with the fuselage attached vs. separate when I placed them, but I managed. The masks did leave some adhesive residue behind in some spots, so I used an old strip of T-shirt and a wooden toothpick to carefully remove it. A second coat of Future applied with a small square tip brush completed the canopy work. The last remaining details included the install of the propellers, the addition of the small antennas, the wingtip lights, and the landing lights on the wing undersides. With that, Lady in the Dark was ready for her walk-arounds! 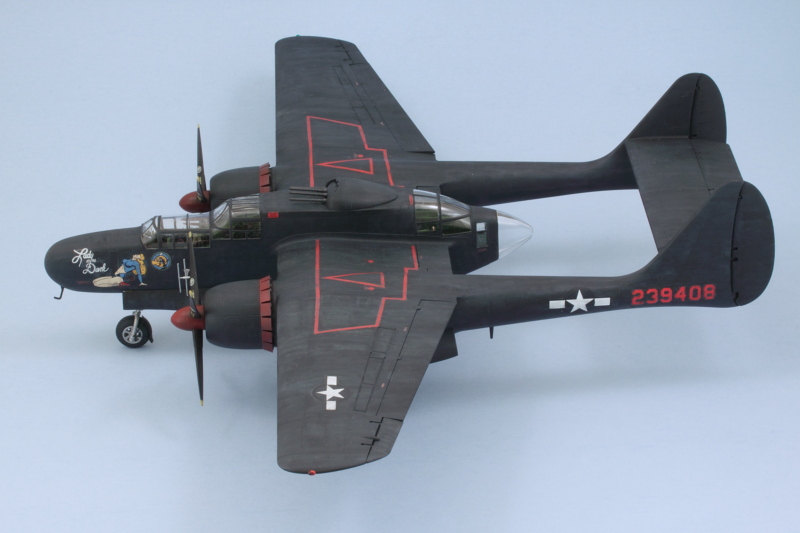 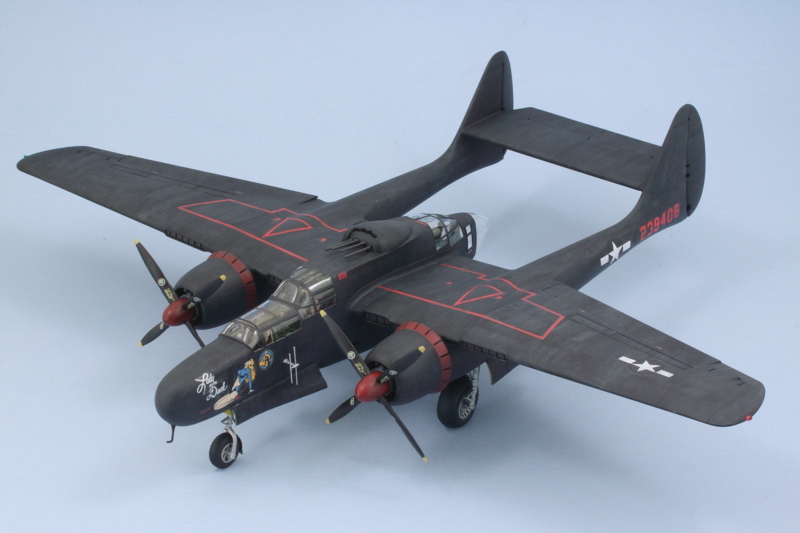 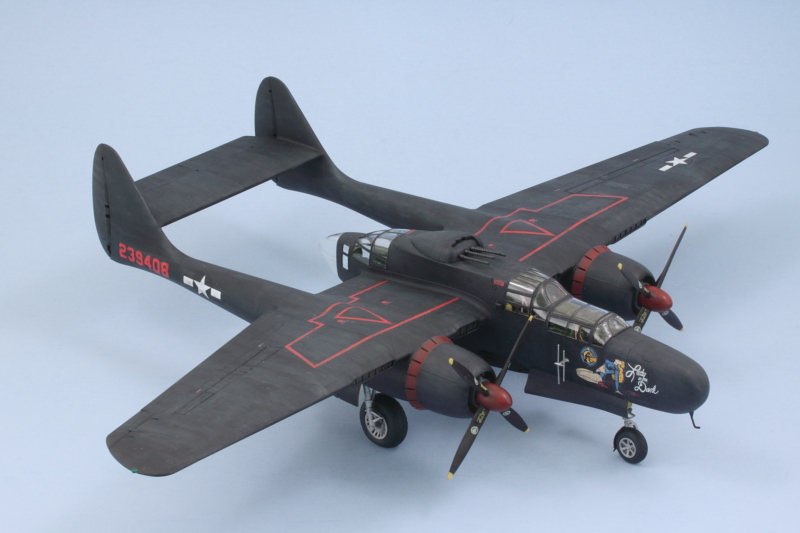 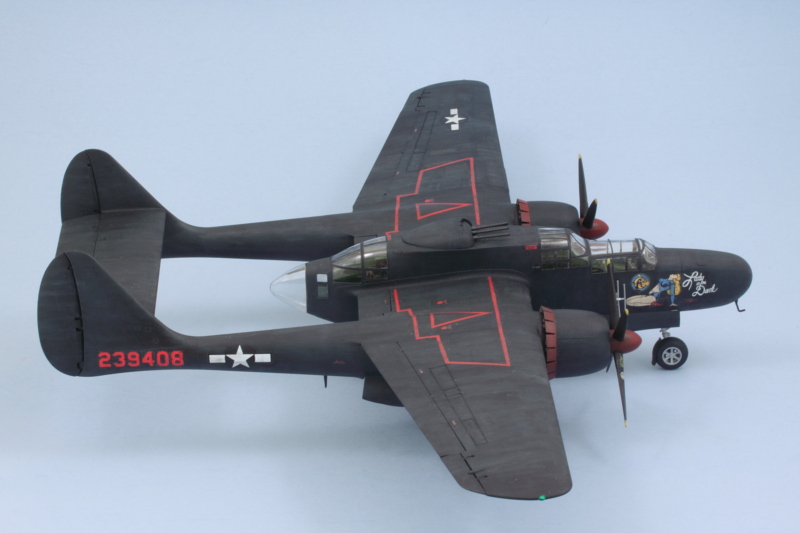 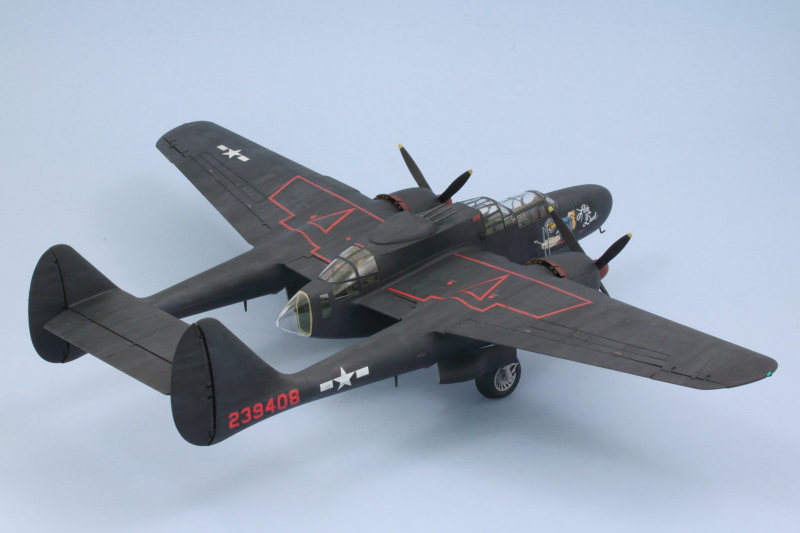 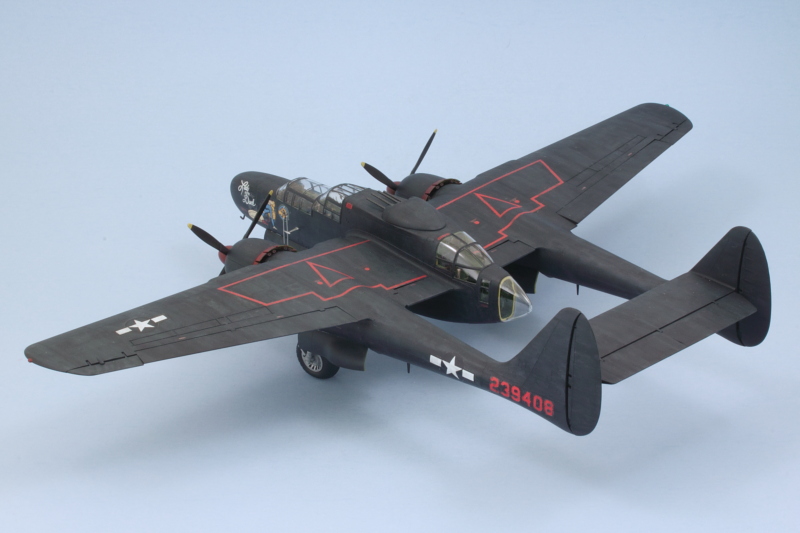 |
|