406 Silverado
Global Administrator     
Member since: November 2011
Posts: 10,201
Member is Online
MSC Staff
|
Post by 406 Silverado on Mar 21, 2018 17:29:23 GMT -5
Thought I'd start this thread now and will update once it hits the bench. I Have to finish my M113 and a commission UH-1D before I can dive into this kit since it has the full interior. Knowing me I might break her open and start cleaning some parts lol  |
|
thug626
Senior Member
   
Member since: January 2013
Posts: 2,030
Jan 15, 2013 13:05:28 GMT -5
Jan 15, 2013 13:05:28 GMT -5
|
Post by thug626 on Mar 21, 2018 18:05:49 GMT -5
Count me in Rob. I just picked this one up the other day. There’s only about fifty pages of instructions.
I’ll be taking notes while you build. Not to mention getting out my Schiffer reference books
|
|
|
|
Post by Leon on Mar 21, 2018 18:46:17 GMT -5
I'll be following along when you start Rob!  |
|
|
|
Post by dierk on Mar 22, 2018 4:12:52 GMT -5
I'll tag along when the time comes.
|
|
406 Silverado
Global Administrator     
Member since: November 2011
Posts: 10,201
Member is Online
MSC Staff
|
Post by 406 Silverado on Mar 22, 2018 8:28:22 GMT -5
Dave it's one hell of an instruction book for sure. Since the model can be done in two versions, early/late 44/45 you really have to double check the instructions. Thinking I will start with the hull floor first and tackle all the PE in that area. Then slowly work up.
|
|
joelsmith
Full Member
  
Member since: July 2012
There no winners in war, only survivors.
Posts: 1,404
Jul 5, 2012 22:33:58 GMT -5
Jul 5, 2012 22:33:58 GMT -5
|
Post by joelsmith on Mar 22, 2018 11:48:35 GMT -5
If you haven't seen the Andy's Hobby Headquarters two part video, you might want to view it. I found it interesting, some of his color choices are unusual, but it gives a good overview of the kit.
|
|
thug626
Senior Member
   
Member since: January 2013
Posts: 2,030
Jan 15, 2013 13:05:28 GMT -5
Jan 15, 2013 13:05:28 GMT -5
|
Post by thug626 on Mar 22, 2018 12:49:33 GMT -5
Rob, When I first looked at the instruction manual, I had thought what the heck? I read back through it, and realized, it appears to be laid out as well as one could expect given the complexity of the kit. That being said, the modeler is going to have to be very careful during assembly.
Even the hull floor has its complexities. At least it doesn't appear to have the variables like the turret or upper hull.
|
|
|
|
Post by Tojo72 on Mar 23, 2018 8:44:00 GMT -5
Looking forward to it
|
|
pt109
Full Member
  
Member since: April 2013
Stop staring at me! heheheh
Posts: 491 
|
Post by pt109 on Mar 30, 2018 11:21:23 GMT -5
Me too....
Paul
|
|
406 Silverado
Global Administrator     
Member since: November 2011
Posts: 10,201
Member is Online
MSC Staff
|
Post by 406 Silverado on Apr 2, 2018 9:52:34 GMT -5
Well I started on the hull lol. I ran out of crates and other stowage for the M113 so I thought I'd get a start on the lower hull of the Panther.
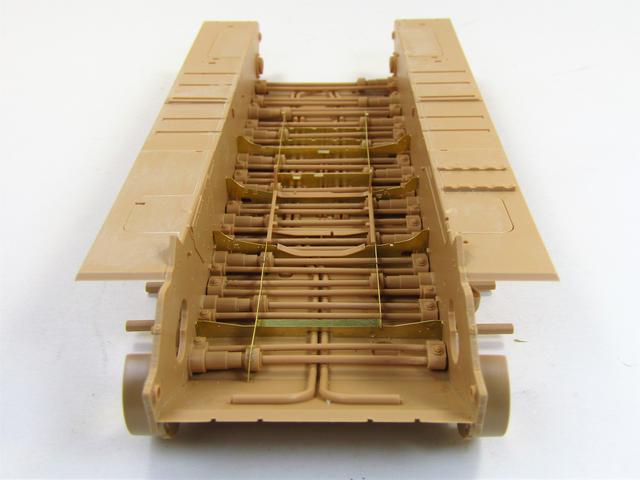
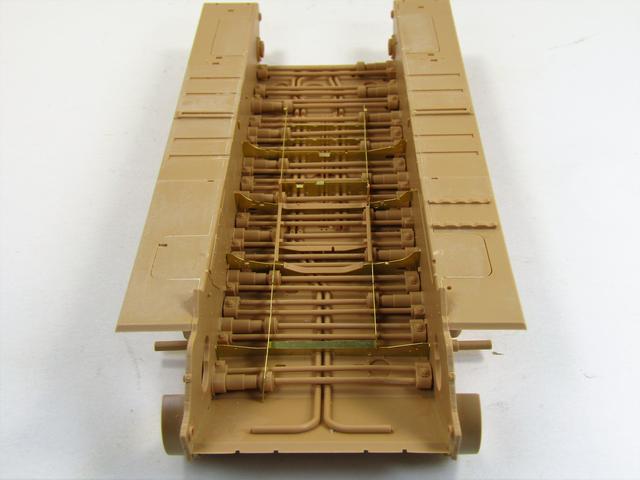
Sooo, there are supposed to be 9 C21 parts but the kit only has 8!! These are the parts that the torsion bars go through in the lower hull floor. They give 8 of the opposite side, C20, and you only use 7 of them. Not sure if you can use the extra C20 as a C21 but have no choice here.
Am not looking forward to all the PE bracing on the floor. They could have made them out of plastic since there are other parts that attach to the PE that are plastic.Scale thickness won't matter much since these will be covered by the hull floor and turret basket floor.
Pics coming soon.
|
|
406 Silverado
Global Administrator     
Member since: November 2011
Posts: 10,201
Member is Online
MSC Staff
|
Post by 406 Silverado on Apr 2, 2018 10:11:26 GMT -5
First stages of the build. The instructions have you start with the turret, Upper hull and then the lower hull. I decided to start with the lower hull as with any normal build lol. Using the glacis plate and fire wall I assembled the hull side walls and sponsons.   While letting the glue set and dry on the hull walls I then cleaned some of the exterior side wall parts, then glued them in place.  Back to the inside of the hull and what I mentioned before about the torsion bar mount thingies. Only 8 of part C21 and I need 9!!! Opposite side calls for only 7 of part C20 and they give you 8, and so I will use the extra C20 as a C21 and mount this one in the motor comp. area where it won't be seen.  Going to get a bit more done in the hull floor area and then return to working on the Uh-1D Huey. |
|
|
|
Post by Leon on Apr 2, 2018 11:24:43 GMT -5
Nice start Rob!
|
|
|
|
Post by dierk on Apr 2, 2018 11:25:18 GMT -5
Looking good Rob! Was the parts layout designed by the guy who does the Dragon instructions?  |
|
406 Silverado
Global Administrator     
Member since: November 2011
Posts: 10,201
Member is Online
MSC Staff
|
Post by 406 Silverado on Apr 4, 2018 10:54:41 GMT -5
Well I have to say that I wasn't looking forward to doing the PE in the lower hull....but they have designed this area, the framing/support thingies so it all interlocks with bent tabs and slots. I assembled the long braces and cross members and carefully slotted them in the cross members that were glued into the lower hull. Had one tricky spot but got it in. Spent a couple of hours last night cleaning roadwheels since that is the most boring part of a build, especially when it comes to the big cats with tons of wheels. Cleanup of the wheels was actually easy as they have the mold seam along the edge of the rubber tire, and not in the center as with most kits. It took a bit longer with the wheels because I wanted them a bit rounder without a sharp edge, and I also distressed the rubber tires.    I'm going to set the Panther aside for a couple of days so I can do more work on the Huey and M113. The next step in the instructions call for the assembly of hull parts such as the shocks, battery boxes, ammo bins etc. While I take a short break I will have to decide/think ahead as far as painting the lower hull. I may add a few parts and then start primer and Red Oxide before adding more parts etc that would be a different color. This will make it easier to paint since it would be hard to reach some areas and avoids a lot of masking. The trans and brakes will be assembled and painted separately as well. Going to slap some primer and base OD on the M113 later today to get that one moving a long before the figs arrive and extra stowage. |
|
406 Silverado
Global Administrator     
Member since: November 2011
Posts: 10,201
Member is Online
MSC Staff
|
Post by 406 Silverado on Apr 8, 2018 18:42:06 GMT -5
|
|
|
|
Post by Leon on Apr 8, 2018 18:50:14 GMT -5
Paint and primer are looking good Rob!  |
|
406 Silverado
Global Administrator     
Member since: November 2011
Posts: 10,201
Member is Online
MSC Staff
|
Post by 406 Silverado on Apr 8, 2018 18:56:18 GMT -5
Thanks Leon. Sure took a while due to trying to paint in and under all the torsion bars and supports. Figured I would just paint it using the Vallejo Red Oxide primer and no base coat over that since it's already the right color.
|
|
|
|
Post by tobias5555 on Apr 9, 2018 11:46:19 GMT -5
Very nice job
|
|
406 Silverado
Global Administrator     
Member since: November 2011
Posts: 10,201
Member is Online
MSC Staff
|
Post by 406 Silverado on Apr 10, 2018 12:01:42 GMT -5
|
|
thug626
Senior Member
   
Member since: January 2013
Posts: 2,030
Jan 15, 2013 13:05:28 GMT -5
Jan 15, 2013 13:05:28 GMT -5
|
Post by thug626 on Apr 10, 2018 12:31:08 GMT -5
Your paint work is looking amazing. This is a nice update to peruse while having my morning java
|
|
406 Silverado
Global Administrator     
Member since: November 2011
Posts: 10,201
Member is Online
MSC Staff
|
Post by 406 Silverado on Apr 16, 2018 8:51:10 GMT -5
Slow progress as I haven't had much time at the bench, and also getting work done on other models. Started the floor and ammo bins the other day and will try to get some primer and paint going today.  |
|
ossie262
Full Member
   July '24 Showcased Build Awarded
Member since: January 2015
Posts: 319
Jan 3, 2015 15:31:27 GMT -5
Jan 3, 2015 15:31:27 GMT -5
|
Post by ossie262 on Apr 18, 2018 14:40:02 GMT -5
Rob
you are just like David Parker always got something on the go and always seem to inspire us with your work and so DAMM quick man .
Great build mate
Ossie
|
|
|
|
Post by Leon on Apr 18, 2018 15:09:32 GMT -5
Tranny and interior are looking good Rob!  |
|
406 Silverado
Global Administrator     
Member since: November 2011
Posts: 10,201
Member is Online
MSC Staff
|
Post by 406 Silverado on Apr 18, 2018 18:53:02 GMT -5
|
|
ossie262
Full Member
   July '24 Showcased Build Awarded
Member since: January 2015
Posts: 319
Jan 3, 2015 15:31:27 GMT -5
Jan 3, 2015 15:31:27 GMT -5
|
Post by ossie262 on Apr 19, 2018 10:50:24 GMT -5
Rob
That’s it I have to get one so I can make a berg Panther
Just looks fantastic
|
|
|
|
Post by mustang1989 on Apr 19, 2018 11:10:15 GMT -5
Man you just into a little of everything aintcha? Terrific work and good/ quick progress.
Tranny...............that's a word that a lot of auto techs use.  |
|
406 Silverado
Global Administrator     
Member since: November 2011
Posts: 10,201
Member is Online
MSC Staff
|
Post by 406 Silverado on Apr 19, 2018 13:14:54 GMT -5
Thanks Joe and Ossie.
lol yeah a bit of everything. Mainly comm work and a nice break from the rust buckets, although I'm itching to get back to them lol.
|
|
sturmbird
Full Member
  
Member since: June 2012
Posts: 1,406
Jun 21, 2012 13:51:45 GMT -5
Jun 21, 2012 13:51:45 GMT -5
|
Post by sturmbird on Apr 19, 2018 14:23:09 GMT -5
Wow! There's a lot of stuff crammed in there. I ordered the kit in, but still out there floating around. Can't wait to see how the upper hull and turret go together.
gary
|
|
406 Silverado
Global Administrator     
Member since: November 2011
Posts: 10,201
Member is Online
MSC Staff
|
Post by 406 Silverado on Apr 19, 2018 17:34:46 GMT -5
Gary there is A LOT in there. I won't be adding the motor comp. so that will save time and work. The kit comes with a clear upper hull and turret, which I hate. The plastic is harder than styrene and it's hard to see any details or parts locations. I've already primer the inside of the upper hull so I could see how it looks.
|
|
pt109
Full Member
  
Member since: April 2013
Stop staring at me! heheheh
Posts: 491 
|
Post by pt109 on Apr 23, 2018 15:24:04 GMT -5
Nice one....the Takom doesn't have the clear parts, but should look pretty nice when done. I always thought the Trannys were Green but what do I know?
Looking great, Paul
|
|