|
|
Post by chromdome35 on Dec 13, 2022 22:47:43 GMT -5
I slapped together a 1/35 Monogram T48 to serve as a paint mule for practicing on. I made no attempt to fill any gaps, trim mold lines, etc...so don't judge me  My painting and weathering goal was to represent an active-duty tank in Vietnam. I am trying to recreate what a tank coming off of patrol duty might look like. I wanted damp and dirty and if possible to also reflect the infamous red clay of Vietnam So here's where I'm at I primed it in Black Mr Finishing Surfacer 1500 cut 50/50 with MLT I painted in this order (All thinned 1:1 with MLT) * Shadow Color: XF-62 Olive Drab thinned 1:1 with MLT * Primary Color: XF-62 Olive Drab with XF-59 Desert Yellow in a 2:1 ratio * Highlight Color: XF-62 / XF-59 1:1 * Chipping via sponge application of Vallejo 985 Hull Red * I used AK Interactives Streaking Grime (AK012) over the majority of the tank * I followed that with AK026 Slimy Grime on the front glacis plate to represent general jungle grime * I used some select applications of AK046 Light Rust, but as this is to represent an active duty tank, I didn't feel that any more than slight/light rusting was appropriate. * On the exhaust grills, I used AK082 engine grime. * I then started to try to weather the tank to represent Vietnam's red clay, as you can see from the pictures, I only did this to the driver's left side of the tank. Give me some feedback guys, does this look like total crap (it's ok to say so), or am I on the right track? To me, the red clay pigment looks more like a poor attempt at rusting. Are there any techniques for recreating that effect? How do you go about weathering the grills above the engine?   |
|
reserve
Senior Member
   
Member since: July 2012
Si vis pacem para bellum
Posts: 2,372
Jul 11, 2012 9:11:45 GMT -5
Jul 11, 2012 9:11:45 GMT -5
|
Post by reserve on Dec 14, 2022 11:44:08 GMT -5
I'd say it's pretty good overall. I can't tell if you gave it a pinwash, if you did not this is something that will help the overall appearance. Chipping? I know chipping is all the rage these days but I feel that most guys overdo it, if you look at pictures of operational tanks you really don't see much of this especially with the more modern paints that are alot tougher than the stuff available in WW II. I can understand the artistic license impulse as chipping can make a model's visual appeal skyrocket, and how much you decide to do is up to you. I'll toss in a few shots of the Revell of Germany kit I converted into a Vietnam era '48 A2 and describe my process perhaps this will help.     I primed the assembled model with Tammy fine grey lacquer from a rattlecan and allowed it to dry. Once dry I sprayed it with Tammy SF-62 thinned 40-50% with perhaps 20% Tammy acrylic paint retarder at around 20 psi until I had solid coverage. The retarder is important as it keeps the paint from drying on the airbrush needle. I then mixed more OD with some flat yellow (all Tammy XF) until I got a noticeably lighter shade, thinned it up to 40% paint and 60% thinner and boosted air pressure up to 30 psi as this atomizes the mixture better. I gave it thin, light passes while moving the airbrush fairly quickly from directly above until I got the desired subtle fading effect on the upper surfaces. Once this was dry I sealed the model with Model Masters clear gloss acrylic until it was good and ugly shiny. Once this was dry the decals went on and then I pinwashed the model with MIG enamel Dark Wash. Model Masters clear acrylic flat was applied after the pinwash was dry. When this dried I took some AK acrylic ground texture paste and laid it on the lower hull, suspension, and roadwheels in the places where mud would collect, painting the mixture when it had dried. I used Vallejo Flat Earth acrylic for the mud and dust as it has a reddish quality to it. Dust was heavily thinned Vallejo Flat Earth thinned to 20% paint and 80% thinner (water) with the airbrush at 40 psi once again for superior atomization of the mixture. I kept the airbrush at least six inches from the model at this point and kept making light passes with emphasis on the lower surfaces until desired opacity was achieved. When doing this step you'll want to spray until the surface begins to appear wet then stop, allow it to dry up some and see what it looks like. Don't mean to hijack your thread with pictures of my junk, hope this helps you out |
|
|
|
Post by chromdome35 on Dec 14, 2022 12:30:57 GMT -5
Excellent response, thank you! +1 Karma. No worries at all about your pics...I appreciate seeing how it turned out.
I used a light application of AK's Streaking Grime wash on every surface of the vehicle with a heavier coating around the details.
I few questions on your methodology
I use Mr. Color Leveling Thinner, which I'm under the impression (maybe mistakenly) has a flow improver/retarder in it. Should I add an additional retarder?
Did you apply this over the entire surface or just in the nooks and crannies to bring out the details?
Thanks again for your advice!!!
|
|
reserve
Senior Member
   
Member since: July 2012
Si vis pacem para bellum
Posts: 2,372
Jul 11, 2012 9:11:45 GMT -5
Jul 11, 2012 9:11:45 GMT -5
|
Post by reserve on Dec 14, 2022 18:48:42 GMT -5
I'm not familiar with Mr Color paint. That being said it appears you got a nice smooth even coat of paint applied which is what you want. I always add retarder to acrylic paint as in my Montana basement humidity averages 23% and it's very necessary to do, otherwise my airbrush chokes out within two minutes or so. It has the additional benefit of giving the paint time to level out some before it dries which may not be an issue in Arkansas with potentially higher humidity levels. Looking at the old Monogram beastie, you're doing it right.
Pinwashing means a wash applied in the nooks and crannies and around raised or recessed details. It works best with oil or enamel mediums due to their low surface tension as they will not bead up like a water base paint will. I find it very important to seal the model with a good durable acrylic clear gloss and let it dry thoroughly before this step...some guys don't but I do. This will help the wash flow on the nice smooth surface and eliminate bloom which will happen if you try to do this on a flat finish. Bloom is when the wash being applied will seep out into the surrounding paint due to capillary action because flat paint has a much rougher surface than gloss.
I could drone on here for some time. It occurs to me, however, watching someone do this might be even more help than reading about it. My next piece of advice is to go to YouTube and in the search box type in "Night Shift Models". You do that and you'll get a choice of many videos made by a Czech guy named Martin Kovacks who films himself working and none of his videos are a waste of time to watch. The guy's a paint wizard and his techniques are second to none.
You're quite welcome, I'm glad to help out. Hopefully between this and Kovacks videos we'll get ya tightened up some.
If you've got further questions or need clarification feel free to ask
|
|
|
|
Post by chromdome35 on Dec 14, 2022 18:57:10 GMT -5
I'm a big fan of Night Shift's videos, I like WIll Pattison's as well, but he's mostly aircraft.
|
|
|
|
Post by Tobi on Dec 17, 2022 1:16:57 GMT -5
* I then started to try to weather the tank to represent Vietnam's red clay, as you can see from the pictures, I only did this to the driver's left side of the tank. To me, the red clay pigment looks more like a poor attempt at rusting. Are there any techniques for recreating that effect? Do I understand correctly, you tried dirtying the tank just with pigments? |
|
|
|
Post by chromdome35 on Dec 17, 2022 1:19:33 GMT -5
I used AK's Streaking grime wash over the entire tank.
The pigments are only on the drivers (left) side. I was trying to use the pigments to replicate red clay from Vietnam
|
|
|
|
Post by Tobi on Dec 17, 2022 2:08:22 GMT -5
Don't use pigments to dirty up your model. They are just a finishing product and can't replace a proper paint job. Too hard to predict in their outcome and to control. Usually I would have said look up my Leopard 2 blog here on MSC to get a little SBS on weathering, but sadly Photobucket has removed almost all of the pictures. To illustrate my point. The only pigments in this picture can be found on the far left on the shovel blade (partly obscured by the cable reel), the rest is simply painted on. First acrylics, then enamels, then oils. Always work in layers, don't try to achieve your results in just one inning. Then you'll be fine and don't have to worry. If you find nooks and crannies in the end, where you would like to have more 3d dirt/earth: carefully insert pigments there, spread them with a dry brush and then fix 'em either with a drop dedicated pigment fixer or with Tamiya acrylic thinner. Don't flood! 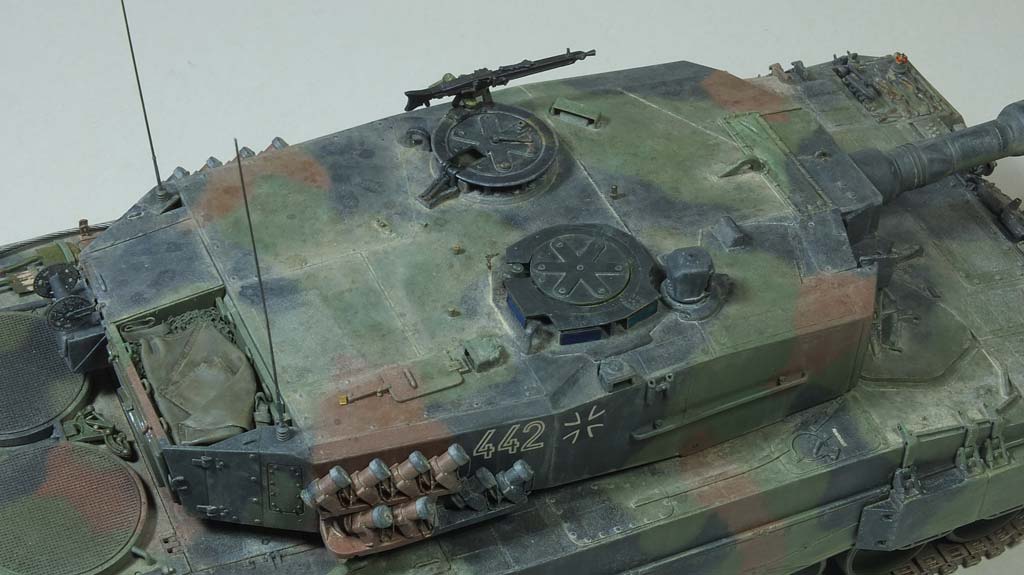 |
|
|
|
Post by Tobi on Dec 17, 2022 2:37:14 GMT -5
Zero pigments here. Not even on the tracks or the ice cleats: 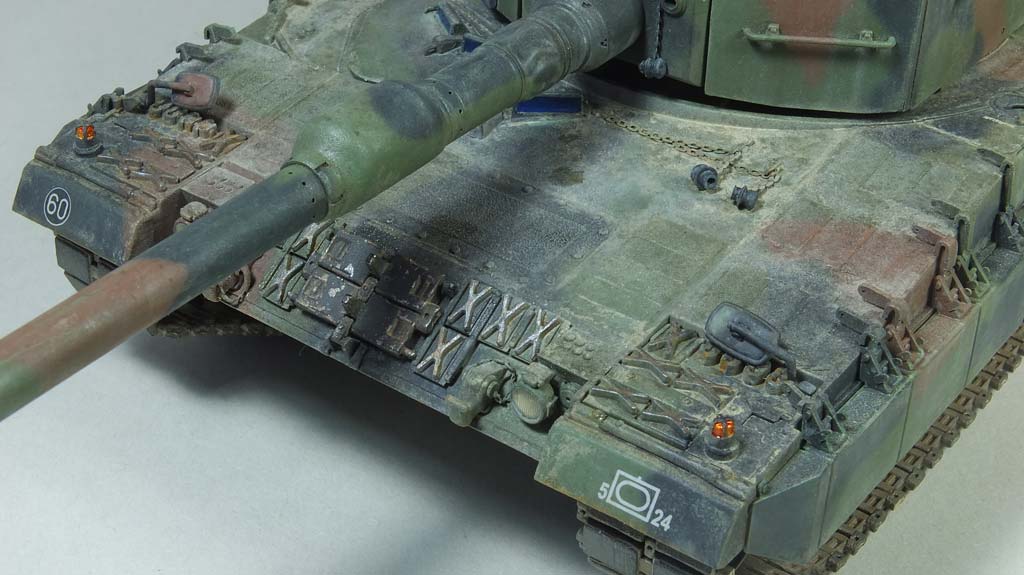 Only pigments on the exhausts and the cables: 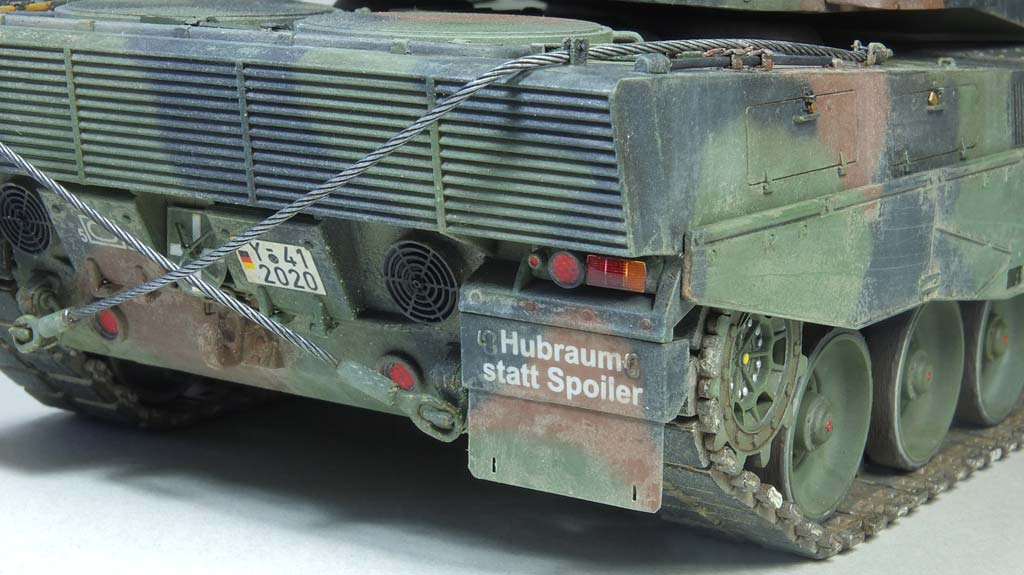 |
|
|
|
Post by mustang1989 on Dec 17, 2022 7:30:15 GMT -5
There is a TON of useful information here in this thread! WOW!!!
|
|
|
|
Post by chromdome35 on Dec 17, 2022 9:52:01 GMT -5
Tobi, thank you! I understand what you are saying. Since this is just a paint mule to practice on, I think I will strip it and start over.
I appreciate your feedback tremendously. Have a karma good sir.
|
|
|
|
Post by Tobi on Dec 17, 2022 10:28:44 GMT -5
Tobi, thank you! I understand what you are saying. Since this is just a paint mule to practice on, I think I will strip it and start over. I appreciate your feedback tremendously. Have a karma good sir. I don't think there is really a need to strip the mule, unless you haven't progressed further than in the pictures. But from here there is still possibilities to "rescue" it. The chipping will need some refinement and corrections, but with heavy dusting you can also tone down and hide a lot. The left fender is still okay as well. Spray some base color in the centers and then dust wash with enamels. You can mix some pigments in the enamel, too. Makes a good carrier medium. |
|
|
|
Post by chromdome35 on Dec 17, 2022 10:53:35 GMT -5
Tobi, I haven't done anything with it since taking those pictures.
Are there any proven ways to strip everything off? I'm assuming stripping will take everything including the primer?
|
|
|
|
Post by Tobi on Dec 17, 2022 14:01:32 GMT -5
If you submerge the model in a bucket full of stuff called "Persil Kraft Gel" (a German laundry soap) and leave it for some hours, a lot of the Tamiya acrylics will come off nicely and I would guess without the primer, since that is lacquer based. Rinse in clean water and the gel is reusable after letting the paint settle. May go by the name of "Power Gel" or "Active Gel" in the US. Has green color. More aggressive paint removers are available from Carson/Tamiya (Paint Killer) and AK (Paint Stripper), and many others. I only have experience with the first one. All will remove lacquer and enamel based colors as well, but should be largely polystyrene friendly nowadays. In the modelling Jurassic some folks wrote about using red braking fluid. Never tried it and I wouldn't recommend it. I believe you can easily end up with a melted chunk of plastic.  I didn't do the stunt of paint removal too often in my life. Like you I work often with Tamiya acrylics. Started with Persil and afterwards removed the persistent remnants with the Paint Killer, if necessary. Spray or brush on, don't wait too long and remove with a bristle brush. The more delicate the build, the higher the risk of damages. Sometimes there is also no way around scraping and sanding. Therefore, I recommend you experiment a little more on your mule before taking that other road, since it is a heck of a work. |
|
|
|
Post by Steve Zuleski on Dec 17, 2022 14:19:11 GMT -5
I don't recon I could add much, Tody and Mark covered all the key points. CD, if you get great intel from Night Shift's vid, use em and play with it. From the pics it appears you may have gone a bit over on the chipping, but that can be fixed easily. Your best bet, as mentioned, review a boat load of pics of the M48, in color if you can, verify the chipping and amount of scrapes and where they normally occurred. It's a little tricky in the beginning, but you'll get it quickly, simple practice. Ruck On, I say! Might be hard to see, but there isn't much chipping on this pig. 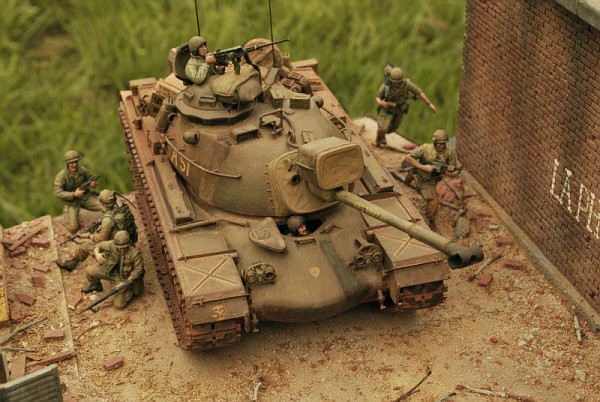 |
|
|
|
Post by Tobi on Dec 18, 2022 7:42:47 GMT -5
Steve made a good point here.
The problem with your current chipping is: it's too random (sounds odd) and also too uniform. It's just chipping for the sake of chipping. It has no logic to it and tells the viewer no story. The human eye and human mind like things they can recognize and they're are familiar with. If you copy the scratch you made with a screwdriver on your car's engine hood to a model, everyone will say: "ick!" Of course you can explain that this is realistic, but a model should be self-explanatory. But if you copy the rust marks from the wheel houses (still 'ick' if it's your car), everybody will say: "what a nice weathering, so realistic!" Because they have seen it before. They know little stone impacts from gravel roads, high air humidity, salt in the air near the sea or on winter streets and cars getting old.
So what's to keep in mind:
- Sponge is a cool technique, but hard to control and can never substitute mastering a paint brush. Also the more contrast between base and sponge chipping color, the higher the risk of sending the whole thing south. Limit the application, if anything, to a few selected areas.
- Whenever applying scratches and flakes, know the ropes. That means, study real life pictures, best in color. For the basics it's not strictly necessary to have the same vehicle as example. What can be observed on an Abrams can be well translated to a Patton or even a Sherman, for example worn off paint around hatch openings. Some effects, of course, are quite unique and best taken from the same object (let's say the peculiar exhaust plume on the Abrams), but with enough practice reading modern pics, interpreting B&W ones will become easier and you will soon recognize the exhaust stain on the M48, just from knowing the Abrams'.
- Vary the appearance of the chipping: large & small, long & short, superficial & deep, light & dark, zones with chipping and ones without. You can even do a 3d effect with border(s) in lighter color, then a little primer color and in the center rust or steel.
- Vary the types of colors: acrylics, enamels, oils. Even pencils can work and all will produce different appearances.
- Use different techniques as well: sponge-, salt-, hairspray technique, paint brush, speckling, dry brushing (a mighty tool, sadly long forgotten or if used, almost always done completely wrong) and since newer times: airbrush with paint damage masks! All can produce good realistic chips, but need mastering and most important good planning, right from the primer stage.
- Sven Frisch told me once: "you can never have enough of a chip as small as it gets". And I might add: "remember, less is more."
- Start with those easy chips you're confident and sure about: hatch openings, box lids, workable parts like handles and hooks, hatch edges, etc. This way you already cover a lot. Scratches and flaking from ground and vegetation are Major League.
- Don't expect to be thru' with the chipping in just one hour. Even the masters spend several days, pausing, viewing, checking, refining. I'm not so good at it, I even rely on taking photographs and watch them enlarged on the monitor. Don't be afraid to remove chipping that's not to your liking again.
Now good luck and most important: have fun!
Every model YOU are happy with is a good model.
|
|
|
|
Post by chromdome35 on Dec 18, 2022 10:51:49 GMT -5
Wow, great information. Thank you.
These are the type of posts that make MSC special. I"m glad to see the phoenix rising from the ashes.
|
|
|
|
Post by Steve Zuleski on Dec 18, 2022 12:30:05 GMT -5
One item to stress from Tobi's list is the worn effect on high traffic areas, especially modern rigs. It's not chipped, it's worn off paint, in most cases. It looks just like it sounds, worn out. Mike Rinaldi has a great series of books, Tank Art. www.rinaldistudiopress.com/ Specifically book #3, Modern Armor. I've got all 4, but it appears #1 and #2 are out of stock. You might find them elsewhere. These books are very comprehensive in photos and a final wrap-up of the process at the end of each chapter as a quick guide. Even snagging just one of these will help you immensely. Ruck On! |
|
|
|
Post by Tobi on Dec 18, 2022 12:58:49 GMT -5
You know, at first I was reluctant to reply anything at all, up to the point I deleted my first reply draft and left again. Years ago I swore to myself not to fall for that whole feedback thing again. I had one nasty encounter too many in the past, where confused people requested 'constructive comments', when in reality they meant: "Give me praises for my junk, all you attaboys". Even here. I started blocking them, of course, but it got me cautious. In 2013 I wrote an article about "real colors", which got translated here modelerssocialclub.proboards.com/thread/4025/colour-madness. You can't imagine what kind of emails I receive from time to time. Then Mark came in. You seem to be a good chap, one who's serious and eager to learn, so you're welcome. Should my English occasionally sound a little harsh please excuse me, I'm no native speaker. That's just German engineer genes. We like coming straight to the point, very intimidating and/or frustrating to outsiders...  PS: my wife loves this trait, says she always knows what's the deal. No mind reading or guessing necessary. |
|
|
|
Post by Tobi on Dec 18, 2022 13:34:44 GMT -5
One item to stress from Tobi's list is the worn effect on high traffic areas, especially modern rigs. It's not chipped, it's worn off paint, in most cases. It looks just like it sounds, worn out. Mike Rinaldi has a great series of books, Tank Art. www.rinaldistudiopress.com/ Specifically book #3, Modern Armor. I've got all 4, but it appears #1 and #2 are out of stock. You might find them elsewhere. These books are very comprehensive in photos and a final wrap-up of the process at the end of each chapter as a quick guide. Even snagging just one of these will help you immensely. Ruck On! I second that. Got these books, too. It's also a thin line between appealing artistic license and sticking to reality. Little anecdote from Sven Frisch, again. He once built and painted a marvelous breath taking Ferdinand Panzerjäger, it dropped my jaw. Still my favourite chipping ideal, ultra-realistic in photographs. Didn't get a gong at Scale Model Challenge, not even a commendation... He told me he believes his chipping was too discreet, the judges wouldn't notice it! That's the other end of as small as it gets.  WWII armor (especially the German) is often hopelessly overdone chipping-wise. Few would question the design quality and craftsmanship of German vehicles, but the factories were unable to paint properly? Seriously? The reason for overshooting is IMHO too much relying on pictures of wrecks plus wrong interpretation of B&W shots, and too much copying. One starts and myriads of others start doing the same because they think it's cool. And then they always repeat themselves. Rusted mufflers... a drama! There are many stages of rusting. I mean, a Pz.II from the French campaign is almost brand new, so why make the whole thing beaten up like April '45! There is this guy, Sungjun Jang, in fact quite talented. First model I saw was impressive. Second model I saw just looked like the first? Okay. Every other model since then always the same standards. Same color modulation, Same extend of mud, same rusted exhaust, same chipping. A bit of a yawn. |
|
|
|
Post by chromdome35 on Dec 18, 2022 17:53:36 GMT -5
You know, at first I was reluctant to reply anything at all, up to the point I deleted my first reply draft and left again. Years ago I swore to myself not to fall for that whole feedback thing again. I had one nasty encounter too many in the past, where confused people requested 'constructive comments', when in reality they meant: "Give me praises for my junk, all you attaboys". Even here. I started blocking them, of course, but it got me cautious. In 2013 I wrote an article about "real colors", which got translated here modelerssocialclub.proboards.com/thread/4025/colour-madness. You can't imagine what kind of emails I receive from time to time. Then Mark came in. You seem to be a good chap, one who's serious and eager to learn, so you're welcome. Should my English occasionally sound a little harsh please excuse me, I'm no native speaker. That's just German engineer genes. We like coming straight to the point, very intimidating and/or frustrating to outsiders...  PS: my wife loves this trait, says she always knows what's the deal. No mind reading or guessing necessary. I appreciate your willingness to share your knowledge. I am a rank beginner at this compared to you guys, and having the ability to ask questions and gain knowledge from those who are more skilled than me is a true blessing. Please know, when I ask for opinions, I truly want to hear them and I'm not put off by direct replies, I appreciate them. I don't know what you mean by "Then Mark came in". I'm not sure who Mark is or why his coming in mattered...is this related to the turbulence MSC went through? |
|
|
|
Post by Tobi on Dec 18, 2022 23:59:46 GMT -5
Mark is Reserve. So when he started things going, I felt more confident.
|
|
|
|
Post by Steve Zuleski on Dec 19, 2022 12:58:37 GMT -5
CD, keep us posted, please, on your progress on this M48, it's a beauty of a rig, IMHO. Remember, we're "sniffin paint and gluin our fingers together" as much as we can! Should my English occasionally sound a little harsh please excuse me, I'm no native speaker. That's just German engineer genes. We like coming straight to the point, very intimidating and/or frustrating to outsiders...  PS: my wife loves this trait, says she always knows what's the deal. No mind reading or guessing necessary. Tobi, you're not gruff, just a driver like me, understood and appreciated  |
|
|
|
Post by Tobi on Dec 21, 2022 13:08:32 GMT -5
I almost forgot another chipping technique: liquid mask, produces flaking and peel off paint effects. I used this to make some heavy rust effects on a BTR-60P (in clear sight on the left, before any other weathering took place)  |
|
|
|
Post by chromdome35 on Jan 12, 2023 18:18:56 GMT -5
One item to stress from Tobi's list is the worn effect on high traffic areas, especially modern rigs. It's not chipped, it's worn off paint, in most cases. It looks just like it sounds, worn out. Mike Rinaldi has a great series of books, Tank Art. www.rinaldistudiopress.com/ Specifically book #3, Modern Armor. I've got all 4, but it appears #1 and #2 are out of stock. You might find them elsewhere. These books are very comprehensive in photos and a final wrap-up of the process at the end of each chapter as a quick guide. Even snagging just one of these will help you immensely. Ruck On! I just received #4, #3 is on the way, and #2 I'll just wait to find a <$100 copy. #4 looks great, haven't had a chance to really dig into it yet, but I'm looking forward to it. Edit to Add: I've just finished reading the Introduction and Technique Proficiency pages and I am already happy with the purchase. I can't say that about a lot of books, The FAQ2 from Mig Jeenez being a good example. 2nd Edit: It almost feels like Rinaldi is in my head with some of the things he's saying. Specifically, I'm refering to page 18 of #4. The opening paragraph describes exactly what I've been feeling. Loving this book. |
|
|
|
Post by Steve Zuleski on Jan 13, 2023 11:05:25 GMT -5
Ya, you can tell Mike has taken his time writing these SBS books, a lot of time explaining in detail. Good deal, get #1 as well, you will be missing some techniques and examples. It appears several of the books have been updated with more info, so now who's missing out? Bummer  |
|
|
|
Post by chromdome35 on Jan 13, 2023 15:15:25 GMT -5
Ya, you can tell Mike has taken his time writing these SBS books, a lot of time explaining in detail. Good deal, get #1 as well, you will be missing some techniques and examples. It appears several of the books have been updated with more info, so now who's missing out? Bummer  I will pick up #1 in the near future based on how much I like #4. I haven't made a lot of updates lately, I have been in watching/reading - learning mode. I'm really focused on learning OPR based on your recommendation. I am going to try OPR on the Scimitar/Scorpian build first. |
|
|
|
Post by Tobi on Jan 14, 2023 4:33:28 GMT -5
The good thing about OPR is, the possibilities to make corrections if something is not to your liking are almost endless.
I modified things a little by buying acrylic based oil paints that can be mixed with Vallejos or similar. Extends the time they are workable and removable, but not so extreme like in real OPR. You can work with tap water, though there are odorless thinners for oil paints available these days. And with oil paints I feel always the need to clear coat them for sealing. It's a quirk.
|
|
|
|
Post by chromdome35 on Jan 14, 2023 13:26:47 GMT -5
The good thing about OPR is, the possibilities to make corrections if something is not to your liking are almost endless. I modified things a little by buying acrylic based oil paints that can be mixed with Vallejos or similar. Extends the time they are workable and removable, but not so extreme like in real OPR. You can work with tap water, though there are odorless thinners for oil paints available these days. And with oil paints I feel always the need to clear coat them for sealing. It's a quirk. My first attempt at executing OPR. I am enjoying it immensely!!  |
|
|
|
Post by mustang1989 on Jan 14, 2023 13:27:59 GMT -5
and you should be. Those results are stunning. Great work Brian!!
|
|