|
|
Post by kyledehart5 on Dec 29, 2023 12:51:36 GMT -5
Joe’s masterpieces for sure!! Beautiful work on those wheels and tires. And that gloss already looks wonderful.
|
|
eaglecash867
Full Member
  
Member since: July 2023
Posts: 338
Jul 1, 2023 5:18:34 GMT -5
Jul 1, 2023 5:18:34 GMT -5
|
Post by eaglecash867 on Dec 29, 2023 13:47:08 GMT -5
Beautiful Vette, Joe! Gotta love a shiny, metallic blue car...and that engine looks amazing.
|
|
atomicholiday
Full Member
  
Member since: September 2023
Posts: 411
Sept 4, 2023 8:25:11 GMT -5
Sept 4, 2023 8:25:11 GMT -5
|
Post by atomicholiday on Dec 29, 2023 13:55:42 GMT -5
Thanks for the heads up on the wheels. That bit of advice will come in very handy when I get back around to this kit.
The clear coat looks amazing! Doesn’t look like it needs wet sanding. Great job Joe.👍
|
|
406 Silverado
Global Administrator     
Member since: November 2011
Posts: 10,263
Member is Online
MSC Staff
|
Post by 406 Silverado on Dec 30, 2023 7:24:58 GMT -5
Great work on the wheel correction Joe. Your alterations worked wonders. I am sure looking forward to seeing the paint after your polishing treatment considering it already looks awesome. Thats looks really good with the gloss coat on it.👍🏻 Ahh, good fix on the wheels! Joe if you held this car in the sunlight the right way I bet the reflection could start a fire. I can't wait to see the tires with the lettering on them! Thank you all for the encouraging comments. Slowly but surely I'm getting closer to the finish line. |
|
406 Silverado
Global Administrator     
Member since: November 2011
Posts: 10,263
Member is Online
MSC Staff
|
Post by 406 Silverado on Dec 30, 2023 7:36:05 GMT -5
Joe’s masterpieces for sure!! Beautiful work on those wheels and tires. And that gloss already looks wonderful. A good friend of mine on another much smaller forum made these for the staff. Beautiful Vette, Joe! Gotta love a shiny, metallic blue car...and that engine looks amazing. Thank you Eagle Thanks for the heads up on the wheels. That bit of advice will come in very handy when I get back around to this kit. The clear coat looks amazing! Doesn’t look like it needs wet sanding. Great job Joe.👍 No problem at all Jeremy. Let me know when you start back up on it. I've learned A LOT on this kit as well as the Mustang kit that I built not too long ago. Pretty much all of these older AMT models suffer from the same stance and wheel/ tire issues but once I started experimenting a little bit as well as watch others build them up I started learning how to negotiate the problem areas. One thing that I do now is to buy TWO kits. One for a dry run mock up to see how its all going to look built up by tacking all of the parts in place. Once that is done I take it back apart and modify the unpainted assembly and start modifying and from that point on that kit is my test mule and spare parts kit. |
|
406 Silverado
Global Administrator     
Member since: November 2011
Posts: 10,263
Member is Online
MSC Staff
|
Post by 406 Silverado on Dec 30, 2023 7:39:04 GMT -5
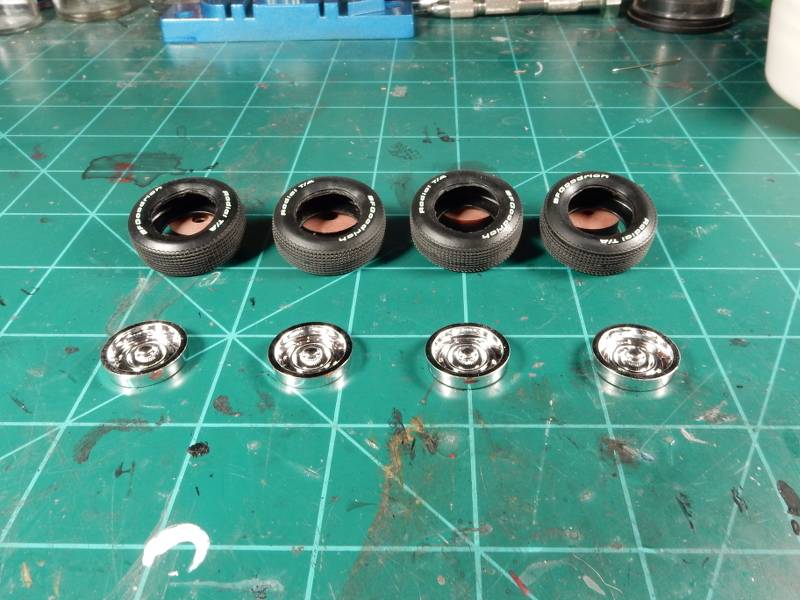
This morning I managed to get up and scuff the tire tread and apply the BF Goodrich decals. The sidewalls look a little wonky but straighten out when I install the wheels. Still gotta paint and detail the wheels and then shoot a dull coat over the tires after the cals are dry but here we are as of today:  |
|
406 Silverado
Global Administrator     
Member since: November 2011
Posts: 10,263
Member is Online
MSC Staff
|
Post by 406 Silverado on Jan 10, 2024 6:29:29 GMT -5
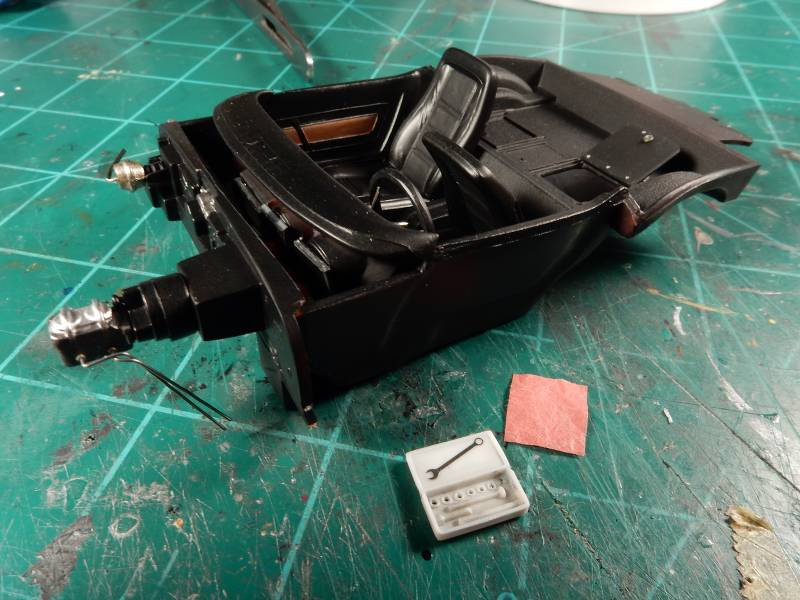
I keep on inching closer and closer to the finish line with this build folks. For the past few weeks, I've been looking for a ratchet & socket set to go along with that open battery compartment door in the interior. I just knew I had one in my parts stash somewhere and ended up finding it just a few days ago. A little clean up and then drilling the sockets out to add to the realism and we're about set. For good measure there'll also be a combination wrench laying in the lid when it's all said and done. Just gotta paint and detail it all up and the ideas will be brought to life. I've also been working on the "red rag" idea that's been rolling around in my head. I'll have to make it have a natural "lay" next to the socket set in the interior, but you get the idea here.  |
|
atomicholiday
Full Member
  
Member since: September 2023
Posts: 411
Sept 4, 2023 8:25:11 GMT -5
Sept 4, 2023 8:25:11 GMT -5
|
Post by atomicholiday on Jan 10, 2024 6:43:58 GMT -5
The tools will really add something to the "story" of this car. Great idea Joe.
|
|
Joe Rix
Forum Moderator     
Member since: January 2023
Posts: 1,534 
MSC Staff
|
Post by Joe Rix on Jan 10, 2024 8:04:05 GMT -5
Glad you found it Joe. That's going to be a sweet little enhancement.
|
|
handiabled
Administrator      Apr '23 Showcased Build Awarded
Member since: February 2023
Posts: 4,438 
MSC Staff
|
Post by handiabled on Jan 10, 2024 9:41:55 GMT -5
Your attention to detail is next level Joe. I know I kinda threw some curveballs at you with blah blah details in some of the pictures I sent you but man oh man with what you have done with this car is more than great
|
|
brandonk
Full Member
   Jan '24 Showcased Model Awarded
Member since: May 2023
Posts: 1,286
May 14, 2023 13:45:45 GMT -5
May 14, 2023 13:45:45 GMT -5
|
Post by brandonk on Jan 10, 2024 10:21:59 GMT -5
Your are certainly taking this one to the next level. Awesome sauce.!
|
|
406 Silverado
Global Administrator     
Member since: November 2011
Posts: 10,263
Member is Online
MSC Staff
|
Post by 406 Silverado on Jan 12, 2024 11:00:08 GMT -5
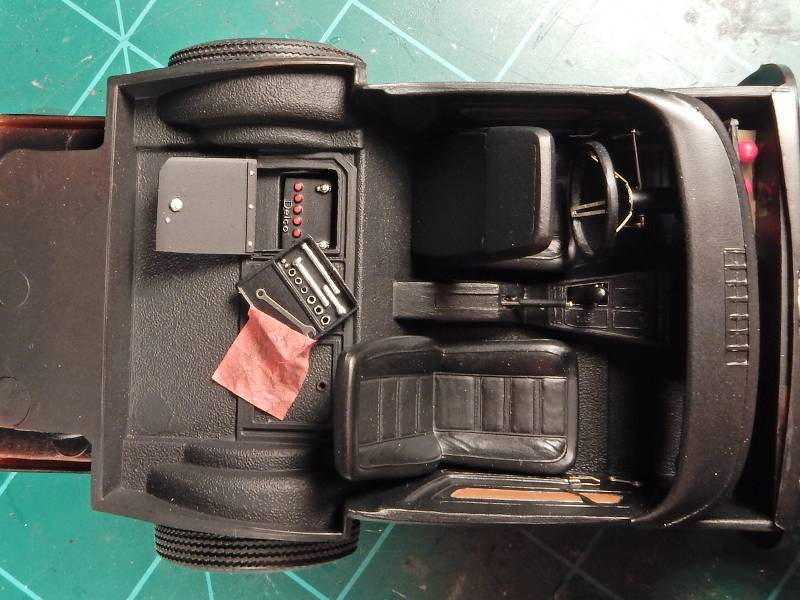
Thanks fellas. Well today I got the tool set all painted up and detailed. Got the wrench added to the lid on the toolset to fill a bit of a blank space on it and made a red rag and weathered that up a little bit to give it a bit of a used look. This is an important step for me because NOW I can move forward with assembling the body over the chassis. Here's the shot of that:  Wheels and tires are finished and I've got everything test fitted on the chassis as a sort of dry run I guess:  |
|
atomicholiday
Full Member
  
Member since: September 2023
Posts: 411
Sept 4, 2023 8:25:11 GMT -5
Sept 4, 2023 8:25:11 GMT -5
|
Post by atomicholiday on Jan 12, 2024 12:01:14 GMT -5
Looking really good!
Hey, can I borrow a 1/2” socket?😁
|
|
handiabled
Administrator      Apr '23 Showcased Build Awarded
Member since: February 2023
Posts: 4,438 
MSC Staff
|
Post by handiabled on Jan 12, 2024 12:42:25 GMT -5
I LOVE the finish on the seats! They really do look like the real deal. ( I actually have a couple red rags tucked in one of the compartments our our 71 for just in case)
|
|
406 Silverado
Global Administrator     
Member since: November 2011
Posts: 10,263
Member is Online
MSC Staff
|
Post by 406 Silverado on Jan 12, 2024 13:04:47 GMT -5
Looking really good! Hey, can I borrow a 1/2” socket?😁 LOL!! Thank you Jeremy. I'm now prepping the windows by dunking them in Future. When dry then I can glue them to the body and install the rearview mirror. After that....the body can finally go over the chassis. I LOVE the finish on the seats! They really do look like the real deal. ( I actually have a couple red rags tucked in one of the compartments our our 71 for just in case) Thanks Brent. I spent a good amount of time trying to get those right. A true gear head you are. I do the same thing. lol |
|
70 STING
Full Member
  
Member since: April 2023
Posts: 544
Apr 10, 2023 11:44:31 GMT -5
Apr 10, 2023 11:44:31 GMT -5
|
Post by 70 STING on Jan 12, 2024 13:09:48 GMT -5
Lookin’ good. :^)
Meant to mention earlier, I noticed you did not go with Fireball’s tires. Any particular reason?
|
|
406 Silverado
Global Administrator     
Member since: November 2011
Posts: 10,263
Member is Online
MSC Staff
|
Post by 406 Silverado on Jan 12, 2024 13:18:17 GMT -5
Lookin’ good. :^) Meant to mention earlier, I noticed you did not go with Fireball’s tires. Any particular reason? Thanks bud. I started to go with them but this just wasn't the car to use 'em on. Just too big. |
|
70 STING
Full Member
  
Member since: April 2023
Posts: 544
Apr 10, 2023 11:44:31 GMT -5
Apr 10, 2023 11:44:31 GMT -5
|
Post by 70 STING on Jan 12, 2024 15:53:55 GMT -5
Agreed. I ordered every close match they offered, but sadly, they looked too balloonish for my taste.
|
|
|
|
Post by kyledehart5 on Jan 12, 2024 16:32:16 GMT -5
Is my 10mm in there? 😂🤣Truly fantastic work Joe. Really love it.
|
|
rondriaan
Full Member
   Aug '24 Showcased Build Awarded
Member since: March 2012
Posts: 650
Mar 27, 2012 2:07:40 GMT -5
Mar 27, 2012 2:07:40 GMT -5
|
Post by rondriaan on Jan 12, 2024 17:25:46 GMT -5
Never thought about the fact that the Corvette had no storage space until now looking at youre model  |
|
406 Silverado
Global Administrator     
Member since: November 2011
Posts: 10,263
Member is Online
MSC Staff
|
Post by 406 Silverado on Jan 12, 2024 18:37:41 GMT -5
Agreed. I ordered every close match they offered, but sadly, they looked too balloonish for my taste. Right??!! Really sucks too. Maybe on something bigger like a Charger R/T or similar. Is my 10mm in there? 😂🤣Truly fantastic work Joe. Really love it. No sir it aint. Only standard sockets for the Vette bro.  Thanks Kyle. Never thought about the fact that the Corvette had no storage space until now looking at youre model  I never knew that before I built this car either Ron. lol |
|
|
|
Post by kyledehart5 on Jan 12, 2024 20:20:17 GMT -5
Well I’m missing my 3/8 too. 🤦🏻♂️🤣
|
|
406 Silverado
Global Administrator     
Member since: November 2011
Posts: 10,263
Member is Online
MSC Staff
|
Post by 406 Silverado on Jan 13, 2024 8:45:46 GMT -5
Well I’m missing my 3/8 too. 🤦🏻♂️🤣 Hey man......watch the tools bro.  |
|
406 Silverado
Global Administrator     
Member since: November 2011
Posts: 10,263
Member is Online
MSC Staff
|
Post by 406 Silverado on Jan 14, 2024 9:02:46 GMT -5
I'm coming to the final stages of this build and grabbed for the inside and outside rearview mirrors to start working on them. Why.....oh why do modeling manufacturers do this? I've worked with countless mirrors and have never come across this.....until today. Un...frickin' believeable. I'll be tossing the inside mirror and grabbing one from my spares and the outside....I'm going to have to do some fancy foot work with.   |
|
|
|
Post by tcoat on Jan 14, 2024 9:08:15 GMT -5
I'm coming to the final stages of this build and grabbed for the inside and outside rearview mirrors to start working on them. Why.....oh why do modeling manufacturers do this? I've worked with countless mirrors and have never come across this.....until today. Un...frickin' believeable. I'll be tossing the inside mirror and grabbing one from my spares and the outside....I'm going to have to do some fancy foot work with.   Maybe the owner was just really concerned about blind spots. It is a Corvette after all.  |
|
handiabled
Administrator      Apr '23 Showcased Build Awarded
Member since: February 2023
Posts: 4,438 
MSC Staff
|
Post by handiabled on Jan 14, 2024 9:08:18 GMT -5
Gee... do they give a lame stupid looking "mirror" decal to put over that lovely ejector mark? My money is on you whipping it into shape buddy. Oh and if you need blind spot mirrors on a convertible you might want to see a chiropractor so you can actually turn your head
|
|
eaglecash867
Full Member
  
Member since: July 2023
Posts: 338
Jul 1, 2023 5:18:34 GMT -5
Jul 1, 2023 5:18:34 GMT -5
|
Post by eaglecash867 on Jan 14, 2024 9:16:26 GMT -5
That interior looks freakin' awesome Joe! Don't know if you want to go the route of stripping and re-chroming those mirrors, but if you do that, you can just knock the edges off those pin marks on the mirror and then lay down a thin coat of epoxy to level it all out before re-chroming.
|
|
406 Silverado
Global Administrator     
Member since: November 2011
Posts: 10,263
Member is Online
MSC Staff
|
Post by 406 Silverado on Jan 14, 2024 9:18:27 GMT -5
That interior looks freakin' awesome Joe! Don't know if you want to go the route of stripping and re-chroming those mirrors, but if you do that, you can just knock the edges off those pin marks on the mirror and then lay down a thin coat of epoxy to level it all out before re-chroming. Great minds think alike eagle and I'm not afraid of Alclad at all. I may just do that. |
|
70 STING
Full Member
  
Member since: April 2023
Posts: 544
Apr 10, 2023 11:44:31 GMT -5
Apr 10, 2023 11:44:31 GMT -5
|
Post by 70 STING on Jan 14, 2024 10:32:24 GMT -5
lol. You beat me to it tcoat |
|
406 Silverado
Global Administrator     
Member since: November 2011
Posts: 10,263
Member is Online
MSC Staff
|
Post by 406 Silverado on Jan 14, 2024 10:37:21 GMT -5
lol. You beat me to it tcoat You both funny guys!!  |
|