|
|
Post by deafpanzer on Jul 3, 2023 10:02:41 GMT -5
Can that not be clamped and glued? By adding a strip you will move that beautifully molded weld oy by half a scale inch. Hey buddy! I am so glad you suggested to use clamping because I tried that just before I left for Georgia and it seemed to work! I will post the outcome when I have the chance. I will say that RFM does have some rather unorthodox methods in their assembly patterns. Fantastic progress and great job on filling in that seam Andy. Ahhhh everyone’s most fun part….roadwheels!!! After gluing approx. 100,830,268.5 fiddly little guide horns on the Meng kit tracks I am looking forward to some nice relaxing roadwheels! Oh man, I am not looking forward to this. Assembling the tracks is the only thing I have to do next...  Can that not be clamped and glued? By adding a strip you will move that beautifully molded weld oy by half a scale inch. I’d suggest using some stretched sprue or thin styrene rod in that gap. Douse that with some “hot” liquid cement and texture it to match the weld seam. That was my plan but it looks like using the clasp has taken care of the gap. I hope it stays that way... thanks for the suggestion. You are scooting right along there Andy. The full assembly looks smart. Looks as though folks have got your gap solution covered. And, yes Andy, your wheels look scrumptious.  AHHHH! So you were the one who didn't save me a piece?    Thanks for stopping by buddy! Andy That's coming on really nicely. Also very helpful for my JP build! Keep up the good work. Andrew Anytime mate! Thanks again and I hope I can resume my work soon. Things have been crazy busy for last two weeks and we are celebrating holiday for next two days. Really good progress buddy! Sorry no road wheels for me. Had my share already.  LOLOLOLOL! Thanks for dropping by! Your moving along nicely,the term I use is,"planting the roadwheel garden." Either way it's tedious,although the large Panther roadwheels aren't too bad to handle. Definitely far better than those PZ III & IV wheels! I happen to enjoy gardening too so we will make good friends.  Your moving along nicely,the term I use is,"planting the roadwheel garden." Either way it's tedious,although the large Panther roadwheels aren't too bad to handle. This is some good progress alright. Haven't seen ol deafpanzer since last week on this one. Maybe he'll throw us an update on this. Yeah! I should have warned everybody that I will be away for ten days. I got to celebrate my brother's 50th birthday in Georgia and to attend a conference for work in New Orleans. Yes, I got to visit the awesome WWII National Museum and it is definitely top five best museums in USA on my list. I can post pictures of the museum if you are interested. Unfortunately no update on my Panther... track links have been screaming my names to have them assembled next. |
|
|
|
Post by deafpanzer on Jul 10, 2023 8:23:02 GMT -5
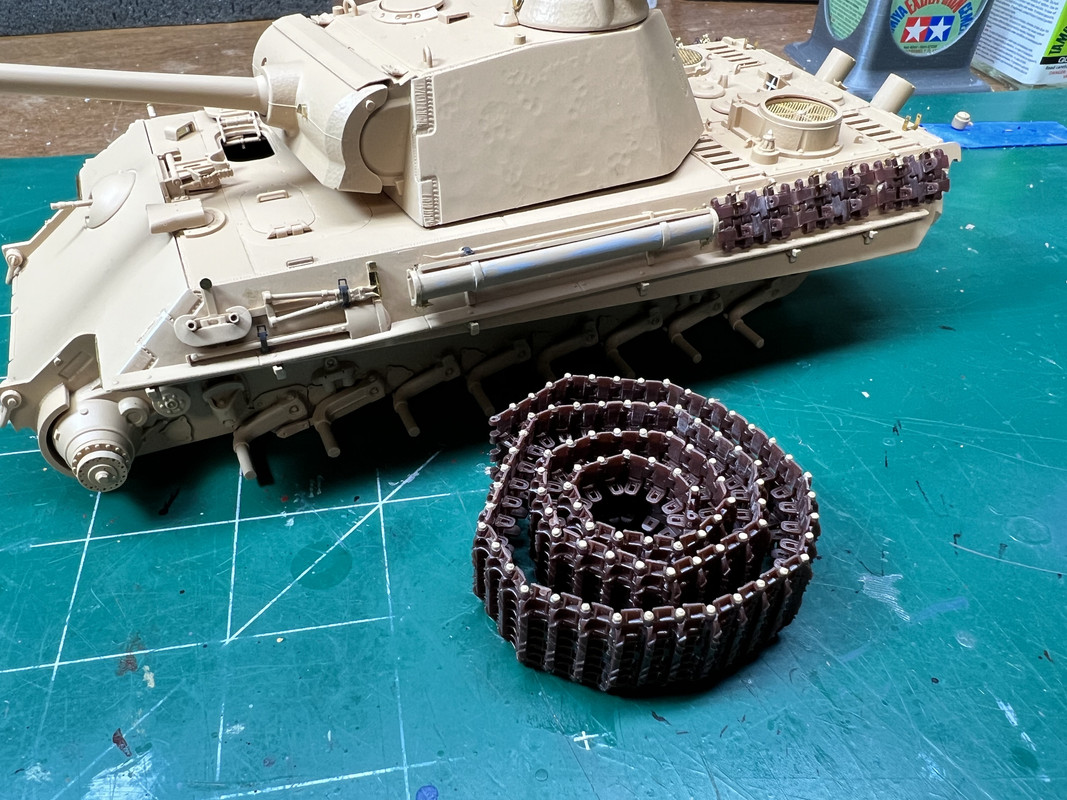
Not much an update but I finally found the way back to my bench after being away for more than two weeks and catching up at work. I have to say that it is the BEST kit tracks I have assembled so far!!! Kudos to RFM. Minimal cleaning and ease of assembling using the jig that holds up to 12 links. And so far it is holding up pretty good and solid.  My last track job was a disaster for my 1/35 British Crusader by Border so it really felt good this time! |
|
stikpusher
Forum Moderator      May '23 Showcased Model Awarded
Member since: April 2023
Living The Dream
Posts: 4,113 
MSC Staff
|
Post by stikpusher on Jul 10, 2023 10:07:10 GMT -5
Looking good Andy! And looks about ready for some primer here!
|
|
|
|
Post by hasenpfeffer on Jul 10, 2023 10:27:07 GMT -5
Not much an update but I finally found the way back to my bench after being away for more than two weeks and catching up at work. I have to say that it is the BEST kit tracks I have assembled so far!!! Kudos to RFM. Minimal cleaning and ease of assembling using the jig that holds up to 12 links. And so far it is holding up pretty good and solid. My last track job was a disaster for my 1/35 British Crusader by Border so it really felt good this time! That's good to know, Andy as I have this kit and a JP from RFM in the stash. That was my experience with the Pz. III J - so much so that I have purchased sets of those tracks about 4 or 5 times since. It's what I ended up using on the MiniArt Pz. IV. Anyway, looking good. Time for paint! |
|
|
|
Post by deafpanzer on Jul 10, 2023 10:40:41 GMT -5
Looking good Andy! And looks about ready for some primer here! Very soon! I neglected to mention that I need to finish another side of track... hopefully tonight!!! I can't wait to start the next step priming it too! |
|
|
|
Post by deafpanzer on Jul 10, 2023 10:44:28 GMT -5
Not much an update but I finally found the way back to my bench after being away for more than two weeks and catching up at work. I have to say that it is the BEST kit tracks I have assembled so far!!! Kudos to RFM. Minimal cleaning and ease of assembling using the jig that holds up to 12 links. And so far it is holding up pretty good and solid. My last track job was a disaster for my 1/35 British Crusader by Border so it really felt good this time! That's good to know, Andy as I have this kit and a JP from RFM in the stash. That was my experience with the Pz. III J - so much so that I have purchased sets of those tracks about 4 or 5 times since. It's what I ended up using on the MiniArt Pz. IV. Anyway, looking good. Time for paint! AWESOME! It is my first RFM build and I am VERY pleased so far that I will not hesitate to buy more kits by RFM. I am not too sure about Border kits because the tracks I worked on last time was the worst ever so I am now very keen about buying more kits by Border. I already have few Border kits in my stash so I need to take a good look at them all one more time.  |
|
|
|
Post by hasenpfeffer on Jul 10, 2023 10:49:09 GMT -5
That's good to know, Andy as I have this kit and a JP from RFM in the stash. That was my experience with the Pz. III J - so much so that I have purchased sets of those tracks about 4 or 5 times since. It's what I ended up using on the MiniArt Pz. IV. Anyway, looking good. Time for paint! AWESOME! It is my first RFM build and I am VERY pleased so far that I will not hesitate to buy more kits by RFM. I am not too sure about Border kits because the tracks I worked on last time was the worst ever so I am now very keen about buying more kits by Border. I already have few Border kits in my stash so I need to take a good look at them all one more time.  It sure makes the RFM kits feel like a great deal since they are nicely detailed/engineered (kinda feel like a semi-copy of Dragon) and the stand-alone tracks are $30ish. |
|
|
|
Post by deafpanzer on Jul 11, 2023 7:52:00 GMT -5
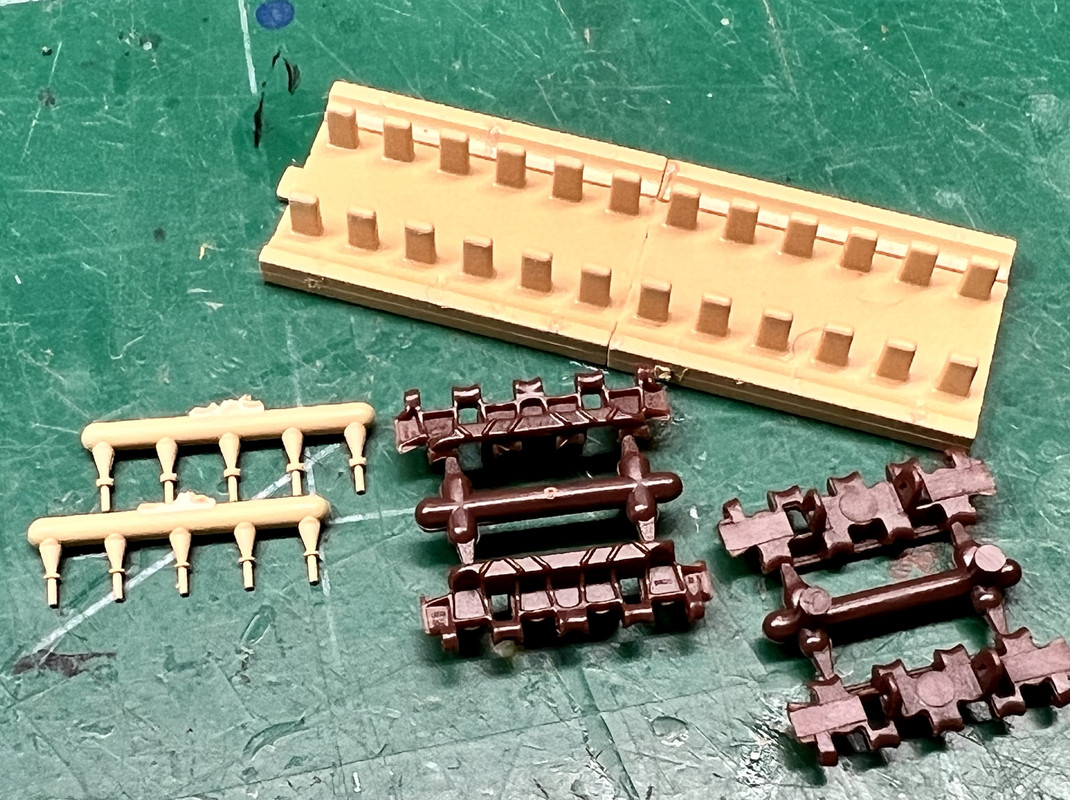
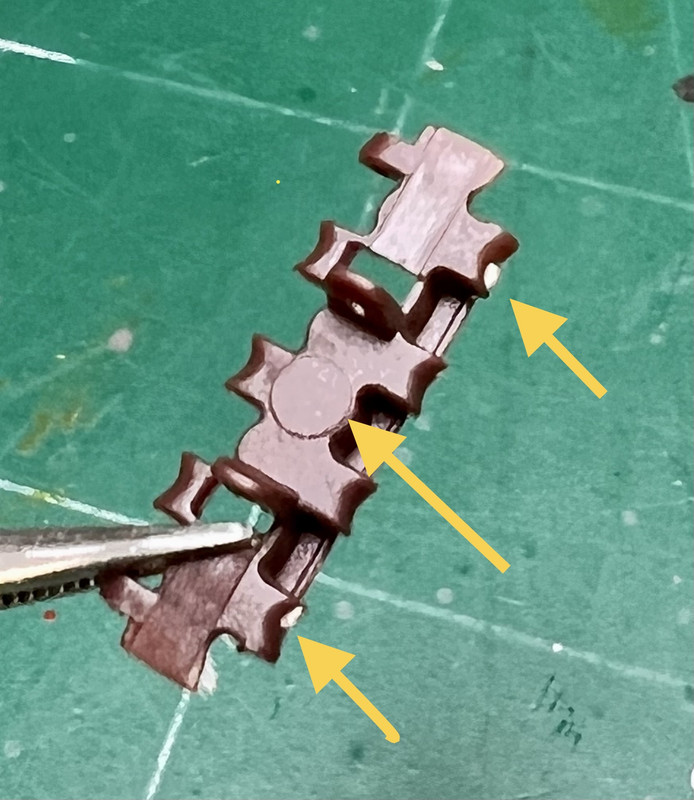
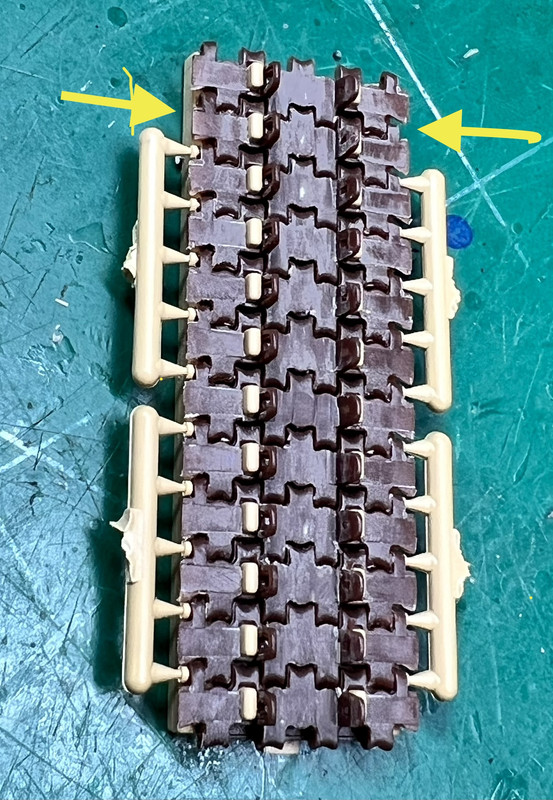
Good news the tracks for both side are completed after 3 evenings of tedious work but it was worth it...  Once again I am very pleased how it came out. I was surprised how easy and sturdy the kit tracks are. I thought I'd show how it was done in steps... It comes with two pieces to be glued together to perform as a jig to hold the tracks while being assembled. Each sprue holds five pins that you can insert at same time.  Very minimal cleaning needed... I was able to remove the tracks off the sprue with my hands only by bending it few times and it comes off easily.  Then I used my Exacto knife to remove the pin mark in the middle then performed a quick sanding job.  I admit I have OCD and I don't understand why RFM created a jig that holds 12 tracks but the sprue holds five pins each. It left one hole on each side for me to insert the pin. Maybe it would have been easier to assemble 11 links instead of 12 like I did.   After applying Tamiya Extra Thin cement to the pins, don't insert the pins all the way in. So that way I cut the pins off the sprue perfectly. Then I used a toothpick to push them all the way in. 
I bend the assembled tracks few times as soon as I remove them from the jig so they won't be too stiff like my first set which was my mistake when I worked on it. I see that RFM makes several aftermarket tracks and I will not hesitate to buy them especially that they only cost $20-$25 when I am seeing most aftermarket track sets costing $40-$50 or even more now. Hope this helps. |
|
|
|
Post by Tojo72 on Jul 11, 2023 8:07:29 GMT -5
That's a lot of work,but they look good.
|
|
|
|
Post by hasenpfeffer on Jul 11, 2023 13:20:26 GMT -5
Great description Andy.
|
|
Joe Rix
Forum Moderator     
Member since: January 2023
Posts: 1,524 
MSC Staff
|
Post by Joe Rix on Jul 13, 2023 0:01:29 GMT -5
Sure glad those turned out so well for you Andy. Yor investment in time and effort has paid off and they look great. Thank You for the in depth tutorial on how they go together and how you approached it.
|
|
|
|
Post by 406 Silverado on Jul 13, 2023 4:52:40 GMT -5
Good news the tracks for both side are completed after 3 evenings of tedious work but it was worth it... Once again I am very pleased how it came out. I was surprised how easy and sturdy the kit tracks are. I thought I'd show how it was done in steps... It comes with two pieces to be glued together to perform as a jig to hold the tracks while being assembled. Each sprue holds five pins that you can insert at same time. Very minimal cleaning needed... I was able to remove the tracks off the sprue with my hands only by bending it few times and it comes off easily. Then I used my Exacto knife to remove the pin mark in the middle then performed a quick sanding job. I admit I have OCD and I don't understand why RFM created a jig that holds 12 tracks but the sprue holds five pins each. It left one hole on each side for me to insert the pin. Maybe it would have been easier to assemble 11 links instead of 12 like I did.  After applying Tamiya Extra Thin cement to the pins, don't insert the pins all the way in. So that way I cut the pins off the sprue perfectly. Then I used a toothpick to push them all the way in. 
I bend the assembled tracks few times as soon as I remove them from the jig so they won't be too stiff like my first set which was my mistake when I worked on it. I see that RFM makes several aftermarket tracks and I will not hesitate to buy them especially that they only cost $20-$25 when I am seeing most aftermarket track sets costing $40-$50 or even more now. Hope this helps. Thank you for the detailed assembly process Andy! I can't get over the track assembly on these armor builds. I do like the way RFM did their build layout and your explanation really helps ALOT with understanding how these things go together. I did want to ask, once you have the pins all the way in--How do they stay in? Are they press fit or did you have to use a glue on them anywhere? |
|
|
|
Post by deafpanzer on Jul 13, 2023 7:47:29 GMT -5
Guys, appreciate your comments!!! I thought it would be nice to share and in the future if new members ask for help we can tell them to check this thread. Anything for our great forum to help others!
I didn't keep track of time but I would say it took me about four hours for both sides. Keep in mind I like to take breaks frequently to check my iPhone. LOL If they were Friuls it would have taken me about two hours and I never liked how the pins looked at the end. With this RFM set, the pins look close to the actual thing which amazed me for its accuracy.
Joe, I applied plenty of Tamiya Extra Thin cement on the pins before I insert them. And it allows me about a minute to cut and push them all the way in before they dry. The pins were sticky enough to stay 75% inside while I cut them off the sprue you can say. Once a while a pin would fall out but it was easy to put it back inside with a tweezer.
|
|
|
|
Post by deafpanzer on Jul 13, 2023 7:56:52 GMT -5
Guys, last night was NOT a good night... almost everything has gone wrong! I dropped my optivisor and it landed right on one of the tracks breaking it in half so it required my attention to repair it. Then I broke the handle bar above the rear turret hatch... more work! And I lost two pieces to the vinyl monster so I had to make parts from scratch after failed search attempts. I hope it doesn't happen again!    Before I can have my Panther primed, I had to go back and add all of those small fragile parts that I saved for last or I would break them all...    I wish RFM has done a better job such as marking where I can add those loops on the turret. I had to rely on the instruction diagram where to add them and used masking tapes to keep them straight as much as I could. Then I drilled small holes so that way they can hold the loops better before I glued them in. It is about 99% completed and I only need to repair a damaged part and attach the front track covers so I can have it primed finally. I am still undecided to add some kind of smaller cable to the tool rack on its right side... Thanks for looking! |
|
|
|
Post by Tojo72 on Jul 13, 2023 8:10:20 GMT -5
Good solution,Dragon's KT with zimm on the turret did the same thing with the spare track holders,I had to eyeball their placement.
|
|
|
|
Post by deafpanzer on Jul 13, 2023 22:55:39 GMT -5
Good solution,Dragon's KT with zimm on the turret did the same thing with the spare track holders,I had to eyeball their placement. I am so glad I didn't have any of adult beverages or they would have been very crooked! LOL Thanks for stopping by buddy! |
|
|
|
Post by deafpanzer on Jul 13, 2023 23:00:31 GMT -5
OK, I think it is safe to say that the building stage is COMPLETED! I am surprised that it took me only six weeks to build it despite being away for two weeks.  The resin figures from Alpine Miniatures are fitting inside the hatches nicely. WHEW!!!  I will have it primed over the weekend and start painting... |
|
|
|
Post by chromdome35 on Jul 14, 2023 0:01:17 GMT -5
A beautiful build. I am looking forward to watching you lay some color down
|
|
|
|
Post by Tobi on Jul 14, 2023 0:25:39 GMT -5
Guys, last night was NOT a good night... almost everything has gone wrong! I dropped my optivisor and it landed right on one of the tracks breaking it in half so it required my attention to repair it. Then I broke the handle bar above the rear turret hatch... more work! And I lost two pieces to the vinyl monster so I had to make parts from scratch after failed search attempts. I hope it doesn't happen again!    The "joys" of model building.  Good rescue Andy. |
|
|
|
Post by deafpanzer on Jul 14, 2023 7:20:36 GMT -5
A beautiful build. I am looking forward to watching you lay some color down Brian, thanks my friend! Normally I am rarely excited about the painting part but this time I am! Guys, last night was NOT a good night... almost everything has gone wrong! I dropped my optivisor and it landed right on one of the tracks breaking it in half so it required my attention to repair it. Then I broke the handle bar above the rear turret hatch... more work! And I lost two pieces to the vinyl monster so I had to make parts from scratch after failed search attempts. I hope it doesn't happen again!    The "joys" of model building.  Good rescue Andy. And amount of time spent hunting for pieces that I dropped or flew off my tweezer.  This time the vinyl monster is winning... four times... a new record broke for my current build! Thanks for stopping by buddy! |
|
Joe Rix
Forum Moderator     
Member since: January 2023
Posts: 1,524 
MSC Staff
|
Post by Joe Rix on Jul 14, 2023 8:26:15 GMT -5
Such is the trevails of our hobby. But, so is the art of recovery and you have come out the other side brilliantly. It all looks fantastic Andy. I am anxious to see paint on your Panther. Well done my friend.
|
|
|
|
Post by 406 Silverado on Jul 14, 2023 11:40:27 GMT -5
Oh wow!! You DID have a rough night Andy! I will say that it looks like you've recovered nicely from all the mishaps though. I remember not too long ago I was painting an auto body and the paint job was turning out to be one of my best paint jobs ever and then.....all of a sudden the body fell off of the stand that I was holding and it fell upside down.....on the frickin' carpet. I was devastated at the time but....after a couple of days was able to recover from it the way you have here.
Keep the updates comin'. You're doing some great work here.
|
|
|
|
Post by deafpanzer on Jul 15, 2023 10:17:59 GMT -5
Thank you both Joe! Yeah never a dull moment with our modeling hobby. I hope I won't experience more of mishaps for the rest of the build. I realize I need couple of paint so I have a perfect excuse to visit the hobby shop today but unfortunately my wife is tagging along this time. Maybe you can give me tips how to keep her distracted while I hunt for a kit or two?  |
|
|
|
Post by 406 Silverado on Jul 16, 2023 17:56:22 GMT -5
Thank you both Joe! Yeah never a dull moment with our modeling hobby. I hope I won't experience more of mishaps for the rest of the build. I realize I need couple of paint so I have a perfect excuse to visit the hobby shop today but unfortunately my wife is tagging along this time. Maybe you can give me tips how to keep her distracted while I hunt for a kit or two?  Hope you had some good luck with that!! |
|
m1keh
Full Member
  
Member since: April 2023
Posts: 259
Apr 9, 2023 23:03:02 GMT -5
Apr 9, 2023 23:03:02 GMT -5
|
Post by m1keh on Jul 16, 2023 23:18:05 GMT -5
Off to a good start Buddy! Leon, thanks my friend! Guys, I worked on the turret for last two nights and I really enjoyed it very much. So far I really like RFM as it is my first and I will not hesitate to buy kits from them. I was amazed by the surface texture on the turret especially the mantlet...     I was worried that my resin figure may not fit into the hatch but it was almost a perfect fit after I sanded down the commander's jacket sleeve little so the hand can connect to the cupola.  I will be adding the weld seams to some places eventually. Thanks for looking! Cool to see that RFM didn't forget the Orterkomoass mount or the poison gas detection plates on the turret roof. |
|
|
|
Post by deafpanzer on Jul 17, 2023 10:28:37 GMT -5
Cool to see that RFM didn't forget the Orterkomoass mount or the poison gas detection plates on the turret roof. That's good to know... I have so much to learn! LOL |
|
m1keh
Full Member
  
Member since: April 2023
Posts: 259
Apr 9, 2023 23:03:02 GMT -5
Apr 9, 2023 23:03:02 GMT -5
|
Post by m1keh on Jul 17, 2023 13:06:23 GMT -5
Here is what the Orterkomoass looks like. This for a 1/16th Panther. Also, in case you were wondering what the two mounting plates on the right side of the mantlet is they are for mounting Sperber night fighting IR equipment on. Does the right rear bin look like it opens like a cupboard door? If so this where the IR equipment was stored. You are doing an excellent build and that crew is first rate.  |
|
m1keh
Full Member
  
Member since: April 2023
Posts: 259
Apr 9, 2023 23:03:02 GMT -5
Apr 9, 2023 23:03:02 GMT -5
|
Post by m1keh on Jul 17, 2023 13:14:06 GMT -5
Panthers of an unidentified unit in Hungary, the picture shows the modified rear storage bin used to store the tanks IR equipment.  тест мыши онлайн тест мыши онлайн |
|
|
|
Post by deafpanzer on Jul 17, 2023 14:27:08 GMT -5
Panthers of an unidentified unit in Hungary, the picture shows the modified rear storage bin used to store the tanks IR equipment.  тест мыши онлайн тест мыши онлайнI thought that it was so cool of RFM for offering that special storage option for my kit but I didn't opt for it because I want to build one that was used in Battle of Bulge. It was one of few things I have learned while I built it. |
|
|
|
Post by deafpanzer on Jul 18, 2023 20:21:32 GMT -5
 Not much of update but I managed to get the Panther and figures primed. I will start painting after my New York trip. |
|


 Thanks for stopping by buddy!


