lyle
Forum Moderator 
Member since: May 2013
On the sunny side of the dirt
Posts: 1,258 
MSC Staff
|
Post by lyle on Feb 22, 2024 15:14:14 GMT -5
Knocking this straight down the fairway! Fill ‘em.
|
|
speedgraflex
Full Member

Member since: May 2023
My favorite thing is to go where I've never been.
Posts: 235
May 10, 2023 19:16:04 GMT -5
May 10, 2023 19:16:04 GMT -5
|
Post by speedgraflex on Feb 22, 2024 15:25:04 GMT -5
Thanks, Admiral! Closer to getting this section licked, that’s a promise - I don’t know any golfing metaphors, sadly, but I do so appreciate your support! I still have to work on the navigational beacon shape - it looks like a whittled piece of sprue which is what it is -  |
|
|
|
Post by 406 Silverado on Feb 22, 2024 17:27:38 GMT -5
Love the progress on this one Bruce. You're hangin' with this one in good fashion and it should make for a fantastic finish buddy. MAN this is good!!
|
|
speedgraflex
Full Member
Member since: May 2023
My favorite thing is to go where I've never been.
Posts: 235
May 10, 2023 19:16:04 GMT -5
May 10, 2023 19:16:04 GMT -5
|
Post by speedgraflex on Feb 22, 2024 17:51:16 GMT -5
Thanks so much! Here’s another angle -  I’m not sure how to describe this effect, but the exterior surface has become coated or has cured over the years, so I find a judicious amount of fine grit sanding is necessary to promote the best adhesion. I noticed this effect when I tried to skip the sanding stage and go straight to color coat on the deflector: old paint plus old plastic didn’t agree with each other. This was after I removed dirt from the initial surface. I think that despite the smoothness of the plastic, the majority should be carefully sanded for better adhesion. Somehow this reminds me of when my Dad painted plastic detail parts on a BMW coupe in his garage and wet sanded or “scratched” the brand new factory parts to create “tooth.” This must be the small scale equivalent of doing that. |
|
speedgraflex
Full Member
Member since: May 2023
My favorite thing is to go where I've never been.
Posts: 235
May 10, 2023 19:16:04 GMT -5
May 10, 2023 19:16:04 GMT -5
|
Post by speedgraflex on Feb 22, 2024 18:28:45 GMT -5
Love the progress on this one Bruce. You're hangin' with this one in good fashion and it should make for a fantastic finish buddy. MAN this is good!! I really really thank you for inviting me here! You’re a good man. |
|
speedgraflex
Full Member
Member since: May 2023
My favorite thing is to go where I've never been.
Posts: 235
May 10, 2023 19:16:04 GMT -5
May 10, 2023 19:16:04 GMT -5
|
Post by speedgraflex on Feb 22, 2024 18:32:10 GMT -5
You can see the “wrinkly effect” here which is also something that happens when reducing the top layer -  Maybe I wrote something self-evident above about re-sanding an already smooth surface, but I don’t think a chemical strip would be enough to create a finish that responds well to paint. I don’t recall this being discussed anywhere. I’m a member of “old Aurora kits and Aurora Prehistoric kits” Facebook Groups but I rarely see building process or structural design; painting is what is usually showcased. One of the many reasons I have for this publishing this personal project is to share building problems and solutions. |
|
moramartht
Full Member
Member since: October 2018
Posts: 147
Oct 11, 2018 17:36:23 GMT -5
Oct 11, 2018 17:36:23 GMT -5
|
Post by moramartht on Feb 22, 2024 21:40:44 GMT -5
I'm still trying to come up with an easy fix for this but while I have ideas I haven't the capacity to prove them practical by experiment. Back in the day I used to make mushroom-headed rivets by holding a length of Slaters plastic rod perpendicular to a heat source (electric hob glowing red, or the side of the part of a soldering iron containing the heating element); not in contact but maybe a centimetre away. The plastic would reach a critical temperature and suddenly melt back on itself and form a mushroom head about twice the diameter of the rod. Whip it away quick and let it harden, cut it off a few millimetres down the rod so the head has a shaft to pop in a hole made with a drill the same size as the plastic rod. It took only a little practice to start churning them out at a pretty consistent size, leave them in proximity to the heat a little longer and you'd get a sphere on the end which was useful for making levers with knobs on the end. I did use the same trick to form a rim on round sprue to make drums for the musicians in my skeleton army.
So I'm thinking if you have some clear round sprue about half the diameter of of the (hemispherical) bubble you might try this. I seem to recall for the sprue I had to rotate it quickly between my fingertips to be sure it heated evenly, but this was many years ago and I doubt I have the dexterity to repeat it now.
I'm having thoughts about vacuum-forming small clear hemispherical bubbles which would be useful for SF scratch builds, but I might grab a pack of stick-on "wobbly eyes" from the craft shop and use the clear front part, even though the profile would be wrong.
Cheers,
M
|
|
|
|
Post by kyledehart5 on Feb 22, 2024 23:34:53 GMT -5
Thanks so much! Here’s another angle - I’m not sure how to describe this effect, but the exterior surface has become coated or has cured over the years, so I find a judicious amount of fine grit sanding is necessary to promote the best adhesion. I noticed this effect when I tried to skip the sanding stage and go straight to color coat on the deflector: old paint plus old plastic didn’t agree with each other. This was after I removed dirt from the initial surface. I think that despite the smoothness of the plastic, the majority should be carefully sanded for better adhesion. Somehow this reminds me of when my Dad painted plastic detail parts on a BMW coupe in his garage and wet sanded or “scratched” the brand new factory parts to create “tooth.” This must be the small scale equivalent of doing that. Interesting Bruce. I found I had to do this same thing when I built my Aurora 1920 Indy 500 winner originally popped out of the molds circa 1958. The plastic had almost turned to glass it was so smooth. No way anything would have ever stuck. Had to sand everything on thats kit. |
|
speedgraflex
Full Member
Member since: May 2023
My favorite thing is to go where I've never been.
Posts: 235
May 10, 2023 19:16:04 GMT -5
May 10, 2023 19:16:04 GMT -5
|
Post by speedgraflex on Feb 23, 2024 1:50:20 GMT -5
Tom, Thank you for those great ideas - great ideas sparked some good thinking on my part and I really & truly appreciate the way you describe the process of invention for that's what this hobby can be about with even the most technologically advanced kits - a place to dream up different ways of doing things. I'm not really good with fire. That was a Scouting merit badge that initially caused me some trouble. I think that's due to some childhood trauma, actually. I'm still trying to learn how to stretch sprue! Going through your thoughts several times did make me think a visit to the jewelry shoppe was in order. I know that initially I measured that nav dome or beacon to be about 4mm in diameter. Maybe the sisters who own the shoppe have something that could work - something made of plastic already cut in half but with a bit of a milky white tonality to it would be perfect. Thanks again for your thoughts; these are most welcome.
Kyle, Thank you - I now need to find a possible link to your project. I love the Aurora Racers Series - let's see: Monroe Special, Murphy Special, Miller Special, Gilmore Special, Maserati Special... and the last I can't remember maybe it was Fuel Injected Special? The cars with the "real" rubber tires! I would love to build them all!
|
|
speedgraflex
Full Member
Member since: May 2023
My favorite thing is to go where I've never been.
Posts: 235
May 10, 2023 19:16:04 GMT -5
May 10, 2023 19:16:04 GMT -5
|
Post by speedgraflex on Feb 23, 2024 13:26:03 GMT -5
 A small but important idea occurred to me last night: to create a more accurate bay door opening I should scribe a narrow line along the bottom edge of the doors. The kit is designed with the edge of the doors disappearing within the ship below the shuttle bay deck. But the ship is designed with the doors level with the deck! Oh, yes do I feel like a Trekkie as I write this. Happy Friday! |
|
|
|
Post by kyledehart5 on Feb 23, 2024 14:15:58 GMT -5
Replied regarding the build thread already in my thread. Thanks for checking it out!! I have the Murphy special, the miller special and the Gilmore special to build as yet too. The Maserati and fuel injection special are the other two from the line but it’s almost like they gave up when they got to those. Not as if the others ar highly accurate but at least the bodies are relatively close. Those other two do not even resemble the real cars. I would like to have them just to complete the lineup. Probably would build them with Aurora’s absurd wheels and tires just to have the full collecrion.
|
|
speedgraflex
Full Member
Member since: May 2023
My favorite thing is to go where I've never been.
Posts: 235
May 10, 2023 19:16:04 GMT -5
May 10, 2023 19:16:04 GMT -5
|
Post by speedgraflex on Feb 23, 2024 14:48:51 GMT -5
Kyle! I enjoyed reading your build thread on Scalemates as well as your Reddit posts. That’s one of my favorite decades for design - both the subject and the kit respectively. You did more than justice to the old kit. You transformed the kit entirely! I looked briefly on Fernando’s site but didn’t see the wheels but I wasn’t doing in depth research. A wonderful project and I look forward to when you do your next one! PS. I have a Fb model building friend who has designed these - 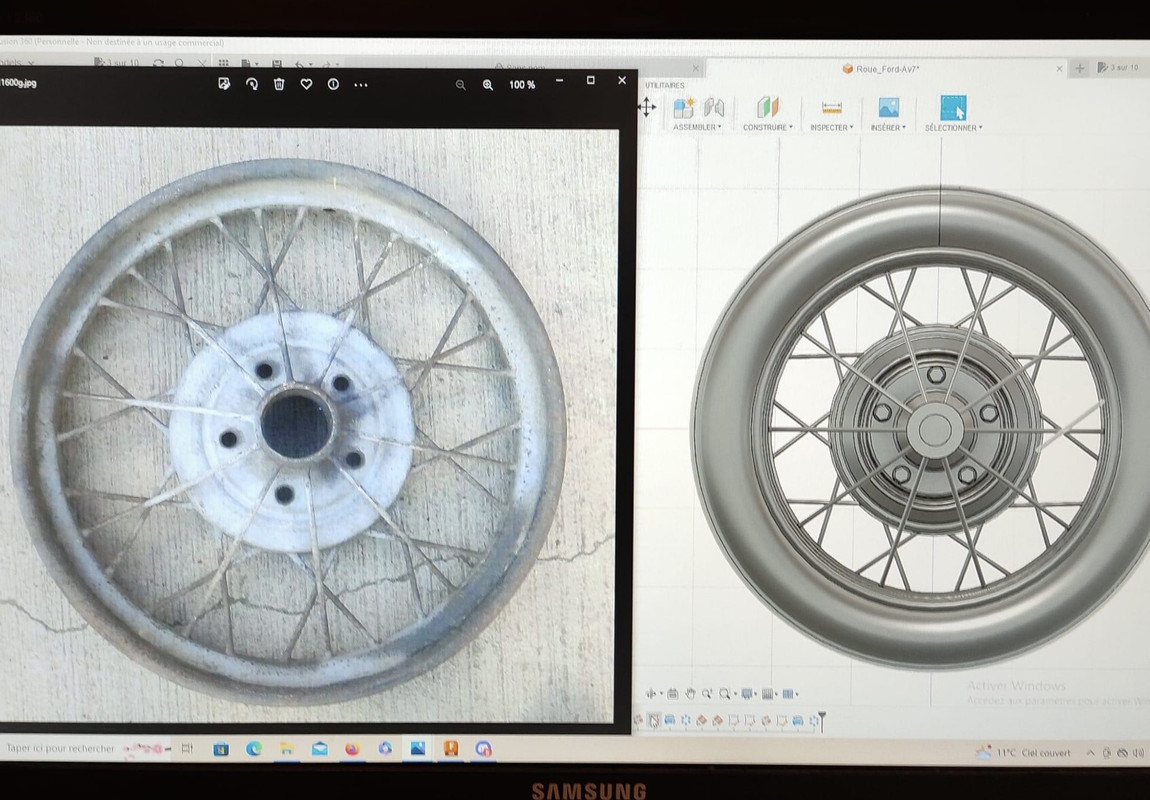 However these are far simpler in design. I have to stop thinking about this. |
|
|
|
Post by kyledehart5 on Feb 23, 2024 16:11:45 GMT -5
Kyle! I enjoyed reading your build thread on Scalemates as well as your Reddit posts. That’s one of my favorite decades for design - both the subject and the kit respectively. You did more than justice to the old kit. You transformed the kit entirely! I looked briefly on Fernando’s site but didn’t see the wheels but I wasn’t doing in depth research. A wonderful project and I look forward to when you do your next one! PS. I have a Fb model building friend who has designed these - However these are far simpler in design. I have to stop thinking about this. Recently I have tried to keep better build logs but I sure am glad that some people have enjoyed the build. That remains one of my favorites that I’ve ever built. I just love how it turned out and it was so simple and fun to build. now, to your friends wheels. I would certainly buy those. I’ve been thinking for some kits that it’s silly to spend the money on Fernando’s hand laced wires. (Incidentally I don’t think he always has all his products on his website, I usually just email him) I’d love to have access to someone that prints wire wheels so I could build some of the old Merit and Hawk kits I have without spending the big bucks on Pinto wheels. I think those you posted would look great on a merit Talbot for instance. |
|
speedgraflex
Full Member
Member since: May 2023
My favorite thing is to go where I've never been.
Posts: 235
May 10, 2023 19:16:04 GMT -5
May 10, 2023 19:16:04 GMT -5
|
Post by speedgraflex on Feb 23, 2024 17:26:52 GMT -5
I’ll let him know. He’s working on a belly tank racer with those wheels on it -  I can’t compliment you enough on the job you made of the Monroe Special, Kyle. Simply stunning work! Very well done! |
|
speedgraflex
Full Member
Member since: May 2023
My favorite thing is to go where I've never been.
Posts: 235
May 10, 2023 19:16:04 GMT -5
May 10, 2023 19:16:04 GMT -5
|
Post by speedgraflex on Feb 23, 2024 17:35:01 GMT -5
I’m reposting this image - this remains where I’m concentrating my efforts -  I actually quickly sanded the area and used a Tamiya basic scriber to clean the edges. That may only require me to add a tiny line using an X-Acto to create the effect at scale. |
|
|
|
Post by kyledehart5 on Feb 23, 2024 17:52:33 GMT -5
Brilliant. Love those belly tank racers. And thanks again for the kind words! Looking forward to seeing how this section looks once you’ve worked your magic.
|
|
speedgraflex
Full Member
Member since: May 2023
My favorite thing is to go where I've never been.
Posts: 235
May 10, 2023 19:16:04 GMT -5
May 10, 2023 19:16:04 GMT -5
|
Post by speedgraflex on Feb 24, 2024 2:03:07 GMT -5
Short update: I spent half an hour sanding, polishing and scribing. I decided that the edge of the lip has a slight bend or twist to it and added a layer of CA to compensate. Let's see how that looks in a bit. Cheers!
Another short update: I added two coats of CA so far. Let's see how that looks in a bit. I'll post up photos in the morning! Cheers!
|
|
handiabled
Community Relations Moderator 
Member since: February 2023
Posts: 2,579
MSC Staff
|
Post by handiabled on Feb 24, 2024 4:10:17 GMT -5
You are getting there Bruce!
|
|
speedgraflex
Full Member
Member since: May 2023
My favorite thing is to go where I've never been.
Posts: 235
May 10, 2023 19:16:04 GMT -5
May 10, 2023 19:16:04 GMT -5
|
Post by speedgraflex on Feb 24, 2024 14:37:35 GMT -5
You are getting there Bruce! Thanks, Brett! I know what the issue is - it’s in the shape of the molds with one side being slightly shorter than the other. I would prefer adding then removing because it affects the design of the aft fantail. Lets see. Quick snap  |
|
stikpusher
Forum Moderator
Member since: April 2023
Living The Dream
Posts: 3,515
MSC Staff
|
Post by stikpusher on Feb 24, 2024 22:17:49 GMT -5
Bruce, the red lines look m ore off than the lines of hull at the fantail...
|
|
speedgraflex
Full Member
Member since: May 2023
My favorite thing is to go where I've never been.
Posts: 235
May 10, 2023 19:16:04 GMT -5
May 10, 2023 19:16:04 GMT -5
|
Post by speedgraflex on Feb 25, 2024 2:18:33 GMT -5
Forgive me, Carlos! I meant to add that I exaggerated the lines I drew for emphasis!
|
|
dean48ws
Full Member
Member since: October 2023
Posts: 252
|
Post by dean48ws on Feb 25, 2024 2:28:46 GMT -5
Tom, Thank you for those great ideas - great ideas sparked some good thinking on my part and I really & truly appreciate the way you describe the process of invention for that's what this hobby can be about with even the most technologically advanced kits - a place to dream up different ways of doing things. I'm not really good with fire. That was a Scouting merit badge that initially caused me some trouble. I think that's due to some childhood trauma, actually. I'm still trying to learn how to stretch sprue! Going through your thoughts several times did make me think a visit to the jewelry shoppe was in order. I know that initially I measured that nav dome or beacon to be about 4mm in diameter. Maybe the sisters who own the shoppe have something that could work - something made of plastic already cut in half but with a bit of a milky white tonality to it would be perfect. Thanks again for your thoughts; these are most welcome. Kyle, Thank you - I now need to find a possible link to your project. I love the Aurora Racers Series - let's see: Monroe Special, Murphy Special, Miller Special, Gilmore Special, Maserati Special... and the last I can't remember maybe it was Fuel Injected Special? The cars with the "real" rubber tires! I would love to build them all! I don't know what you call them over there, Radio Shack maybe?? But my old man used to always be annoying the poor blokes in the local electrical supply shop looking for bits and pieces to use on builds. Diodes, small grain of wheat bulbs, you name it, he got it, cut it up or glued several together and then painted it and who knew?? Just a thought that you've probably already had, but.... |
|
speedgraflex
Full Member
Member since: May 2023
My favorite thing is to go where I've never been.
Posts: 235
May 10, 2023 19:16:04 GMT -5
May 10, 2023 19:16:04 GMT -5
|
Post by speedgraflex on Feb 25, 2024 3:32:21 GMT -5
Thanks, Deano! "The Shack" has sadly passed through the hands of many after bankruptcy and now no longer has a presence in Southern California, but your idea is a good one. I could take apart or find some old electronics to take apart! Thanks again!
|
|
midnightprowler
Full Member
Member since: February 2016
Posts: 701
|
Post by midnightprowler on Feb 25, 2024 15:34:39 GMT -5
Nice work. Are you going to be rescribing door lines?
|
|
stikpusher
Forum Moderator
Member since: April 2023
Living The Dream
Posts: 3,515
MSC Staff
|
Post by stikpusher on Feb 25, 2024 16:41:18 GMT -5
Forgive me, Carlos! I meant to add that I exaggerated the lines I drew for emphasis! Bruce, we are usually our own harshest critics, my old friend.  |
|
speedgraflex
Full Member
Member since: May 2023
My favorite thing is to go where I've never been.
Posts: 235
May 10, 2023 19:16:04 GMT -5
May 10, 2023 19:16:04 GMT -5
|
Post by speedgraflex on Feb 25, 2024 16:54:46 GMT -5
Nice work. Are you going to be rescribing door lines? That’s a good question. When I see the latest restoration the lines look drawn on, but on the 1992 restoration the same lines appear to be partially scribed. I’m not sure I could scribe well enough in that small space; I think I will try pencils on a flat surface. I spent too much time smoothing out the surfaces. I think the surface should be smooth. |
|
speedgraflex
Full Member
Member since: May 2023
My favorite thing is to go where I've never been.
Posts: 235
May 10, 2023 19:16:04 GMT -5
May 10, 2023 19:16:04 GMT -5
|
Post by speedgraflex on Feb 25, 2024 16:56:31 GMT -5
Forgive me, Carlos! I meant to add that I exaggerated the lines I drew for emphasis! Bruce, we are usually our own harshest critics, my old friend. Yes, yes, yes! I spent some time adding CA to the lower hull. Let’s see. |
|
TOWGunner
Full Member
Member since: January 2024
Slowly building down my stash...only 600 more to go!
Posts: 185
Jan 29, 2024 17:15:24 GMT -5
Jan 29, 2024 17:15:24 GMT -5
|
Post by TOWGunner on Feb 25, 2024 17:20:00 GMT -5
I just bombed through this thread to catch up. To call this build epic somehow seems an understatement. Your skill and dedication are impressive. Your work is excellent.
|
|
|
|
Post by kyledehart5 on Feb 25, 2024 19:30:42 GMT -5
Forgive me, Carlos! I meant to add that I exaggerated the lines I drew for emphasis! Bruce, we are usually our own harshest critics, my old friend. Always. Always. I pretty much don’t like anything I do. 😂 Have fun doing it though even if something leads me to be disappointed in one aspect or another. Bruce your build process and attention to detail is outstanding and a joy to follow along with. |
|
speedgraflex
Full Member
Member since: May 2023
My favorite thing is to go where I've never been.
Posts: 235
May 10, 2023 19:16:04 GMT -5
May 10, 2023 19:16:04 GMT -5
|
Post by speedgraflex on Feb 25, 2024 21:26:41 GMT -5
I just bombed through this thread to catch up. To call this build epic somehow seems an understatement. Your skill and dedication are impressive. Your work is excellent. Thank you, Matt! Sincerely! Welcome to the forum and I truly hope you will stick around for more on the thread as well! I have learned much about weathering specifically from those who build armor. There’s a great deal of weathering information on the Enterprise since the restoration and I hope to translate as much as possible to the scale. |
|


