|
|
Post by kyledehart5 on Oct 20, 2024 6:42:26 GMT -5
Good idea!! That looks pretty cool. Nicely done.
|
|
joelw
Full Member
  
Member since: July 2024
Posts: 582 
|
Post by joelw on Oct 20, 2024 7:45:04 GMT -5
Paddy,
The Mig polishing pigment really made a huge difference and yet it still by the reflection looks like Aluminum that's aged somewhat.
joel
|
|
greg
Full Member
  
Member since: March 2023
Posts: 305
Mar 11, 2023 10:40:27 GMT -5
Mar 11, 2023 10:40:27 GMT -5
|
Post by greg on Oct 20, 2024 8:02:01 GMT -5
Funny, I fussed quite a bit over the finish on my Lotus tub back when I was painting mine, too.
You're right, not easy to tell from the pic but it sure looks good from here, and I do see the reflection. Interesting about the Mig polishing compounds.
Of all things, I've taken a liking to Vallejo's Metal Finish (the new ones, not the originals).
|
|
benb
Full Member
   December '24 Showcased Model Awarded
Member since: July 2024
Posts: 277
Jul 17, 2024 12:07:35 GMT -5
Jul 17, 2024 12:07:35 GMT -5
|
Post by benb on Oct 20, 2024 8:02:28 GMT -5
That polishing pigment sounds like the SNJ polishing powder from years ago. You could get some really good results with it. Your engine looks amazing!
Ben
|
|
paddy
Full Member
   Nov '23 & Sept '24 Showcased Models Awarded
Member since: September 2023
Posts: 326
Sept 1, 2023 10:16:31 GMT -5
Sept 1, 2023 10:16:31 GMT -5
|
Post by paddy on Oct 22, 2024 14:17:31 GMT -5
Front suspension was a bit of a nightmare, in the end i had to read the instructions  not something a real man should do or at least own up too but i think i got away with it by keeping my fingers crossed at the same time...   |
|
|
|
Post by project510 on Oct 22, 2024 15:02:43 GMT -5
Oh my, that looks beautiful!
|
|
joelw
Full Member
  
Member since: July 2024
Posts: 582 
|
Post by joelw on Oct 22, 2024 19:04:24 GMT -5
Paddy,
Outstanding job on the front suspension. And don't feel bad, lately I need to not only read and study the directions a step at a time, but repeat as necessary.
joel
|
|
|
|
Post by keavdog on Oct 22, 2024 19:46:21 GMT -5
Man that's looking sharp. Love the tub color.
|
|
paddy
Full Member
   Nov '23 & Sept '24 Showcased Models Awarded
Member since: September 2023
Posts: 326
Sept 1, 2023 10:16:31 GMT -5
Sept 1, 2023 10:16:31 GMT -5
|
Post by paddy on Oct 23, 2024 4:08:30 GMT -5
|
|
|
|
Post by 406 Silverado on Oct 23, 2024 4:34:56 GMT -5
Man, that looks good just like that Paddy. LOTSA details throughout this car already and we don't even have the interior going yet. That engine alone is a showcase!!!
|
|
greg
Full Member
  
Member since: March 2023
Posts: 305
Mar 11, 2023 10:40:27 GMT -5
Mar 11, 2023 10:40:27 GMT -5
|
Post by greg on Oct 23, 2024 7:52:20 GMT -5
Ditto that. Everything is outstanding. This would look good on jacks, displayed as is!
I meant to mention I really like your subtle 'weathering' (for lack of knowing what else to call it) on the tub surfaces.
|
|
handiabled
Administrator      Apr '23 Showcased Build Awarded
Member since: February 2023
Posts: 4,508 
MSC Staff
|
Post by handiabled on Oct 23, 2024 8:52:11 GMT -5
Scratch build some jack stands and leave it just like this! Man that detail looks gorgeous!
|
|
paddy
Full Member
   Nov '23 & Sept '24 Showcased Models Awarded
Member since: September 2023
Posts: 326
Sept 1, 2023 10:16:31 GMT -5
Sept 1, 2023 10:16:31 GMT -5
|
Post by paddy on Oct 23, 2024 9:35:08 GMT -5
ha ha ..yes i might leave the panels off if i cant make them detachable but it needs a bit more than where its at just now i think  |
|
joelw
Full Member
  
Member since: July 2024
Posts: 582 
|
Post by joelw on Oct 23, 2024 10:00:33 GMT -5
paddy,
More great progress. The installed engine looks fantastic seating in the Aluminum pan.
As for removable panels in 1/12 scale you could try rivets or safety pins.
joel
|
|
|
|
Post by keavdog on Oct 23, 2024 10:20:09 GMT -5
Man that's impressive. So much detail to look at. Gotta be happy with where this one is going for sure!
|
|
|
|
Post by kyledehart5 on Oct 24, 2024 4:31:23 GMT -5
Awesome work paddy! Engine looks incredible and attached to the tub you’ve already got yourself a great looking unit there.
|
|
paddy
Full Member
   Nov '23 & Sept '24 Showcased Models Awarded
Member since: September 2023
Posts: 326
Sept 1, 2023 10:16:31 GMT -5
Sept 1, 2023 10:16:31 GMT -5
|
Post by paddy on Oct 24, 2024 5:53:02 GMT -5
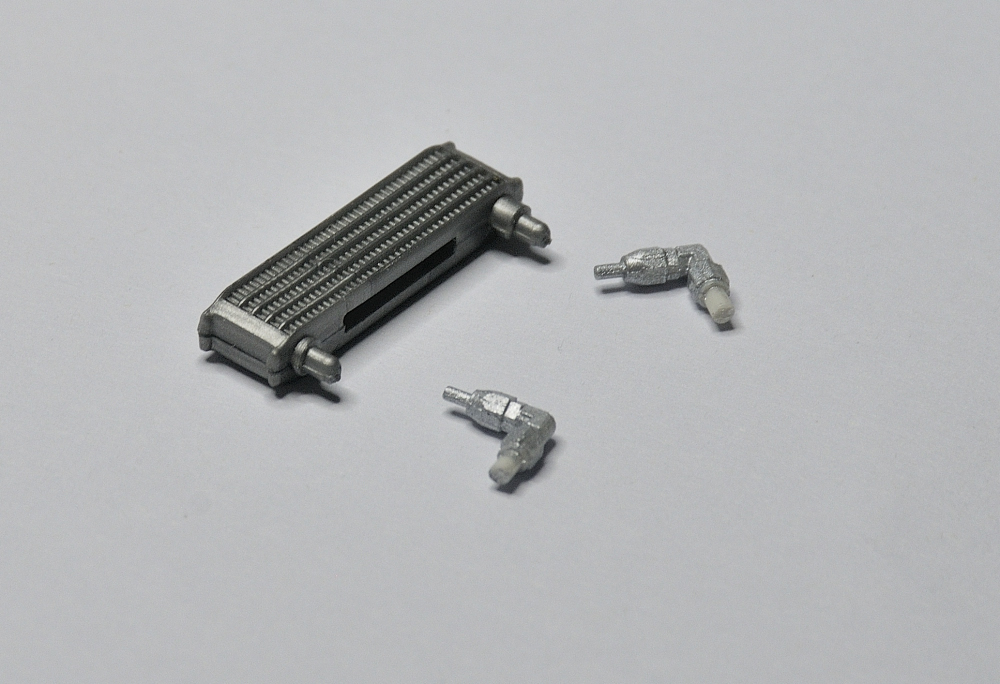
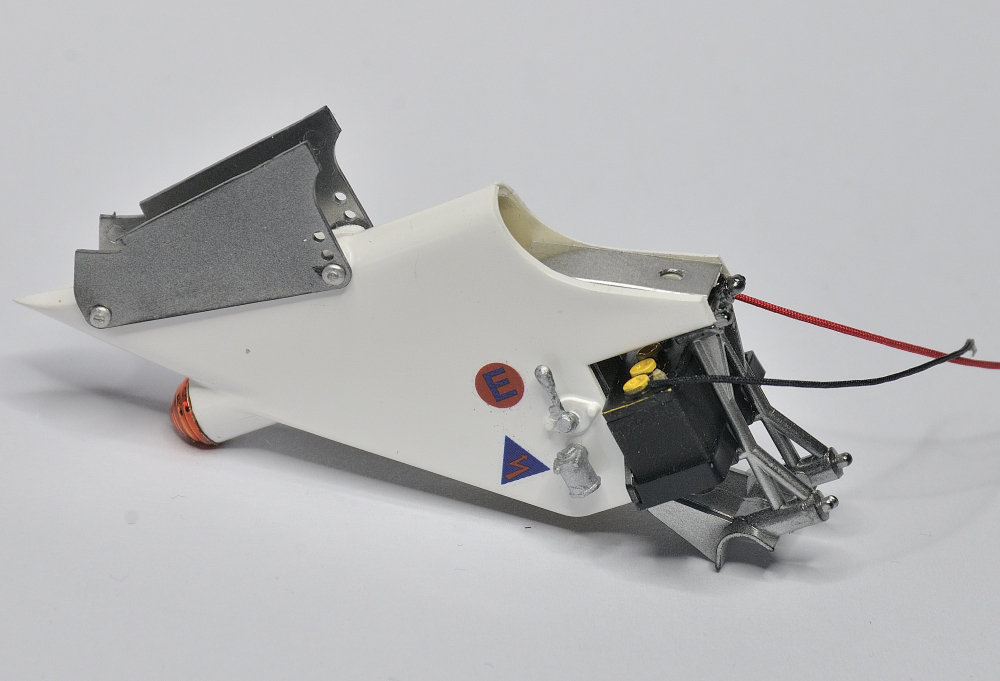
Rear fin not really sure how far to go with this? You reach a stage where you start covering up all the work you have done  Anyway i decided it needs a rear wing while i wait for some seat belts which Tamiya never included in these early kits  One good thing about building something you wouldn't normally build is you learn lots about the subject....,like the support for the rear wing has an oil cooler inside as well as forming the battery mount.  the oil cooler has straight outlets which means the pipes would come out at 90 degree to the fin so i swapped these for resin right angle unions  Whatever you do the join above the battery is a disaster as the battery frame is wider than the fin.. The rest of the sides of the fin meet up fine all round the edges except this small front section.  and the finished lob with the oil unions pointing in the right direction   |
|
greg
Full Member
  
Member since: March 2023
Posts: 305
Mar 11, 2023 10:40:27 GMT -5
Mar 11, 2023 10:40:27 GMT -5
|
Post by greg on Oct 24, 2024 6:33:48 GMT -5
The detail in this kit is really something. You're starting to get me fired up for my first big scale car build since the 60's, Paddy. Looking good, which seems to be the norm from you.  |
|
paddy
Full Member
   Nov '23 & Sept '24 Showcased Models Awarded
Member since: September 2023
Posts: 326
Sept 1, 2023 10:16:31 GMT -5
Sept 1, 2023 10:16:31 GMT -5
|
Post by paddy on Oct 24, 2024 8:24:12 GMT -5
Cheers Greg Just to put the part in context  |
|
greg
Full Member
  
Member since: March 2023
Posts: 305
Mar 11, 2023 10:40:27 GMT -5
Mar 11, 2023 10:40:27 GMT -5
|
Post by greg on Oct 24, 2024 8:35:10 GMT -5
Yes, that helps. Wasn't sure exactly what it was, makes sense now.
|
|
|
|
Post by project510 on Oct 24, 2024 10:01:50 GMT -5
Ditto that. Everything is outstanding. This would look good on jacks, displayed as is! I meant to mention I really like your subtle 'weathering' (for lack of knowing what else to call it) on the tub surfaces. Yes, this. I need to know how this was achieved. |
|
|
|
Post by kyledehart5 on Oct 24, 2024 15:08:16 GMT -5
Incredible work. This is looking so good.
|
|
paddy
Full Member
   Nov '23 & Sept '24 Showcased Models Awarded
Member since: September 2023
Posts: 326
Sept 1, 2023 10:16:31 GMT -5
Sept 1, 2023 10:16:31 GMT -5
|
Post by paddy on Oct 24, 2024 16:32:08 GMT -5
Hi James The tub is MRP white alloy over white primer then brushed/stippled with MIG polished metal pigment  |
|
greg
Full Member
  
Member since: March 2023
Posts: 305
Mar 11, 2023 10:40:27 GMT -5
Mar 11, 2023 10:40:27 GMT -5
|
Post by greg on Oct 24, 2024 18:53:45 GMT -5
Hi James The tub is MRP white alloy over white primer then brushed/stippled with MIG polished metal pigment  Thanks for telling.  |
|
paddy
Full Member
   Nov '23 & Sept '24 Showcased Models Awarded
Member since: September 2023
Posts: 326
Sept 1, 2023 10:16:31 GMT -5
Sept 1, 2023 10:16:31 GMT -5
|
Post by paddy on Oct 26, 2024 4:29:26 GMT -5
Another great example of things looking ok to the naked eye but looking wrong in an enlarged photo is Tamiya's 1mm tubing for brakes and cables.  I need to do something about this, i wish i could find 0.75mm tubing with a thin wall. 1mm scaled is 12mm or half inch. Brake pipes would be 7 or 8mm , speedo cables maybe 9 or 10mm , its not a lot of difference but it sticks out in the pictures.  |
|
joelw
Full Member
  
Member since: July 2024
Posts: 582 
|
Post by joelw on Oct 26, 2024 5:16:11 GMT -5
paddy,
Personally I think that your detailing looks fantastic in the pictures. You're being way to critical of your own work.
Have you checked to see what MFH has for tubing and fittings as they specialize in 1/12 scale cars?
Joel
|
|
greg
Full Member
  
Member since: March 2023
Posts: 305
Mar 11, 2023 10:40:27 GMT -5
Mar 11, 2023 10:40:27 GMT -5
|
Post by greg on Oct 26, 2024 8:09:30 GMT -5
Me too, everything looks fantastic. It's hard not to judge one's own work from close-up photos, I do get where you're coming from as I do the the same.
|
|
|
|
Post by kyledehart5 on Oct 27, 2024 5:08:40 GMT -5
Pictures are the worst. But don’t sell yourself short. In my opinion it looks excellent even in the photos but I know we are always our own worst critics so I understand that completely. Wonderful work
|
|
paddy
Full Member
   Nov '23 & Sept '24 Showcased Models Awarded
Member since: September 2023
Posts: 326
Sept 1, 2023 10:16:31 GMT -5
Sept 1, 2023 10:16:31 GMT -5
|
Post by paddy on Oct 27, 2024 7:49:20 GMT -5
I changed the cables from the clocks to 0.7mm from 1mm and really please with the difference, it shows how detail is far more critical to scale as you get smaller, it might seem like 0.3mm is not a lot but think of ity as 30% and suddenly its more important,  also added some seat belts, Tamiya didnt include these in the early large scale F1 kits but these came from top Studio and included everything you need including wire/double sided tape/ the ribbon /cloth decals/ cast parts/ and PE for £8.00 or $12.00  I used Revell spray chrome on the wheels. This stuff takes a few weeks to go hard but i have had it in a warm cabinet at about 28 degrees for 4 days and as its the inside of the wheels they will not be handled so can proceed with care -) |
|
joelw
Full Member
  
Member since: July 2024
Posts: 582 
|
Post by joelw on Oct 27, 2024 9:21:27 GMT -5
The smaller cables/wires do indeed look better, but the old ones still looked good too.
joel
|
|