|
|
Post by Teabone on Mar 20, 2013 17:03:47 GMT -5
DickyF wing_nut
Thanks for the look and comments. We are on hold right now while I am awaiting a Humber kit that is supposed to have the key to what the inside of the turret looked like.
Bones
|
|
|
|
Post by Teabone on Mar 23, 2013 13:21:01 GMT -5
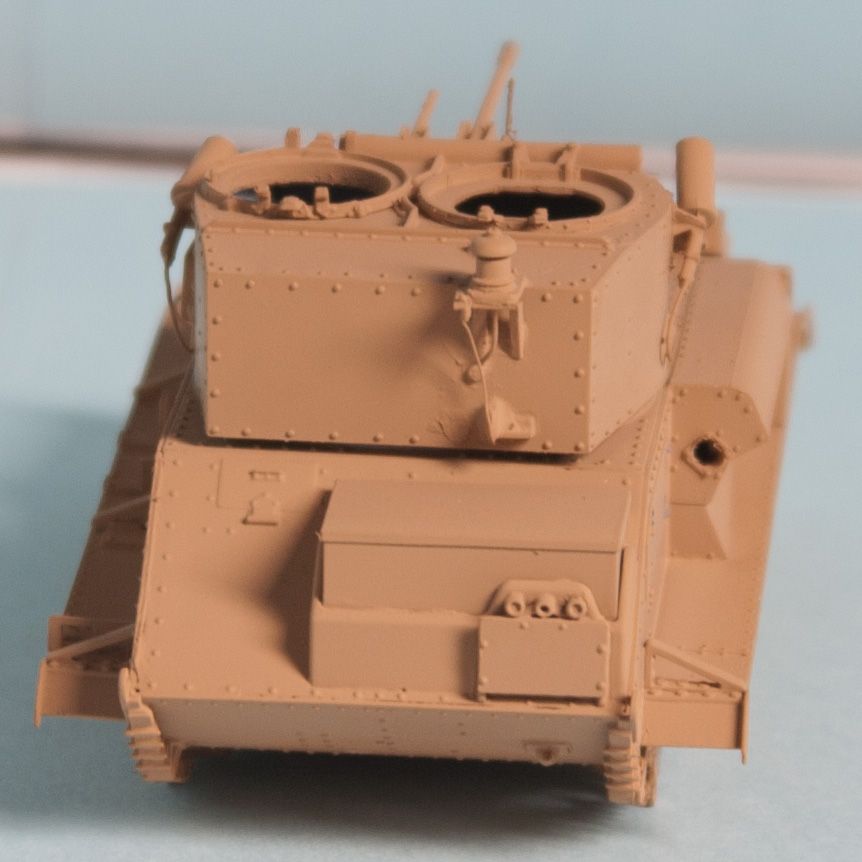
Here are some pictures of the hull and turret with the base coat on, the paint is Tamiya Desert Yellow per the kit recommended color but I can see it should have had some white added but with the green stripping it will be just fine.
This build is now waiting until I get the Roll-Royce to a point where I can set it aside and finish the Turret interior then the tracks followed by the stripping.
I messed up the picture order and these pictures will appear below.
|
|
|
|
Post by tonylee on Mar 23, 2013 14:47:01 GMT -5
Tbone all you need to do is take some of your base color and mix some "Buff" in it,thin it 70 to 80% for a lighter shade and dust her up with it hitting the panel centers a little heavier than around the edges. Try it,you'll like it  Tony lee |
|
|
|
Post by Teabone on Mar 23, 2013 17:14:25 GMT -5
Tbone all you need to do is take some of your base color and mix some "Buff" in it,thin it 70 to 80% for a lighter shade and dust her up with it hitting the panel centers a little heavier than around the edges. Try it,you'll like it Tony lee |
|
|
|
Post by wbill76 on Mar 23, 2013 20:41:08 GMT -5
Tony's got you covered teabone! Looking forward to seeing this one with the camo done.
|
|
|
|
Post by Teabone on Mar 25, 2013 14:31:01 GMT -5
I just need to get the Rolls along sufficient I can put it in temporary box mode then we will go to Malta.
|
|
|
|
Post by Teabone on Apr 5, 2013 12:46:18 GMT -5
|
|
|
|
Post by wbill76 on Apr 5, 2013 19:08:42 GMT -5
Looks like some good stuff to populate the engine bay in particular.
|
|
|
|
Post by Teabone on Apr 5, 2013 22:25:03 GMT -5
From what I saw it is not quite up to the (IMA kit that never was) standard of detail but until Resi-Cast produces a real product its hard to judge.
|
|
|
|
Post by Teabone on May 21, 2013 22:49:22 GMT -5
Some more pictures that I screwed up in my changing the name of the Album.


|
|
|
|
Post by Teabone on May 21, 2013 22:50:51 GMT -5
A couple more.

|
|
|
|
Post by Teabone on May 21, 2013 23:01:44 GMT -5
Here comes the real mistake, I have a very, very bad habit if being in a hurry at times and just plowing ahead. In this case it was inexcusable because I had good reference pictures all over the place but I guess I was getting tired of looking at this vehicle which is another bad habit. I took out the green paint and started on the turret and the first thing I did wrong was make the patteren to small, then I also made it brick like when it should have been stones. Well my Malta expert says brick shapes might have been OK but had to be larger. In any event by the time I got half the turret done and discovered my eorror it was too late for me to go back so its ending up to be good enough for who its for.

|
|
|
|
Post by Teabone on May 21, 2013 23:03:03 GMT -5
Another view. The lantern I saw in a refence for the VIc so I made one up quick using an MV lens. The radio is a little dodgy but came from the interior maker so I went with it.

|
|
|
|
Post by Teabone on May 21, 2013 23:08:25 GMT -5
Got the boggies on today with surprising ease after a real bad scare about lining them up but I found a way to fake it and it worked slick. Pictures will follow, almost ready to start the CMP.
|
|
Deleted
Member since: January 1970
Posts: 0
May 13, 2024 23:48:57 GMT -5
May 13, 2024 23:48:57 GMT -5
|
Post by Deleted on May 22, 2013 2:06:44 GMT -5
Nice work old chap and nice to see you are going with the Malta scheme
|
|
|
|
Post by bullardino on May 22, 2013 10:36:20 GMT -5
Bones, I had totally missed this one. Stunning job on a tiny tank. Can't wait to see more of this one |
|
|
|
Post by Teabone on May 22, 2013 12:53:22 GMT -5
snipersmudge, richardoram & Luigi
Thanks for looking and your boosting comments. Snipersmudge, it only looks like a Malta scheme but I like it also the color on that above four pictures is not right in the picture, in real life they look real good for color.
Richardoram, there are a lot of people who seem to have a preference for the Vickers, they are interesting served well in Britain's attempts to have a fully mechanized army ahead of all the other countries.
Luigi, more will follow soon with my observations on the engineering on the bogies which may be helpful to ant who are building this kit.
Bones
|
|
|
|
Post by wbill76 on May 22, 2013 20:20:56 GMT -5
Pattern still looks good from here even if it is a bit small...it will still fill the bill when all is said and done! Nice to see this one nearing the finish line.
|
|
|
|
Post by Teabone on May 22, 2013 22:52:29 GMT -5
Some turret shots near finish, drilled out the spot light and installed an MV lens and added a wire handle which is difficult to see in the picture.
Bones

|
|
|
|
Post by Teabone on May 22, 2013 22:56:29 GMT -5
The pictures make one think the basket is catiwampas but it is true the camera is at an angle. 
|
|
|
|
Post by Teabone on May 22, 2013 22:58:31 GMT -5
Last one shows some of how the base for the aerial turned out.

|
|
|
|
Post by Teabone on May 22, 2013 23:38:57 GMT -5
This picture shows the side view and the road wheels which is an area of contention with some builders since this kit came on the scene. When assembled correctly the bogie is a remarkable representation of these vehicles. From the comments I have seen on this kit I am sure that more than one model has ended it service in the trash due to this setup. The springs are a double set with a smaller spring inside the outer one you see, they go over a metal rod provided in the kit. The rods for the front set are shorter than the ones for the rear bogie. The simple fix is to go to our friendly hardware store and buy an identical sized wire and the use the long rear one in the front bogie and make one a shade longer for the rear. I say this being sure that there are some who probably are able to build this assembly as provided but I know a number who are not. There are castle nuts on the bogie sprue that have to be drilled out while on the sprue to avoid any desire to kill something while drilling them off the sprue. Here one should, using the dreaded CA glue fasten a nut on one end of all the rods, to try to do this gluing while assembling will drive you back to wanting to kill something. With the nut fastened the assembly of the bogies becomes relatively simple other than you have to keep the wheels and articulating parts free from glue or else you loose the articulating feature. So far so good.
If you built the assembly per plans and it is still articulated and probably best not painted yet. (I always paint off the vehicle to avoid the spoty paint job behind the bogies that is often seen when painted afterwards except for the truly great ones.) If you have painted yours and possibly had your friendly capillary action draw some glue into a joint or two you will find that the bogies are not movable anymore. The vehicle body has holes to receive the bogies with indexing steps in the holes which fix how the bogie is set in the hole. If your bogies are articulate no problem you can then flex them into the correct position to get the parallel with the ground surface. In my case no movement and the momentary feelings of a heart attack coming on. Having had these things happen fairly often since I began building these little buggers I sat back drew a deep breath and looked at the hole with the step in them and the bogie and realized that this set up was slightly over designed for what it had to do. I got out my trusty number 44 drill bit and got rid of the step in the hole and found I could then rotate the bogies to line up flat on the ground as they should.
The point of this tome is about the term "over engineering" which I have heard often since joining the ranks of scale modelers building manufactured kits. I, as an engineer by profession, have always been touchy about that term often offered by non engineers lacking understanding of the practice. In our case with models it usually means too much fiddly detail but I love fiddly details as much as my talent will let me work with them. This is the first kit I have built where I feel the bogies are way more complicated than they need to be for the intended purpose. There is no question that the springs make it look right but I am sure that could have been done in a fixed position making the whole process much easier. You all can let me know when I post it with the tracks in place.
Bones
|
|
|
|
Post by bullardino on May 23, 2013 2:13:32 GMT -5
Thanks for the explaination, the result looks gorgeous |
|
Smudge
Reviews member 
Member since: March 2012
...The 'other Smudge' not the 'Sniper Smudge' LOL
Posts: 613
Mar 8, 2012 4:29:18 GMT -5
Mar 8, 2012 4:29:18 GMT -5
|
Post by Smudge on May 23, 2013 6:37:36 GMT -5
Here comes the real mistake, I have a very, very bad habit if being in a hurry at times and just plowing ahead. In this case it was inexcusable because I had good reference pictures all over the place but I guess I was getting tired of looking at this vehicle which is another bad habit. I took out the green paint and started on the turret and the first thing I did wrong was make the patteren to small, then I also made it brick like when it should have been stones. Well my Malta expert says brick shapes might have been OK but had to be larger. In any event by the time I got half the turret done and discovered my eorror it was too late for me to go back so its ending up to be good enough for who its for.
Mr Bones It's coming along nicely. I might have to obtain one myself. As a rule of thumb the smaller vehicles (like the Austin Tilly, Carriers etc) could be parked next fo walls for camouflage hence the uneven 'rubble/dry stone wall effect'. Larger vehicles like the tanks and 6x6, 4x4 trucks would have to be parked next to buildings hence the more even brick effect. Smudge |
|
|
|
Post by Steve Zuleski on May 23, 2013 12:31:37 GMT -5
TeaBone, that is some in depth study there buddy, bravo work! I love the detailed write-up. I'll be standing by for the finale'.
Cheers, Ski.
|
|
Deleted
Member since: January 1970
Posts: 0
May 13, 2024 23:48:57 GMT -5
May 13, 2024 23:48:57 GMT -5
|
Post by Deleted on May 23, 2013 13:44:41 GMT -5
Great stuff! I had a real problem with the suspension on my model, just couldn't get it right, in the end I used sovereign 2000's resin replacements. Nice work on the model
|
|
|
|
Post by Teabone on May 23, 2013 15:03:44 GMT -5
Great stuff! I had a real problem with the suspension on my model, just couldn't get it right, in the end I used sovereign 2000's resin replacements. Nice work on the model
Did you read my above tome on the suspension.
Bones.
|
|
|
|
Post by Teabone on May 23, 2013 15:06:03 GMT -5
TeaBone, that is some in depth study there buddy, bravo work! I love the detailed write-up. I'll be standing by for the finale'. Cheers, Ski.
It will be up no later than Saturday and thanks for the nice thoughts.
Bones.
|
|
|
|
Post by Teabone on May 23, 2013 15:11:06 GMT -5
Richardoram
Thanks for taking the time to look and the comments.
I like this the best it is my motto "it could be an in-theatre adaption?"
Bones.
|
|
|
|
Post by wbill76 on May 23, 2013 20:40:41 GMT -5
Nice SBS on the suspension Bones, love the way this one's coming together.
|
|