|
|
Post by wbill76 on Apr 10, 2013 19:53:56 GMT -5
Nice detail PE work Tony. Those loops must've taken a lot of patience.
|
|
multicam
Senior Member
   
Member since: January 2012
Nate
Posts: 2,039
Jan 10, 2012 14:35:41 GMT -5
Jan 10, 2012 14:35:41 GMT -5
|
Post by multicam on Apr 10, 2013 22:51:54 GMT -5
Looks great Tony! Nice work so far:)
|
|
|
|
Post by bbd468 on Apr 11, 2013 0:27:07 GMT -5
WOW, Very clean PE work and a great build over all.  Gary |
|
|
|
Post by bullardino on Apr 11, 2013 1:09:46 GMT -5
I envy your patience and skill. So much PE and so little parts... Great progress, Tony  |
|
|
|
Post by deafpanzer on Apr 11, 2013 7:06:32 GMT -5
Excellent PE work!!! It is really looking good!
|
|
Tony Thunder
Full Member
  
Member since: January 2012
Posts: 591
Jan 30, 2012 18:22:10 GMT -5
Jan 30, 2012 18:22:10 GMT -5
|
Post by Tony Thunder on Apr 11, 2013 15:06:28 GMT -5
Thanks for the comments guys!
Dicky - Empty but with the centre troop seating and if I can get it right a full tilt (open at the back).
Cheers
Tony
|
|
Holdfast
Junior Member
 
Member since: November 2012
Posts: 71
Nov 30, 2012 7:46:40 GMT -5
Nov 30, 2012 7:46:40 GMT -5
|
Post by Holdfast on Apr 11, 2013 15:46:59 GMT -5
Great job. Brings back memories of driving them on exercise in West Germany, in the early 80's.  |
|
Tony Thunder
Full Member
  
Member since: January 2012
Posts: 591
Jan 30, 2012 18:22:10 GMT -5
Jan 30, 2012 18:22:10 GMT -5
|
Post by Tony Thunder on Apr 16, 2013 11:25:13 GMT -5
|
|
|
|
Post by bullardino on Apr 16, 2013 13:31:28 GMT -5
Awesome job, Tony.
|
|
Tony Thunder
Full Member
  
Member since: January 2012
Posts: 591
Jan 30, 2012 18:22:10 GMT -5
Jan 30, 2012 18:22:10 GMT -5
|
Post by Tony Thunder on Apr 16, 2013 15:54:29 GMT -5
All strip, rod etc comes with the kit! (and there is a lot!).
Only thing I have had to supply is wire for engine detailing/cabling etc
Next up is the collapsable troop seating which is scratch built but all materials and instructions are included.
Tony
|
|
|
|
Post by wbill76 on Apr 16, 2013 19:52:28 GMT -5
Nice work on the PE and other details Tony, looking forward to those troop seats.
|
|
|
|
Post by deafpanzer on Apr 16, 2013 19:53:26 GMT -5
SO SHINY!!!! It made me pause for a long period. Great PE work!
|
|
|
|
Post by Leon on Apr 17, 2013 3:44:40 GMT -5
PE looks top notch Tony.
|
|
Smudge
Reviews member    
Member since: March 2012
...The 'other Smudge' not the 'Sniper Smudge' LOL
Posts: 613
Mar 8, 2012 4:29:18 GMT -5
Mar 8, 2012 4:29:18 GMT -5
|
Post by Smudge on Apr 17, 2013 4:57:10 GMT -5
Hi Tony Great work mate. The KFS kits are really well researched and produced bits of kit. You're making it look very easy though. Shame it doesn't come with tilt cover. I never saw many without one. My local TA infantry unit did have these until last summer now they've been issued with MAN's so I doubt we'll see many of these in service now...maybe the more specialised versions. Great wagons though. We definately got our moneys worth from the MK. Smudge PS. My missus learned to drive wagons in a MK. She's scary enough in a car imagine the terror going on in the back with her driving a 4 tonner  |
|
Tony Thunder
Full Member
  
Member since: January 2012
Posts: 591
Jan 30, 2012 18:22:10 GMT -5
Jan 30, 2012 18:22:10 GMT -5
|
Post by Tony Thunder on Apr 17, 2013 5:08:23 GMT -5
Thanks for the kind comments guys.
Smudge you are right about the tilt and thats the reason I'm going to have a go at making one!
Tony
|
|
Deleted
Member since: January 1970
Posts: 0
Dec 2, 2024 2:51:51 GMT -5
Dec 2, 2024 2:51:51 GMT -5
|
Post by Deleted on Apr 17, 2013 7:06:13 GMT -5
This is really a fun build. I love the work you do, so clean and exact.
Nice save with the roof hatch. That's the story of my life, cut it off twice and it's still too short.
G
|
|
|
|
Post by robbo on Apr 18, 2013 4:22:58 GMT -5
Wow this is really good mate
|
|
|
|
Post by bbd468 on Apr 18, 2013 14:01:49 GMT -5
Mighty fine works Tony! Great job with all that PE...well done my man!  Gary |
|
Tony Thunder
Full Member
  
Member since: January 2012
Posts: 591
Jan 30, 2012 18:22:10 GMT -5
Jan 30, 2012 18:22:10 GMT -5
|
Post by Tony Thunder on May 10, 2013 11:28:00 GMT -5
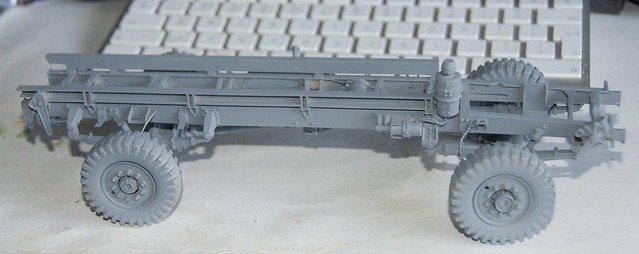
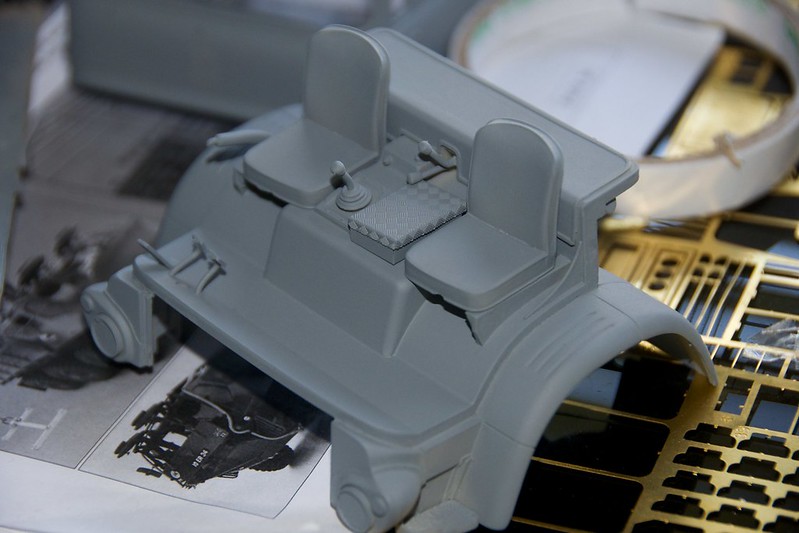
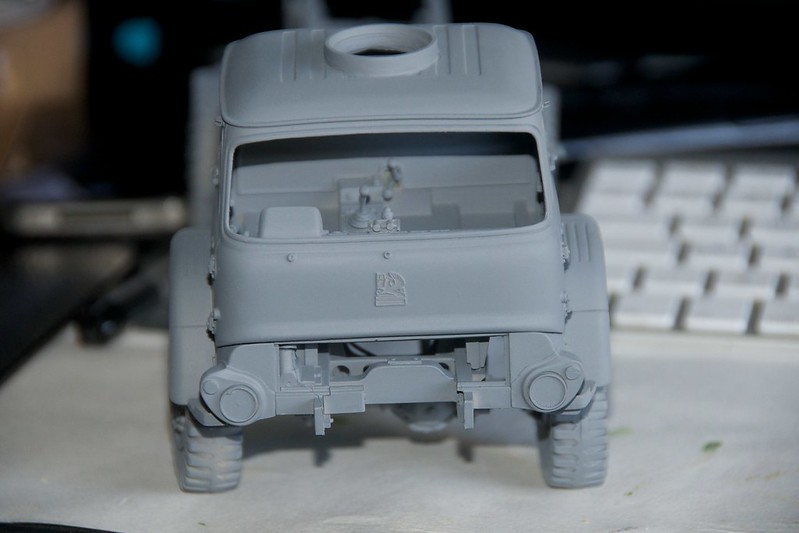
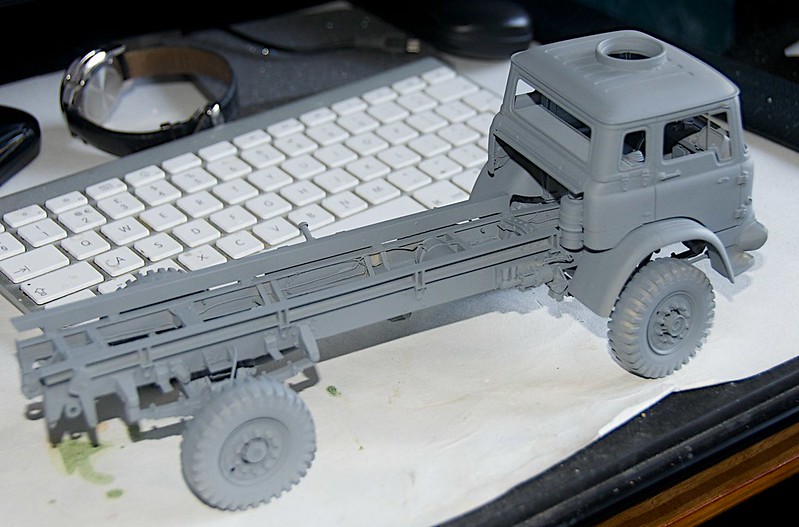
Its been a while since my last update but I some work has been done. I finished the chassis with fuel, brake, airlines etc have now been added and along with the cab have been built as much as they can be prior to paint. I still have some work to do to the cargo area but that will be in my next post. So to the pics! (I forgot to take a pic of the chassis prior to primer). Drivers side  DSC_2450 DSC_2450 by TonyThunder, on Flickr Near side  DSC_2449 DSC_2449 by TonyThunder, on Flickr Engine/motor! most of this will be covered by the cab so I won't plumb the engine this time because it will never be seen.  DSC_2451 DSC_2451 by TonyThunder, on Flickr Interior of cab  DSC_2452 DSC_2452 by TonyThunder, on Flickr Cab complete so far  DSC_2439 DSC_2439 by TonyThunder, on Flickr  DSC_2438 DSC_2438 by TonyThunder, on Flickr  DSC_2459 DSC_2459 by TonyThunder, on Flickr I couldn't resist putting the back on, still some work to do before I can prime.  DSC_2461 DSC_2461 by TonyThunder, on Flickr As ever ACW Tony |
|
|
|
Post by bbd468 on May 10, 2013 11:40:03 GMT -5
PRIMER!!! AHHH smells AWESOME!  Looks great Tony....bring on that smelly Paint!  |
|
Tony Thunder
Full Member
  
Member since: January 2012
Posts: 591
Jan 30, 2012 18:22:10 GMT -5
Jan 30, 2012 18:22:10 GMT -5
|
Post by Tony Thunder on May 10, 2013 13:13:46 GMT -5
Dicky - Good question!
I actually primed with Halfords Plastic Primer.
Over the last year or so I have got into using the airbrush and Vallejo primers but this thing is so big I went the rattle can route.
Its turned out well so far.
Tony
|
|
|
|
Post by bullardino on May 10, 2013 13:17:44 GMT -5
Great to see progress on this one  It looks fantabulous, Tony. |
|
|
|
Post by wbill76 on May 10, 2013 20:42:43 GMT -5
Good progress on this one Tony, nice to see it moving along once more.  |
|
|
|
Post by Leon on May 10, 2013 20:57:27 GMT -5
Great progress Tony.Your doing a fine job on this.  |
|
|
|
Post by robbo on May 11, 2013 5:05:38 GMT -5
Can't beat a good primer shot, everything just jumps out at you, going in to the paint next  |
|
multicam
Senior Member
   
Member since: January 2012
Nate
Posts: 2,039
Jan 10, 2012 14:35:41 GMT -5
Jan 10, 2012 14:35:41 GMT -5
|
Post by multicam on May 12, 2013 8:17:00 GMT -5
Lookin good, Tony! I'm lovin this build. Very cool truck and your details are outstanding and very tidy:) Keep it up.
|
|
|
|
Post by dupes on May 12, 2013 8:58:25 GMT -5
Mmmmmm primer!
|
|
Thomas_M/
Full Member
  
Member since: May 2013
Don´t panic! I am German!
Posts: 217 
|
Post by Thomas_M/ on May 12, 2013 9:24:36 GMT -5
What a fantastic show here! I knew that KFS kits exist but never ever have seen one build. Looking at the resin parts and the amazing detail first remembered me at my MiniMan Factory KRaZ (shelf of shame...), those details and your gorgeous skills do this wonderful kit justice.
Under the primer coat the details pop out even more. Beautiful!
|
|
Tony Thunder
Full Member
  
Member since: January 2012
Posts: 591
Jan 30, 2012 18:22:10 GMT -5
Jan 30, 2012 18:22:10 GMT -5
|
Post by Tony Thunder on May 16, 2013 11:56:10 GMT -5
|
|
Deleted
Member since: January 1970
Posts: 0
Dec 2, 2024 2:51:51 GMT -5
Dec 2, 2024 2:51:51 GMT -5
|
Post by Deleted on May 16, 2013 12:18:51 GMT -5
Some great work going into this great old work horse,Tony....One of the later versions,with the Turbo,I assume? The MK's in service when I was in,hardly any had the tread plate on the cab.Looking forward to see how you tackle the tilt....  Jeez....when I was in,we still had RL's   |
|