|
|
Post by wbill76 on May 19, 2013 14:45:18 GMT -5
There you go Thomas, the perfect solution!  Glad to have you along. MK's offer a lot of the same benefits as Fruils but are styrene instead of metal, so there's a little difference there of course. |
|
Hinksy
Full Member
  
Member since: June 2012
THE ENGLISH LIONHEART - HINKSY!
Posts: 1,016
Jun 22, 2012 16:46:21 GMT -5
Jun 22, 2012 16:46:21 GMT -5
|
Post by Hinksy on May 19, 2013 14:49:26 GMT -5
Hey Bill, I'm going to really enjoy this one buddy ! This kit caught my eye as soon as I first saw it advertised so I'll be following this blog with interest. Good luck! Ben  |
|
|
|
Post by wbill76 on May 19, 2013 17:31:57 GMT -5
Ben, the Marder II-D is the lesser-known cousin to the Marder III, but it's one I've wanted to do for a while, and it caught my eye too when first released. Glad to have you along! Dicky, sometimes I wonder if the kit manufacturers actually ever BUILD the kits they sell...but there's always more than one way to skin the cat! More bloggage incoming in a minute. 
|
|
|
|
Post by wbill76 on May 19, 2013 17:32:06 GMT -5
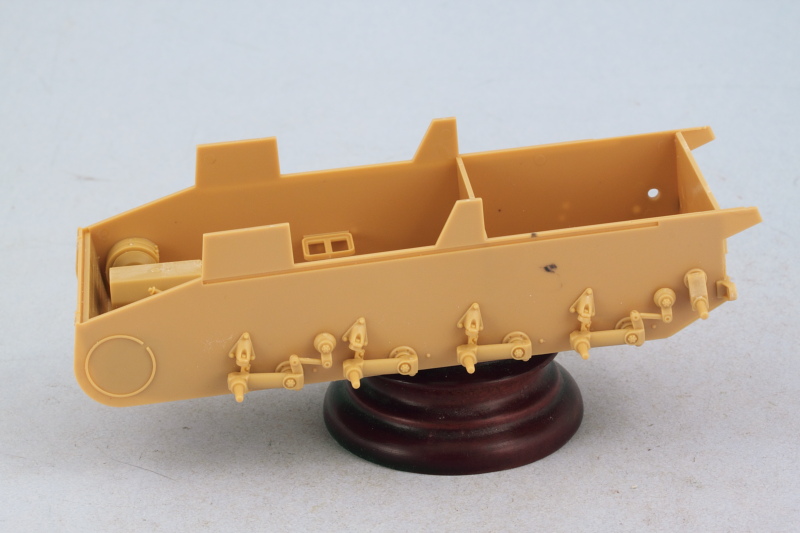
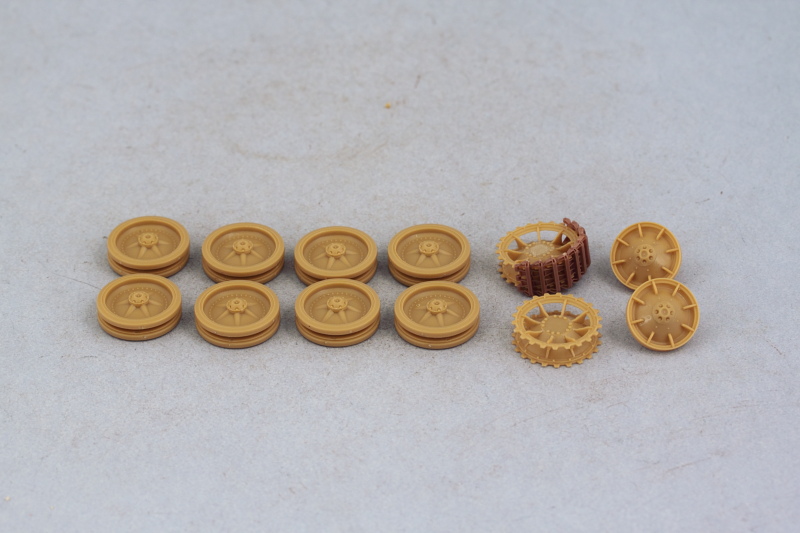
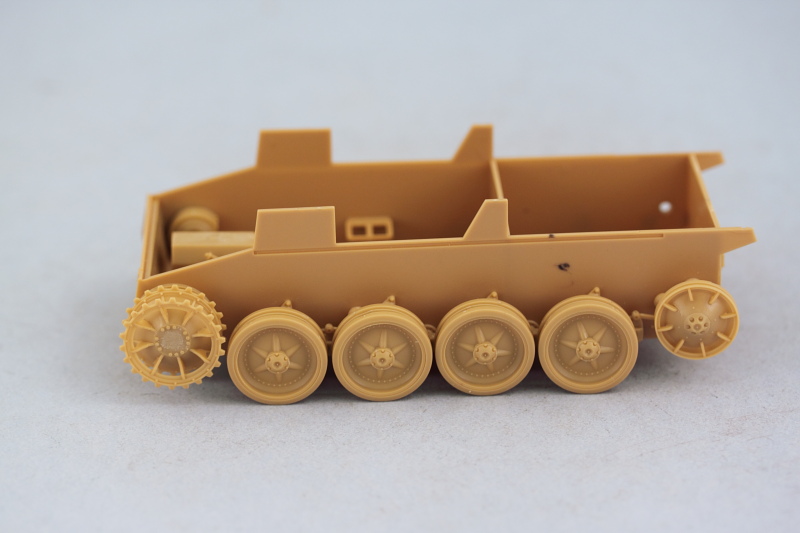
Work continued from yesterday's efforts with Steps 4 and 5 which deal with the suspension elements. Step 4 adds a lot of little parts along with the suspension arms for the road wheels. The instructions direct you to remove 3.1mm from the portions of the arms that mount into the hull, so some surgery is required on all 8 arms. This is due to the fact that the addition of the torsion bar parts on the hull interior (presumably not present in Bronco's earlier Pz II-D kit) blocks off those openings in the hull sides. Easily done with a ruler to mark the cut line, then snip off with sprue cutters and sand down the ends where necessary. The arm bump stops, parts B40, have mount pins on their backs but the pins are too long for them to fit flush, so some sanding is necessary there as well. The idler mount arms were dry-fit only as I need them to remain movable to allow for the workable track tensioning down the road.  Step 5 deals with the assembly of the road wheels, sprockets, and idlers. The road wheels are separate halves with separate rubber rims as well...and each part has 4 attachment points to be cleaned up. The wheel hubs also had some flash on their inner surfaces that had to be removed, so quite a bit of clean up effort involved with them as a result. The rubber rims fit tightly with a friction fit, so they can be removed easily later on for separate painting but care will be needed to avoid any paint on the insides of the rims and the hubs causing a disruption. The sprockets assembled easily and I used a run of 10 links from the MK set to ensure the sprocket teeth lined up correctly and would play nice with the tracks later on. That same run was used to test the gap fit on the road wheels as well as the idlers. On the idlers, the front half has small tabs that are supposed to fit into the back halves but the tabs are too tall and have to be trimmed down to all the front half to fit flush at the right gap interval. Bronco designed the idlers to have a small insert (B21) that's meant to help create a friction fit with the idler swing arm. It's the same part that goes inside each of the road wheels but the difference with the idler arm is that it isn't tapered like the road wheel arms...so it won't fit. It's a good thing I tested that before committing to glue on the idler hub caps, otherwise it would've been harder to fix. The solution is to taper the points of the idler mount arms to match the taper on the road wheel suspension arms with careful trimming/sanding. Don't add part B23 (the idler tension bolt) at this stage unless you're sure about the position you need for the idler...I'm not, so that will get added later.  A test fit with all the parts from Step 5 was carried out to make sure everything lined up properly. Installation will occur later on after painting.  Next up will be working on the rear hull details and then on to the fenders. |
|
|
|
Post by tonylee-Rest In Peace on May 19, 2013 17:42:50 GMT -5
Duly Noted Tex.  Tony lee |
|
|
|
Post by Leon on May 19, 2013 18:04:58 GMT -5
Great SBS there Bill.Moving a long nicely.  |
|
bigjohn
Reviews member    
Member since: December 2011
John Hale
Posts: 3,438
Dec 21, 2011 2:17:45 GMT -5
Dec 21, 2011 2:17:45 GMT -5
|
Post by bigjohn on May 19, 2013 18:08:15 GMT -5
Nice! Double update weekend!!!!! Your making good progress now Bill, Nice to see the road wheels out of the way. Looks like that kit has some nice crisp detail to boot!
|
|
|
|
Post by wbill76 on May 19, 2013 19:52:18 GMT -5
Tony, take good notes, there will be a quiz at the end!  Thanks Leon! BJ, yep this weekend gets a 2-for-1...because next weekend is Memorial Day weekend and my wife wants to go see Star Trek (so do I!)  I'm impressed with the details that Bronco has achieved, even on things that would be hidden away. For example, under the wheel hub caps are impressions for the bolt holes should you wish to show a wheel removed or damaged...same thing on the rear sides, full detail.
|
|
|
|
Post by tonylee-Rest In Peace on May 19, 2013 20:18:19 GMT -5
Crib notes don't fail me now.  Tony lee |
|
|
|
Post by wbill76 on May 19, 2013 21:06:46 GMT -5
Crib notes don't fail me now.  Tony lee I hear the testing administrator is open to bribes, but only if they are styrene.  |
|
|
|
Post by bullardino on May 20, 2013 8:12:02 GMT -5
I hear the testing administrator is open to bribes, but only if they are styrene.  Good to hear, I got tons of unused sprue from my previous builds, mostly unpainted and unprimed. Will they do?  This tank looks really small, Bill. I keep on following, this build is really interesting  |
|
|
|
Post by wbill76 on May 20, 2013 9:52:00 GMT -5
Nice work-around Luigi! Styrene is styrene but some is more valuable than others...  It's no giant that's for sure, the Pz II chassis wasn't large to begin with and mounting the 7.62cm gun on it put a lot of strain on it. It served well enough as an expedient way to get mobile AT capability using already built Pz II-Ds but didn't have the same success as the Marder III for obvious reasons I guess.  |
|
|
|
Post by bullardino on May 20, 2013 11:11:15 GMT -5
Oh, well, I suppose it was a very soft target, especially for KVs and T-34..
|
|
|
|
Post by deafpanzer on May 20, 2013 14:28:27 GMT -5
I have to say that the wheels have great details! Looks like getting MBA is paying off as you are building at faster pace now...  Trust me you will love the new Star Trek movie... saw it last Saturday and it was just awesome! Planning to take the boys to see the movie Iron Man 3 this weekend. Enjoy the movie my friend! |
|
|
|
Post by wbill76 on May 20, 2013 20:16:45 GMT -5
I was pleasantly surprised to discover that the MK track set included a full set of wheels...but they definitely aren't needed on this build! The Bronco wheels have great definition all around, no question about it. I've heard nothing but good things about Star Trek, so looking forward to it...just have to pick the right time to go to avoid the worst of the crowds.
|
|
Deleted
Member since: January 1970
Posts: 0
Nov 25, 2024 5:33:39 GMT -5
Nov 25, 2024 5:33:39 GMT -5
|
Post by Deleted on May 21, 2013 7:21:46 GMT -5
really neat and nice work, the details do look nice and crisp
|
|
|
|
Post by wbill76 on May 21, 2013 10:17:10 GMT -5
Pete, thanks for the comments as always! Roman, no worries about the road wheels, it's a small thing and I'm not going to sweat it. Will hit you up if I have any questions or run into any issues along the way, thanks for the offer! 
|
|
Hinksy
Full Member
  
Member since: June 2012
THE ENGLISH LIONHEART - HINKSY!
Posts: 1,016
Jun 22, 2012 16:46:21 GMT -5
Jun 22, 2012 16:46:21 GMT -5
|
Post by Hinksy on May 21, 2013 13:54:10 GMT -5
Looking great so far Bill  I don't know if you've read my post entitled 'Bronco Pz.II Ausf. D' but due to this very blog of yours I really fancied looking into a newer Bronco kit and I ordered one this afternoon. What a cracking looking kit! I've got the Comet too but that's from when, 1990? www.perthmilitarymodelling.com/reviews/vehicles/bronco/cb35061.htmlI've got Friuls and replacement barrels - it's a shame Bronco haven't released their new 'clickable' links that don't need clean up and there are the kit links that come with it have 4 sprue attachment points so I'm not exactly keen on cleaning that lot up with the limited time on hands! Friuls are the order of the day! I'll be folowing this one closely Bill - keep us posted! Ben  |
|
|
|
Post by wbill76 on May 21, 2013 14:32:39 GMT -5
Not sure on the date of the Comet but it's definitely not 1990...Bronco hasn't been around that long, at least in terms of producing Armor kits. The Comet I believe dates from 2005-2006 or around there.
Look forward to seeing what you do with the standard II-D gun-tank Ben. Have fun with it!
|
|
Hinksy
Full Member
  
Member since: June 2012
THE ENGLISH LIONHEART - HINKSY!
Posts: 1,016
Jun 22, 2012 16:46:21 GMT -5
Jun 22, 2012 16:46:21 GMT -5
|
Post by Hinksy on May 21, 2013 16:22:04 GMT -5
Not sure on the date of the Comet but it's definitely not 1990...Bronco hasn't been around that long, at least in terms of producing Armor kits. The Comet I believe dates from 2005-2006 or around there. Look forward to seeing what you do with the standard II-D gun-tank Ben. Have fun with it! Oh right! I heard a couple of guys at the club talking whilst looking at the contents of my Comet kit box and talking about when it came out and thought they said 1990 but must have totally mis-heard them as having looked on Google now it looks like it was sometime in 2006? Ah well, only 16 years out! LOL! The II-D looks like a corker matey - I hope Bronco start releasing a lot of their clickable tracks now. So far the Sherman guys are well covered but not the German modellers (yet). I cant face cleaning up 200+ links with 4 attachment points  Cheers Bill, Ben  |
|
Deleted
Member since: January 1970
Posts: 0
Nov 25, 2024 5:33:39 GMT -5
Nov 25, 2024 5:33:39 GMT -5
|
Post by Deleted on May 21, 2013 16:44:37 GMT -5
Hey Bill looking good my friend !
|
|
|
|
Post by wbill76 on May 21, 2013 17:25:39 GMT -5
Ben, If you've got a good pair of sprue cutters, the clean-up shouldn't be too tough. All about picking your poison though when it comes to tracks, even though I choose to use MK's on mine, they still have the same 4 connection points per link that have to be dealt with.  Carl Carl, thanks for stopping by! 
|
|
|
|
Post by bbd468 on May 21, 2013 19:41:42 GMT -5
Parts seem to be real clean with crisp detail so far Bill, you agree? Lookin nice bro.
|
|
|
|
Post by wbill76 on May 21, 2013 20:02:51 GMT -5
Parts seem to be real clean with crisp detail so far Bill, you agree? Lookin nice bro. For the most part this is true Gary. There has been some fine flash on the road wheels to deal with but otherwise the detail in the molding is crisp and well defined. You could even make the argument that the kit is slightly over-engineered in terms of the detail in some areas (I'm not complaining though!) like the suspension but it presents you with choices/options that you wouldn't have otherwise. |
|
Hinksy
Full Member
  
Member since: June 2012
THE ENGLISH LIONHEART - HINKSY!
Posts: 1,016
Jun 22, 2012 16:46:21 GMT -5
Jun 22, 2012 16:46:21 GMT -5
|
Post by Hinksy on May 24, 2013 6:53:25 GMT -5
Ben, If you've got a good pair of sprue cutters, the clean-up shouldn't be too tough. All about picking your poison though when it comes to tracks, even though I choose to use MK's on mine, they still have the same 4 connection points per link that have to be dealt with.  Hi Bill old chum, Time is a BIG factor in my work - I can only build at weekends due to work and my long hours and if I put my mind to the task I can assemble a full set of Friuls in 2 hours. I like to know that I can really manhandle them without risking a breakage if I need to aswell. I don't build many kits so don't mind the additional expense occasionally but will try some MK's again soon. My first taste of them was their Panzer I links (aaagghhh!) and they were impossible so I'd like to try some Panther/Tiger MK's (in other words - big MK links)! I opened up the bag that holds uall the sprues in their own little bags and I was mightily impressed. A slight bit of flash and the odd ejector mark (but only marks which are on hidden areas and aren't going to be on any external, visible places anyway). Instructions look clear enough. The moulding detail for the wheels is exquisite and all-in-all, a lovely looking kit. I assembled a run of 6 Friuls and they built up lovely. With the new RB Barrels this should be a corker! Imo Bronco are a name to watch out for now! Excellent kits at GREAT prices! Thanks to this blog making me notice how excellent Bronco's stuff is now I've now got another PROVEN manufacturer to use that I'm happy to go with. Anyway, this thread is about your lovely looking Marder. I'm glad it's dropping together well-it's certaily looking good and clean. I'll be interested to see what 'style' you go for (new, smart and tidy OR rough, tired and knocked about). The cammo should be good too - are you going with the box art scheme? That will test you! As for me I'm working from home tomorrow but will have my Jagdpanther close at hand to do little bits on - hopefully the work phone will be quiet. I've got all of Sunday then I'm off all of next week! SWEEEEET!  Keep the updates coming Bill, Ben  |
|
|
|
Post by wbill76 on May 24, 2013 10:53:05 GMT -5
This weekend is a long holiday weekend here in the US so I plan to make the most of it. The box art scheme (but soft-edged) is the plan and it will be weathered accordingly for a unit serving on the Eastern Front in early-mid '43.  |
|
|
|
Post by bullardino on May 24, 2013 11:05:29 GMT -5
Interesting camo, Bill. I've never seen such pattern before...
|
|
|
|
Post by wbill76 on May 24, 2013 12:07:58 GMT -5
that's a brave choice, Bill. I think it is a bit demanding. However, not that extreme as this one on top.  Now that's an example with a crew that had too much time on its hands!  |
|
pt109
Full Member
  
Member since: April 2013
Stop staring at me! heheheh
Posts: 491 
|
Post by pt109 on May 24, 2013 20:14:22 GMT -5
Looking clean and tidy as usual Bill...always love your blogs.
Paul
|
|
|
|
Post by wbill76 on May 24, 2013 21:02:36 GMT -5
Thanks Paul! Hoping to make the most of the long weekend, just have to fit in enough bench time around the normal 'honey do' items as well as going to the theater for Star Trek! If I play my cards right, I should be able to balance it all out to my advantage. Fingers crossed!  |
|