Deleted
Member since: January 1970
Posts: 0
Nov 26, 2024 21:45:05 GMT -5
Nov 26, 2024 21:45:05 GMT -5
|
Post by Deleted on Aug 28, 2013 22:35:46 GMT -5
Guy ......impressive my friend ! Definitely worth being bookmarked .
|
|
|
|
Post by wouter on Aug 29, 2013 1:43:56 GMT -5
I agree with Gary that it can be scary stuff to work with. Seems like you got it covered well though. It really is getting better and better Guy, it just looks very convincing. Like those detail shots. If you ever decide to take this one to a show, you'll defo got a winner!
Cheers
|
|
|
|
Post by bullardino on Sept 1, 2013 14:32:14 GMT -5
I really love the outcome, Guy. That's a real bad ass tank with a gorgeous weathering on  |
|
|
|
Post by armorguy on Sept 4, 2013 18:38:26 GMT -5
Luigi, thank you ! Wouter, I didn't make this one to take it to a show in the first place, I just had to have one for my (small) collection of 1:35 scale armor. But I keep it in mind, we'll see how it looks once finished. Carl, thanks my friend ! Glad you like it ! Boots, that's a BIG compliment bud ! Deano, thanks ! The tracks score 11/10, these were the easiest ones I've ever assembled ! And another big advantage : they're plastic so painting is child's play ! Bruce, thanks mate ! Andy, I'm by far not as awesome as many of the guys here ! Always supportive to other builders...unbelievable ! I didn't have much bench time the past days, and also posting here wasn't possible. My father-in-law had to have urgent surgery (3 bypasses) so I had less mojo. He's doing well so now the mojo is coming back. Bill, the scraper holes were great fun to do ! Bones, thanks my friend ! Dicky, I wet the collected pigments with fixer and finer dust effects were treated with airbrushed on fixer. Pete, that's the challenge of it, to create a wide range of effects. Thanks ! Tobi, thank you fella ! The chains were first degreased and airbrushed with Tamiya acrylic mat Red Brown. I then applied dry rust pigments and fixed them with fixer by airbrush (fine misting). Dust pigments were applied to finish them. 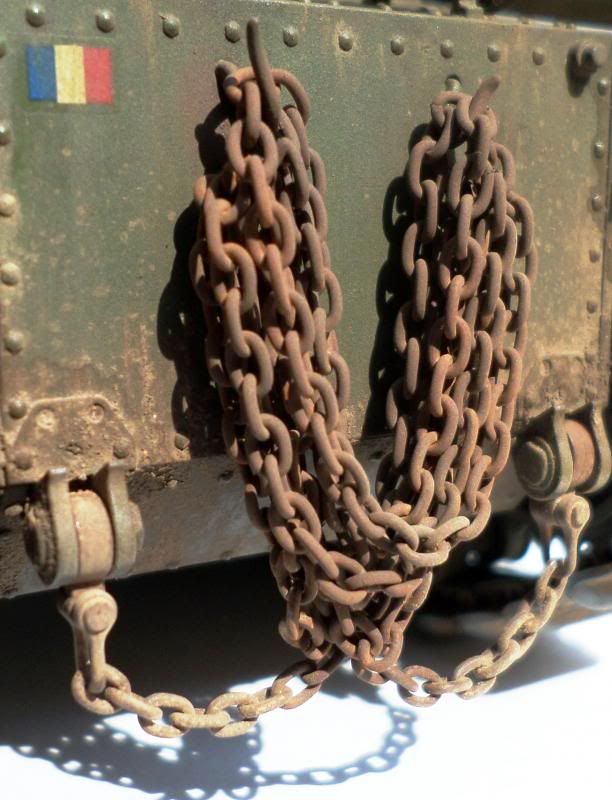 The tools were given their colors and covered with a mist of Clear. Then burnt umber oil paint was brushed on and removed for 99% to reveal the wood structure. 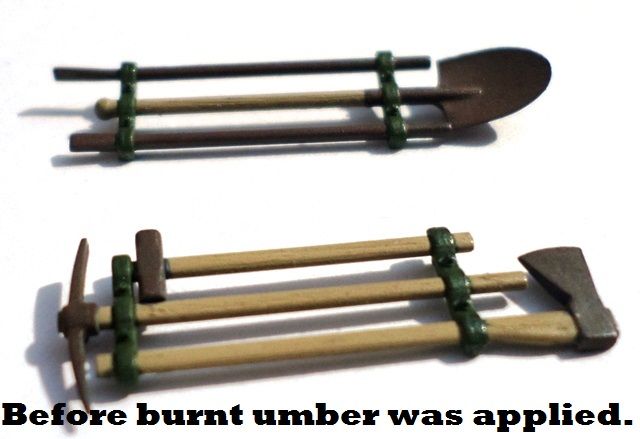 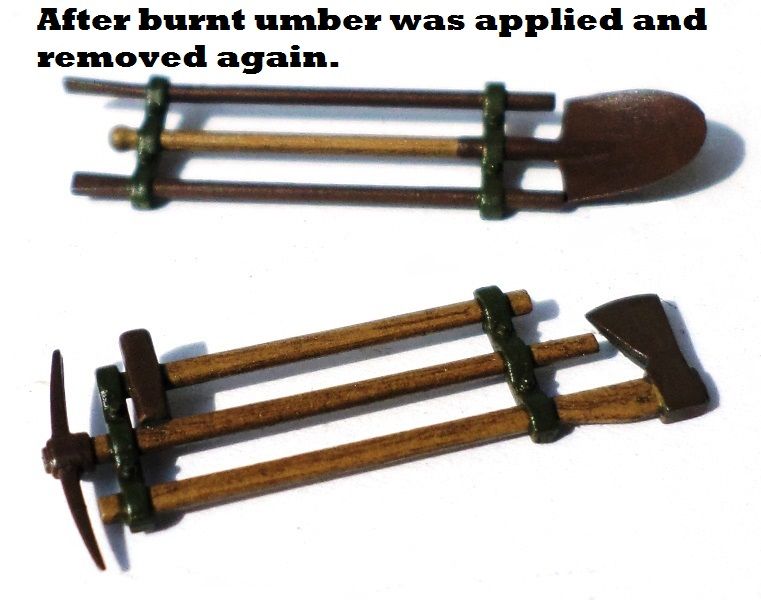 More soon, best regards ! AG. |
|
|
|
Post by bbd468 on Sept 4, 2013 18:41:14 GMT -5
AG, tools and chain are bloody fantastic! Love the wood handels....well done buddy!  |
|
|
|
Post by wbill76 on Sept 4, 2013 20:11:59 GMT -5
Nice chains and tools AG!
|
|
|
|
Post by Leon on Sept 4, 2013 20:30:28 GMT -5
Fantastic work all around Guy  .The mud and tools look aces.  |
|
|
|
Post by Teabone on Sept 4, 2013 21:59:15 GMT -5
Guy
The metal and wood are spot on or picture perfect. I like the chain the best as I first thought you were showing an example of some real chain before I saw it was your build I was looking at.
Bones
|
|
|
|
Post by deafpanzer on Sept 4, 2013 22:02:49 GMT -5
Nice chains! Where did you take the picture at? Local tank museum? Bet they were very heavy... can't be fake... I am not going to be fooled again.  |
|
|
|
Post by bullardino on Sept 5, 2013 3:38:37 GMT -5
Thanks for the explaination about the chains. Where did you get such small chains, were they intended for bijoux creation?
|
|
|
|
Post by ceresvesta. on Sept 5, 2013 7:08:40 GMT -5
AAA build right there with very realistic finish. This one really rocks AG!
|
|
Deleted
Member since: January 1970
Posts: 0
Nov 26, 2024 21:45:05 GMT -5
Nov 26, 2024 21:45:05 GMT -5
|
Post by Deleted on Sept 5, 2013 22:35:53 GMT -5
Sheeesh ! Their Beautiful !!!
|
|
|
|
Post by wouter on Sept 6, 2013 0:52:00 GMT -5
whehey...looks great Guy!
I'm trying your pigment techniques on my PzIII, but I must say, it ain't that easy to get it right, again it shows you truly are an ace at this. Love that chain!
Cheers
|
|
|
|
Post by armorguy on Sept 6, 2013 2:40:01 GMT -5
Thanks fellers ! Luigi, the chains came with the kit, they're metal ones. Wout, I catch up soon my friend, Pz III you say...mmmm lovely ! You're right, I'm truly an a$$ at this ! LOL More done...wood'n metal... 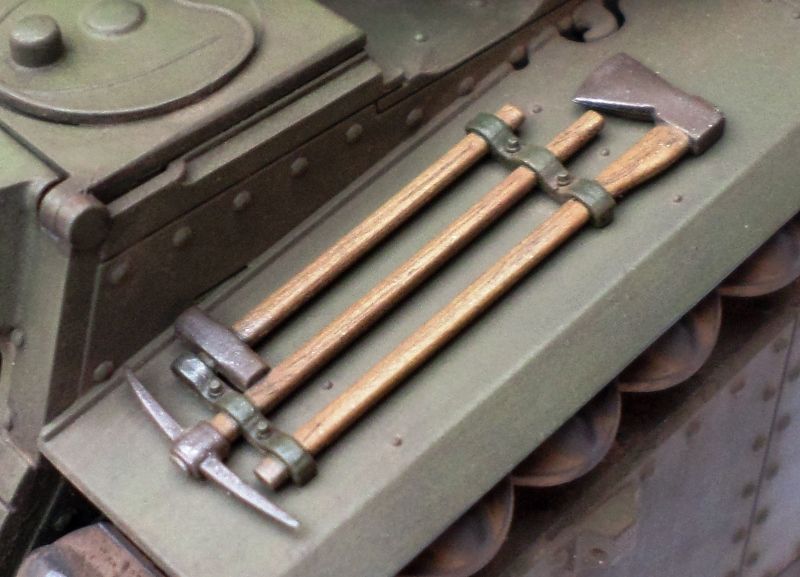 And then I saw an imperfection...another rusty chain will be dropped to cover it up.  More dust will be applied now too. Best regards ! Guy. |
|
|
|
Post by wouter on Sept 6, 2013 4:28:25 GMT -5
Tools look awesome Guy!...Mister A$$ LOL...how did you obtain that cool metal effect? Glad to see you are human...even you make mistakes  OMG looking forward to see how you camouflage that? A tarp or so? Cheers |
|
|
|
Post by ceresvesta. on Sept 6, 2013 7:16:30 GMT -5
Another stunnig update!
|
|
|
|
Post by Deano on Sept 6, 2013 7:25:30 GMT -5
Good progress Guy , the tools look great ! wood effect is spot on .
Deano
|
|
afvfan
Senior Member
   
Member since: December 2012
Bob
Posts: 1,772
Dec 10, 2012 17:32:38 GMT -5
Dec 10, 2012 17:32:38 GMT -5
|
Post by afvfan on Sept 6, 2013 13:02:15 GMT -5
This just keeps getting better and better, AG. Superb work on the tools and chains.
|
|
|
|
Post by armorguy on Sept 7, 2013 12:18:10 GMT -5
Thanks mates ! The tow cable was finished and added to the Char deck, a smaller chain was glued on to make it look a bit more interesting and more dust'n sand was brushed on dry. 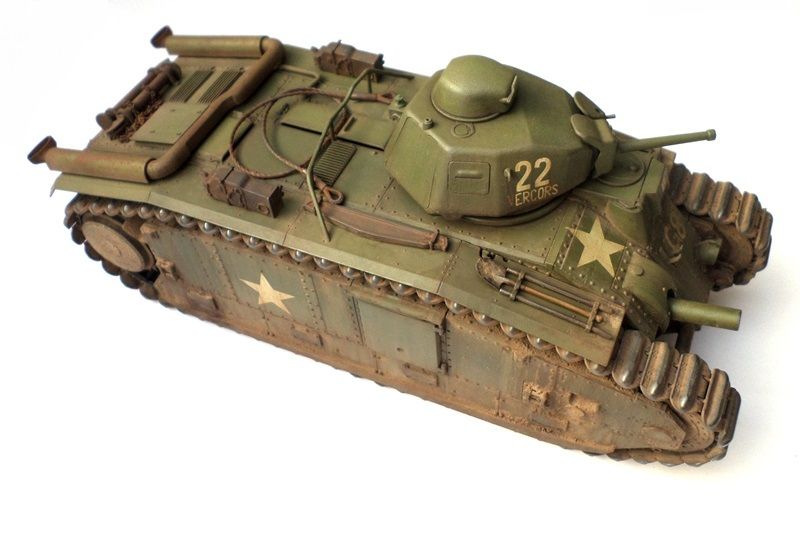  One more week and I think it will be finished by then. Best regards ! AG. |
|
Deleted
Member since: January 1970
Posts: 0
Nov 26, 2024 21:45:05 GMT -5
Nov 26, 2024 21:45:05 GMT -5
|
Post by Deleted on Sept 7, 2013 12:44:37 GMT -5
Guy those cables look spot on with the weathering you did on them .
Overall look of the weathering on your Char is very well done .
|
|
ogrejohn
Full Member
   Oct '23 Showcased Model Awarded
Member since: June 2012
Go away or I shall taunt you a second time!
Posts: 1,302
Jun 1, 2012 17:33:59 GMT -5
Jun 1, 2012 17:33:59 GMT -5
|
Post by ogrejohn on Sept 7, 2013 12:48:21 GMT -5
Beautiful work Guy!
|
|
|
|
Post by wbill76 on Sept 7, 2013 13:29:16 GMT -5
Just keeps getting better and better Guy! Very nice work on the details. That little 'ding' could be attributed to actual tool usage in the field by a careless crew you know.  |
|
Deleted
Member since: January 1970
Posts: 0
Nov 26, 2024 21:45:05 GMT -5
Nov 26, 2024 21:45:05 GMT -5
|
Post by Deleted on Sept 7, 2013 14:20:37 GMT -5
superb! looks fab
|
|
|
|
Post by armorguy on Sept 7, 2013 15:52:56 GMT -5
Wout, I forgot to answer your question, sorry for that... To obtain the metal effect I did this : - first I airbrushed on Tamiya Flat Earth + Red Brown, - I then drybrushed on Humbrol enamel metal paint*, veeeeeeeery subtle, - AK Metal pigment was also added and polished softly, - dust pigments to match the tools with the dusty fenders. * to create more like blueish metallic tones in the grey metal pigment tones (see edge of the shovel blade). Thank you for the kind comments gents ! I finished the tools too.  Best regards ! AG. |
|
|
|
Post by Teabone on Sept 7, 2013 16:50:07 GMT -5
Those tools are a masterpiece of painting, VERY real looking.
Bones
|
|
|
|
Post by tonylee-Rest In Peace on Sept 7, 2013 18:02:52 GMT -5
I Dig It,dig it dig it  Tony lee |
|
Deleted
Member since: January 1970
Posts: 0
Nov 26, 2024 21:45:05 GMT -5
Nov 26, 2024 21:45:05 GMT -5
|
Post by Deleted on Sept 7, 2013 18:59:51 GMT -5
The dirt on the spade tops it off Guy !
|
|
|
|
Post by bullardino on Sept 8, 2013 10:51:28 GMT -5
Outstanding job, Guy. I really love the look of every single detail, they look the real thing all the way.
|
|
|
|
Post by bbd468 on Sept 8, 2013 14:12:26 GMT -5
|
|
|
|
Post by ceresvesta. on Sept 8, 2013 14:56:04 GMT -5
Tools are just superb AG!
|
|