|
|
Post by 406 Silverado on Mar 15, 2012 12:54:04 GMT -5
A couple of long overdue pics of the M51. I've added some tonal variation to the rear rusted area, and am in the process of doing the staining on the painted front end. Once dry I'll add the dust to the entire model.   Hopefully get a lot done today. |
|
|
|
Post by spud on Mar 15, 2012 13:17:58 GMT -5
is that pigs or lc rusts?
oh ya AWSOME
|
|
|
|
Post by eastrock on Mar 15, 2012 13:23:24 GMT -5
Great to see another update Boss!!! I should be right back on the bench after a few hours of sleep  I appreciated the Advice!!! Still the tracks have a huge difference... and Lot of SBS needed in the Tamiya to make it more look like a tank, once again Thanks, Rob!! |
|
|
|
Post by 406 Silverado on Mar 15, 2012 13:30:56 GMT -5
ER no prob bro, and thanks.
Spud, thanks bud. LC and Vallejo acrylics used as filters built up in layers and blended together. Just applied bright rust wash from AK for staining the tan paint, then toned this to a more brown color with W&N Vandyke brown filter. Will let this dry and see if it needs another filter.
By applying the rusts in filters you can build up and blend the rust colors, also allowing the underlying rust to show through...and adds texture after many layers.
|
|
|
|
Post by spud on Mar 15, 2012 13:37:53 GMT -5
ill pretend i under stand ;D but i think i get the idea.  |
|
|
|
Post by 406 Silverado on Mar 15, 2012 14:53:01 GMT -5
  Thin layers bro, it's all in the layers. When you can't see the different layers then it's right. Gonna slap some dust on this baby, back later.
|
|
|
|
Post by spud on Mar 15, 2012 16:17:18 GMT -5
hehe ill get there one day  |
|
|
|
Post by 406 Silverado on Mar 15, 2012 16:26:06 GMT -5
It's all practice spud. OK I've added a light dusting using pigments, but no fixer, just dry. I then removed the excess with a damp, almost dry large soft brush. I mainly wanted t keep the dust in the nooks. Once done I then did a dry brushing with AK track rust pigments. This was done sparingly and mainly kept to those raised areas. Before the pigments:  And after :  You can see the difference a light dusting will make. The key is to not over due things.   i'll put this aside and work on the suspension next. |
|
|
|
Post by TRM on Mar 15, 2012 16:27:52 GMT -5
WOW, is that looking beautiful Rob! Keep it coming buddy!!! Depth....  |
|
macmcconnell.
Full Member
  
Member since: December 2011
Posts: 1,238
Dec 11, 2011 12:07:33 GMT -5
Dec 11, 2011 12:07:33 GMT -5
|
Post by macmcconnell. on Mar 15, 2012 16:30:33 GMT -5
Outstanding and the the barr is set to reach Fantastic work Rob Fantastic.
Rgs Mac
|
|
|
|
Post by 406 Silverado on Mar 15, 2012 16:35:58 GMT -5
LOL...thanks a bunch for the kind words fellas. Was good to rust something again. Can't wait to start the Panther and Tiger.
|
|
|
|
Post by 406 Silverado on Mar 15, 2012 20:42:32 GMT -5
LOTS of experimenting to get it close to right. Thanks a million Steve. Always good to hear from you dude.
|
|
|
|
Post by eastrock on Mar 15, 2012 23:50:46 GMT -5
Oh I can' hardly wait for the Tiger, Rob!!!  |
|
Wes
Full Member
  
Member since: November 2011
Posts: 686
Nov 16, 2011 9:34:50 GMT -5
Nov 16, 2011 9:34:50 GMT -5
|
Post by Wes on Mar 16, 2012 1:44:38 GMT -5
Rob I bow down to your rusting capabilities.
Its mind blowing what you produce.
|
|
jackh.
Full Member
  
Member since: December 2011
Posts: 1,195
Dec 15, 2011 2:51:27 GMT -5
Dec 15, 2011 2:51:27 GMT -5
|
Post by jackh. on Mar 16, 2012 3:09:25 GMT -5
Fabulous rusting Rob, looks just like the real thing  |
|
|
|
Post by robbo on Mar 16, 2012 7:43:18 GMT -5
Tasty rusting Rob
|
|
|
|
Post by 406 Silverado on Mar 16, 2012 10:10:07 GMT -5
cheers fellas, the comments are most appreciated and helps me stay on track, as well as improve my rusting.
|
|
|
|
Post by wouter on Mar 16, 2012 11:18:19 GMT -5
mmm...nice rustin' and dustin' Rob. One can see it's one of yours: you got a typical style. Love her mate. Keep it comin'
Cheers
|
|
johnt
Full Member
   Feb 2012 MoM and 2012 Model of the Year Winner
Member since: November 2011
Posts: 1,174
Nov 15, 2011 5:38:32 GMT -5
Nov 15, 2011 5:38:32 GMT -5
|
Post by johnt on Mar 16, 2012 11:32:26 GMT -5
Fantastic stuff!! Thanks for showing the steps Rob, lots of people here looking over your shoulder!
Cheers
JT
|
|
|
|
Post by 406 Silverado on Mar 16, 2012 18:26:15 GMT -5
Over the shoulder lookers eh John....you guys are always welcome to peek over my shoulder. hell, if I could fit you all in my hobby room you could really peak over my shoulder.
Wout's, good to have you checking her out bud. And also good to have you back on the forum.
|
|
bigjohn
Reviews member    
Member since: December 2011
John Hale
Posts: 3,438
Dec 21, 2011 2:17:45 GMT -5
Dec 21, 2011 2:17:45 GMT -5
|
Post by bigjohn on Mar 16, 2012 20:33:27 GMT -5
Rob, I'm really digging the looks of this one, Nice job bro.
|
|
|
|
Post by bullardino on Mar 17, 2012 4:32:05 GMT -5
Your skills are really inspiring, and the rust looks like the real thing. Not to mention the faded paint and the burned appearance...
|
|
Deleted
Member since: January 1970
Posts: 0
Nov 24, 2024 6:47:06 GMT -5
Nov 24, 2024 6:47:06 GMT -5
|
Post by Deleted on Mar 17, 2012 6:02:34 GMT -5
This rusting technique looks like alchemy to a wingy thing builder like me  stunning results though.. really like it  Steve |
|
|
|
Post by 406 Silverado on Mar 17, 2012 8:32:26 GMT -5
John, Luigi and Steve....thanks guys for checking it out and for the comments.
|
|
|
|
Post by armorguy on Mar 17, 2012 9:20:22 GMT -5
Thanks for sharing this Rob, many will like it and try also. Brilliant photos of even more brilliant work !
|
|
danb.
Reviews member     March 2013 MoM Winner
Member since: November 2011
Posts: 2,808
Nov 17, 2011 9:22:52 GMT -5
Nov 17, 2011 9:22:52 GMT -5
|
Post by danb. on Mar 17, 2012 10:09:04 GMT -5
Awesome work Rob damn i wish i had your rustin skillz can never get mine to look anything like rust!!! lol keep up the hard work
Dan B
|
|
|
|
Post by Steve Zuleski on Mar 18, 2012 9:07:31 GMT -5
Now that's some classic Scratchmob work Rob, love it. Can't much better than this, it's friggin crazy!!!
Cheers, Ski.
|
|
Deleted
Member since: January 1970
Posts: 0
Nov 24, 2024 6:47:06 GMT -5
Nov 24, 2024 6:47:06 GMT -5
|
Post by Deleted on Oct 28, 2012 11:53:50 GMT -5
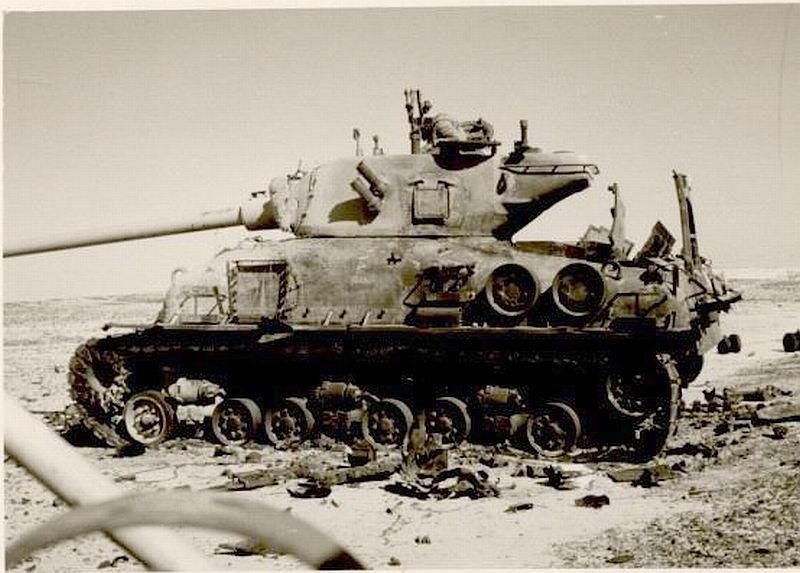
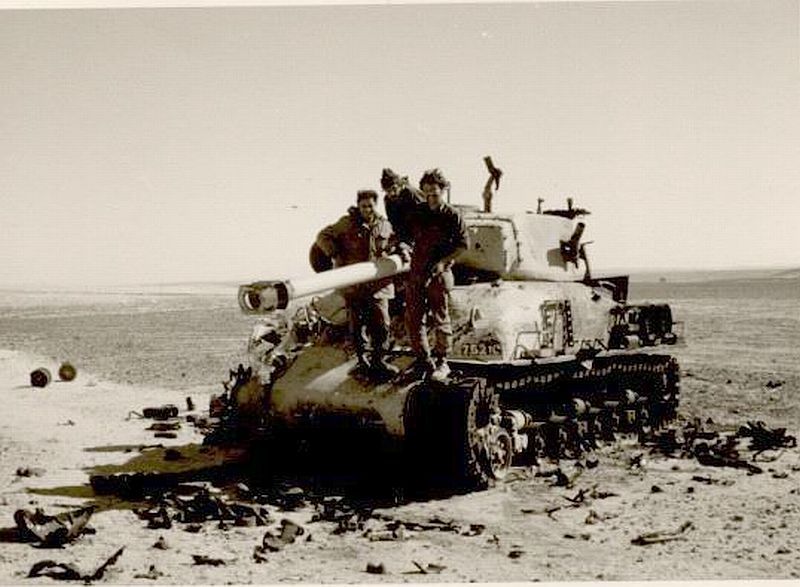
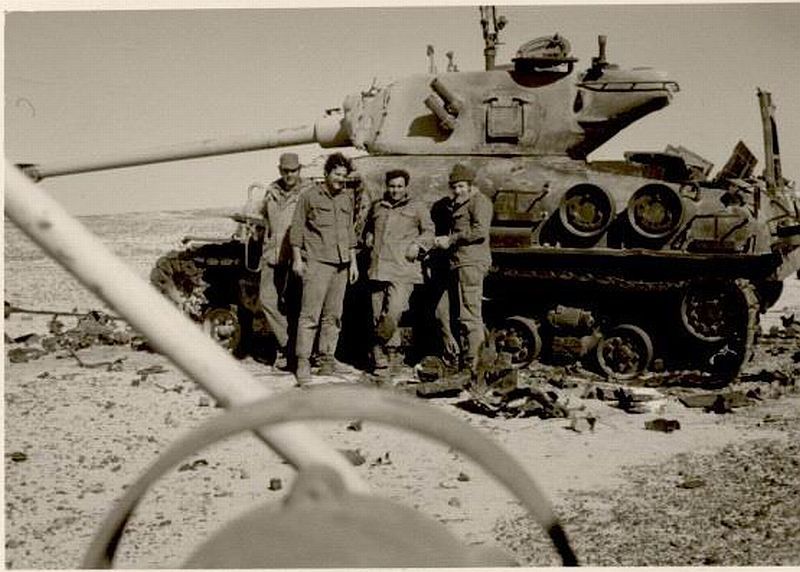
Hello all I am new here...found this amazing plave while re-searching for my current M51 project (non destroyed). I found some more pics of the vehicle that is the bases for this great project...taken earlier, maybe shortly after it was destroyed. Has the project meanwhile been finished? I would love to see more pics... thanks Uwe    |
|
|
|
Post by 406 Silverado on Oct 28, 2012 13:55:56 GMT -5
Hi Uwe. No it's not done yet. Had probs with the tracks lately and gave them up. Am re thinking that area before going further. Yep I have those pics as well. Shows the change over time.
|
|
brembo--Rest In Peace
Full Member
  
Member since: September 2012
RIP--04 October 2019
Posts: 264
Sept 7, 2012 4:35:14 GMT -5
Sept 7, 2012 4:35:14 GMT -5
|
Post by brembo--Rest In Peace on Oct 28, 2012 14:03:47 GMT -5
those pics make me cry  what an irrereverant end to such a beautiful tank.  anyho....i came late to this party but love the work on this kit. being as im making this same kit at the mo it was staggering to see what can be done to the base placky....stagggering or scary...somewhere in between methinks. |
|