DeskJockey
Junior Member
 
Member since: September 2013
Posts: 66 
|
Post by DeskJockey on Oct 12, 2013 8:01:23 GMT -5
Here's the log of my ongoing build. This will be a US-based vehicle in the MERDC gray desert cammo pattern, built for a friend who was in the Army in the early 80s as an artillery Lieutenant and commanded a squadron of these in a cavalry unit. He's retiring from his job now and moving away, so this is my present to him. So far I've built the tub and started detailing it. It's been fairly straightforward, although a couple of the tub parts were slightly warped. I also noticed that the turret top was warped and straightened it out in a pot of hot water. In any case, here are the pics of where the project stood as of two nights ago.   |
|
|
|
Post by Leon on Oct 12, 2013 8:25:39 GMT -5
Nice start on the 109 DJ.Watching with interest.  |
|
|
|
Post by deafpanzer on Oct 12, 2013 10:28:16 GMT -5
Nice start... count me in please! Have fun
|
|
|
|
Post by wbill76 on Oct 12, 2013 20:19:47 GMT -5
Looking forward to more on this one DJ. Nice start!
|
|
|
|
Post by wing_nut on Oct 13, 2013 15:59:18 GMT -5
As fine a start as I've seen here.
|
|
DeskJockey
Junior Member
 
Member since: September 2013
Posts: 66 
|
Post by DeskJockey on Oct 13, 2013 20:48:56 GMT -5
Thanks, guys. I finished the hull today and have started on the gun. I'll post pics tomorrow.
|
|
DeskJockey
Junior Member
 
Member since: September 2013
Posts: 66 
|
Post by DeskJockey on Oct 15, 2013 5:53:47 GMT -5
It's been a couple of days since I promised to post pics, but I got busy yesterday and couldn't find the time, unfortunately. In any case, here we go! I finished the hull and have done most of the gun. I left the spades movable per the instructions to facilitate painting and because I want to ask the recipient how he wants them displayed. Once we decide on the final position, I will glue them down. The only fit problems I have encountered so far were with the shocks for the idlers--they were too long. I had to shorten then a bit to make them fit correctly. I do have one question for all of you--do you know if I should take out what look to be four ejector pins in the inside of the rear mud guards in this picture? 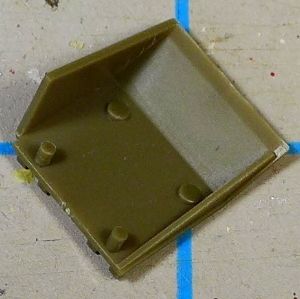 In any case, here are the pictures of where the model stands: 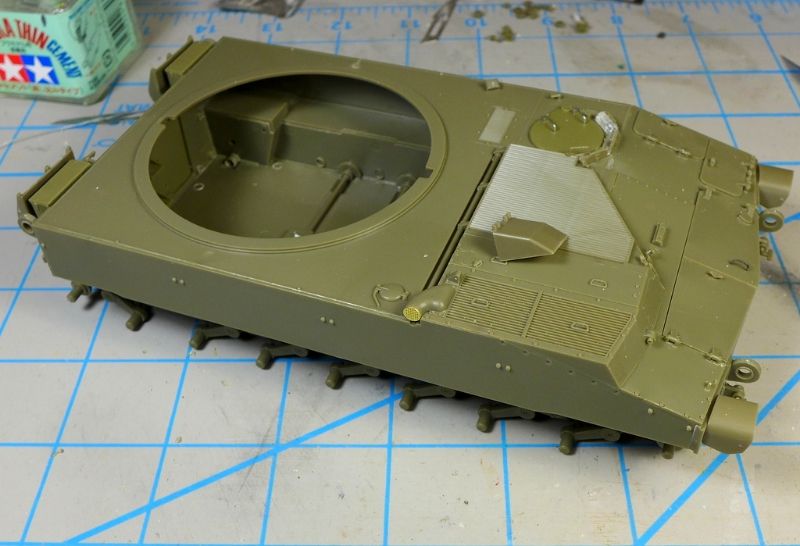 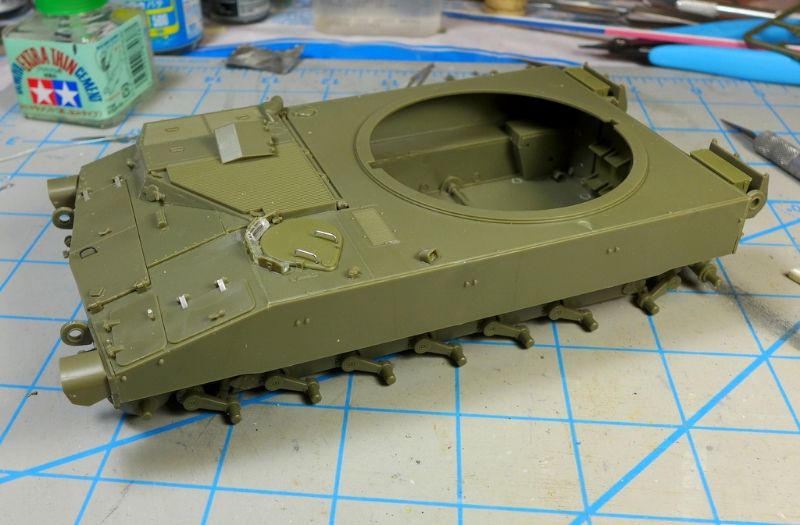 Spades down: 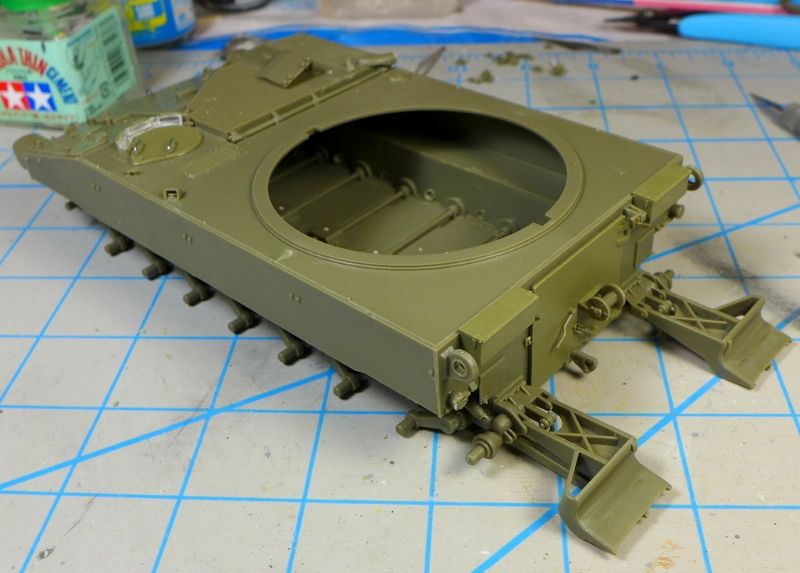 And up: 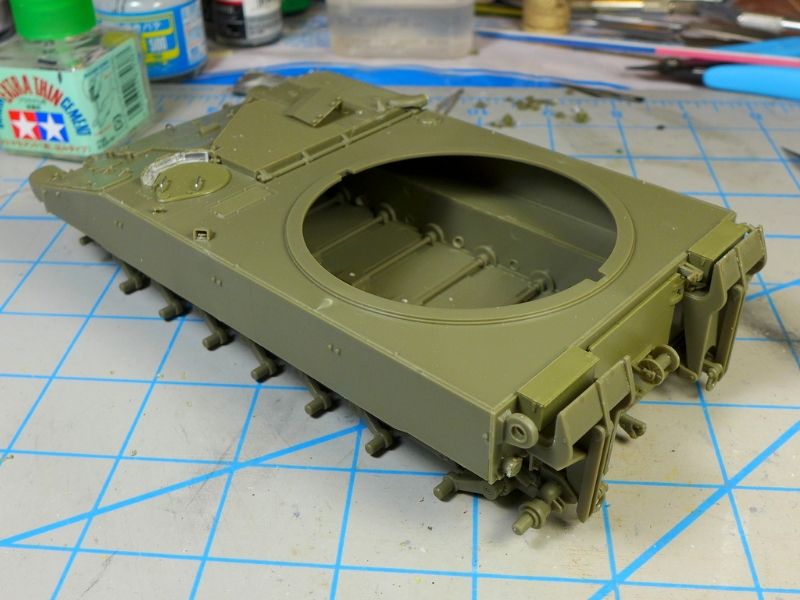 And the gun:  |
|
Deleted
Member since: January 1970
Posts: 0
Dec 2, 2024 2:57:51 GMT -5
Dec 2, 2024 2:57:51 GMT -5
|
Post by Deleted on Oct 15, 2013 7:44:50 GMT -5
Nice work.
|
|
|
|
Post by wbill76 on Oct 15, 2013 14:23:46 GMT -5
Nice progress, got to love the look of those spades and of course the gun.  |
|
DeskJockey
Junior Member
 
Member since: September 2013
Posts: 66 
|
Post by DeskJockey on Oct 15, 2013 20:11:03 GMT -5
Dicky--I've got the Italeri boxing of the Paladin (and the new AFV Club one on the way over on a slow boat from China!). From what I hear the Tamiya boxing has some additional stowage from their stowage sets. Should be a nice build.
As for this A2, I'm debating whether I should use the rubber band tracks that come with the kit or the aftermarket AFV Club indy link tracks. The kit is so nice it seems like a letdown to use the rubber band tracks, but I'm not sure I'll be up for indy link tracks after putting everything together. It may also slow me down too much, since I need to have this one wrapped up by early in the new year, when my friend will be moving away (he still hasn't set a move date). Any thoughts?
|
|
|
|
Post by Leon on Oct 15, 2013 21:30:18 GMT -5
JT,i used the rubber band tracks on my 109 and really like how they look.Don't want to hog your thread,hears a pic before weathering. 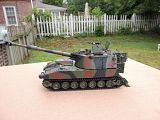 |
|
DeskJockey
Junior Member
 
Member since: September 2013
Posts: 66 
|
Post by DeskJockey on Oct 16, 2013 7:10:26 GMT -5
Leon--the rubber band tracks look nice. Definitely way better than the ones that come with the Italeri kit. I'm leaning toward using the indy link tracks at the moment so that I can get the correct sag and eliminate the seam along the side of the track, however. Nevertheless, we'll see how I feel when I get to that stage of the build.
|
|
|
|
Post by robbo on Oct 16, 2013 7:52:35 GMT -5
Look forward to seeing this one built, great start fella
|
|
|
|
Post by bullardino on Oct 16, 2013 8:00:09 GMT -5
Nice, I'll be following  |
|
DeskJockey
Junior Member
 
Member since: September 2013
Posts: 66 
|
Post by DeskJockey on Oct 18, 2013 6:40:06 GMT -5
Just a quick note to say that I had fit issues with part D1, which goes over the barrel and connects the two cylinders that are parallel to the gun. The part is slightly too long, so I had to trim one of the attachment points to make it fit. Even so, that meant that part D4 was not parallel with the barrel, as it should be, since D4's attachment point to D1 sits too far off to one side. It's not too far off, but enough to annoy me. The gun mount also gave me trouble last night. It just won't sit properly, as the curved gun covers rub up against the turret ring. Tonight I'll shave off some of the ring and see if that helps.
|
|
DeskJockey
Junior Member
 
Member since: September 2013
Posts: 66 
|
Post by DeskJockey on Oct 18, 2013 20:56:41 GMT -5
Here are some pictures of the issues I've had with the gun and cradle. In this pic, you can see how part D4 is slightly crooked and not parallel with the gun tube because its mounting point on part D1 is too far to the side. As a result, it also misses its corresponding mounting point on the gun mantle (if I had made it align properly with that mounting point, it would be even more crooked) 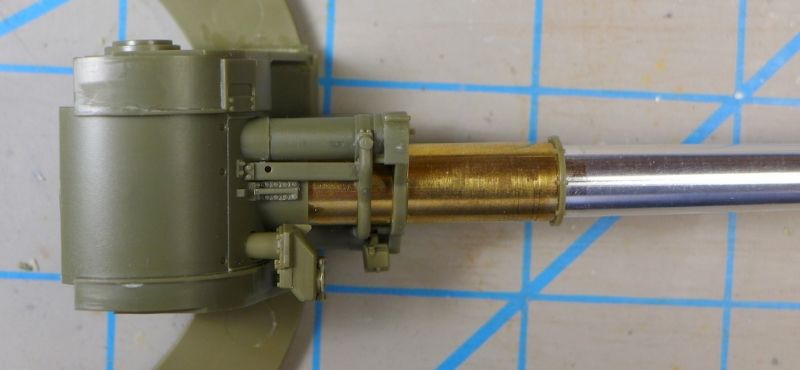 In this pic, you can see how much of the turret ring I had to dig out to accommodate part D7 and make sure it could swing free. Otherwise, the cradle would not stay glued down. 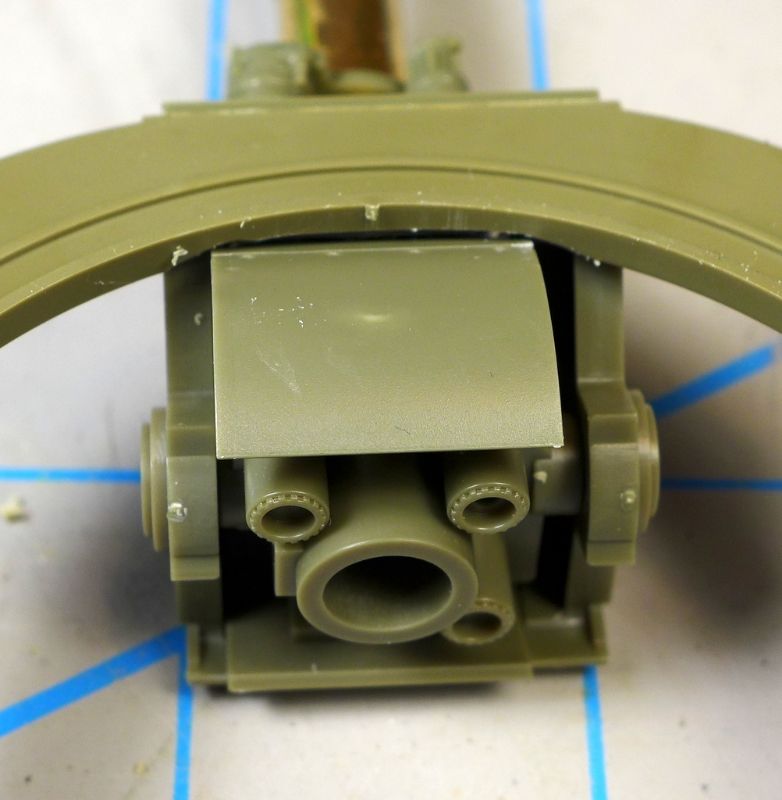 In this pic, you can see the damage done when I tried to force-glue the cradle without first carving the turret ring. The left side of the cradle just popped right back out after I had glued it down with super glue and clamped it for 20 minutes. I then re-glued it with regular Tamiya Extra-thin after the adjustments and this is what it looks like now. It's an ugly scar. 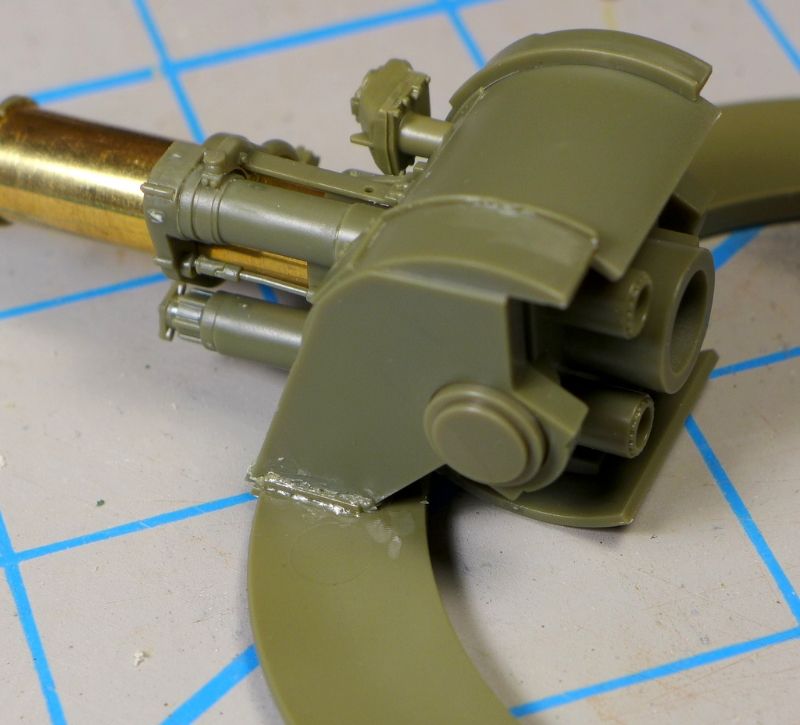 The other side looks better, but is still a bit scarred from the stress. 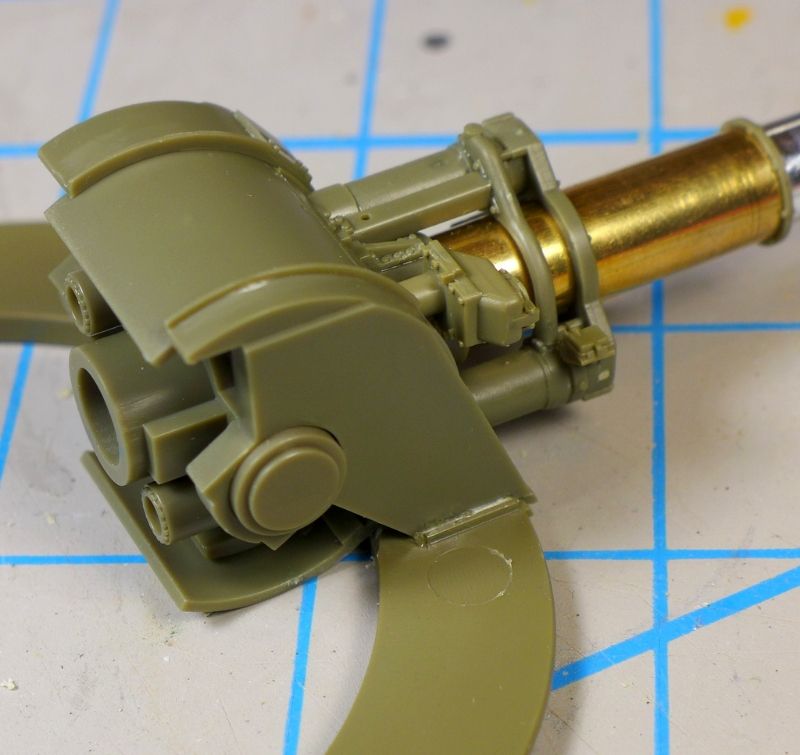 |
|
Deleted
Member since: January 1970
Posts: 0
Dec 2, 2024 2:57:51 GMT -5
Dec 2, 2024 2:57:51 GMT -5
|
Post by Deleted on Oct 19, 2013 5:12:19 GMT -5
No worries...... just looks like extra welding on a stress point:)
|
|
|
|
Post by bullardino on Oct 19, 2013 5:35:25 GMT -5
Nice to see you overcame the problems. What kit is it?
|
|
DeskJockey
Junior Member
 
Member since: September 2013
Posts: 66 
|
Post by DeskJockey on Oct 19, 2013 5:56:07 GMT -5
It's the AFV Club kit.
|
|
DeskJockey
Junior Member
 
Member since: September 2013
Posts: 66 
|
Post by DeskJockey on Oct 19, 2013 18:32:14 GMT -5
Dicky--yeah, I was surprised, too, especially given how well the hull fit together (and given that the hull was made up of about 15 parts, that is no mean feat!). The biggest bugaboo has been the gun cradle, which took a lot of test fitting and carving of the turret ring. At first I thought it was user error, but after looking over the parts and measuring things, I think AFV Club just forgot to account for the fact that the gun would have to travel past the turret ring, which would get in the way. I have now run into one other part that is about half a millimeter too narrow (part D36). It is part of the gun mantle. Its twin, which sits on top of the turret and mates to it, is the correct width, but D36 is a tad too narrow. I'll have to find a way to widen it so it fits properly. Otherwise, things are fitting very well.
|
|
DeskJockey
Junior Member
 
Member since: September 2013
Posts: 66 
|
Post by DeskJockey on Oct 19, 2013 20:42:18 GMT -5
Well, the basic turret structure went together like a glove after I got rid of the warpage on the turret top. As I mentioned above, part D36 the only one that has given me trouble on the turret. It is about half a millimeter too short, so it won't mate properly with its counterpart, which spans the gun mount around the mantle. First, I'll show a couple of pics of how the gun mount fix turned out. You can't see it was a horrid mess anymore: 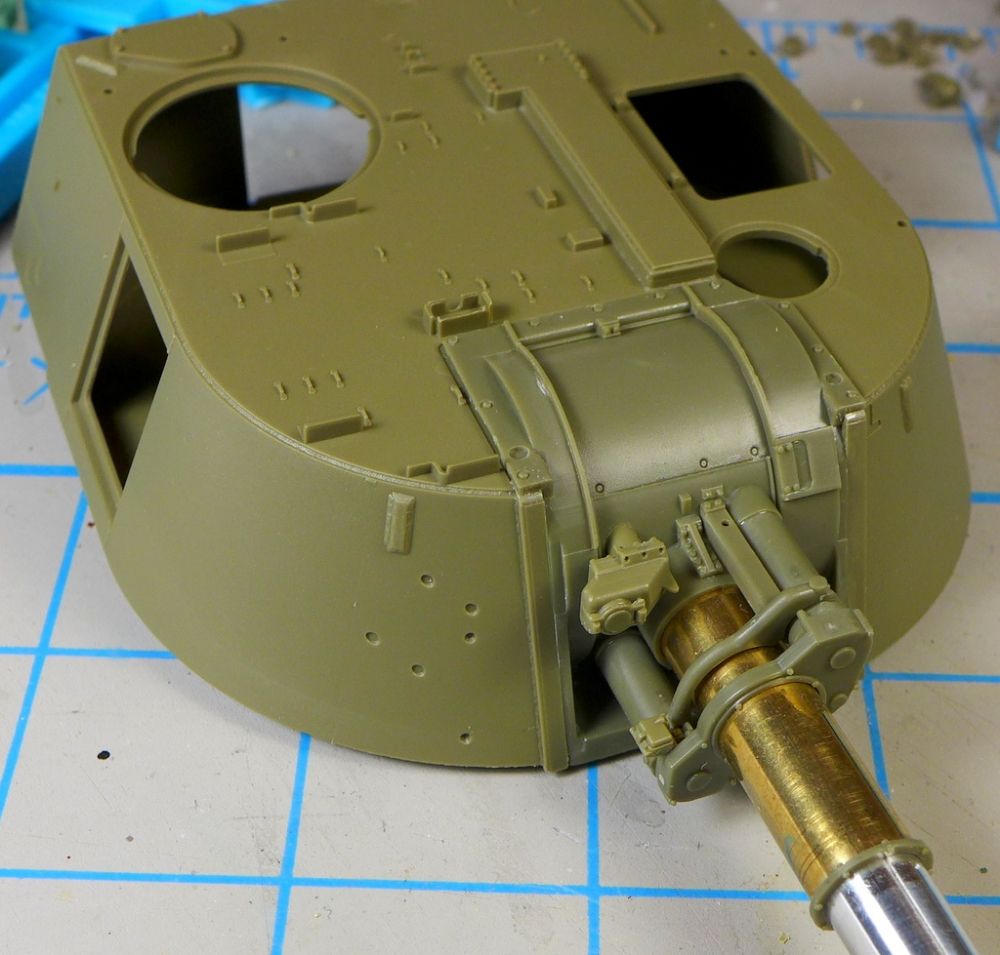 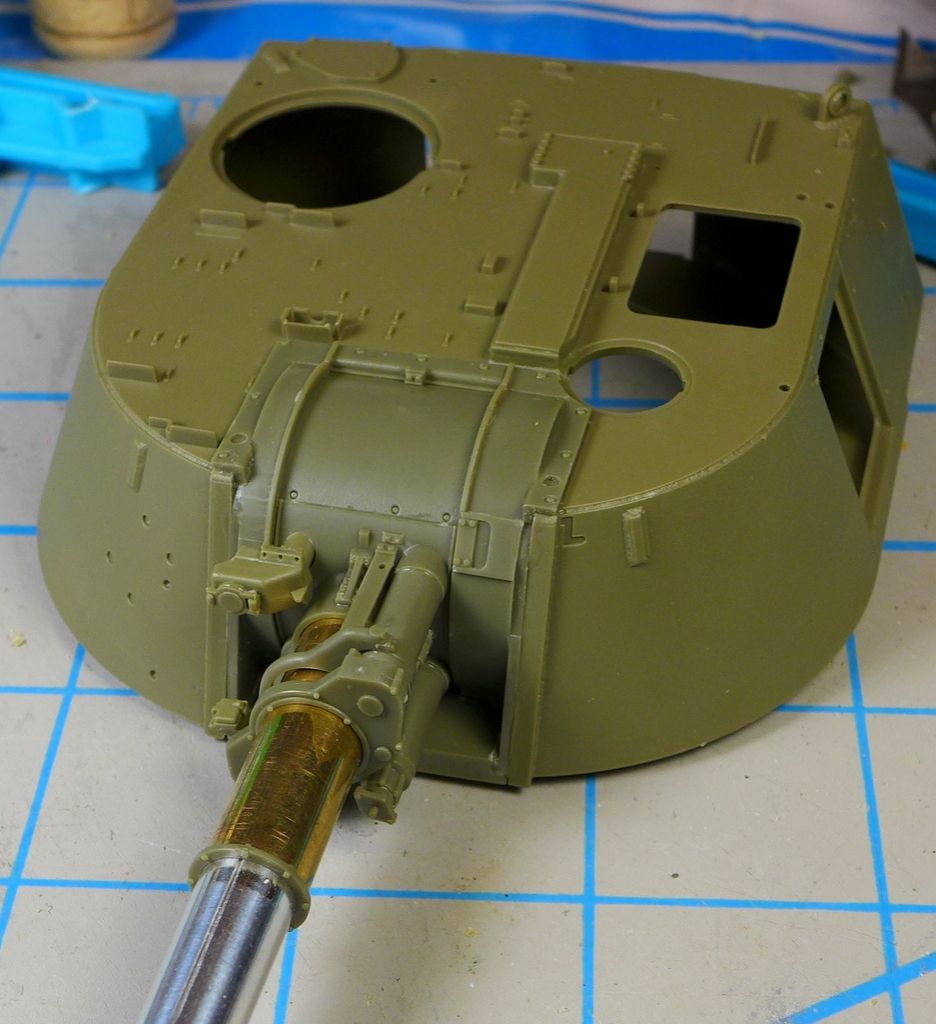 Now here's a picture of the problem part placed on top of the gun and right next to the part it's supposed to mate to. You can see it is not the same width as its counterpart, so it won't fit where it is supposed to go. In addition, the part also was warped. 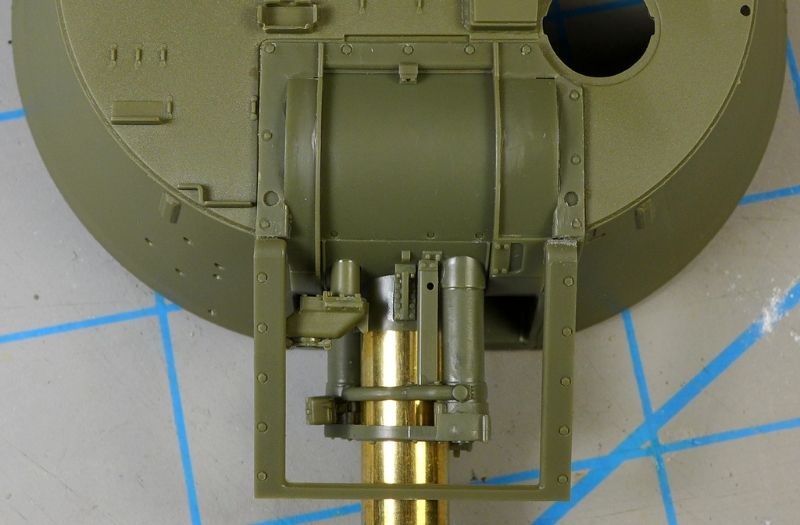 I decided to cut D36 in the middle and glue each half in place, then fill in the gap below the gun tube. Here's what it looked like after I glued each half in place, but before I clamped the warped sections down and glued them. Also notice that one half of D36 sits lower than the other. This is annoying, as it doesn't look right, but it's just the way the part is designed, unfortunately. I'm not sure I can correct this, so I'll just live with it, as it's not really that noticeable to the naked eye. 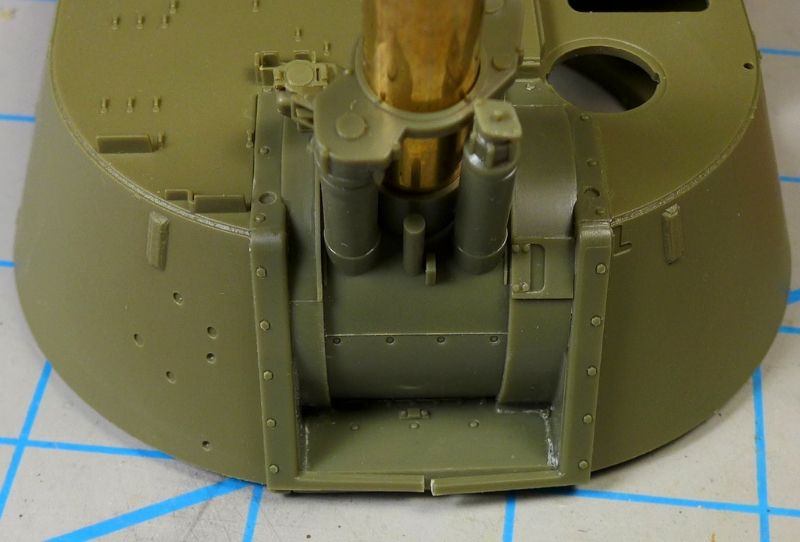 |
|
|
|
Post by Leon on Oct 19, 2013 21:24:05 GMT -5
DJ,making some good progress despite the fit issues.I just looked at mine and had no problem with part D36.Wonder if it's just a mold issue.
|
|
DeskJockey
Junior Member
 
Member since: September 2013
Posts: 66 
|
Post by DeskJockey on Oct 20, 2013 7:18:13 GMT -5
I agree, Leon. It may well be a mold issue, with one of the "D" molds not being quite up to standards, as all of the parts with fit problems have come from the same sprue so far. I was unlucky enough to get one of those. I also did a bit of searching and found a build thread on the Finescale Modeler forums where someone had similar fit issues (he didn't name the specific parts, but the general locations are the same), so I'm not alone.
|
|
|
|
Post by wbill76 on Oct 20, 2013 20:19:07 GMT -5
Nice save on the gun mount. Would never know you had any issues by that last set of pics.  |
|
|
|
Post by bullardino on Oct 21, 2013 8:56:25 GMT -5
I agree, great save.  |
|
Deleted
Member since: January 1970
Posts: 0
Dec 2, 2024 2:57:51 GMT -5
Dec 2, 2024 2:57:51 GMT -5
|
Post by Deleted on Oct 21, 2013 13:37:35 GMT -5
great work old chap watching with interest
|
|
DeskJockey
Junior Member
 
Member since: September 2013
Posts: 66 
|
Post by DeskJockey on Oct 21, 2013 20:53:12 GMT -5
Thanks, guys! I finished the repair to the mantlet and have done about half of the detailing of the turret so far. Here are a series of photos of where I am. Some photos of the repair (before I detailed the turret) showing the scrap styrene insert and the superglue filler along the top of the turret where D36 meets its counterpart and forms a shoulder. 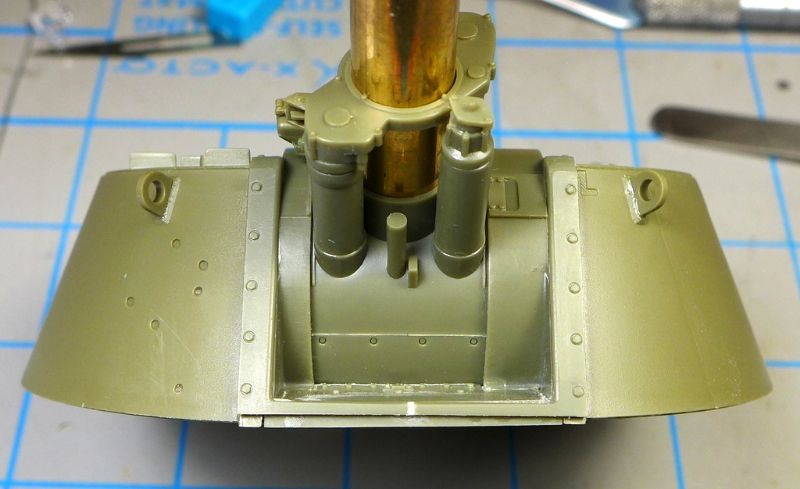 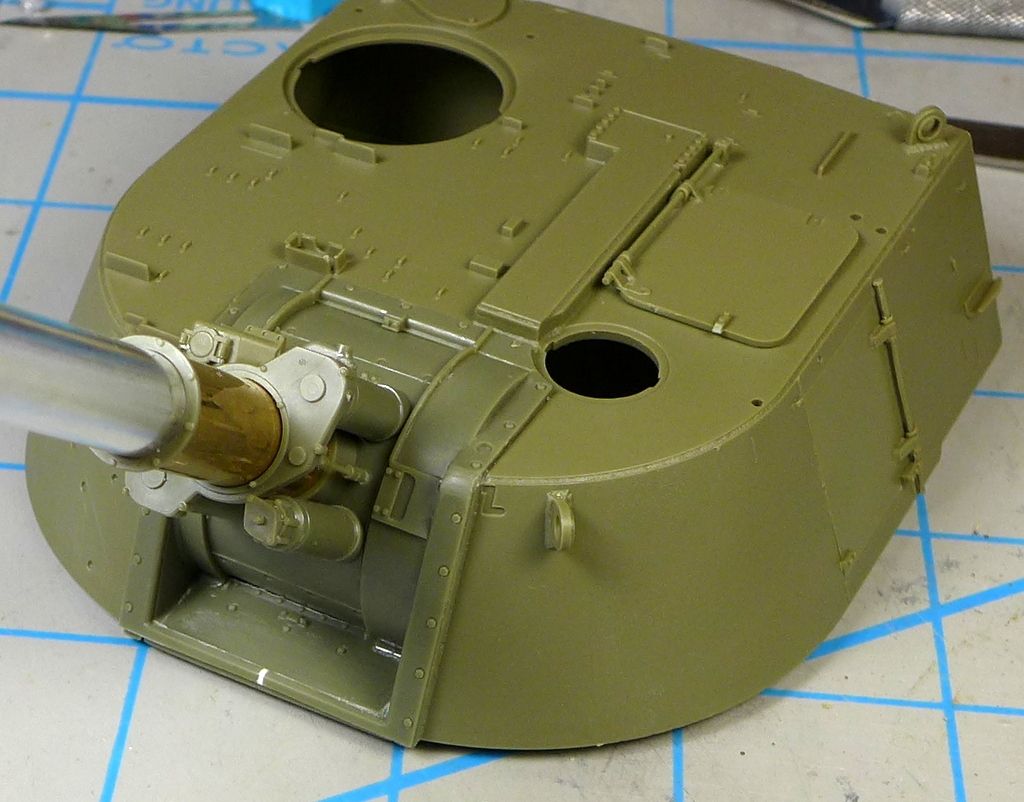 And a couple of photos of the detailed turret. 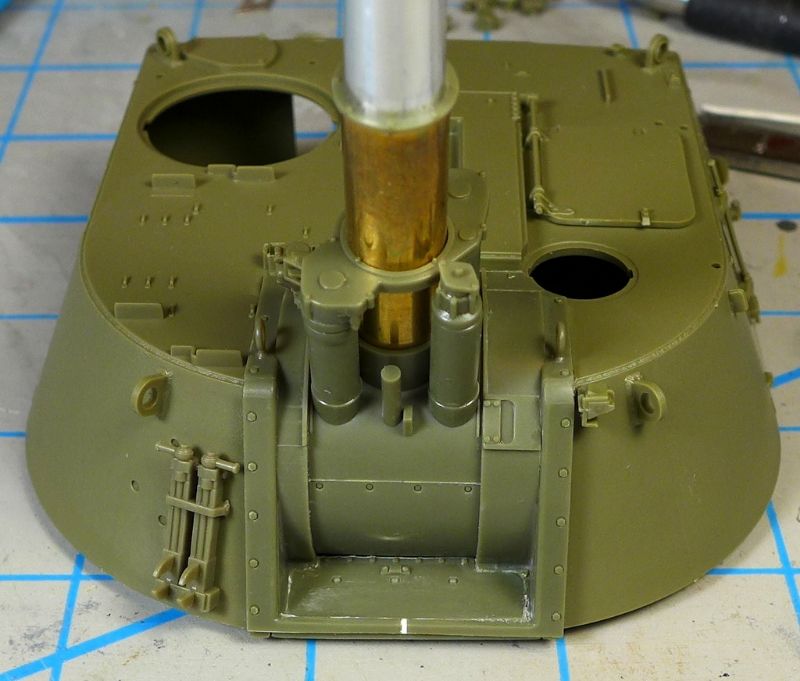 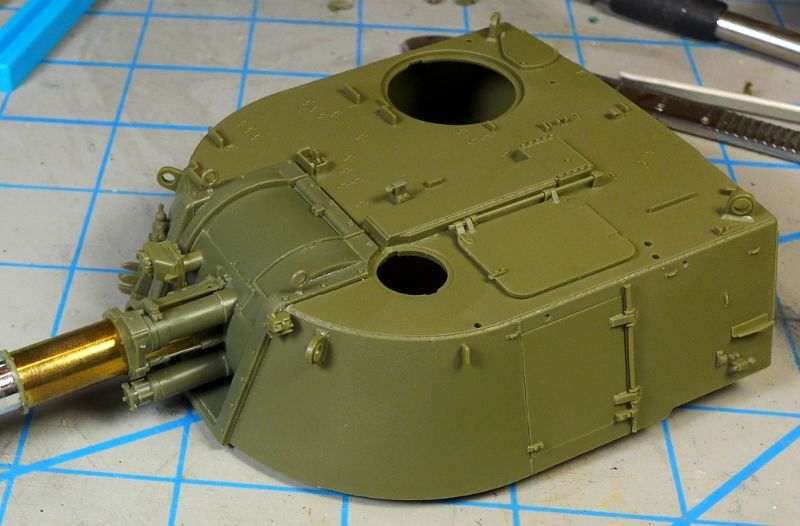 I'm going slowly because of the number of small parts. More than a dozen have flown off into the ether and led to long hunts on the workbench and the carpet. It's a bit annoying, but that's the price you pay for amazing details. I haven't decided whether to use the radio antenna, since the few reference vehicles I have photos of don't have one. |
|
danb.
Reviews member     March 2013 MoM Winner
Member since: November 2011
Posts: 2,808
Nov 17, 2011 9:22:52 GMT -5
Nov 17, 2011 9:22:52 GMT -5
|
Post by danb. on Oct 22, 2013 1:35:11 GMT -5
Fantastic work so far DJ really enjoying this build  Dan B |
|
paulh.
Senior Member
   
Member since: November 2011
build, fail, learn, succeed - ENJOY
Posts: 2,389
Nov 15, 2011 15:54:51 GMT -5
Nov 15, 2011 15:54:51 GMT -5
|
Post by paulh. on Oct 22, 2013 7:05:31 GMT -5
Issues of fit not withstanding that's a pretty tasty build you got gonig on DJ.
Bookmarked!
P
|
|
|
|
Post by bullardino on Oct 22, 2013 8:47:20 GMT -5
DJ, even if it had so many issues, the result doesn't show. It looks really great  |
|