|
|
Post by robbo on Dec 30, 2013 8:22:12 GMT -5
Very nice paint job mate. I love this model, must get me one  |
|
Deleted
Member since: January 1970
Posts: 0
Dec 2, 2024 3:00:11 GMT -5
Dec 2, 2024 3:00:11 GMT -5
|
Post by Deleted on Dec 30, 2013 13:44:30 GMT -5
you are correct with wood for the barrel cleaning rods, metal has the potential to score the barrel and they are heavier than wood. I think later rods are made of composite materials.
|
|
|
|
Post by bullardino on Jan 3, 2014 9:33:01 GMT -5
Outstanding camo job. I really like the final outcome.
|
|
DeskJockey
Junior Member
 
Member since: September 2013
Posts: 66 
|
Post by DeskJockey on Jan 5, 2014 21:43:58 GMT -5
Well, I've been busy with the holidays over the past couple of weeks, but I did manage to sneak in some bench time. Here are the results. I decided to use the AFV Club indi-link tracks for their added detail and ability to depict realistic sag, but they were a real bear to work with. Assembly was easy--it was keeping them in one piece that was the problem. You so much as look at them and they fall apart! I ended up using Testors liquid cement in the final assembly phase before positioning them on the model, then firmly fixing them in place with Tamiya extra thin once they were on (Testors has a much longer set time and is much less aggressive, so the tracks stayed flexible for several minutes). I had hoped to be able to paint them while keeping them fully flexible, but that went out the window. Now they look like this: 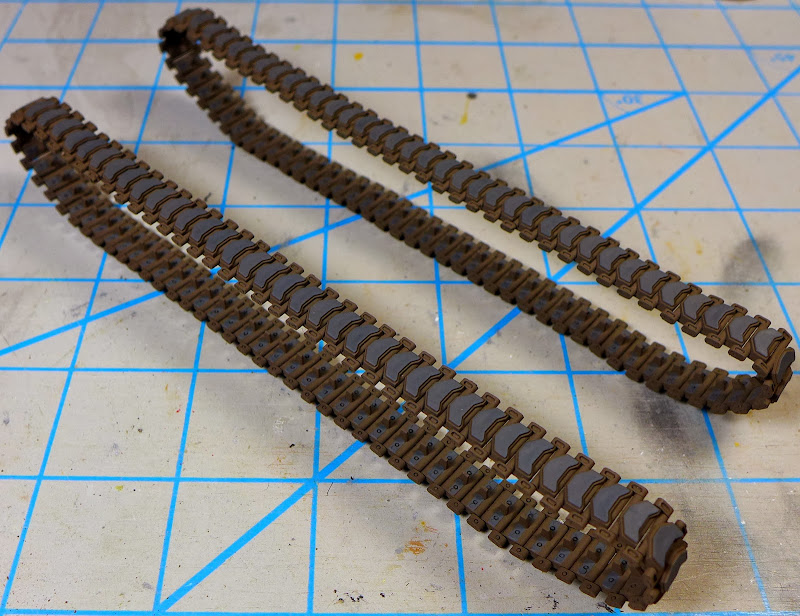  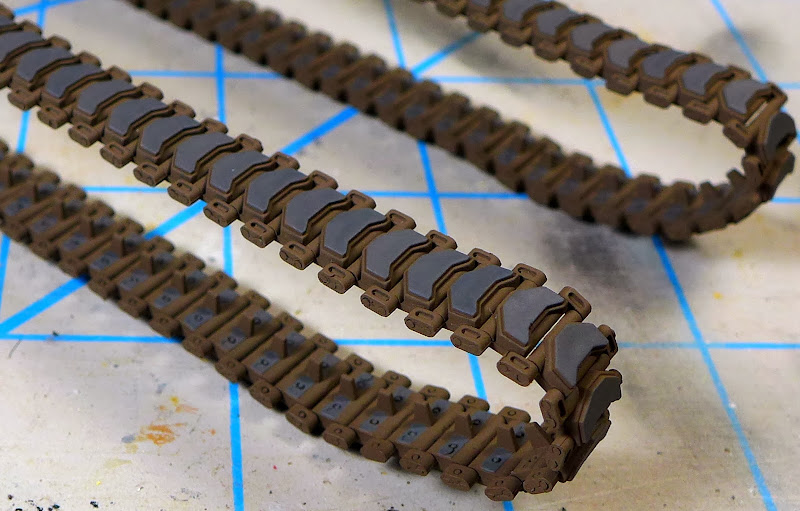 Unfortunately some of the end connectors lost their details because of the double shot of glue, as you can see in the final picture. You will also notice in the last pic that some of the inner pads have pin marks. These were hard to see before I painted the tracks, as the plastic is black, but then popped out clear as day once paint went on. I thought I had gotten them all with a knife later on, but apparently I missed at least one. The sunken ones I decided not to do anything about--it's too hard to fill and sand them now. I painted the tracks after they had set, using Model Master Brown Tread as the base and then painting the rubber pads in Vallejo Panzer Aces Dark Rubber. I still haven't given them any washes or weathering--that will come later. Here is a shot of the rest of the stuff I've been working on--the wheels and equipment. These are pretty much ready to go on (or, in the case of the wheels, ready for washes and weathering). For the gun cleaning staff, I used Alclad dark aluminum, with the connectors in MM Metalizer Dark Anodic Gray for variety. 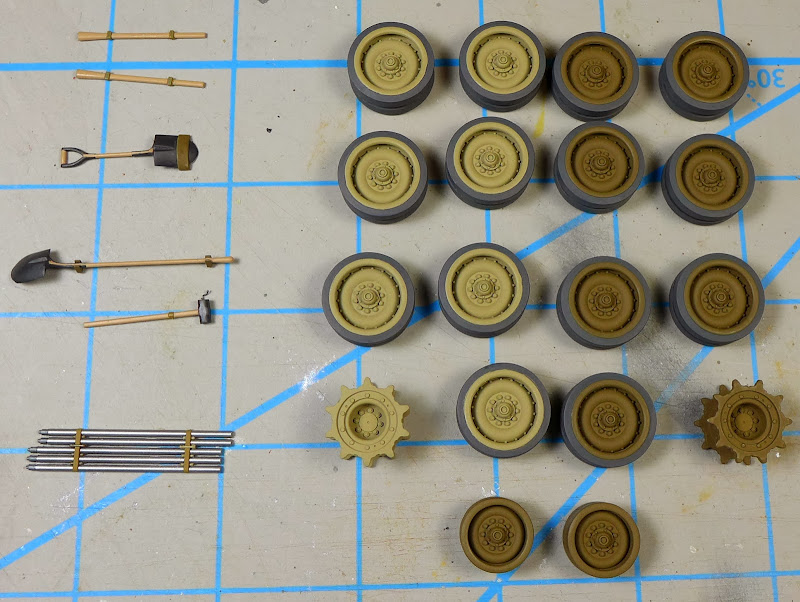 I've also been working on the base for the model. I took an Ikea picture frame, removed the glass, added in some fiber board, epoxied that to the frame, and then used Vallejo texture paste to build the groundwork (with a few "rocks" from my kids' sand table added). This was my first time using the Vallejo paste, and I think the results are fairly good. I then painted the base with several sand-colored acrylics. I still need to highlight the groundwork and pick out the rocks with different colors, but it is otherwise ready to go. Let me know what you think.  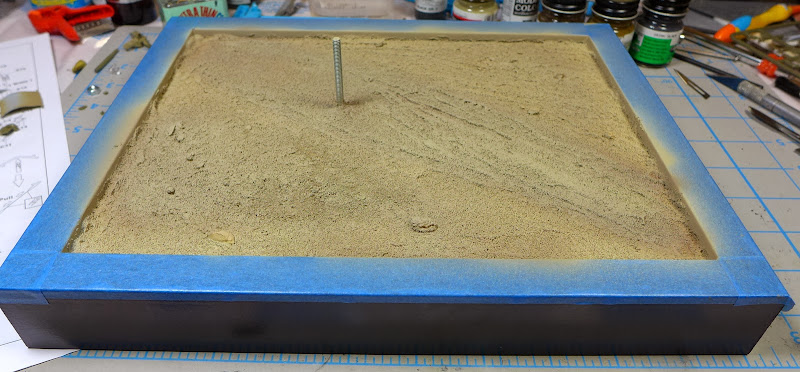 |
|
|
|
Post by Leon on Jan 5, 2014 21:53:31 GMT -5
Making really good progress DJ.Nice work on the base.
|
|
|
|
Post by deafpanzer on Jan 5, 2014 21:58:39 GMT -5
Tracks look GREAT!!! Base is looking good too!
|
|
|
|
Post by bullardino on Jan 6, 2014 15:14:35 GMT -5
Nice base and wheels  |
|
Deleted
Member since: January 1970
Posts: 0
Dec 2, 2024 3:00:11 GMT -5
Dec 2, 2024 3:00:11 GMT -5
|
Post by Deleted on Jan 6, 2014 15:30:10 GMT -5
nice work on the tracks they do look good, the gun cleaning rods would actually be wood, metal one's would be too heavy and would not flex like wood
|
|
|
|
Post by ceresvesta. on Jan 6, 2014 17:21:52 GMT -5
Awesome build so far DJ, weathering is going to nail that one for sure.
Bookmarked.
|
|
DeskJockey
Junior Member
 
Member since: September 2013
Posts: 66 
|
Post by DeskJockey on Jan 6, 2014 21:08:53 GMT -5
nice work on the tracks they do look good, the gun cleaning rods would actually be wood, metal one's would be too heavy and would not flex like wood I thought so too, but in talking to a couple of guys who are/were crewmen on M109s, they said that for US vehicles the wood staffs had been phased out in favor of soft aluminum staffs, so I went with that color. Dicky--the AFV Club tracks are very fiddly and a pain to work with. I still haven't decided on the washes I'll use. I have a bunch of them I've bought over the years. I'll see what inspirations strikes me. |
|
|
|
Post by wbill76 on Jan 6, 2014 21:37:56 GMT -5
Nice work on those tracks despite their fragile tendencies. Looking forward to more progress on this one DJ.
|
|
DeskJockey
Junior Member
 
Member since: September 2013
Posts: 66 
|
Post by DeskJockey on Jan 11, 2014 11:42:42 GMT -5
Well, it seems that one or more or my images on Photobucket are being linked to from a high-traffic site. I don't have an easy way of finding out which image it is, so I'm going to sit tight on PB and start using Picasa instead for the rest of the build. The old images should show up again around the 23rd of the month.
|
|
DeskJockey
Junior Member
 
Member since: September 2013
Posts: 66 
|
Post by DeskJockey on Jan 21, 2014 10:03:52 GMT -5
Well, I've been slowly chipping away at this build, despite my inactivity on this thread (I figured I should use the little time I had to build rather than post!). Now that I'm stuck at home waiting for a snowstorm to materialize, I figured I should post this long-overdue update. I whipped up and printed custom decals on my computer and then set about finding the right color for the tan background rectangle. I settled on Vallejo MC Buff. I sprayed it on the rear fenders and on some clear decal paper to make the rectangles for the front decals (masking the rectangles on the front glacis was too problematic given the location of the tow eyes. I then used Future to bed down the decals and avoid silvering. It took a few tries, as the first two decals I tried tore during handling--I ended up putting an extra layer of liquid decal film on the remaining decals to make sure I didn't have that problem again. I always print spares when doing my own decals, as I know from experience that some decals either won't print right or will be damaged somewhere in the process. Here's what the decals look like on the model:   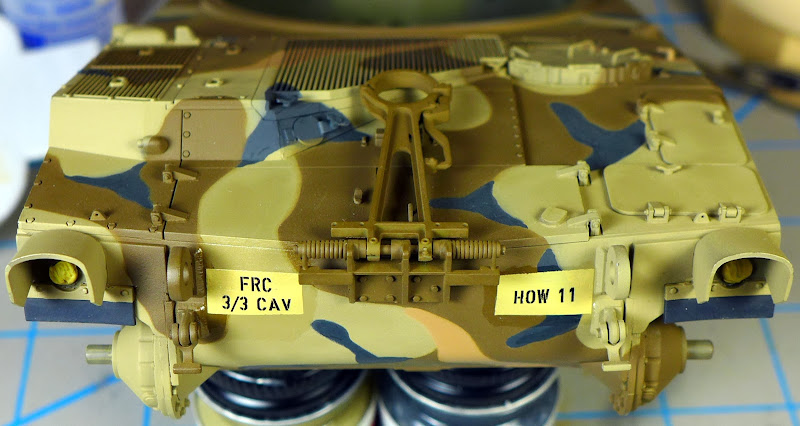 I also added some lead wire to the spool on the rear hull door. Here you can see what it looks like before and after painting. It was not my best work, but I forgot to add it before I built the spool, so I had to loop it on after everything was firmly in place. I think it turned out OK, although it is certainly not enough wire for the howitzer to use in real life! 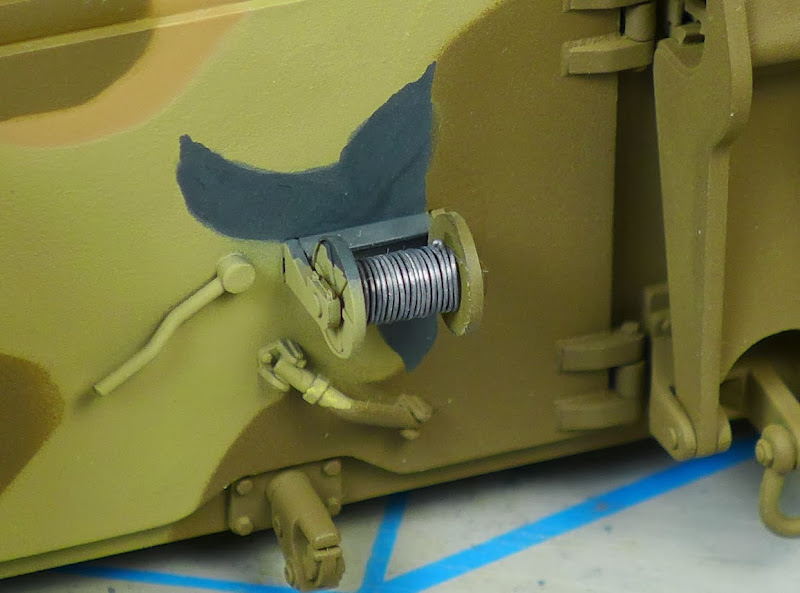  I have pretty much finished the M2, save for the ammo can. Here's what it looks like--it's painted in Vallejo flat black and dry-brushed in Testors Steel (from the small square bottle). The ammo can will be closed, per my friend's request. 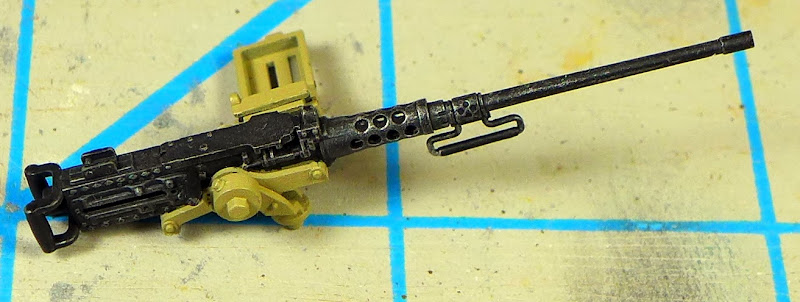 On the turret, I stuck on all the tools (and I also repainted the axe handles to vary the wood color a bit) and then gloss-coated everything in preparation for washes. I made the tow cable from stainless steel twisted wire I bought on eBay several years ago. I annealed the wire and painted it--it's too bad it's stainless steel, since Blacken-It won't work on stainless steel. Here's what the turret looks like now: 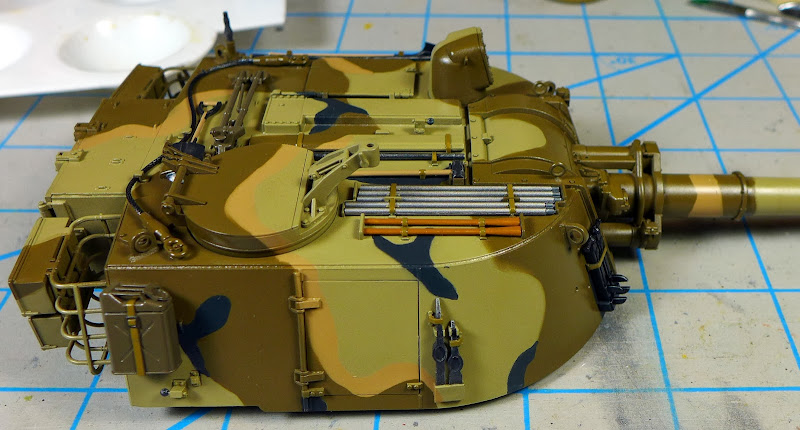 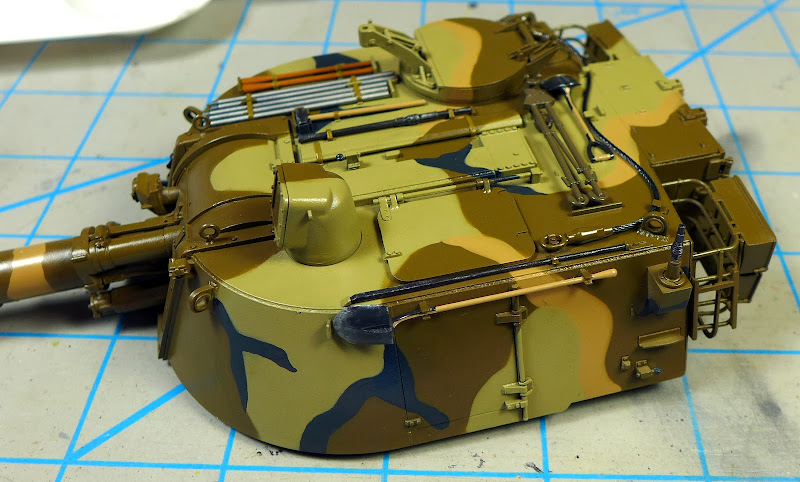  It was at this point that I remembered I was going to add stowage to the rear turret baskets (doh!), so I rummaged through my collection of AM items and found this set:  It has some items I will definitely use, such as the duffel bags,ALICE packs, and what looks like another type of satchel (anyone know what type it is?): 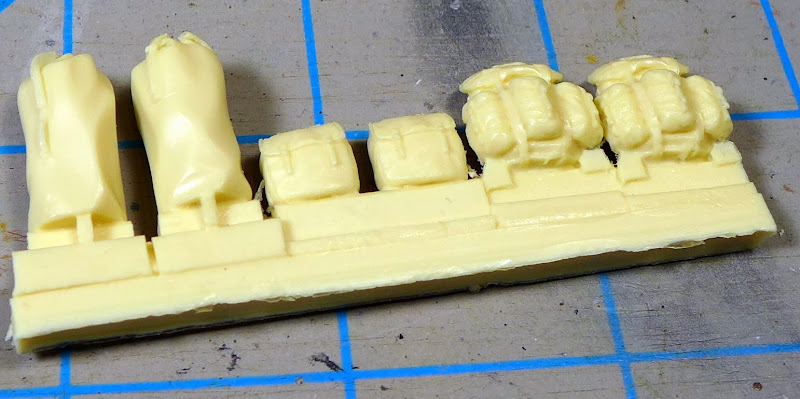 ![It also has some items that I'm not sure if I should use, mainly because I'm not sure what they are. Can anyone identify these items?]() 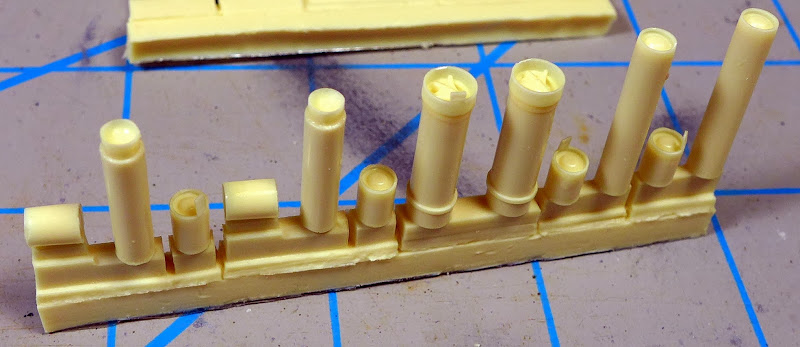   |
|
|
|
Post by bbd468 on Jan 21, 2014 10:15:46 GMT -5
Hiya DJ, M109 is lookin fantastic bro! Nice paint on the tools and the tracks are killer....well done.  |
|
|
|
Post by bullardino on Jan 21, 2014 10:40:34 GMT -5
I agree with Gary, really nice result so far  |
|
Deleted
Member since: January 1970
Posts: 0
Dec 2, 2024 3:00:11 GMT -5
Dec 2, 2024 3:00:11 GMT -5
|
Post by Deleted on Jan 21, 2014 10:46:34 GMT -5
Well, I've been slowly chipping away at this build, despite my inactivity on this thread (I figured I should use the little time I had to build rather than post!). Now that I'm stuck at home waiting for a snowstorm to materialize, I figured I should post this long-overdue update. I whipped up and printed custom decals on my computer and then set about finding the right color for the tan background rectangle. I settled on Vallejo MC Buff. I sprayed it on the rear fenders and on some clear decal paper to make the rectangles for the front decals (masking the rectangles on the front glacis was too problematic given the location of the tow eyes. I then used Future to bed down the decals and avoid silvering. It took a few tries, as the first two decals I tried tore during handling--I ended up putting an extra layer of liquid decal film on the remaining decals to make sure I didn't have that problem again. I always print spares when doing my own decals, as I know from experience that some decals either won't print right or will be damaged somewhere in the process. Here's what the decals look like on the model:    I also added some lead wire to the spool on the rear hull door. Here you can see what it looks like before and after painting. It was not my best work, but I forgot to add it before I built the spool, so I had to loop it on after everything was firmly in place. I think it turned out OK, although it is certainly not enough wire for the howitzer to use in real life!   I have pretty much finished the M2, save for the ammo can. Here's what it looks like--it's painted in Vallejo flat black and dry-brushed in Testors Steel (from the small square bottle). The ammo can will be closed, per my friend's request.  On the turret, I stuck on all the tools (and I also repainted the axe handles to vary the wood color a bit) and then gloss-coated everything in preparation for washes. I made the tow cable from stainless steel twisted wire I bought on eBay several years ago. I annealed the wire and painted it--it's too bad it's stainless steel, since Blacken-It won't work on stainless steel. Here's what the turret looks like now:    It was at this point that I remembered I was going to add stowage to the rear turret baskets (doh!), so I rummaged through my collection of AM items and found this set:  It has some items I will definitely use, such as the duffel bags,ALICE packs, and what looks like another type of satchel (anyone know what type it is?): It's hard to tell from that angle, but those look like old style ALICE packs. They would be good for the period you modeled.  ![It also has some items that I'm not sure if I should use, mainly because I'm not sure what they are. Can anyone identify these items?]() The cylinders with the end caps are what I believe are shipping tubes for M1A1 120mm ammo The short ones are powder bags and thus appropriate for your build, I think. The cylinders with the end caps are what I believe are shipping tubes for M1A1 120mm ammo The short ones are powder bags and thus appropriate for your build, I think.
 The can on the left is an old school 5 gal oil can. I have never seen one stowed on any modern armor. On the right is a bucket, indespensible for the crew of any vehicle. The can on the left is an old school 5 gal oil can. I have never seen one stowed on any modern armor. On the right is a bucket, indespensible for the crew of any vehicle.  |
|
DeskJockey
Junior Member
 
Member since: September 2013
Posts: 66 
|
Post by DeskJockey on Jan 21, 2014 11:36:35 GMT -5
Thanks, agentg; that helps a lot! Here's a better view of the packs--the ones I'm not certain about are the ones in the middle. I'm fairly sure the ones on the right are old ALICE packs, as you note.  I've also found a couple of rolled-up tarps/bedrolls I got in a trade that I think would go well in the turret baskets. What do you all think, should I use them?   |
|
|
|
Post by ceresvesta. on Jan 21, 2014 14:32:13 GMT -5
D.J. Awesome paint job.....drooling awesome  You should defo use the tarp roll. When I was in the military, we always had some sort of tarp...Always come in handy! Bad A$$ build so far my friend. |
|
Deleted
Member since: January 1970
Posts: 0
Dec 2, 2024 3:00:11 GMT -5
Dec 2, 2024 3:00:11 GMT -5
|
Post by Deleted on Jan 21, 2014 17:27:21 GMT -5
Yup those are ALICE packs alright. The other two are knap sacks and would have still been around in some capacity during that time period. The Marines didn't start using the Alice pack until the mid to late '70's depending on a units location.
Definately use the tarps. They will look right at home in the basket as will the seabags.
G
|
|
Deleted
Member since: January 1970
Posts: 0
Dec 2, 2024 3:00:11 GMT -5
Dec 2, 2024 3:00:11 GMT -5
|
Post by Deleted on Jan 21, 2014 18:43:58 GMT -5
WOW!!
|
|
|
|
Post by wbill76 on Jan 21, 2014 18:46:22 GMT -5
Looking good with the markings on. Nice contrast to the camo.
|
|
DeskJockey
Junior Member
 
Member since: September 2013
Posts: 66 
|
Post by DeskJockey on Jan 31, 2014 18:04:46 GMT -5
Thanks, guys! I talked to my friend about what kind of stowage his unit carried and have changed my plan accordingly. It seems they almost always carried, in descending order of likelihood, cammo nets, tarps, and duffel bags in the baskets. I'll stick to these three items. I'll have to make cammo net to fit, and will use a tarp and duffel bag to round out the stowage. I just got back from a business trip that kept me away for most of the week, but last week I managed to get quite a bit done. Here's my update. I first heavily dry-brushed the tracks with MM Gunmetal (not the Metalizer kind, the standard one, which is a dark blue-black), then sealed them Vallejo flat. I then gave the tracks a wash with AK Africa Dust Effects. Here's what they looked like at that stage:  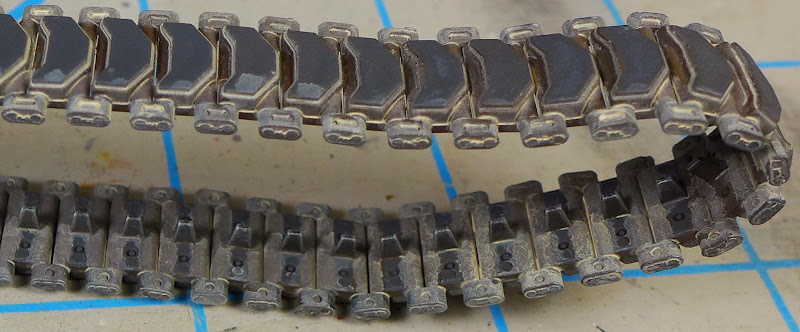 I then gave the tracks another wash with AK Dust Effects and used ground-up pencil graphite to burnish the areas that the sprockets and idlers would rub free of dust and paint. Finally, I dry-brushed a bit of Testors steel paint on the guide horns. Here is the final look of the tracks:   This was my first time using AK's washes. They were fairly nice, although I found that they settled in the bottle really fast--I had to keep stirring and shaking them constantly to keep the pigments in suspension or the wash would quickly thin and then become almost entirely devoid of pigmentation. I also used a new (for me) set of washes on the main hull and turret--Vallejo's acrylic Dark Brown Wash and the Detailer Black wash. Here is what the turret and hull looked like after being glossed and pinwashed with both of those products: 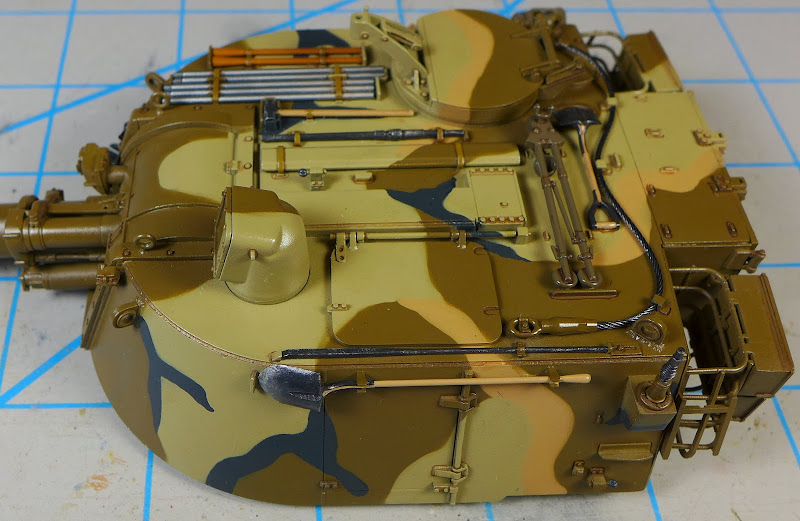   I then sprayed everything with Vallejo's flat coat. For some reason, this time I got a bit of white frosting on the turret (and only the turret), even though I had no problems with the same flat coat what I used it on the hull or the running gear. Go figure. I've managed to eliminate most of the frosting since I took the pictures. 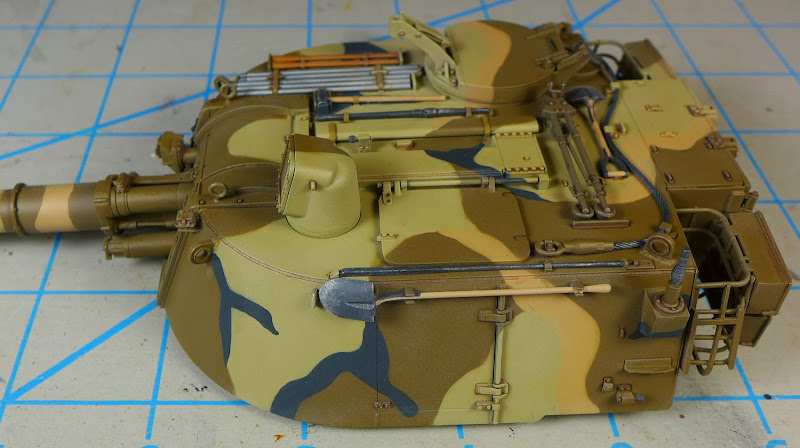   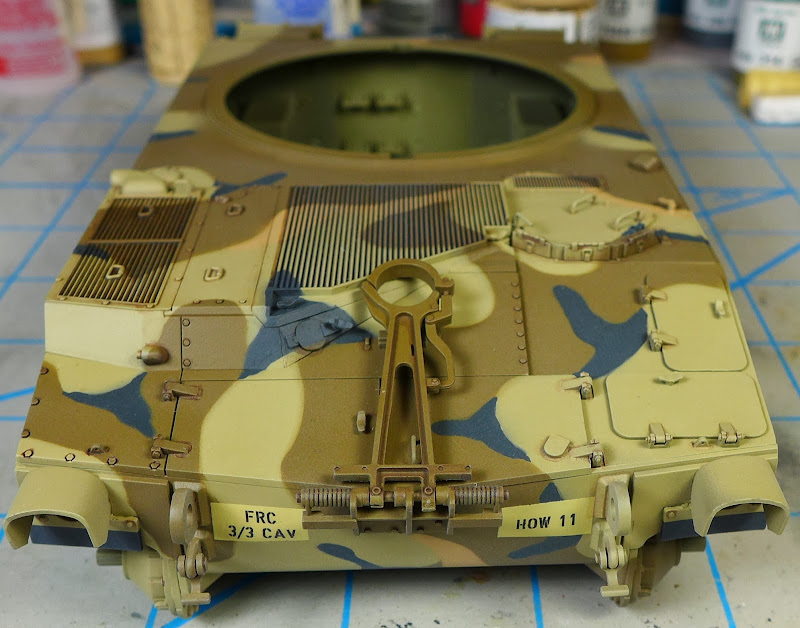  That's mostly where things stand now. In looking at the pictures of the turret, I can see multiple places where I did not properly blend the pin wash--I thought I had caught all of them before shooting the flat coat, but evidently that was not the case. Unfortunately, it is now too late for me to do much about that, except to try tp soften it with filters and weathering. I also started painting the stowage items, but since I've changed what I will be putting in the baskets, half of that work is now beside the point. Let me know what you think. |
|
paulh.
Senior Member
   
Member since: November 2011
build, fail, learn, succeed - ENJOY
Posts: 2,389
Nov 15, 2011 15:54:51 GMT -5
Nov 15, 2011 15:54:51 GMT -5
|
Post by paulh. on Jan 31, 2014 18:09:21 GMT -5
That is looking very good DJ.
I had that frosting issue with a Leopard build last year but managed to get it back somewhat- though not to the same extent that you have.
P
|
|
|
|
Post by ceresvesta. on Jan 31, 2014 19:33:18 GMT -5
Nice progres DJ!
How did you manage the frosting issue?
Thanks.
|
|
|
|
Post by deafpanzer on Jan 31, 2014 19:35:44 GMT -5
Superb work on the track... love the dirt build up around the rubber pads.
|
|
|
|
Post by bbd468 on Jan 31, 2014 19:59:06 GMT -5
Fantastic work DJ! Thats as good a weathering job on rubberband tracks ive seen....well done man!  |
|
|
|
Post by Leon on Jan 31, 2014 21:47:59 GMT -5
Fantastic work DJ,keep up the good work.  |
|
Deleted
Member since: January 1970
Posts: 0
Dec 2, 2024 3:00:11 GMT -5
Dec 2, 2024 3:00:11 GMT -5
|
Post by Deleted on Feb 1, 2014 8:31:54 GMT -5
really nice work on the details and painting, looks so nice in this scheme
|
|
DeskJockey
Junior Member
 
Member since: September 2013
Posts: 66 
|
Post by DeskJockey on Feb 1, 2014 14:23:41 GMT -5
Nice progres DJ! How did you manage the frosting issue? Thanks. I brushed Vallejo flat onto the frosted areas and it seems to have done the trick for most of them. I think what happened, in retrospect, is that I sprayed the flat coat from slightly too far away and applied too thin a coat, so it partially dried on the way to the model. I was afraid of flooding the nooks and crannies of the turret with flat coat and backed away, dusting it in a few light coats. For the wheels and hull, I sprayed closer in and laid on a thin wet coat. |
|
Deleted
Member since: January 1970
Posts: 0
Dec 2, 2024 3:00:11 GMT -5
Dec 2, 2024 3:00:11 GMT -5
|
Post by Deleted on Feb 1, 2014 14:40:01 GMT -5
That is looking really good. I love the tracks.
G
|
|