|
|
Post by wbill76 on Aug 13, 2014 12:23:40 GMT -5
Good to hear on the replacement canopy there Rick! As for the disclaimer, it's nice to see that the legal CYA is common internationally and not just limited to the US.  36 months is the cutoff for knives and glue...who knew? All those wasted years as a child...gone...  |
|
Rick
Full Member
  
Member since: March 2013
what to build, what to build . . . Ok THAT one!
Posts: 854 
|
Post by Rick on Aug 20, 2014 23:20:11 GMT -5
Aug 20: First steps first ... OK, sprayed a gloss coat on the Tigercats and couldn't hold off any longer. That big 'ol box was calling my name so it would have been rude of me to not answer. Right??? First, locate the correct Sprue package. This build starts with interior framework and works it's way out from there. Wing Spars, cockpit and engine framing all build up first and form the foundation for the rest of the aircraft. Due to all the separate pieces of different final color, there will be a number of parts paintings followed by assembly and touch up. The parts seem to be well grouped on their sprues and not to difficult to find. Here's the first major disappointment. Major cleanup required on ALL the interior framework. The two halves of the molds do not line up and leave a nasty seam line all the way around. This leads to a lot of wasted time scraping and sanding resulting in round framework that is not quite round. Some parts also have quite a bit of flash around them that needs to be cleaned up too. I'm trying to figure out what parts will be buried inside the fuselage and out of sight through open panels and the small cockpit opening on top. Not going to waste any more time than necessary fixing manufacturing issues when they will not be visible at all. I'm trying to get as many same color parts cleaned up as possible before painting. And so it begins ... Here are the main framework that all else is built upon: 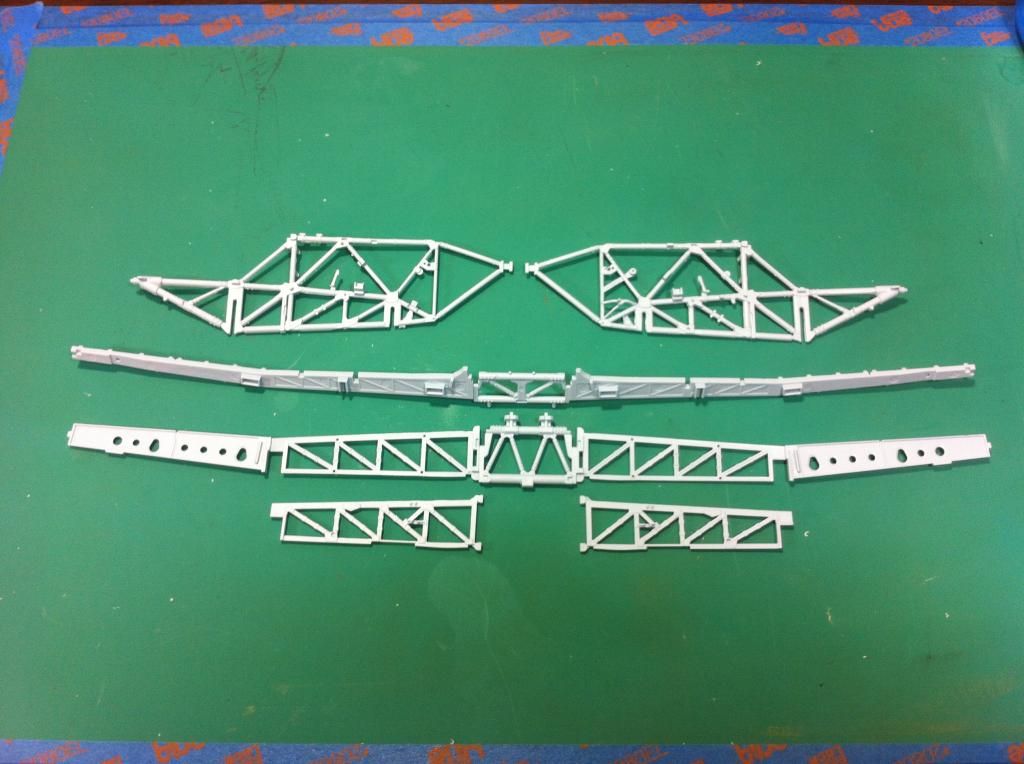 The wing spar has two smaller pieces that must glue flush with spar to ensure the wing fits properly. Together they help make the spar much more rigid. 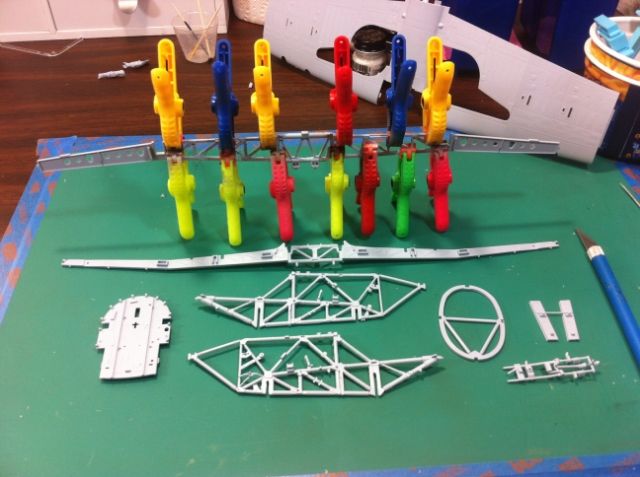 Cockpit framework, spars and firewall are dry fitted to check for problems. This view is the front of the engine compartment looking back at the firewall. 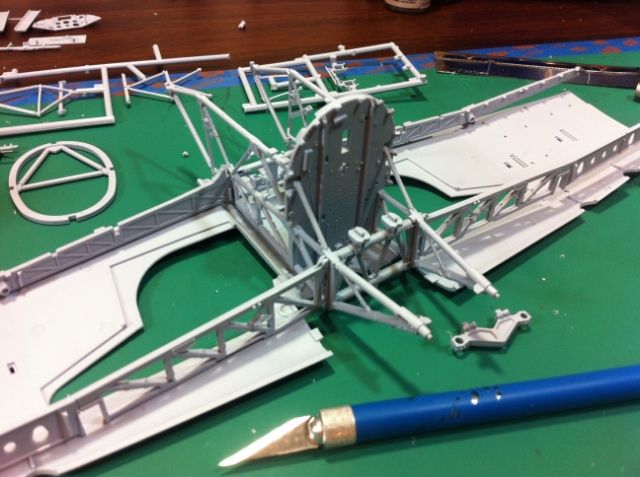 View looking at where the office will be built up and decorated: 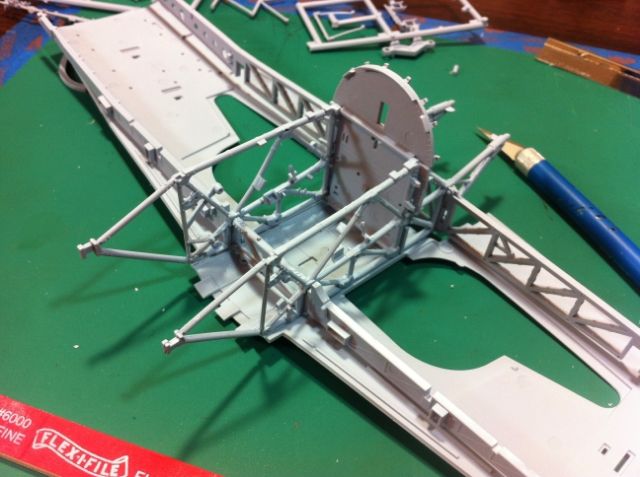 Unfortunately, that's as far as I've gotten up to this point. As mentioned, the majority of time has been spent on identifying and cleaning up the parts to get ready for painting. I have to admit, my initial excitement given all the hype this kit has received is a bit dimmed by the amount of clean-up needed. Airfix's big Mossie did not have nearly the mold lines and flash issues the Tiffie has. (but it did have hundreds of ejector pin marks!) That being said, the external parts look exquisite and even the weapon and landing gear bay parts seem to be less of an issue. So, I'm not going to let these issues get the best of me and work at plowing through them. I fully expect my excitement level to pick up once the glue and paint start to fly. Tally-Ho till next update Rick |
|
venom1
Full Member
  
Member since: October 2012
Posts: 1,369
Oct 10, 2012 2:40:03 GMT -5
Oct 10, 2012 2:40:03 GMT -5
|
Post by venom1 on Aug 21, 2014 0:04:12 GMT -5
Looks great so far Rick! This is gonna be one HUGE bird!!  Cheers, Sam  |
|
|
|
Post by deafpanzer on Aug 21, 2014 9:48:32 GMT -5
Yikes, it scared me when I looked at the pictures... looking stunning even tho!
|
|
|
|
Post by wbill76 on Aug 21, 2014 12:50:52 GMT -5
I hear you Rick on the clean-up being a bit of a let-down, hopefully you can clear that hurdle as painless as possible and carry on with this big old bird. Looking good so far.
|
|
doogsatx/
Senior Member
    Feb and Sept 2014_ MoM Winner
Member since: November 2012
Posts: 1,642
Nov 14, 2012 21:29:10 GMT -5
Nov 14, 2012 21:29:10 GMT -5
|
Post by doogsatx/ on Aug 21, 2014 13:08:14 GMT -5
That's odd that there's so much cleanup on the interior parts and no so much on the exterior.
I'm wondering...how much of the interior is necessary? I'm planning to build mine closed up, and I want things like the cockpit and wing spar and gear bays obviously, but can some elements be left out? Sorta like the superfluous exhaust ducting in Trumpy's P-47...
|
|
Rick
Full Member
  
Member since: March 2013
what to build, what to build . . . Ok THAT one!
Posts: 854 
|
Post by Rick on Aug 21, 2014 16:36:49 GMT -5
You bring up a great point Doogs. I am not cleaning up what will not be seen. Even the instructions and Brett Greens book calls out if panels are used there are parts that must be left off in order for them to fit flush. I'm planning to close up the left side and open the right side. If all closed up much of the engine and gun bays will never be seen or need to be built.
As far as the cleanup, it seems like the interior sprues have the worst alignment. To me, the master mold halves did not align when styrene was injected.
Rick
|
|
doogsatx/
Senior Member
    Feb and Sept 2014_ MoM Winner
Member since: November 2012
Posts: 1,642
Nov 14, 2012 21:29:10 GMT -5
Nov 14, 2012 21:29:10 GMT -5
|
Post by doogsatx/ on Aug 21, 2014 17:15:23 GMT -5
I kinda batted around the idea of doing the engine exposed...but I LOVE the lines of the Typhoon and don't want to break those up...
|
|
Rick
Full Member
  
Member since: March 2013
what to build, what to build . . . Ok THAT one!
Posts: 854 
|
Post by Rick on Aug 21, 2014 18:43:29 GMT -5
I hear you. It's a tough choice. I'll leave that option open in case I really screw up the interior. I've been tempted to leave off the panel that would interchange with the car door version that we all know someone is likely to come out with just to expose a bit more of the office. I think I've got plenty of work ahead of me before I get to that decision.
Rick
|
|
Rick
Full Member
  
Member since: March 2013
what to build, what to build . . . Ok THAT one!
Posts: 854 
|
Post by Rick on Sept 1, 2014 7:52:16 GMT -5
Sept 01 Update - Parts Clean-up: Majority of time the past 10 days has been spent on identifying parts and preparing them for paint. Since the Typhoon has a very complete interior and has great complexities in the order and how parts will fit, painting before assembly is very essential in order to build out the kit. I'm sure there are any number of approaches that can be taken. I've chosen to build up a number of sub assemblies with the same paint colors. Along the way, there are a number of individual parts that require painting as well. A lot of time has been spent studying reference material to determine correct color. Conflicts abound as this aircraft does not seem to follow the RAF norms of interior green for internal components. Some sources indicate all aluminum frame tubing, others indicate black, while others indicate interior green. Apparently, the lone surviving Typhoon and a complete surviving cockpit are restored in differing colors. These conflicts leave room for some creative interpretation. I have decided to move forward with Interior Green wing spars and a combination of aluminum and green framing. Aluminum interior wing wheel wells and interior wing components. Now that's been decided, separating parts into appropriate trays for painting and then cleaning up the parts has been occupying the rest of my bench time. (More venting about parts clean up later!) Since much of the interior will not be visible once the wings and fuselage are attached, I am only making efforts to clean up and paint what may be visible once the kit is complete. The interior framework consists of many individual parts. Choices here are build up all the framing and paint later which will require a lot of brush work or airbrush individual pieces then scrape glue points followed by touch ups. I chose to mate up the primary framing and components and use Micro Mask on the many glue points to hopefully reduce more wasted time spent cleaning up what already has been cleaned up. 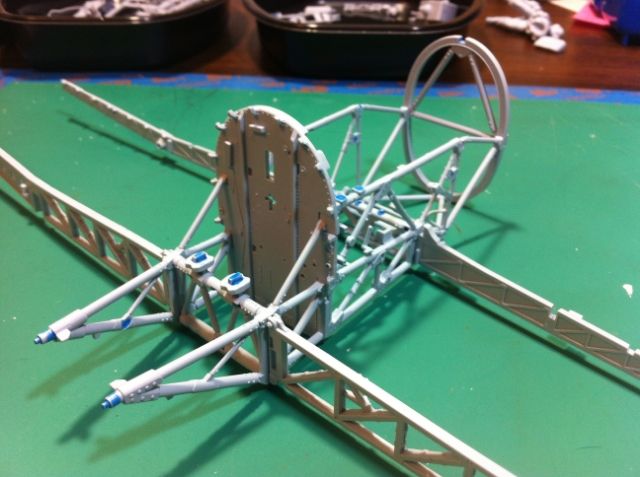 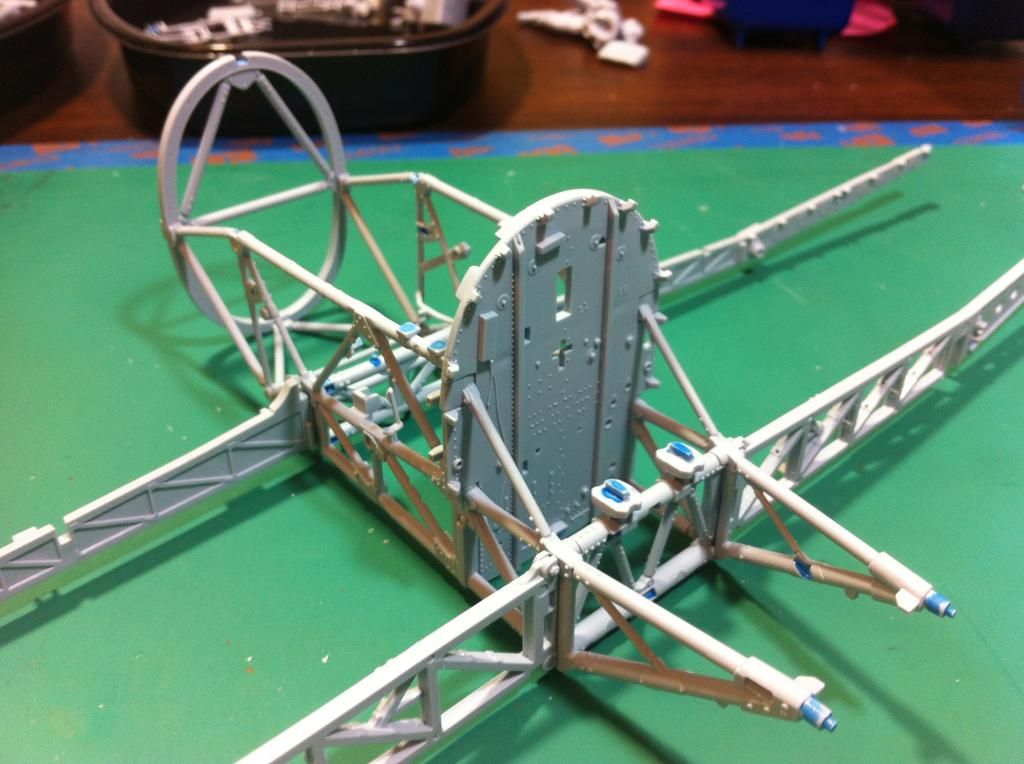 I am planning to AB the primary framing with Nato Black and then separate the parts to apply Interior Green/Aluminum where applicable. The black should serve as pre-shading join areas. The firewall will be overall black as well as instrument panels. Parts trays with sub assemblies and parts waiting their turn in the spray booth. 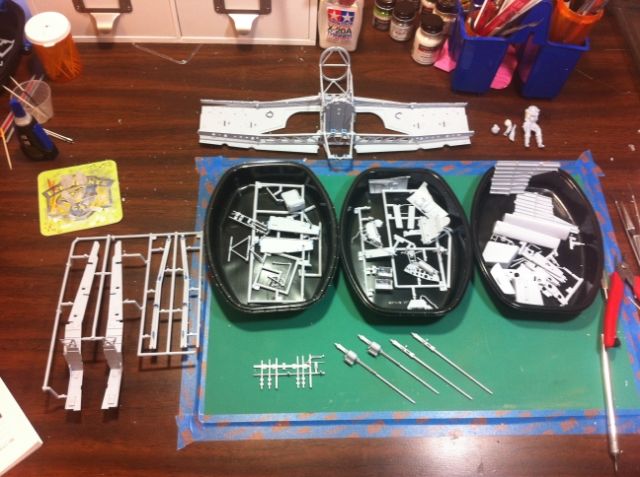 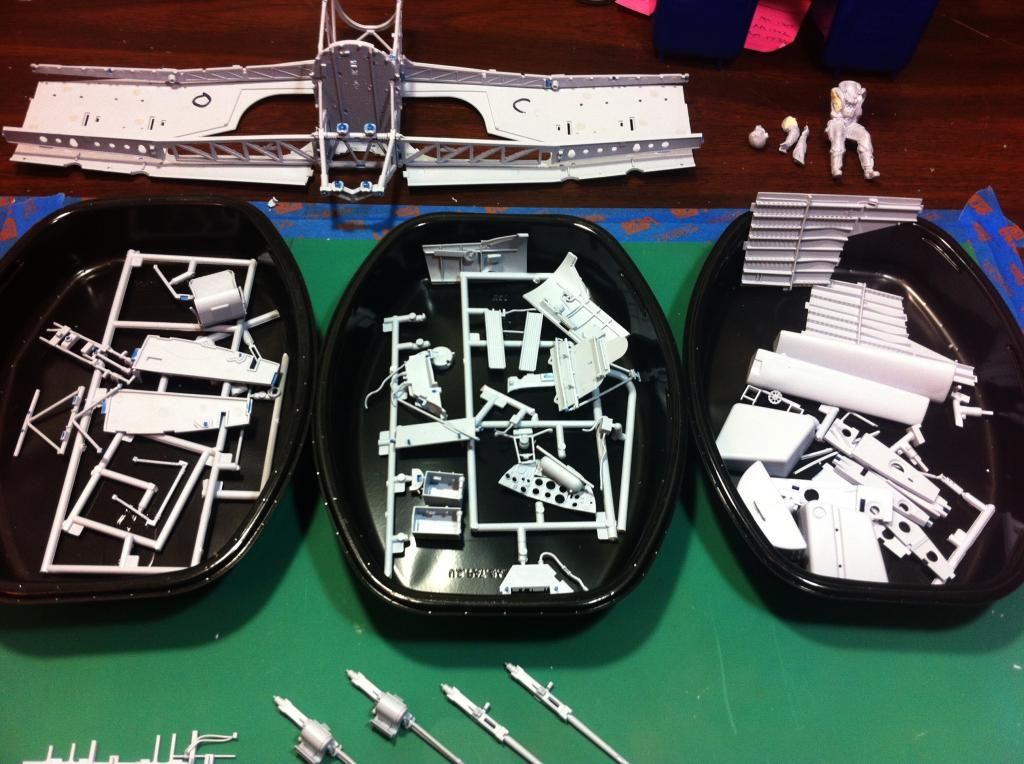  Airfix has done a fantastic job of researching details and engineering design to create what will be a fantastic kit. Following is an example of the upper framing within the wheel wells. They have done a great job of capturing the framing missing in most kits. Later, internal parts will dress the wheel wells up nicely. 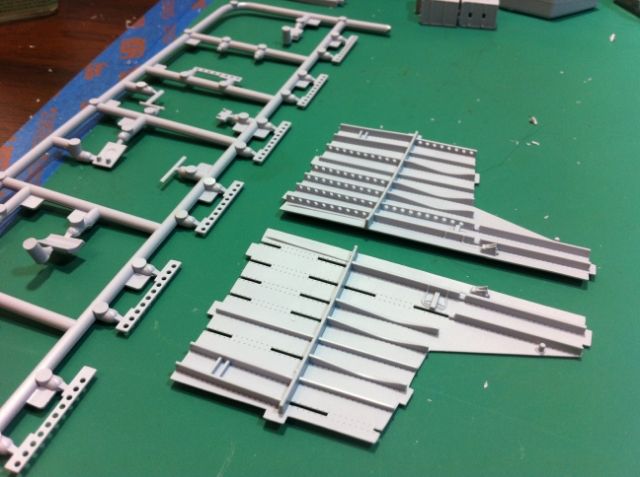 Now, here is my big beef with this kit: The mold lines, flash, and fit at the join points. Here's a before and after of the gun bay supports for the 20mm cannon and magazine mounts: 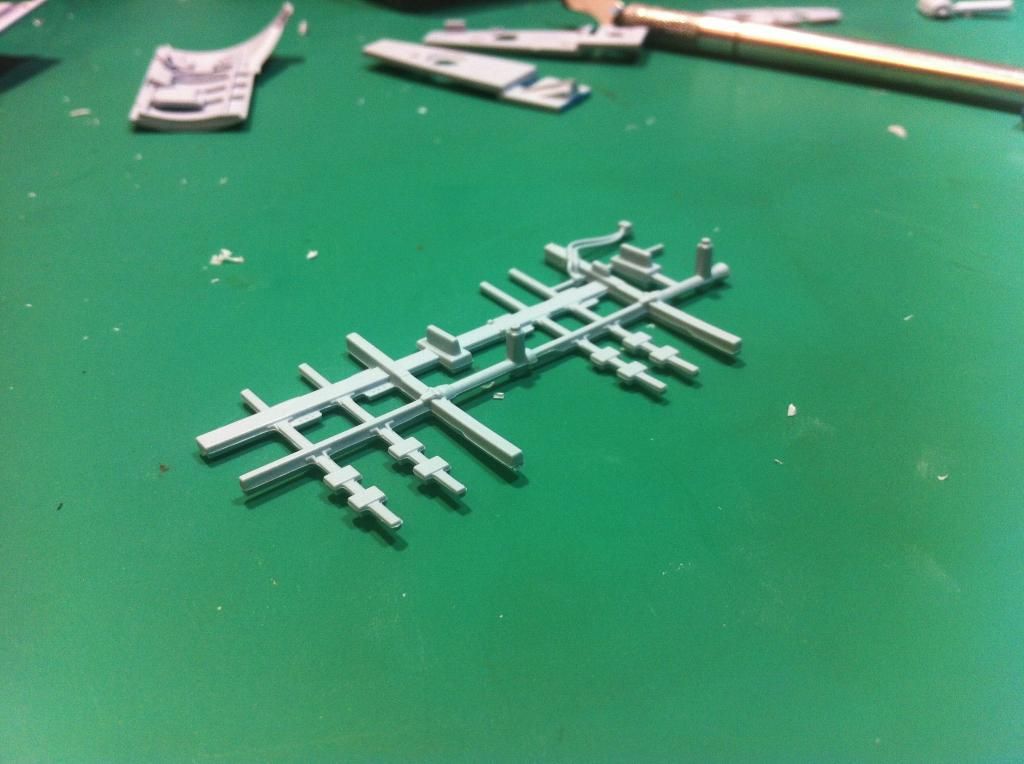 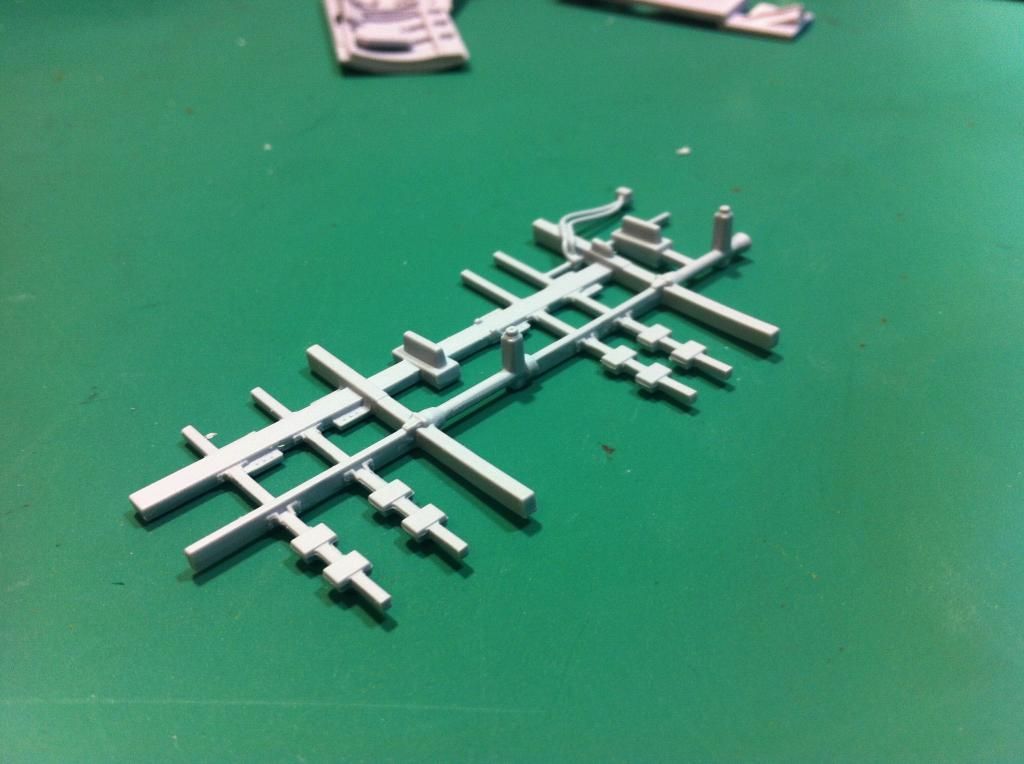 The alignment of the mold halves evidently was slightly off resulting in parts having more than just the normal mold line but also a problem with enough of a slight skewed upper and lower haves that they had to be scraped or sanded wherever the part would be visible. This one part alone took over 30 minutes to clean-up. On top of that, a number of the attachment pins that glue into a hole on another component are not precise and had to be trimmed down to get a flush join. The cannon fit had to be worked over to ensure they will fit flush with the framing. A number of the tubular cockpit join points had the same problem too. Man, this is why I almost left the hobby several years ago. I recognize that some of this is to be expected, but every single part so far has had to be extensively cleaned up. Airfix's Mosquito did not have this problem so to me it seems that the Typhoon was a big step backwards. After building several of their 1/72 gems, these issues came as a disappointment. I'm not trying to scare anyone away from tackling this kit. It will build out to quite a beauty when done. I'm just saying you need to be prepared to spend more time cleaning up parts and checking the fit to get there. OK, I've said my piece. Next update, I hope to have some paint and glue action happening. Rick |
|
|
|
Post by deafpanzer on Sept 1, 2014 11:50:04 GMT -5
WOW! Freaking way too many details... hang in there you will be pleased with it because you are doing everything possible to make it look good than just O-O-B without cleaning up and sanding, etc.
|
|
|
|
Post by wbill76 on Sept 1, 2014 20:09:11 GMT -5
Shame about all the clean-up required Rick, I'm sure that's a mojo-drainer as you know it could be avoided with just a little care/difference during the molding process. Looks like you've got your work well organized and laid out though, keep at it, it will pay off in the end!  |
|
Rick
Full Member
  
Member since: March 2013
what to build, what to build . . . Ok THAT one!
Posts: 854 
|
Post by Rick on Sept 1, 2014 21:30:44 GMT -5
Thanks guys. Appreciate the support. Bill, you are correct about the mojo drain. Eyes get tired studying fit and cleanup to get it flush so it really slows down progress. But it also helps knowing what a beauty this kit can build up to so that makes the cleanup worth it.
Rick
|
|
thug626
Senior Member
   
Member since: January 2013
Posts: 2,035
Jan 15, 2013 13:05:28 GMT -5
Jan 15, 2013 13:05:28 GMT -5
|
Post by thug626 on Sept 6, 2014 11:51:47 GMT -5
Good morning Rick,
I've been reading of you clean up woes. Fight the good fight man. This will be a stunner when you bring it across the finish line.
Dave
|
|
Rick
Full Member
  
Member since: March 2013
what to build, what to build . . . Ok THAT one!
Posts: 854 
|
Post by Rick on Sept 9, 2014 21:59:01 GMT -5
ept 09 Update - Finally ... Paint! After a couple weeks of parts clean-up, I finally had the chance to get started on the interior structure of the Tiffie. The complexity of the interior and diversity of colors means a lot of paint needs to be in place prior to assembly. I'm trying to avoid brush painting as much as possible. To me, it just lacks the smoothness the airbrush provides. It also highlights details and missed clean up to unfortunately. With so many glue points, as I mentioned in an earlier post, I elected to use Micro mask to avoid the scraping the paint from the glue points. I really liked this. It easily cut 3/4 of the time off of glue prep time. Sources are a bit conflicting as to the actual internal colors so I elected to first spray the parts Nato Black to give some depth and then followed by either RAF Interior Green or Alclad Aluminum. The lower framing and engine mounts will be green and the cockpit surround will be finished in Aluminum. 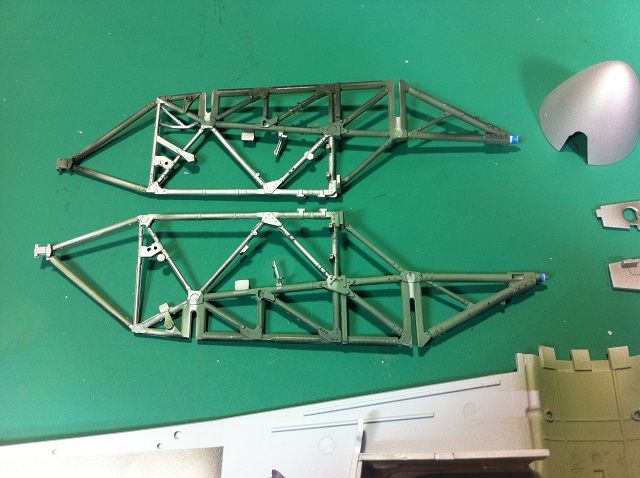 I love spraying Alclad!!! It gives an incredibly smooth and hard finish. Some of these parts will ultimately end up in other colors. The aluminum underneath will help bring out chipping and wear. 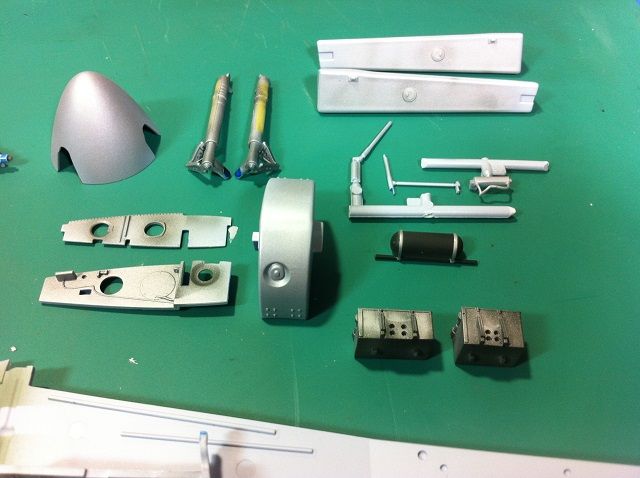 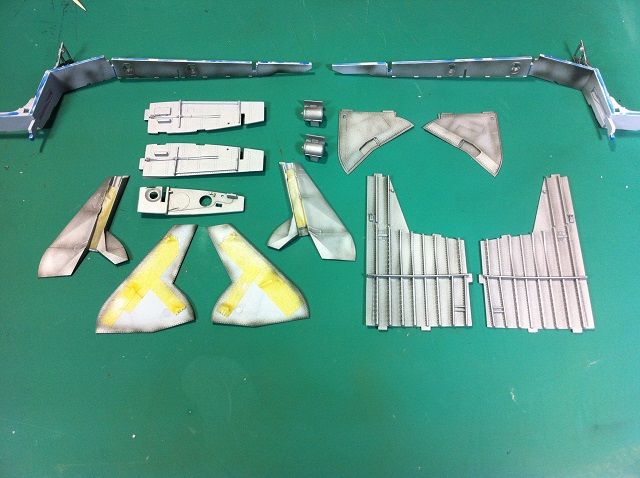 I've decided that I am going to open up the starboard panels to display the engine and cannon bays. The port side will be closed up so the lines of this beast can be viewed as well. The main wing spars are finished in Interior Green while the internal skin and framing will be Aluminum. This is consistent with late war Typhoons. 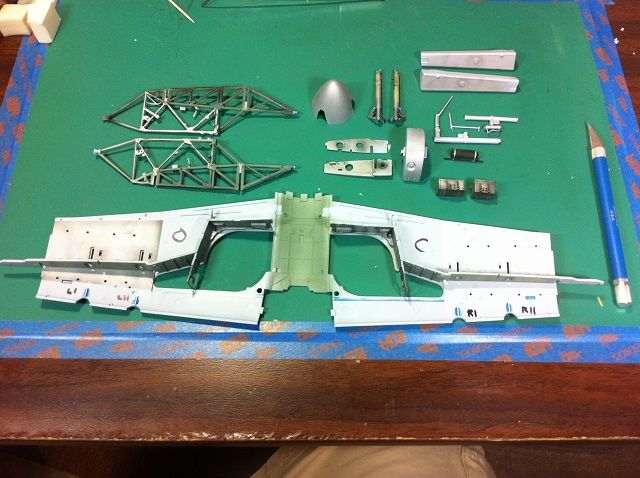 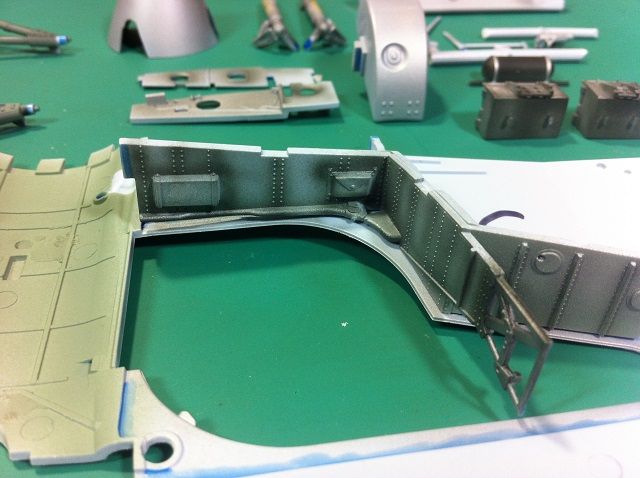 More parts and paint including the Nato Black firewall and very thin to scale pilot seat back armor: 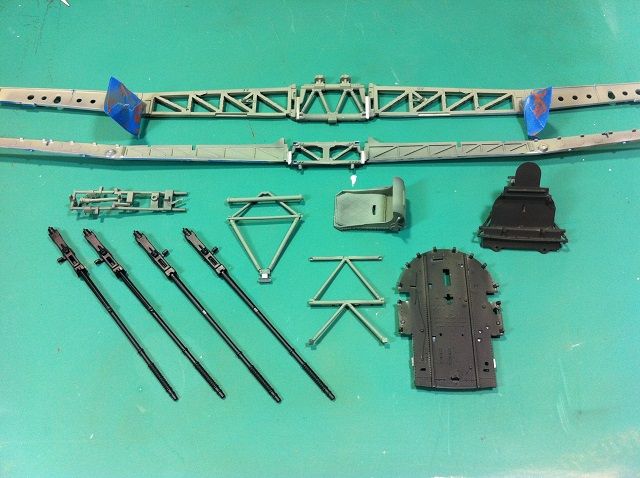 Cannons are painted in Alclad Gun Metal: 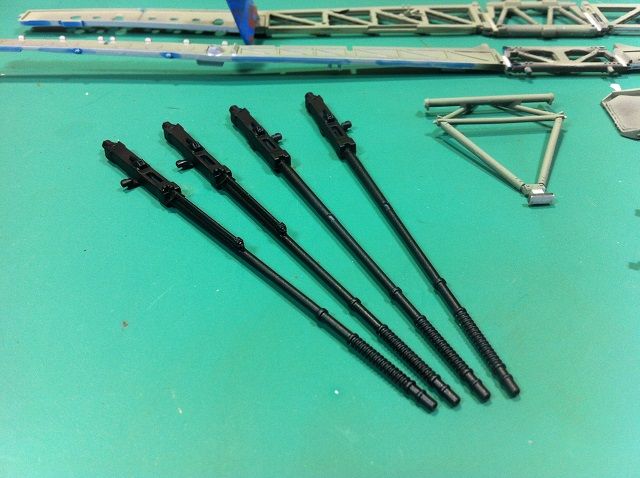 Some of the parts pictured do not appear to have consistent paint coverage. Much of the interior will not be visible once the fuselage and wing outer skins are attached. I'm not spending time and paint on those parts, just cleaning up the fit. For the visible parts, touch ups and additional weathering will be applied at the appropriate time - in most cases prior to actually installing them or prior to adding the outer skins. Plenty of slow going detail work still to come on these parts. Thanks for stopping by for a look-see. Basic construction is underway. More to come. Rick |
|
|
|
Post by TRM on Sept 9, 2014 22:10:54 GMT -5
Wow, some real solid work there Rick!! Love seeing some color going down and looking good brotha!!!
|
|
|
|
Post by Leon on Sept 10, 2014 2:31:37 GMT -5
Nice to see some color going down Rick.
|
|
|
|
Post by wbill76 on Sept 10, 2014 12:09:24 GMT -5
Nice to see some paint fly and bring the interior bits to life in the process Rick. Looking good!
|
|
|
|
Post by deafpanzer on Sept 10, 2014 12:12:39 GMT -5
Those guns look awesome! Making a great process you did!
|
|
|
|
Post by richardcraig-Email Not Valid on Sept 15, 2014 4:09:55 GMT -5
Awesome work Rick ... Don't think I'd have the patience for all that clean up but it's great to see you're making your way through and I can already see this is going to be a show stopper when you're done. Keep on ploughing!
|
|
|
|
Post by dupes on Sept 15, 2014 8:21:35 GMT -5
Whoah...didn't realize you started on this one! Cool!
|
|
|
|
Post by mrt51 on Sept 15, 2014 9:07:58 GMT -5
 I'm really liking this so far! Terry 
|
|
Rick
Full Member
  
Member since: March 2013
what to build, what to build . . . Ok THAT one!
Posts: 854 
|
Post by Rick on Sept 16, 2014 15:29:08 GMT -5
Thanks guys. Appreciate you stopping by. Been working through the cockpit build this past week. Will get some pics up ASAP. Very intricate process. Brett Greens book has been very useful. I'd call it a "must have" tool if you are going to build this one. The instructions and book need to be studied closely to make sure parts are going in the correct places and in the correct direction.
Rick
|
|
Rick
Full Member
  
Member since: March 2013
what to build, what to build . . . Ok THAT one!
Posts: 854 
|
Post by Rick on Sept 16, 2014 22:11:30 GMT -5
Sept 16 Update - Interior framing and cockpit Started assembly on the interior this week. Dry fit, check resources, repeat. Using Micro Mask left clean glue points and saved huge time. Didn't have to scrape and sand where I used it and risk affecting the fit. Just a few touch ups with paint when done. Framing comes together: 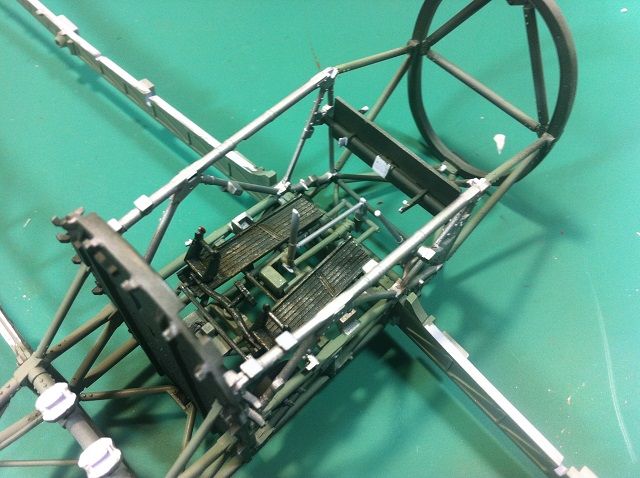 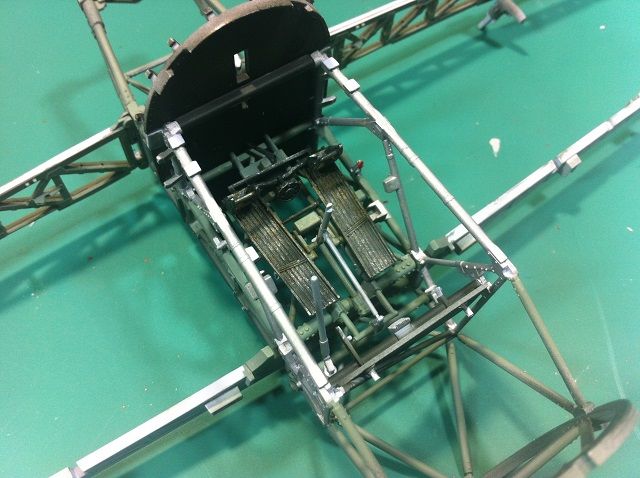 The foot boards were heavily weathered with scrapes, stains, and mud using Mod in a Pot. Once the basic framing was together making sure the wing spars were even, the seat became the next challenge. The seat was in four parts and went together easily and after base paint I added heavy scratches and scrapes in wear areas with flat aluminum and silver artist pencil. The padded back rest needed to be painted and weathered prior to installation and harnesses. I used khaki Drab followed by dry brushing leather on the high spots. Next after gloss coat, a Mig wash mixture of black and brown was applied. Once dry, I worked weathering powder into the recesses and corners of the pad and seat to build up the dirt and heavy use look. Tamiya dark mud weathering lightly brushed on the highlights to dull down any remaining sheen. The seat was then installed with a few choice words and heavy sighs. Evidently I forgot to take pics of just the seat. Here the harnesses have been added but not weathered. 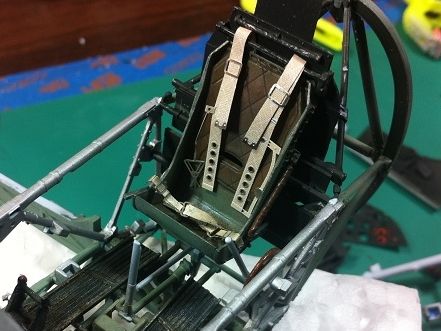 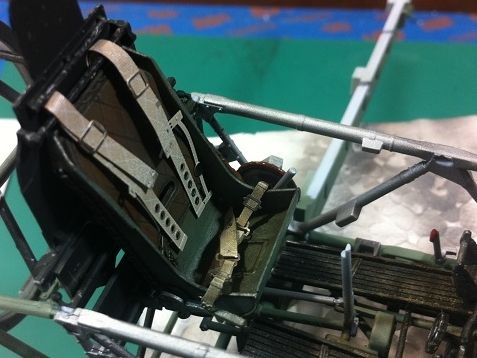 The kit supplied harnesses are pictured here: 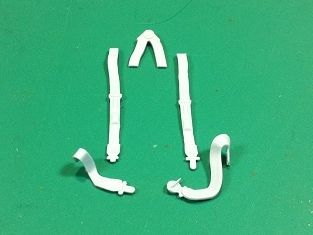 I've seen more detail in a piece of fettuccine. There is some detail present but barely and it is poorly defined. These went from photo to trash in less time it took to cut them off the sprue. I have a cloth set of Sutton harnesses in 1/24 scale. I had just had a disaster using a set of them in a 1/48 spitfire. I went with Eduard's colored PE set instead. A bit harder to work with but a lot less risk of a complete fubar. After assembling and bending them to fit the seat, they were attached and weathered by using the same Mig wash combination dabbed on using a torn piece of cosmetic sponge. This toned down the bright color. Doesn't show up as well in the pics but it is a subtle effect. All told about 8 hours went into the seat. Pics are after the side instrument panels where fiddled into place: 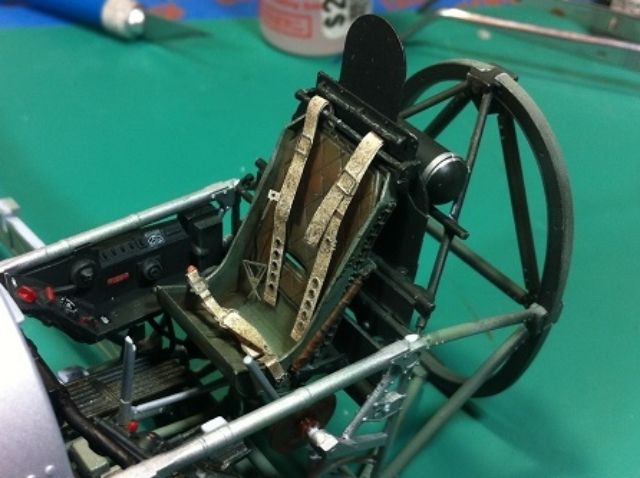 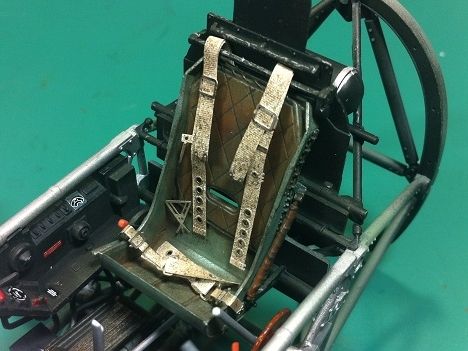 More instrument panel action: Nato Black overall. References indicate the appropriate color for bezels, knobs, and levers. A number of decals were applied before installing. These came from the Airscale instrument decal set specifically for this kit. 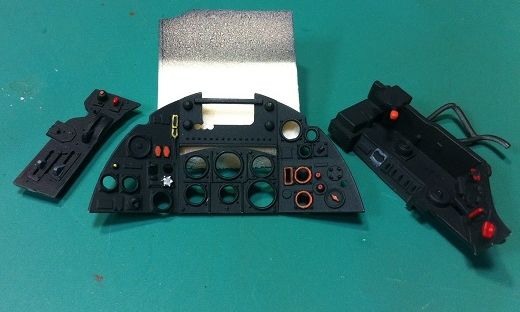 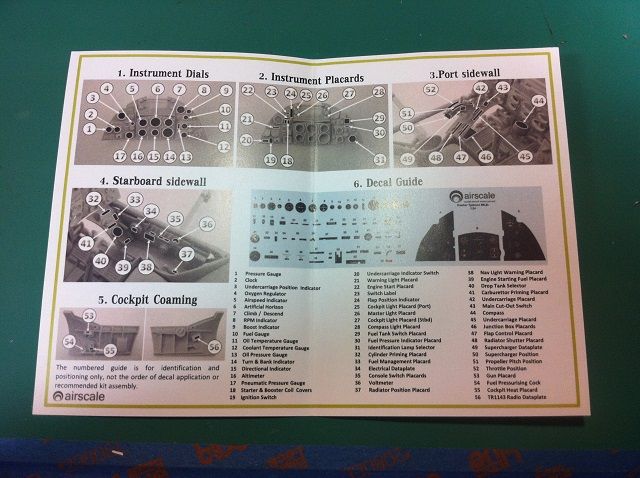 The unfinished front instrument panel positioned waiting for the dials to be decal-ed and mounted from behind. All panels will receive a weathering of light dust and grime using Tamiya weathering powders. 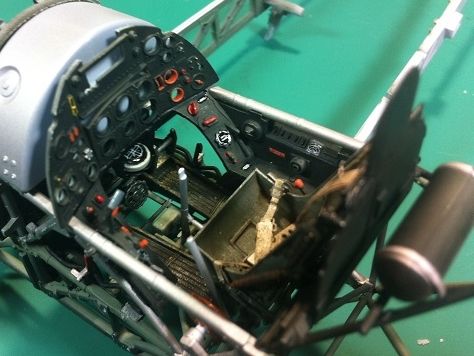 The aircraft will be finished in 2nd Tactical AF markings and served on forward grass airfields in France and Belgium. Weathering and wear, will be somewhat heavy (for me!) and dirt and mud will be represented both inside and out. Thanks for looking in. More to come. Tallyho! Rick |
|
|
|
Post by wbill76 on Sept 17, 2014 15:48:43 GMT -5
Making good progress here Rick! Time well spent on that seat and the instrument panel for sure.
|
|
|
|
Post by deafpanzer on Sept 21, 2014 0:10:39 GMT -5
Agree with Bill... keep it coming man!
|
|
Rick
Full Member
  
Member since: March 2013
what to build, what to build . . . Ok THAT one!
Posts: 854 
|
Post by Rick on Sept 24, 2014 22:42:44 GMT -5
September 24 Update - The office is finished!!!! Wrapped up the cockpit portion of this build with the installation of the control column and installing the front instrument panel. The clear instrument portion began by painting the backside flat black then dipping it in Future. After curing a couple days, I applied Airscale's instrument decals using Micro Sol and Micro. After drying, the clear dial part was pushed through the panel until the instruments were flush with the bezels. The panel was then mounted to the back of the oil tank. 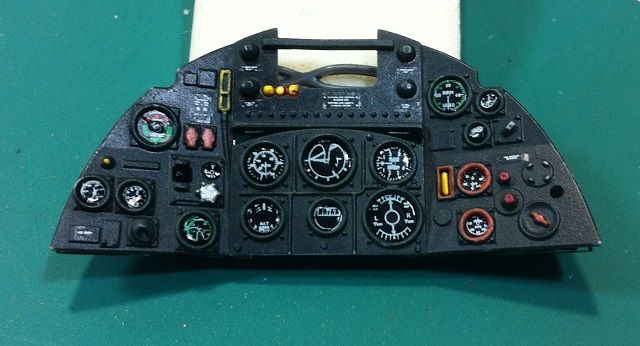 A few drops of future dotted each dial to protect the decal and give the appearance of a glass dial. 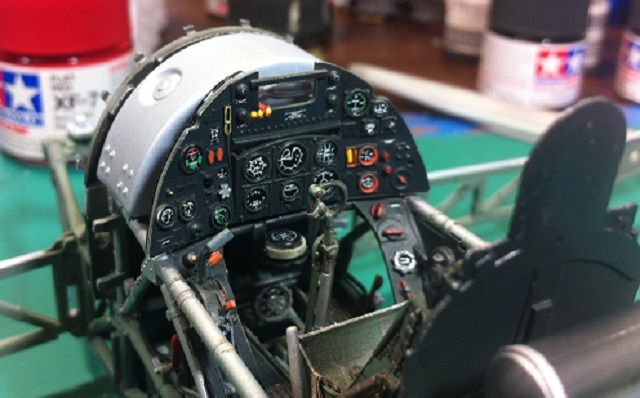 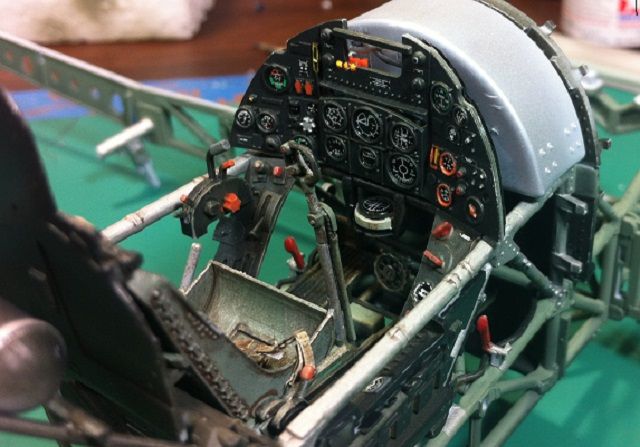 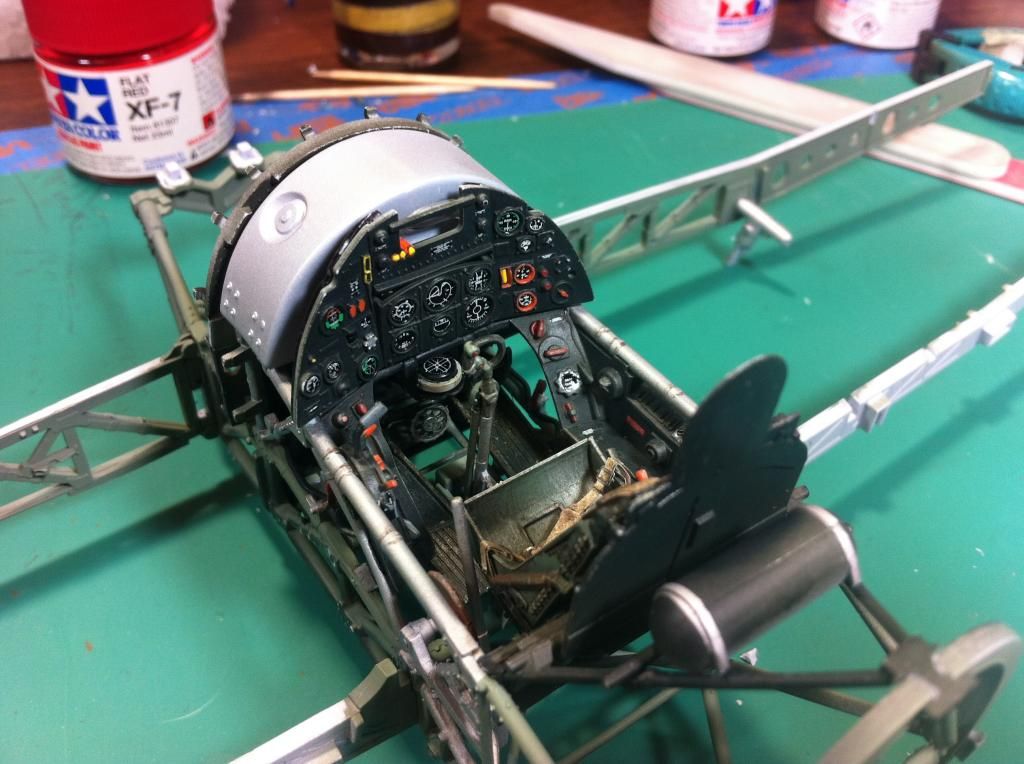 A couple more pics of the interior assembly. Unfortunately, much will not be visible once the fuselage is added. 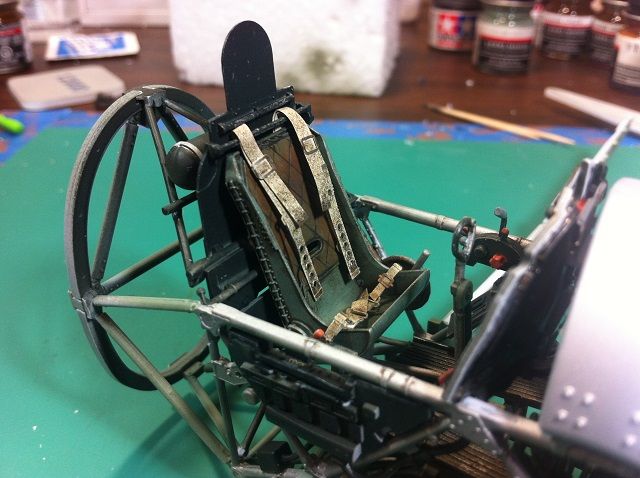 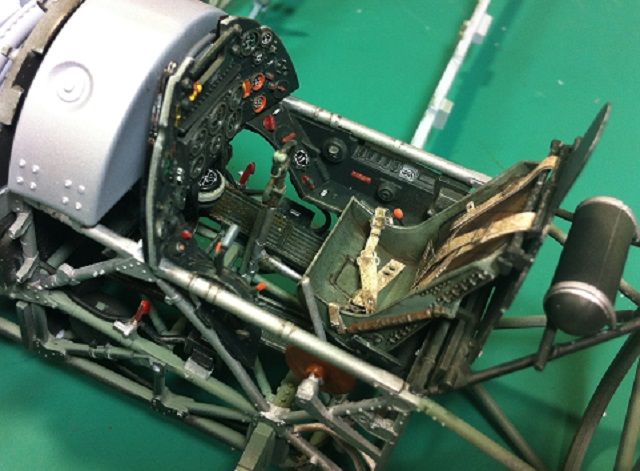 And now we're looking forward to the big 'ol Napier Sabre engine assembly: 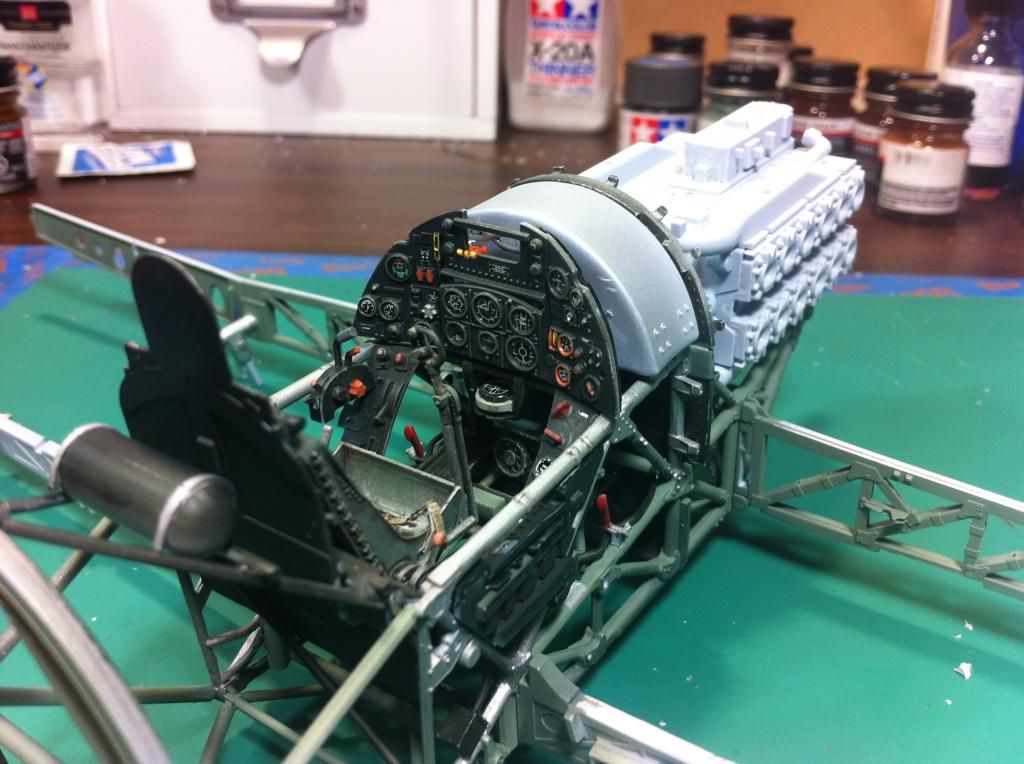 And now I'm looking at more hours of cleaning up seams and mold lines... Yep, all the plumbing and non-flat parts are in need of TLC to hopefully make them presentable. Never seen a kit so wonderfully engineered and designed and so poorly molded. The amount of clean-up reminds me of kits from the 80's and 90's. 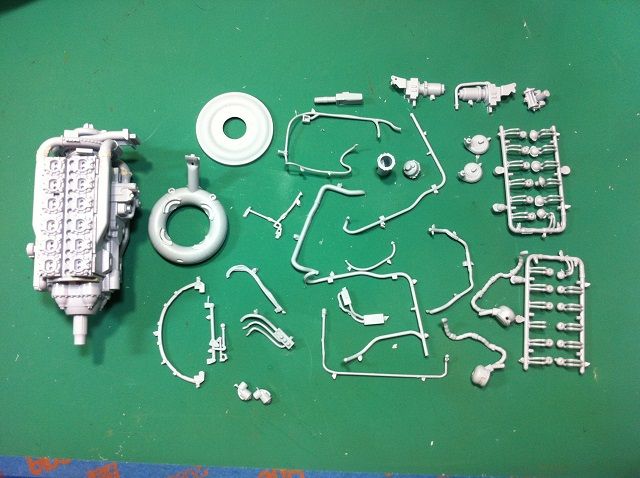 Best get on with a new blade and fresh sanding sticks. Tallyho! Rick |
|
|
|
Post by deafpanzer on Sept 24, 2014 22:48:54 GMT -5
Holy smokes! I love your office!!!
|
|
WigWag Workshop
Reviews member    
Member since: May 2012
"Keep The Glue On The Styrene"
Posts: 720
May 22, 2012 7:25:45 GMT -5
May 22, 2012 7:25:45 GMT -5
|
Post by WigWag Workshop on Sept 25, 2014 15:23:46 GMT -5
Now thats what I call an office! Superb job for sure
-Steven
|
|
|
|
Post by Leon on Sept 25, 2014 17:06:56 GMT -5
All of the above Rick,top notch work on the office and IP.  |
|