|
|
Post by wbill76 on Dec 10, 2014 13:51:26 GMT -5
Thanks Leon and T! The hull's going to take a bit to get done, very deceptive in terms of how much surface area it has but will tackle it one section at a time.  |
|
|
|
Post by JimD on Dec 10, 2014 13:57:46 GMT -5
Holy cow! I don't know how I missed this one until now, but I'm glad I found it. I wasn't familiar with this submarine. It's a really cool looking piece of machinery, and that paint job just makes it that much more cool. I do believe they prefer to be called "little" submarines though.  |
|
|
|
Post by deafpanzer on Dec 10, 2014 14:00:49 GMT -5
Will you be upset if I propose to marry your fish? I am now determined to build mine much sooner... maybe 2015... maybe before USS Indianapolis? Hmm... so many choices!
|
|
afvfan
Senior Member
   
Member since: December 2012
Bob
Posts: 1,772
Dec 10, 2012 17:32:38 GMT -5
Dec 10, 2012 17:32:38 GMT -5
|
Post by afvfan on Dec 10, 2014 15:15:46 GMT -5
Will you be upset if I propose to marry your fish? I am now determined to build mine much sooner... maybe 2015... maybe before USS Indianapolis? Hmm... so many choices! Compared to the Indianapolis, this would make a good weekend build for you, Andy.  |
|
|
|
Post by deafpanzer on Dec 10, 2014 15:40:51 GMT -5
That's what I thought... a good month for me as I am not as fast as Bill is! USS Indianapolis may take me whole year to build. LOL
|
|
|
|
Post by wbill76 on Dec 10, 2014 19:12:44 GMT -5
Jimmy, that's true about the 'little' designation but that's what Bronco put on the box!  It's a pretty interesting piece of equipment that I didn't know very much about either but it grabbed my attention when I caught it on sale a few months back. Apparently it was derived from the British X-Craft that were used to attack the Tirpitz in Norway and considering their relatively limited usage in the final months of the war, did rack up a somewhat impressive tally of 93,000 tons of shipping sunk. Not enough to turn the tide of the war of course but still impressive considering I think! Andy, the only trouble you'll have is that there are two of them!  You should build yours before the Indy, definitely won't take you nearly as long as that one I'm sure.
|
|
|
|
Post by wbill76 on Dec 12, 2014 20:37:38 GMT -5
More progress on the weathering front! I added an overall wash using some highly thinned MM enamel Raw Umber as my weapon of choice. It inevitably darkens the finish but is meant to work in tandem with the following steps as opposed to being a stand-alone treatment. 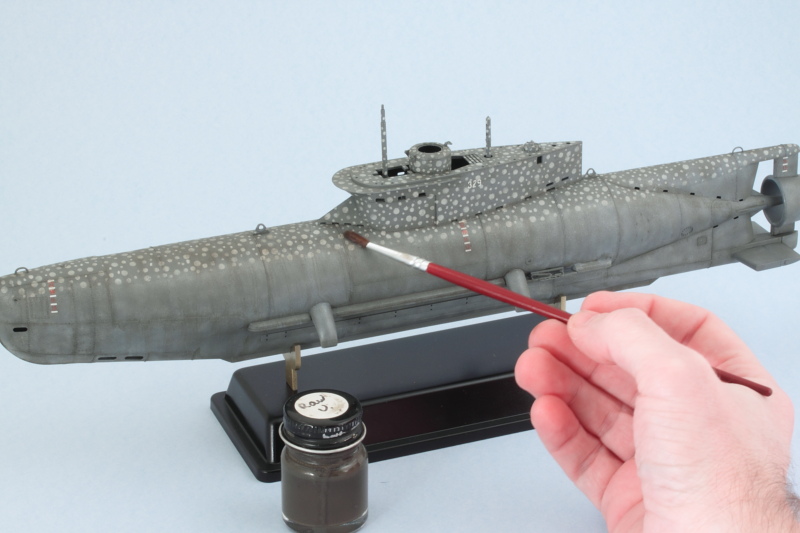 That next step is the application of a dot filter. I used small dots of enamel MM Panzer Schwarzgrau and MM Light Gray in combination with the Raw Umber to create another layer of color variation to the gray hull. 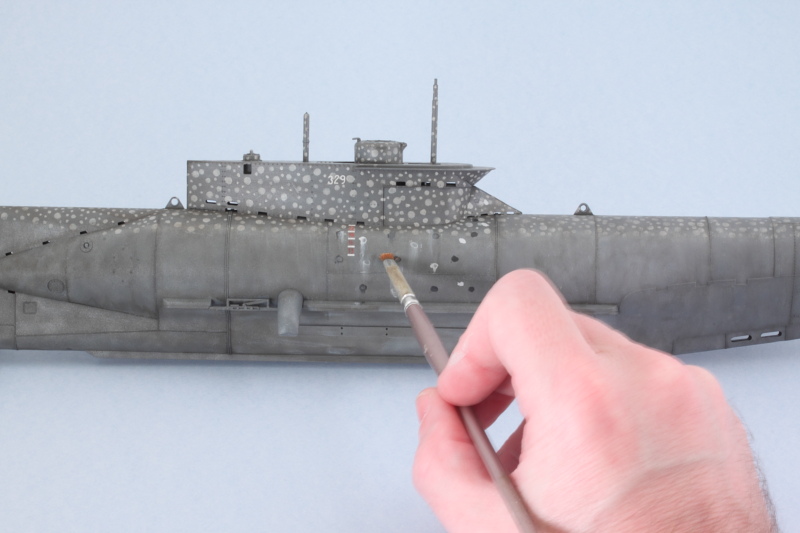 The dot filter process takes a while and requires working in small sections at a time but produces a nice result. Here's how things stand as of now including the already weathered torpedoes. 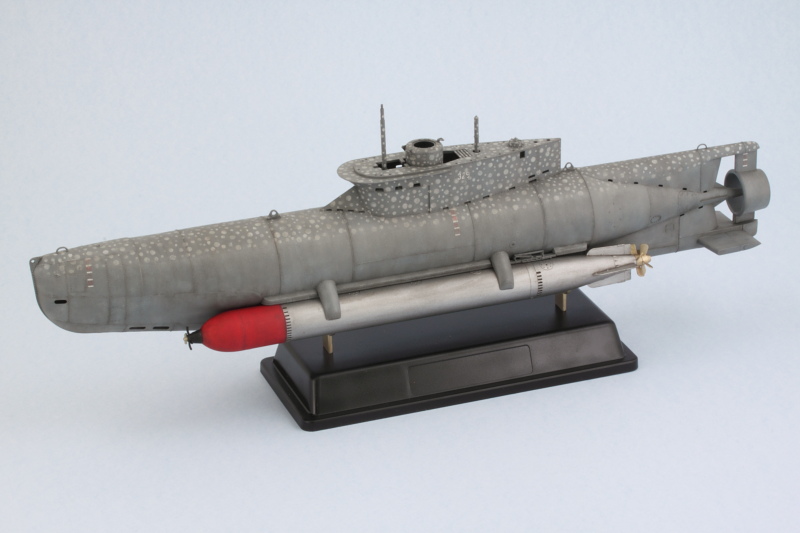 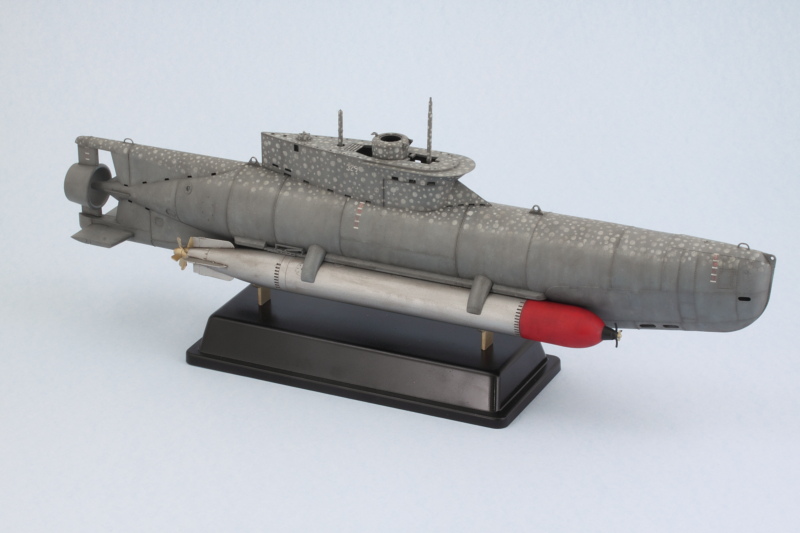 I'll let that sit so I can see it with fresh eyes and make any adjustments that might be needed before moving on to the final steps and sealing it all up. |
|
|
|
Post by JimD on Dec 12, 2014 23:19:48 GMT -5
The weathering is really bringing things together nicely. I do have a question or two if you don't mind. So you use MM enamels for both washes and filters? I'm assuming you cut them down with thinner for the wash...much like prepackaged washes? Are you using white (mineral) spirits for that? And with the dot filters are you just dotting the straight paint from the bottle and working it in like oils? I'd like to try enamels out if I could move away from oils but I'd like to not risk "painting" instead of filtering and ruining the paint job in any other way. I use a variety of enamels, lacqueres and acrylics for base coats if that helps. Sorry I know that's a lot, but I appreciate your time for any guidance  |
|
|
|
Post by deafpanzer on Dec 12, 2014 23:39:07 GMT -5
Looking fantastic... just perfect!!!
|
|
afvfan
Senior Member
   
Member since: December 2012
Bob
Posts: 1,772
Dec 10, 2012 17:32:38 GMT -5
Dec 10, 2012 17:32:38 GMT -5
|
Post by afvfan on Dec 13, 2014 0:07:14 GMT -5
That's actually starting to look presentable, Bill.  Seriously, though, mighty fine work! |
|
|
|
Post by wbill76 on Dec 13, 2014 14:15:09 GMT -5
Andy, thanks buddy, almost done with the little guy!  Bob Bob, presentable is as good a target as any to aim for I think!  The weathering is really bringing things together nicely. I do have a question or two if you don't mind. So you use MM enamels for both washes and filters? I'm assuming you cut them down with thinner for the wash...much like prepackaged washes? Are you using white (mineral) spirits for that? And with the dot filters are you just dotting the straight paint from the bottle and working it in like oils? I'd like to try enamels out if I could move away from oils but I'd like to not risk "painting" instead of filtering and ruining the paint job in any other way. I use a variety of enamels, lacqueres and acrylics for base coats if that helps. Sorry I know that's a lot, but I appreciate your time for any guidance  No worries Jimmy, I'll do my best to answer your different questions. I do use MM enamels for both washes and filters. For the washes I mix my own and use the Universal Enamel Thinner that Testors puts out in their red 8 fl oz cans. Most pre-packaged washes are enamel based so it's comparable to that I suppose. For the dots, I do add them straight from the bottle. Since the base finish is also enamels, there's an acrylic barrier/sealing coat in between via the Future application that protects it. This provides a lot of flexibility for adjustments/modifications as you can imagine and while some have argued that you don't need it (the Future coat) on an acrylic finish, I don't have any experience in that area so can't say one way or the other. One thing I will point out very clearly is that the enamel dots obviously will dry faster than oil dots so their work time is less, so I tend to work in small sections at a time as a result to avoid the dots starting to harden up and become less user friendly as a result. The number, size, different color dots, etc. will also influence the end result depending on what you're after. You can use these same washes over lacquers but only if they are sealed with an acrylic barrier...otherwise the washes will lift the lacquers. There are plus and minus considerations with oils vs. enamels for filters. The oils give you a lot of flexibility because of their extended drying time (which could also be a minus depending!), they tend to have slightly smaller pigments so can provide a finer result, and single tubes literally will last forever. For me, their extended drying time is what made me see if enamels (which are essentially just fast-drying oil paints) could do the same thing for what I was after and with a little trial and error I would say they can...but like anything, you have to get comfortable with the technique and its little quirks to really get the most out of it.  One last note, the process I use is extremely thinner intensive so I always wear a breather mask while doing these steps. Just a fair warning and general health advisory.  HTH!
|
|
|
|
Post by wbill76 on Dec 13, 2014 16:11:55 GMT -5
I suppose it's fitting that today's date has a certain symmetry to it (12-13-14) for another update! Bronco did an excellent job with providing a lot of detail in their moldings so it was time to get some of that to pop. I applied a pin wash of MM enamel Burnt Umber using a pointed 10/0 brush to do the trick. 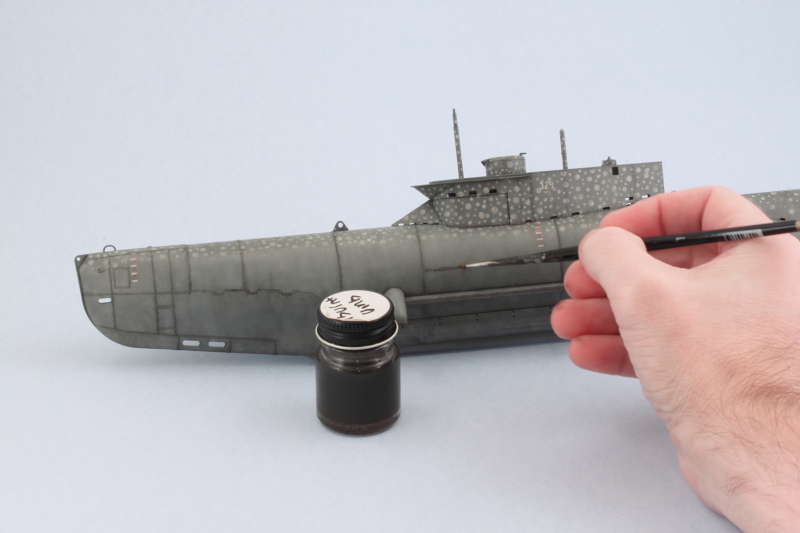 After the pin wash was down, I went back over the different areas with the same brush and some clean thinner and tightened up the effect. 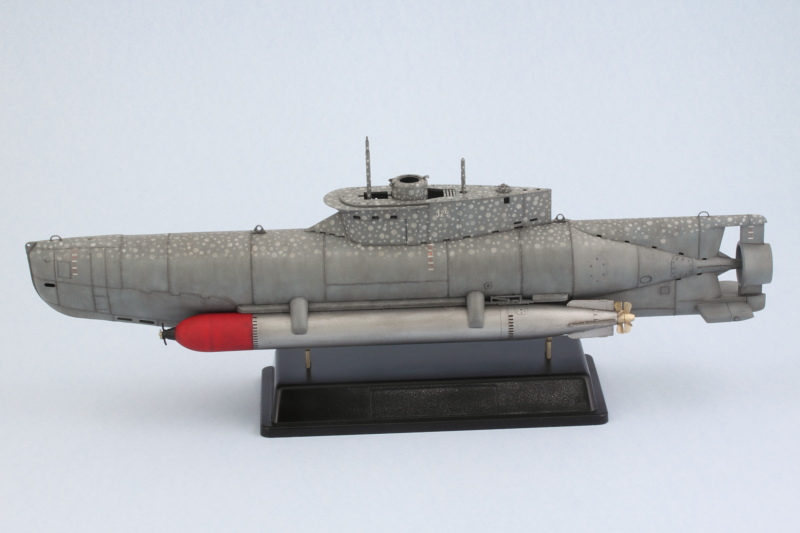 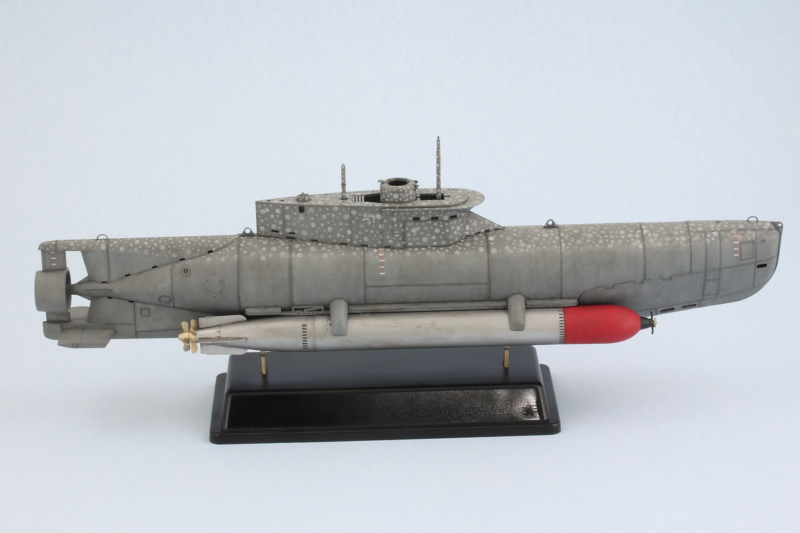 Just about ready to seal this one up and add the final touches to complete it. |
|
|
|
Post by JimD on Dec 13, 2014 19:30:33 GMT -5
Thank you. That's very helpful. I would absolutely be using an acrylic clear before any weathering with the stuff. I'm pretty stubbornly cautious like that these days. My problem with oils is the only residue that is left at thleast end of the process. Yeah, it does dry off, but until it does it drive me batty.
|
|
|
|
Post by deafpanzer on Dec 14, 2014 17:22:20 GMT -5
Pin washing or dark washes is my favorite part... it sure made those details POP!!!
|
|
|
|
Post by TRM on Dec 15, 2014 7:19:20 GMT -5
Always a solid showing in the weathering department Bill!! Everything is popping out nicely!! Well done!!
|
|
|
|
Post by wbill76 on Dec 15, 2014 13:05:12 GMT -5
Thanks Andy and Todd! I always find it a little funny how we have to do different layers in a finish to get things to both blend and pop out all at the same time...definitely keeps things interesting for sure!  |
|
|
|
Post by wbill76 on Dec 15, 2014 15:43:43 GMT -5
|
|
|
|
Post by TRM on Dec 15, 2014 18:05:23 GMT -5
What a fantastic finish Bill!! Chalk another one up!! Woo Hoo!! Love the weathering on this one!! Really makes the model for sure!! Well done!!
|
|
|
|
Post by Tojo72 on Dec 15, 2014 19:06:10 GMT -5
Another nice finish Bill.
|
|
afvfan
Senior Member
   
Member since: December 2012
Bob
Posts: 1,772
Dec 10, 2012 17:32:38 GMT -5
Dec 10, 2012 17:32:38 GMT -5
|
Post by afvfan on Dec 15, 2014 22:47:32 GMT -5
The sub turned out superb, Bill. Great finish!
I do have a technical question that's been plaguing me. Not knowing much at all about German (or any) naval practices, I'm curious, where did the red warheads come from? Are they listed like that in the paint call outs?, Did you just use artistic license?, Or, was that actual standard naval policy to paint them like that?
|
|
|
|
Post by deafpanzer on Dec 16, 2014 0:49:27 GMT -5
It is really a beautiful fish... those spots really gets me every time I look at it. Man, I am so glad I got this kit too...
|
|
|
|
Post by wbill76 on Dec 16, 2014 14:34:06 GMT -5
Thanks T! Had a lot of fun working out the scheme and weathering on this one for sure. For a change most of the time spent was in that department vs. the building!  Thanks as well Anthony! Bob, appreciate the comments as well! I followed the finishing guide for the red warheads so can't say how 'standard' they might have been in actual practice for German naval use. What I can say is that the G7e torpedoes were a standard 21-inch diameter weapon in use with submarines of all types throughout the war from 1939 onwards, so when it came to equipping the Seehunds, they just drew from available stocks. The red warhead probably comes from the surviving example on display at the museum at Minsk, but other museum pieces show different varieties including naked brass for the warhead itself, so lots of choice available in that department. HTH! Thanks Andy! All your fault in regards to that spot pattern!  Look forward to you tackling yours when the time comes.  |
|
|
|
Post by deafpanzer on Dec 16, 2014 15:14:44 GMT -5
LOLOLOL! You may think I am nuts... I think I am going for the water wavy camo!
|
|
afvfan
Senior Member
   
Member since: December 2012
Bob
Posts: 1,772
Dec 10, 2012 17:32:38 GMT -5
Dec 10, 2012 17:32:38 GMT -5
|
Post by afvfan on Dec 16, 2014 16:23:51 GMT -5
Thanks for the insight, Bill. Like I said, curiosity got me.
|
|
|
|
Post by wbill76 on Dec 16, 2014 16:41:24 GMT -5
Andy, I already knew you were nuts!  Will be interesting to see how you tackle the 'wave' reflection pattern.  Bob Bob, my pleasure! When you look at b/w photos you can see there's clearly a color distinction between the warhead and the body and there are even some photos that show torpedoes washed up on beaches out there (they presumably missed and were in shallow enough water that they 'beached' vs. exploding), so I'm sure the 'red' color has some foundation as a result. That and of course it just provides a really nice color contrast! 
|
|
|
|
Post by Leon on Dec 16, 2014 17:12:41 GMT -5
Excellent finish Bill!  I really like how everything pops with the washes.  |
|
|
|
Post by Deano on Dec 16, 2014 18:11:07 GMT -5
1st class finish as always Bill , really like the sea pup!  |
|
|
|
Post by wbill76 on Dec 17, 2014 12:24:38 GMT -5
Thanks Leon and Deano! Glad you like how it all turned out.  |
|
|
|
Post by Tobi on Dec 18, 2014 3:26:07 GMT -5
Wow Bill, what an elaborate paint job!
That midget goes by the nickname "Bubbles"
Your finish is again excellent. Only thing I would add if this was my build: a little green rust wash on the main propeller, mixed from light green, white and dark grey. Just a suggestion.
|
|
|
|
Post by armorguy on Dec 18, 2014 10:31:06 GMT -5
A gem, flawless paintjob mate !
|
|