|
|
Post by Leon on Jan 9, 2015 21:36:05 GMT -5
Frame and drive components are looking good Bill.  |
|
|
|
Post by deafpanzer on Jan 10, 2015 0:30:29 GMT -5
OMG! You painted a figure?!?! I nearly fell off my chair! Those 223's look great... your skill has truly improved over a decade and it will be fun to see the comparison between your old 223s and current 222 build.
Great start... I happen to have Tamiya 222 in the stash as well.
|
|
|
|
Post by dierk on Jan 10, 2015 8:03:37 GMT -5
Why didn't anybody tell me you were doing this? One of my favourite modellers building a classic Thumbs Up! - and we're on page 2 already...looks like I'll have to make do with a seat in the back row dark-thoughts
|
|
|
|
Post by wbill76 on Jan 10, 2015 13:54:29 GMT -5
T, very true...once the wrap is removed and the first pieces cut from the sprue, you're committed!  Dupes Dupes, yep, still have the count going. This one will be #126 on the all-time completion list.  Leon Leon, thanks as always! Andy, yep I played around a bit with figures and also bases at that stage of building but it never really caught my interest sorry to say. Can definitely see a progressing between those builds and now, one of the reasons I keep them around. Dierk, no secrets around here for long I guess!  Glad you found it and were able to find a chair before it got too far along. 
|
|
desertrat
Full Member
  
Member since: October 2013
Posts: 934 
|
Post by desertrat on Jan 10, 2015 16:53:30 GMT -5
getting compfy chair for this one, I think you might need a bigger plinth though, lol.
|
|
|
|
Post by wbill76 on Jan 11, 2015 13:02:05 GMT -5
getting compfy chair for this one, I think you might need a bigger plinth though, lol. Glad to have you along! That trusty little plinth does yeoman service for sure...but has its limits!  |
|
|
|
Post by Tobi on Jan 11, 2015 13:42:19 GMT -5
Ahhh, I love to watch how the skills of a modeler do evolve over the time. Now the beginners can see where you have started once Bill and where you are coming from. It will be a great reference for comparison to your now usual standard. Thanks!  |
|
|
|
Post by richardcraig-Email Not Valid on Jan 16, 2015 11:36:46 GMT -5
I have the Tamiya kit sitting here .. So I'll be watching!! Have fun with it !
|
|
|
|
Post by deafpanzer on Jan 16, 2015 11:44:08 GMT -5
Do I smell a big update coming up? It has been a while... I figured the dog refused to let you leave the couch or its those darn exciting football games. LOL
|
|
bbrowniii
Full Member
  
Member since: March 2012
If you are not part of the solution, you are part of the precipitate.
Posts: 1,239
Mar 25, 2012 22:08:04 GMT -5
Mar 25, 2012 22:08:04 GMT -5
|
Post by bbrowniii on Jan 16, 2015 17:16:34 GMT -5
Great start Bill.
If I recall, build 100 was your 38(t) cutaway, no?
|
|
|
|
Post by wbill76 on Jan 17, 2015 17:26:11 GMT -5
Tobi, very true, always neat to look back on older builds (and sometimes experiment further on them!) to see the progression. Richard, glad to have you along for the ride! Andy, no update yet...between football and other things I've not made any progress on this one so far...it's going to be a slower than usual build I think given how things are shaping up schedule-wise for the near future at least.  Boyd Boyd, you are correct sir! #100 was the 38(t) Cutaway project.
|
|
|
|
Post by wbill76 on Jan 27, 2015 17:26:17 GMT -5
Was able to get back to this one today and spent the afternoon continuing to work on the Step 1 requirements. Attention focused on the four suspension units. Each one consists of 6 separate parts and all of them have multiple sprue points, minor flash, and mold seams to clean up. The springs in particular required some special attention, I used the tip of a round needle file to remove the mold seam on the coils and clean up their separations. The location tabs for the springs and drive axles aren't a consistent or tight fit, so the assembly process requires some careful effort as a result. I added the spring coils first to the chassis frame, then added the top suspension frames (A1), followed by the bottom frames (A21). I used the wheel hub supports (A16) to ensure the top and bottom frames were lined up properly but didn't glue them in place just yet. Instead I let the glue set up on the frames and then popped out the supports so I could add the axles (these can't slide through the supports) and get them properly centered. They fit loosely in their mount holes so I had to hold them for a minute or two until the glue grabbed. Then the supports went back on and were glued in place permanently. A lot of work (and explanation!) but here's where things now stand at the end of Step 1. 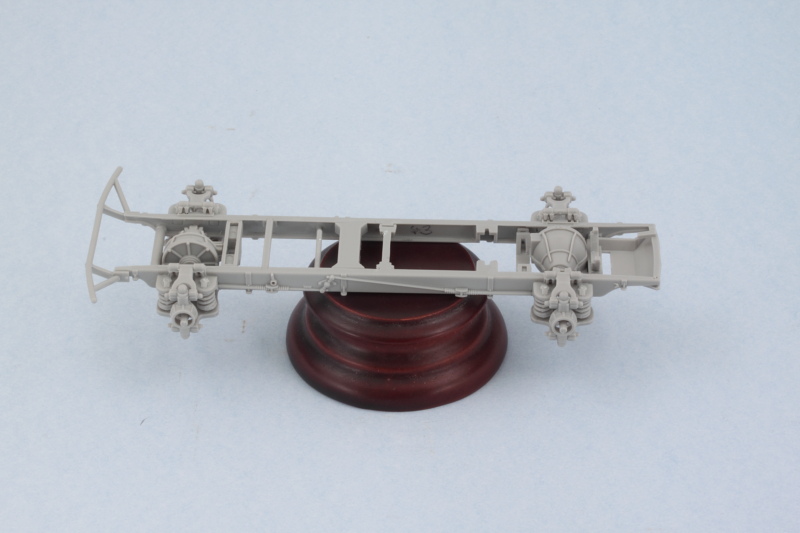 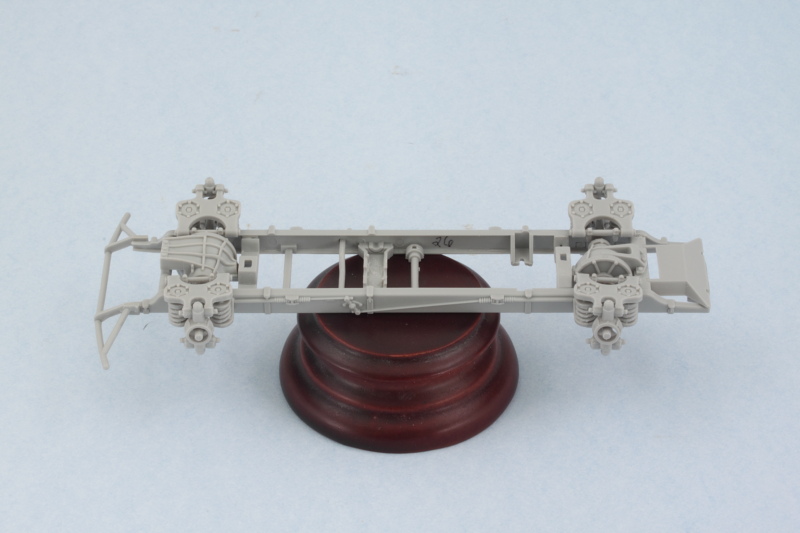 |
|
DeafStuG
Full Member
  
Member since: May 2013
..
Posts: 1,283 
|
Post by DeafStuG on Jan 27, 2015 17:28:58 GMT -5
I missed this, so nice start build.
|
|
|
|
Post by Leon on Jan 27, 2015 17:53:15 GMT -5
Nice work on the suspension Bill!  |
|
|
|
Post by wbill76 on Jan 27, 2015 18:06:44 GMT -5
Thanks Jeremy, glad to have you on board! Leon, thanks as always!  |
|
|
|
Post by deafpanzer on Jan 27, 2015 20:54:19 GMT -5
So many nice details on the chassis... it looks real nice!!!
|
|
406 Silverado
Global Administrator     
Member since: November 2011
Posts: 10,259
Member is Online
MSC Staff
|
Post by 406 Silverado on Jan 28, 2015 0:12:47 GMT -5
All the hard working doing the cleaning is paying off Bill, it's tedious but HAS to be done. Looking good brother.
|
|
|
|
Post by dierk on Jan 28, 2015 5:54:22 GMT -5
Nice work! I remember doing the Tamiya version in the early 80's - loved it at the time, but very primitive by comparison.
|
|
|
|
Post by TRM on Jan 28, 2015 10:31:00 GMT -5
Looking great Bill!! (like you would have it any other way..LOL!!) Suspension looks fantastic! BTW...a truck load of snow is on its way down to you brotha...enjoy!!  |
|
|
|
Post by wbill76 on Jan 28, 2015 13:13:15 GMT -5
Thanks Andy! Rob, I hear you there...some sacrifices have to be made. Fortunately I plan good blocks of time for each section so I can get in a nice comfortable groove while working on an area. This is one of those kits that definitely can't be rushed because of how all the parts interact with each other. Dierk, that's true about the Tamiya kit. Always a trade-off when it comes to ease of building vs. super-detailing I guess.  T T, thanks as well! As for the load of snow, the weather forecast is cold and cloudy through the weekend but no snow...maybe rain...that's the price we have to pay for a high of 70 today (in January that's even unusual for us!) I guess!  |
|
|
|
Post by wbill76 on Jan 31, 2015 17:27:52 GMT -5
Continuing on with the interior drive-train components, Step 2 deals with the transmission and Horch V8 3.5L engine. There's a lot of small parts that go into both of these and of course they need to connect up to each other just so to line up properly. The connecting shaft B51 I left for last to make sure I wouldn't have any problems and did a dry-fit on the chassis and let the glue set up solidly on the transmission end of the shaft as the fit there is a little loose. The third component is the radiator, this is assembled in Step 3. The hoses and fan belt drive need to line up with the engine in specific places but there aren't any guides or locater holes to help with this, so careful fit and dry-fit with the engine in the chassis was necessary to ensure they were all at the right angles and would set properly for later installation. All 3 pieces are fully assembled and awaiting paint/detailing. As usual along the way, some of the fit tabs or holes needed to be trimmed or slightly enlarged to allow for proper connections, so test-fits with these components is essential at every step before committing to glue. 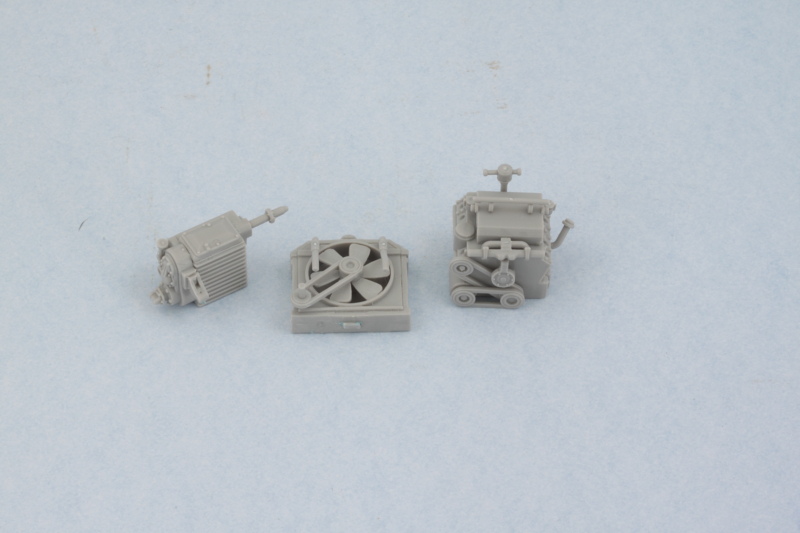 I used some small blobs of poster blue-tack putty to check the fit of all the components throughout when I needed things to stay put and allow glue to set. Here's the latest combo/mock-up with all the components in the positions they will occupy once fully installed. 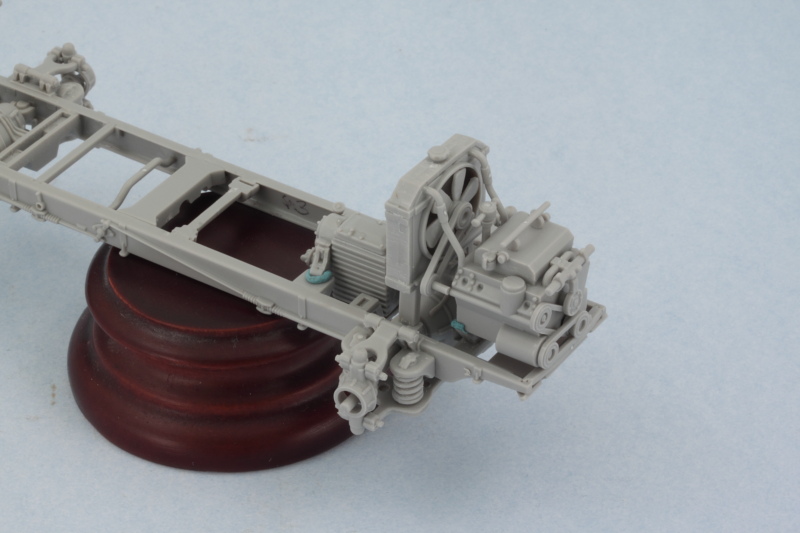 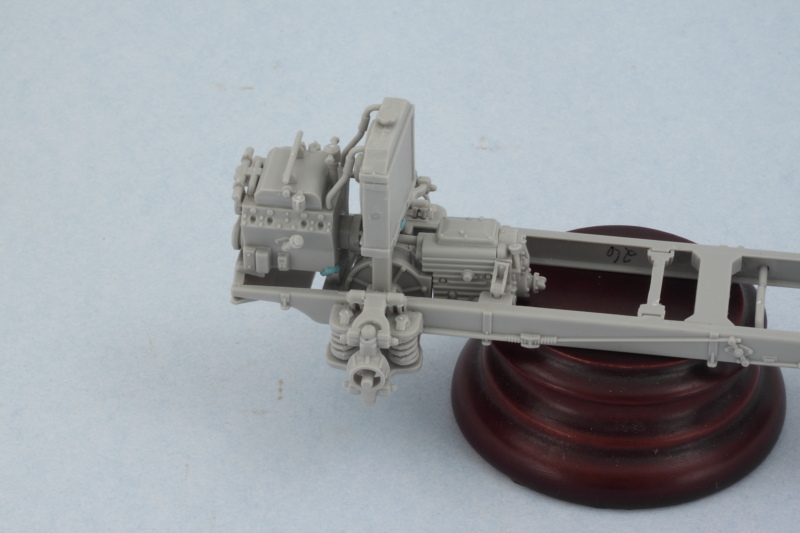 A quick test-fit with the lower hull shows that the transmission is going to be largely hidden away except for some visibility from the hull underside. Everything fits together as it should for the space available, always a good sign. Only the radiator is going to be visible through the separating grate inside the fighting compartment looking back though once the upper hull is added. 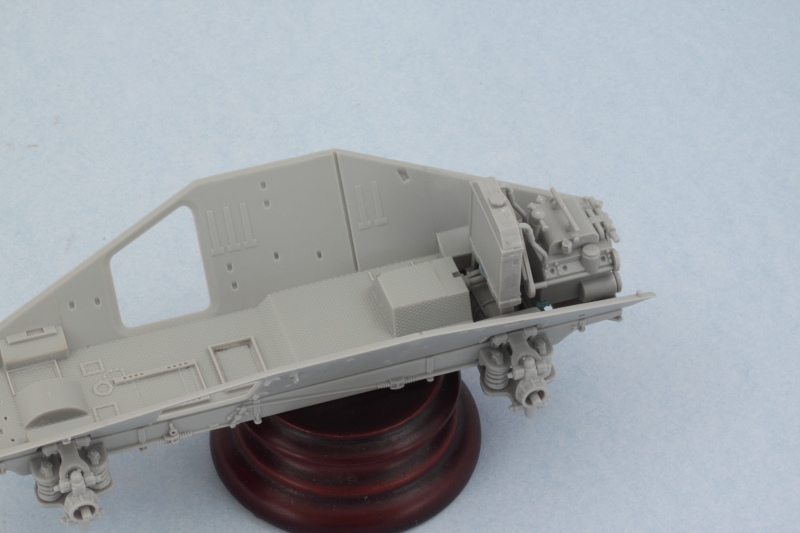 Good chunks of the engine will still be visible with the upper hull in place via the various engine compartment hatches though. Not sure just yet how many (if any) of these I will actually open up. 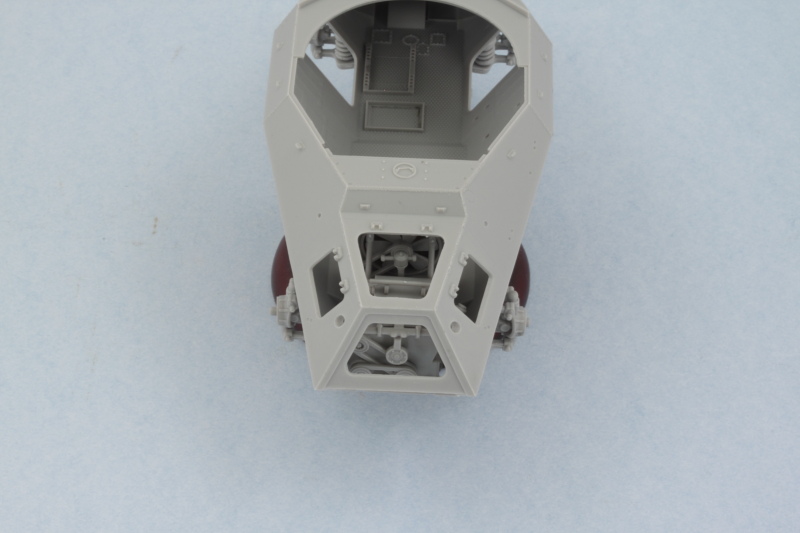 Next up will be spending some time detail painting these areas and getting it ready before I can shift attention to the hull interior proper. The chassis and engine/transmission components are almost a kit in themselves in terms of the level of detail they include. |
|
|
|
Post by TRM on Jan 31, 2015 17:36:23 GMT -5
Nice little update there Bill!! Squeezing in as much building before tomorrows game? The engine looks pretty good! Looking forward to seeing the interior come alive!! BTW...another 6 to 12 inches on the way for tomorrow to Monday!! Oh yay!!  |
|
|
|
Post by bullardino on Jan 31, 2015 17:42:55 GMT -5
I had totally missed this one, as I was telling you on FB you're making me want to do mine  |
|
|
|
Post by wbill76 on Jan 31, 2015 17:58:03 GMT -5
Thanks T! That just gives you more excuses to work at the bench...after you're done shoveling of course...hope it doesn't pile up too deep for you! Tomorrow's game should be interesting...just hope it's not a blow-out on either side. Lui, it's got a lot of detail provided for sure but the clean-up required that goes with it is a time stealer...so when you are ready to crack yours open, plan accordingly!  |
|
|
|
Post by Leon on Jan 31, 2015 18:13:14 GMT -5
Bill! Nice work the drive train components.Dry fit is looking good.   |
|
|
|
Post by wbill76 on Jan 31, 2015 19:33:53 GMT -5
Thanks Leon! Now the real fun begins.  |
|
afvfan
Senior Member
   
Member since: December 2012
Bob
Posts: 1,772
Dec 10, 2012 17:32:38 GMT -5
Dec 10, 2012 17:32:38 GMT -5
|
Post by afvfan on Jan 31, 2015 22:50:51 GMT -5
Great start on the little beast, Bill. Like Dierk, I built the Tammi version. This is a whole new ballgame.
|
|
|
|
Post by dierk on Feb 1, 2015 8:09:10 GMT -5
Wow! The level of detail is pretty amazing Thumbs Up!
|
|
|
|
Post by wbill76 on Feb 1, 2015 14:10:42 GMT -5
Thanks Bob and Dierk! It's got a lot to work with for sure!
|
|
|
|
Post by deafpanzer on Feb 1, 2015 14:33:40 GMT -5
Looking sharp! Great details...
Wondering if we will see an update today despite Super Bowl going on today. LOL
|
|