|
|
Post by bullardino on Feb 21, 2015 15:47:12 GMT -5
Those wheels look fantastic, I made a mental bookmark for them.  |
|
|
|
Post by Leon on Feb 21, 2015 19:46:28 GMT -5
Bill! The new wheels look great.
|
|
|
|
Post by JimD on Feb 21, 2015 21:20:46 GMT -5
Resin makes everything better. Those wheels are ace. Everything else is looking great too of course.
|
|
Jelly
Junior Member
 
Member since: February 2015
Posts: 84 
|
Post by Jelly on Feb 22, 2015 3:55:12 GMT -5
Great build there, Bill  It seems you are going to town with this model & all that AM "additives" , Thanks for sharing!  Jelly |
|
desertrat
Full Member
  
Member since: October 2013
Posts: 934 
|
Post by desertrat on Feb 22, 2015 5:56:33 GMT -5
love them wheels !!!
|
|
|
|
Post by wbill76 on Feb 22, 2015 13:26:20 GMT -5
Thanks Lui, Leon, Jimmy, Jelly, and DR! Appreciate the comments and agree on the tires, they definitely up the game in the detail department for the chassis. Did some airbrush work on the wheels and tires. For the rubber portions, I used Testors enamel Gunmetal first with the hubs snapped in place to help mask off the interior surfaces. Then some enamel Panzer Schwarzgrau on both the inner and outer hubs and lastly some Afrika Grunbraun for the outer hubs over the Schwarzgrau. Popped the hubs out and carefully corrected any over-spray on the rubber areas and voilà! Tires and wheels painted. Toothpicks and small blobs of blue tack made it easy to handle them and also mask off the connection points on the rear hubs. 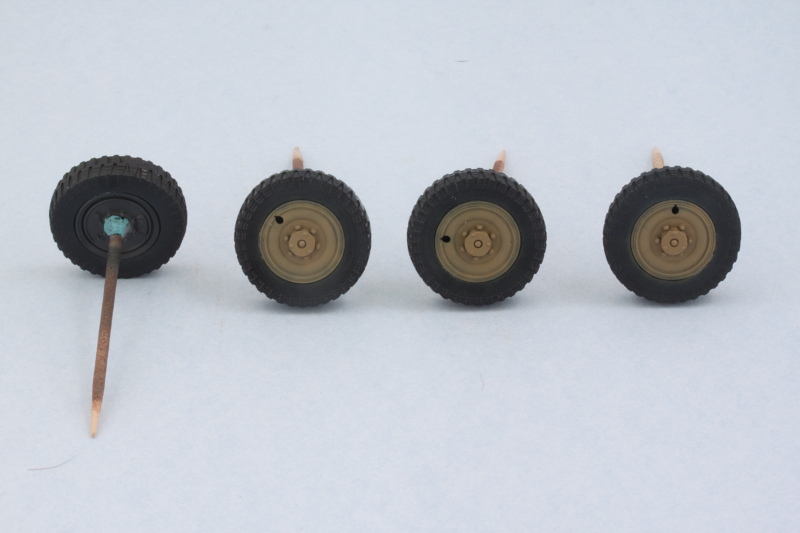 The wheels and tires will get more weathering and detailing down the road and are only dry fit for now, but the chassis portion of the build is now complete! 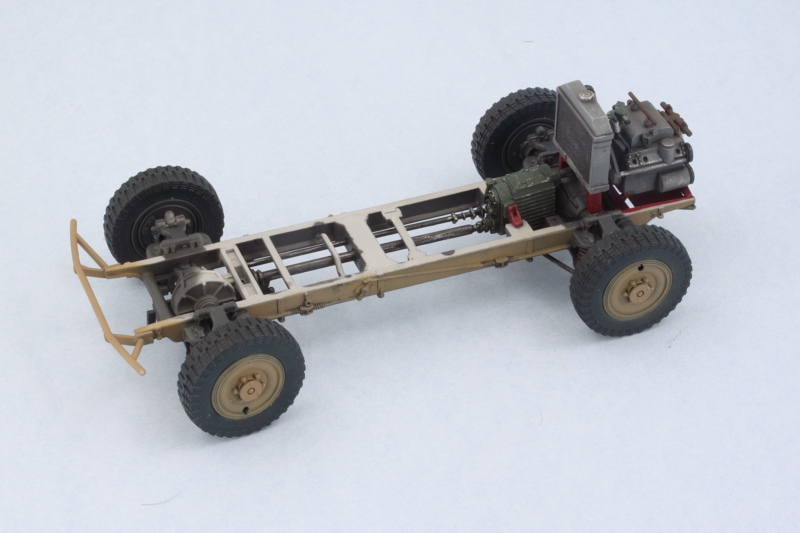 |
|
madairbrush
Full Member
   November 2012 MoM Winner
Member since: May 2012
Cheers!! Matt
Posts: 488
May 30, 2012 14:22:05 GMT -5
May 30, 2012 14:22:05 GMT -5
|
Post by madairbrush on Feb 22, 2015 13:34:55 GMT -5
The chassis looks great, time for the upper hull...  |
|
|
|
Post by wbill76 on Feb 22, 2015 15:13:12 GMT -5
The chassis looks great, time for the upper hull...  Yep! This represents only the first 3 steps in the instructions.  Still 11 more to go... Thanks for the comments! |
|
desertrat
Full Member
  
Member since: October 2013
Posts: 934 
|
Post by desertrat on Feb 22, 2015 15:57:03 GMT -5
Yep! This represents only the first 3 steps in the instructions.  Still 11 more to go... Thanks for the comments! So, this isn't a quick build then? lol, you carry on with the great work, looking brilliant so far !!! |
|
reserve
Senior Member
   
Member since: July 2012
Si vis pacem para bellum
Posts: 2,372
Jul 11, 2012 9:11:45 GMT -5
Jul 11, 2012 9:11:45 GMT -5
|
Post by reserve on Feb 22, 2015 19:45:52 GMT -5
DR it sure wasn't a quick build when I did one, 'twas fiddly and complex
Bill she's lookin great
Regards,
Mark
|
|
|
|
Post by deafpanzer on Feb 23, 2015 1:46:27 GMT -5
Now it can make a run from you... wheels looking good!
|
|
thug626
Senior Member
   
Member since: January 2013
Posts: 2,035
Jan 15, 2013 13:05:28 GMT -5
Jan 15, 2013 13:05:28 GMT -5
|
Post by thug626 on Feb 23, 2015 9:11:07 GMT -5
Dang it! Late again. Now it's book marked.  Dave |
|
|
|
Post by dupes on Feb 23, 2015 10:32:18 GMT -5
I guess the real question is do you think the (visible) detail is such a level of improvement over the Tamiya kit to warrant the extra time? It seems to me that one could build three or four Tamiyas in the time it takes to tackle one of these.
|
|
|
|
Post by wbill76 on Feb 23, 2015 11:38:34 GMT -5
I guess the real question is do you think the (visible) detail is such a level of improvement over the Tamiya kit to warrant the extra time? It seems to me that one could build three or four Tamiyas in the time it takes to tackle one of these. , I would ask first what the intended 'need' is for the build. If you wanted to put this vehicle in a diorama that necessitated showing off elements of the interior (such as a wreck, or a maintenance scene, or even showing the interior with the grenade screens and hatches open), then this kit is superior to the Tamiya kit in every respect in the level of detail it provides. If you're not particularly interested in that, then the amount of time needed to put into this (which could be shortened somewhat by taking some short-cuts in terms of only building/painting what would be seen or essential for other things for example) kit may not be completely worth it. All about picking the right kit for the right job I suppose! The Tamiya kit would still need some PE improvements though IMHO in certain areas that the HB kit already includes in the box, so it's not a strictly apples-to-apples comparison but close enough given your question I think.  HTH! DR, thanks for stopping by! Definitely not a 'speed build' candidate by any stretch of the imagination, but it's moving along all the same.  Mark Mark, can't argue with you there, it's got its complexities for sure! Andy, kind of like a clown car on steroids!  Have to keep it chained to the workbench now to avoid it escaping.  Dave Dave, you're arriving at just the right time, pull up a chair! |
|
|
|
Post by dupes on Feb 23, 2015 11:40:00 GMT -5
Makes sense. Of all of the work you've done so far, how much do you think will be actually visible once you're done? Hopefully a lot?  |
|
|
|
Post by dierk on Feb 23, 2015 12:23:22 GMT -5
As there's not such a huge difference in price between the HB and Tammy kits, I'd opt for the newer moulding every time (you can always add any interior detail to the spares box if you don't fancy the extra work)
This is one of the rare moments where I almost regret having opted to limit myself to Russian armour...Keep it coming!
|
|
|
|
Post by TRM on Feb 23, 2015 12:42:20 GMT -5
Ooops, missed the sneaker update!! Nice job (as usual)!! Tires look fantastic in place!
|
|
|
|
Post by wbill76 on Feb 23, 2015 17:40:37 GMT -5
Dupes, if I put a mirror underneath it like the car guys do, you would see a lot!  Once the hull is on, the engine compartment area will become somewhat cramped and hard to see into even with all of the hatches open to let in some light, but still about 75% of that will be visible even then I'd say. The fact that the vehicle doesn't have a firewall separating the crew from the radiator but instead has a mesh screen means that all of the front part of the radiator is visible from inside the hull for example. Dierk, I agree with you there, so far at least...in terms of value for the $$ spent, you get a lot in the HB box, no doubt about it. I picked mine up on sale a few months back for around $25 IIRC. Glad to have you stopping by!  T T, nothing like a new pair of sneakers to make you run like the wind! 
|
|
|
|
Post by bullardino on Feb 24, 2015 15:33:12 GMT -5
The wheels look even better after paint  |
|
|
|
Post by wbill76 on Feb 24, 2015 18:03:41 GMT -5
Thanks Lui! I started work on the interior for the hull today. Having been forewarned about possible fit issues with the rear bulkhead that separates the fighting compartment from the engine compartment, I skipped ahead a bit to Step 5 to deal with that. After some test fits and some slight sanding on the lower edges and a bit of trimming at the very top portions to get everything lined up properly, I decided the best route was to go ahead and install the bulkhead into the lower hull now. I also needed to putty and sand some rather large ejector marks that are on the interior side of the bulkhead before I could do the installation. Some careful applications of liquid glue around the lower edges and finger pressure did the trick to ensure the bulkhead didn't flex at the top until the glue could grab hold. I then used the upper hull to help hold things in place so the glue could set up permanently and hold the bulkhead in the proper position. A rubber band at the hull nose helped keep the hull halves together as they only have locating pins at the front and rear. Then I added the PE mesh screen last since it had an alarming tendency to bow at the top along with the bulkhead top edges since there wasn't any frame or support there to keep it straight or rigid. 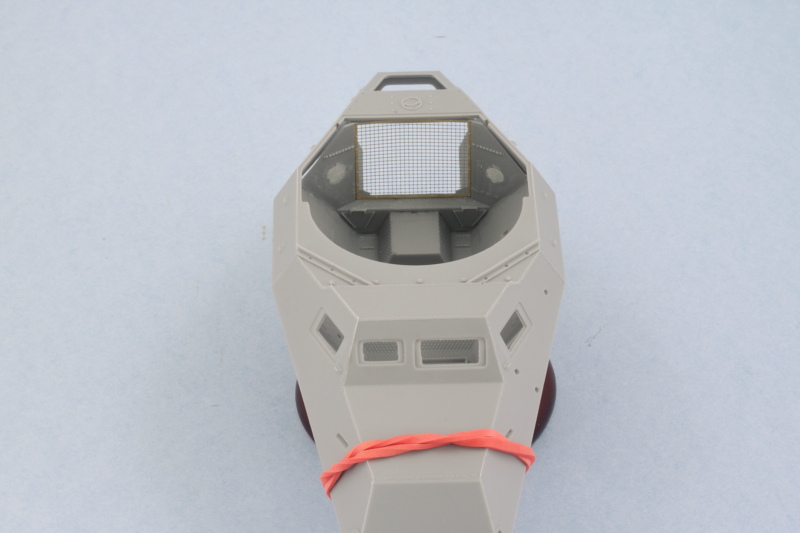 Once that had set up, I could now paint the engine compartments. I airbrushed my Red Oxide mix after carefully masking off the mating edges on the different hull portions. 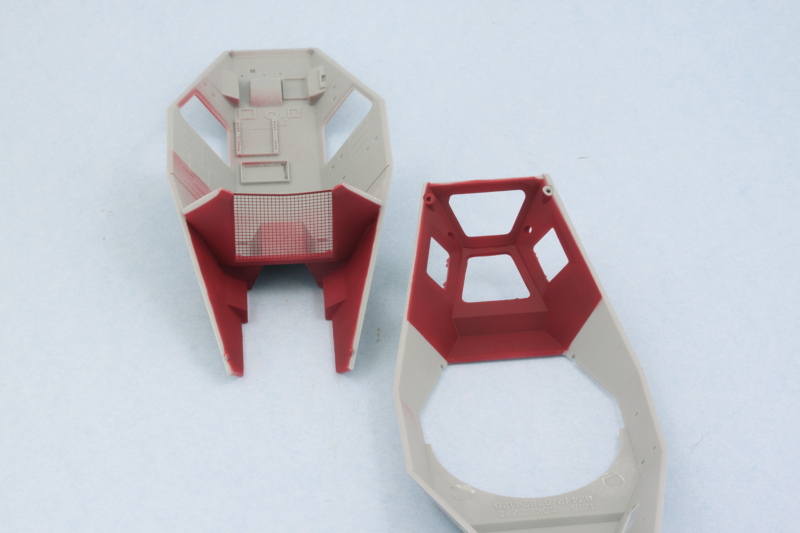 A quick test fit with the chassis and engine shows everything still continuing to play nice with each other, always a good thing. 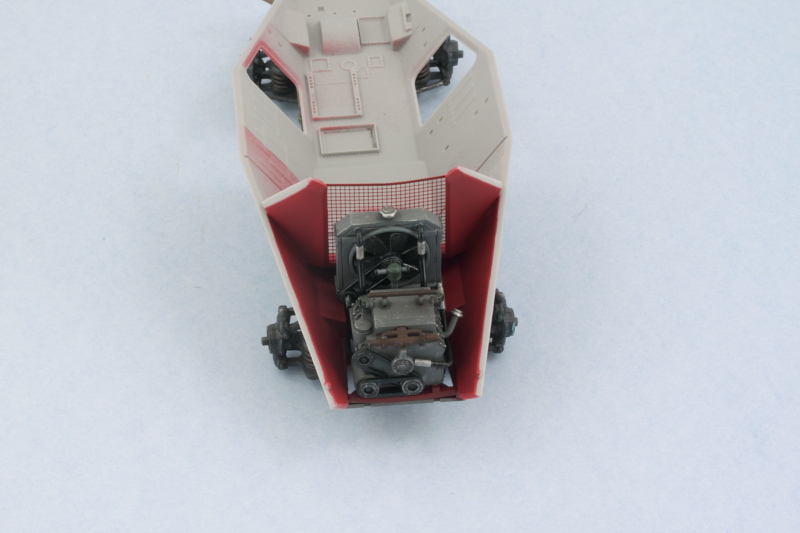 I'll weather up the engine bay a little bit after the red oxide has cured but won't go overboard here since the vast majority of it will disappear from view once the hull halves are joined together. |
|
|
|
Post by TRM on Feb 24, 2015 18:09:53 GMT -5
It's a shame it almost disappears once together! But we all know its there!!  Looking really good Bill!! Nice looking oxide and a great looking lump sitting in it!!  |
|
|
|
Post by Leon on Feb 24, 2015 18:16:51 GMT -5
Coming along nicely Bill!The new shoes look great.  |
|
|
|
Post by wbill76 on Feb 24, 2015 18:31:43 GMT -5
T, that's true about the disappearing act but still fun to work on from time to time!  Leon Leon, thanks as well my friend!
|
|
mrversatile
Full Member
   July '23 Showcased Build Awarded
Member since: January 2013
Posts: 682
Jan 20, 2013 10:52:24 GMT -5
Jan 20, 2013 10:52:24 GMT -5
|
Post by mrversatile on Feb 24, 2015 23:32:14 GMT -5
Its all about the fun, Bill. It is really coming along great.
|
|
|
|
Post by deafpanzer on Feb 25, 2015 0:19:29 GMT -5
Sometimes it can be fun working on the interior even tho nobody else can see it except for us guys. Looking forward to more updates!
|
|
|
|
Post by JimD on Feb 25, 2015 1:11:43 GMT -5
Looking real good. I love the color of that primer...I wish I could just paint everything in it. Sometimes it can be fun working on the interior even tho nobody else can see it except for us guys. Looking forward to more updates! Agree completely. There are so many internals on my current 229 build that will never be seen...but I've decided to do them anyway...I get more mileage out of the kit...plus I know it's there and I'll always have photos.  |
|
|
|
Post by wbill76 on Feb 25, 2015 12:07:41 GMT -5
Thanks Gil and Andy! Looking real good. I love the color of that primer...I wish I could just paint everything in it. Sometimes it can be fun working on the interior even tho nobody else can see it except for us guys. Looking forward to more updates! Agree completely. There are so many internals on my current 229 build that will never be seen...but I've decided to do them anyway...I get more mileage out of the kit...plus I know it's there and I'll always have photos.  Agree 100%! The photos are there as evidence of the level of detail and the enjoyment along the way. While I don't always go all-out for something if it isn't visible in the end, this particular kit provides you with so much detail OOB that I decided to go ahead and work on it all as a nice exercise to get the most out of it for practice if nothing else. That and the fact that the turret and gun mount can be fully removed from the finished vehicle and hatches can be left open means virtually all of the interior detail can be viewed if you so desire!  |
|
|
|
Post by Deano on Feb 26, 2015 3:51:04 GMT -5
Excellent precise work here Bill , slow and steady seizes the day buddy !
|
|
|
|
Post by wbill76 on Feb 26, 2015 11:30:34 GMT -5
Excellent precise work here Bill , slow and steady seizes the day buddy ! Thanks Deano! I have to serve as a counter-weight to Dupes' speed...you know, the whole balance-in-the-universe type of thing.  |
|
reserve
Senior Member
   
Member since: July 2012
Si vis pacem para bellum
Posts: 2,372
Jul 11, 2012 9:11:45 GMT -5
Jul 11, 2012 9:11:45 GMT -5
|
Post by reserve on Feb 26, 2015 21:39:59 GMT -5
Right smart lookin
The next mousetrap you'll want to watch for is the gun mount, which is almost a kit in itself and lovely. It's rather tricky to attach it to the turret I had quite the time with it
Regards,
Mark
|
|