|
|
Post by Leon on Apr 8, 2015 18:51:43 GMT -5
Awesome work on the stable and bales Angi!  This scene is really coming to life now.  |
|
k1w1
Full Member

Member since: February 2015
Posts: 873
Feb 18, 2015 8:07:41 GMT -5
Feb 18, 2015 8:07:41 GMT -5
|
Post by k1w1 on Apr 9, 2015 1:07:04 GMT -5
Hey Peter, I have to order all colors for modeling cause there's no shop in town where I could buy it. But I have a flat sheet of aluminium. That would be good for a roof I think. What would you advice to weather it? I have a few Tamiya and a little more Valejo colors. But no washings for far. For my rust effects I use real rust but I am thinking about a 2k rust kit. I can't believe what you are saying! I really don't think that I am more skilled than you. Never! Look at your work my friend! It is so wonderful. Re skill - I think there is a little appeal with my work because I model some unusual topics - not because they are skillfully painted.
I am not sure what a 2K rust kit is. I have brought every product I could find for rust and tried most. Including the chemical processes and I think good old paint is probably the best thing to replicate rust. If you want to try powders I think The MIG brand pigments would be as good as anything if not better than most. P042 Ochre Rust. P025 Standard Rust. P230 Old Rust. P416 Fresh Rust. I do not have much experience appyling pigments, It takes a bit of practise to use them sucessfully. Vallejo Acrylic paint rust colours from the Panzer Aces range 301 Light Rust, 302 Dark Rust, 303 Yellowish Rust. Also Vallejo Model Air 71080 Rust produced for airbrushing. In a lot of articles I have read many talented modelers are using the Lifecolor brand rust colours. UA 701 Rust Dark Shadow. UA 702 Rust Base color. UA 703 Rust Light Shadow 1. UA 704 Rust Light Shadow 2. I really like the Lifecolor acrylic paints. You just thin them with tap water. You can thin them as much as you wish even to water colour consistency. I have only used them with a brush. I have not tried them in my airbrush. Both MIG and AK do some nice enamel rust shades washes. I really like the MIG brand one. The enamel washes are really controllable as you can wipe off any excess or bits that you are not happy with.
I hope I am not overloading you with information. Based on my limited knowledge - I would recommend buying the 4 Lifecolor rust shades which I think is cheaper than Tamiya or Vallejo paints, and a couple of the MIG enamel washes. MIG Productions P411 Standard Rust effects and MIG Productions P412 Light Rust effects.
If you have an interest in rust techniques for future projects I strongly recommend you buy The Weathering magazine Issue number 1 RUST. It was released about 2 years ago but has been reprinted. You should be able to find it online or at hobby shops for about 8 euro. If you can not locate a copy I think available through The Weathering Magazine website. I think maybe download version is available. This series of magazine is really good. I like how they actually show you the products that they use in each project.
I hope this is helpful.
|
|
lunaiko
Junior Member

Member since: March 2015
Posts: 98 
|
Post by lunaiko on Apr 9, 2015 2:07:21 GMT -5
Thanks a lot, Leon Peter, the 2k rust kit includes 2 kinds of liquid. An instant iron and an instant rust  Yesterday I made my first try with the chipping technique but I removed ALL color when I brushed the 2nd layer. I will try again today using a primer first. Next week I am going to a modeling exhibition. I hope I will find a few nice materials and magazines there |
|
lunaiko
Junior Member
Member since: March 2015
Posts: 98
|
Post by lunaiko on Apr 9, 2015 3:12:59 GMT -5
Hey guys, I did another try and I think it's not bad. First I prepared the metal (taken from an empty mustard tube) with multiple layers of primer (I had in my airbrush and did not want to throw it away). Then I airbrushed a few layers of the burnt sienna, every layer drying with my airbrush. I did not use hairspray and airbrushed the grey layers. After drying I took a brush and worked on it with more water and less pressure than yesterday. I teared up a small area of the edge and covered it with a little bit burnt sienna. Another area was covered with a very fine sand and brushed with burnt sienna too. What do you think?  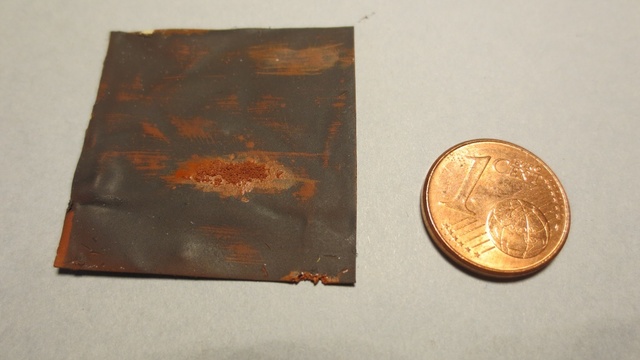  |
|
k1w1
Full Member
Member since: February 2015
Posts: 873
Feb 18, 2015 8:07:41 GMT -5
Feb 18, 2015 8:07:41 GMT -5
|
Post by k1w1 on Apr 9, 2015 3:31:07 GMT -5
Looks good Angi. The 2K Rust Kit. I tried a similar one but did not like the result very much. I don't know of any model builder who uses this for rust effects and I have many magazine articles on the subject. I think that tells us something ?
|
|
lunaiko
Junior Member
Member since: March 2015
Posts: 98
|
Post by lunaiko on Apr 9, 2015 3:55:29 GMT -5
Yep, Peter, I agree. I also have never worked with that kits before and it was an idea. But I am satisfied with my new result and I think, it can be processed |
|
alam
Junior Member
Member since: April 2015
Posts: 37 
|
Post by alam on Apr 9, 2015 12:05:10 GMT -5
Lunaiko,
I saw weed at the bottom of wood and went back to my early memory where we (the playmates - played cricket)used to gather behind a body shop and fired up first cigarette. The wooden garage office had exactly same type of weed.
What a dio with so much characters and memoirs!
|
|
lunaiko
Junior Member
Member since: March 2015
Posts: 98
|
Post by lunaiko on Apr 9, 2015 12:49:12 GMT -5
Thank you, Ahsan The weed in the dio is a small joke. Unfortunately it is not allowed to grow this kind of plant in germany. Can't really understand why not |
|
alam
Junior Member
Member since: April 2015
Posts: 37
|
Post by alam on Apr 9, 2015 13:09:19 GMT -5
It's all good to give me back my early memory anyway.
|
|
lunaiko
Junior Member
Member since: March 2015
Posts: 98
|
Post by lunaiko on Apr 9, 2015 13:12:16 GMT -5
You're welcome |
|
k1w1
Full Member
Member since: February 2015
Posts: 873
Feb 18, 2015 8:07:41 GMT -5
Feb 18, 2015 8:07:41 GMT -5
|
Post by k1w1 on Apr 9, 2015 23:40:22 GMT -5
Thank you, Ahsan The weed in the dio is a small joke. Unfortunately it is not allowed to grow this kind of plant in germany. Can't really understand why not I think Ahsan is talking about the moss type plant growing on the bottom of the boards on your shed Angi - not your other interesting plants ?? |
|
lunaiko
Junior Member
Member since: March 2015
Posts: 98
|
Post by lunaiko on Apr 15, 2015 12:20:41 GMT -5
Hi guys,
I actually have a problem with my figure kit. I tried to fix the arms with a thin superglue (cyanacrylat). It takes many more than a few seconds but it's ok, a tool is helping me to hold the parts. But they broke away a few times when I touched them carefully. Today I wanted to fill the gaps with putty and it happened again.
Please help me. What kind of glue will help me to fix the parts for the eternity? Maybe anyone of the german guys has an idea and an adress for order.
Thanks,
Angi
|
|
k1w1
Full Member
Member since: February 2015
Posts: 873
Feb 18, 2015 8:07:41 GMT -5
Feb 18, 2015 8:07:41 GMT -5
|
Post by k1w1 on Apr 16, 2015 9:27:45 GMT -5
Hi Ange. I see you posted this 20 hours ago. I thought lots of the military diorama guys would have made suggestions. Superglue I have found that the cheap brand ones often are not much good. Also superglue works well on some plastic but not on others. I don't know if your figures are plastic or resin ?. I don't have much experience with gluing figures but if plastic I would recommend Revell Contacta Professional - which is made in Germany. It is a plastics glue for assembling model kits and most hobby shops in Germany should have it. I use the 25g bottle which has a very fine metal pipe as a nozzle. I find this product very good. These plastic glues actually melt the plastic a little into each other. Should set in a few minutes. If resin I think safe to use an Expoy Resin adhesive. These come packaged in a two tube set , a tube of resin and a tube of hardener that are mixed together in equal amounts. Available from any hardware store and should not be expensive. There are 2 types of this expoxy glue. A quick set one - usually 5 minutes or the much stronger one that takes 24 hours to set - but is much stronger. Hope this helps. |
|
k1w1
Full Member
Member since: February 2015
Posts: 873
Feb 18, 2015 8:07:41 GMT -5
Feb 18, 2015 8:07:41 GMT -5
|
Post by k1w1 on Apr 16, 2015 9:45:53 GMT -5
.....sorry been thinking. If resin the Epoxy Resin adhesive would do the job but maybe a bit more than what you need. I don't use the common white glue / PVA glues very much but use a good strong multi purpose, quality glue from hardware shops. In the last few years I have been using one called Weldbond which comes out of the tube white and dries clear. Something like this should do the job on resin and a bottle of this should last you years.
|
|
lunaiko
Junior Member
Member since: March 2015
Posts: 98
|
Post by lunaiko on Apr 16, 2015 13:11:52 GMT -5
Hey Peter, thanks for answering Would you please have an eye to a german webside with hundreds of glues. I don't know the most of them but I think the one I need is on that pages. Maybe you'll recognize a good glue by its picture... That the link to the german shop: www.dersockelshop.de/farbenkleberpinsel/kleber-spachtelmasse/Ty, angi edit: just seen that you can choose english as language. top right next to the german flag |
|
|
|
Post by wbill76 on Apr 16, 2015 13:44:16 GMT -5
|
|
lunaiko
Junior Member
Member since: March 2015
Posts: 98
|
Post by lunaiko on Apr 16, 2015 14:15:25 GMT -5
Thanks a lot, Bill. I will directly go and order both |
|
k1w1
Full Member
Member since: February 2015
Posts: 873
Feb 18, 2015 8:07:41 GMT -5
Feb 18, 2015 8:07:41 GMT -5
|
Post by k1w1 on Apr 17, 2015 2:00:40 GMT -5
Glad you got some help from Bill Angi. I think good advice if your figures are resin. If they are plastic would be worth trying the Revell Contacta I mentioned. I see it on the link you supplied. Revell Artikel Nr REV396 at euro 3.95. Blue bottle. This is good for gluing the type of plastics found in kits and very easy to apply with the very fine nozzle.
|
|
|
|
Post by wbill76 on Apr 17, 2015 14:11:54 GMT -5
Glad you got some help from Bill Angi. I think good advice if your figures are resin. If they are plastic would be worth trying the Revell Contacta I mentioned. I see it on the link you supplied. Revell Artikel Nr REV396 at euro 3.95. Blue bottle. This is good for gluing the type of plastics found in kits and very easy to apply with the very fine nozzle. Definitely a good point to be clear on, the epoxy will work best on the figures if they are resin. They will also work on plastic figures but not nearly as well as an actual plastic model glue like the Contacta that is better because it will 'weld' or melt the plastic parts together vs. just joining them. |
|
lunaiko
Junior Member
Member since: March 2015
Posts: 98
|
Post by lunaiko on Apr 17, 2015 15:50:53 GMT -5
Hi guys, I ordered all glues you commended And some more. Got a mail that my parcel is on its way |
|
|
|
Post by kaytermarram on Apr 19, 2015 6:53:52 GMT -5
Ah, heck, have read this right now... When I have fitting problems with resin or plastic parts, I use an unorthodox method to fix it: I roll a very small ball of Magic Sculpt (or Miliput or other sculpting compounds), place a drop of superglue on the body side, on this I place carefully the Magic Sculpt Ball, put a little bit superglue on the arm and press it immidiatly on the sculpey ball. The pressure will flatten the ball, mix in all with the superglue and make a very stong bond. The small gap is filled with Magic Sculpt after hardening and bingo, all is cemented in very safe. And it is very cheap to work so.
Frank
|
|
lunaiko
Junior Member
Member since: March 2015
Posts: 98
|
Post by lunaiko on Apr 19, 2015 14:04:47 GMT -5
Thanks a lot, Frank. There are still two arms to fix and now I have many tips to do that. |
|
lunaiko
Junior Member
Member since: March 2015
Posts: 98
|
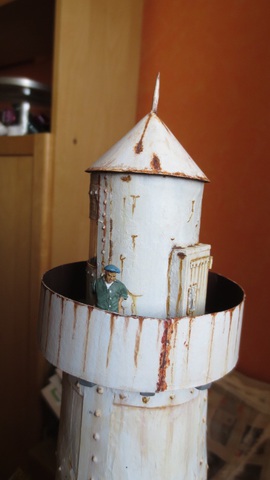
Post by lunaiko on Apr 24, 2015 4:26:57 GMT -5
|
|
|
|
Post by Leon on Apr 24, 2015 4:34:43 GMT -5
Fantastic finish Angi! The figure is a perfect touch. |
|
|
|
Post by TRM on Apr 24, 2015 5:24:45 GMT -5
Well done Angi!! The figure looks great...give a nice sense of scale and placement!! Great job on the lighthouse as well!
|
|
lunaiko
Junior Member
Member since: March 2015
Posts: 98
|
Post by lunaiko on Apr 24, 2015 6:05:20 GMT -5
Thanks Leon and Todd I think a few more days and I finish my terrain. There's only the water I have to work at. And at least my beachboys Yesterday I ordered my next stuff. A wooden boat kit. It's a mediterranean trawler called Mare Nostrum Maybe I have to go into a 6 weeks psychosomatic treatment (I hope I must not). I will take my boat into the clinic with me. And it seems to be much better to take up a smaller item than a large diorama |
|
k1w1
Full Member
Member since: February 2015
Posts: 873
Feb 18, 2015 8:07:41 GMT -5
Feb 18, 2015 8:07:41 GMT -5
|
Post by k1w1 on Apr 24, 2015 8:21:18 GMT -5
Looking really good Angi. I like you figure. He looks good there. Will your boat be just a boat model or will you use it in a diorama ? |
|
lunaiko
Junior Member
Member since: March 2015
Posts: 98
|
Post by lunaiko on Apr 24, 2015 9:31:21 GMT -5
Thanks, Peter. I actually don't plan a diorama with the boat. It is not so small (1/35) and the dio would be gigantic. In a smaller scale that would be a good Idea. But I ordered a small rowboat kit (9,3cm) too. And that will be placed on my lighthouse diorama, swinging in the sea |
|
|
|
Post by deafpanzer on Apr 24, 2015 16:10:01 GMT -5
Really dig those rust streaks... you are going to make many rust-o-addict fans here happy!
|
|
|
|
Post by wbill76 on Apr 24, 2015 19:39:32 GMT -5
Nice touch with the lighthouse Angi! Sounds like you've got a good option if you have to be away for a bit. Having something to work on always helps and a small boat would be just the ticket I'm sure. |
|


 This scene is really coming to life now.