Joe Rix
Forum Moderator 
Member since: January 2023
Posts: 1,460 
MSC Staff
|
Post by Joe Rix on Aug 9, 2023 21:31:22 GMT -5
Been too long since I tuned in Jukka. Whoa! Have you ever been busy laying down some mind blowing modeling. Your KV is looking fantastic. I am really enjoying your painting and weathering techniques. You manage to bring out some outstanding effects. Exquisite tank for sure.
|
|
kaktus
Full Member

Member since: May 2013
Posts: 307
Member is Online
May 5, 2013 3:26:51 GMT -5
May 5, 2013 3:26:51 GMT -5
|
Post by kaktus on Aug 10, 2023 2:45:17 GMT -5
Thank you all for interest.  VERY VERY nice!!! What chipping technique are you using? I start with lighter base color, apply it mostly with sponge and acrylic paint. Some hard to reach spots with brush. Then comes the metal/rusty layer and here I use oil paint. Again, sponge and brush is used here. And why oils? They are easy to wipe away if I make a mistake/or apply too much chip etc. And work time allows you start again the whole tank if it doesn't look good. Second point is that you have much better control to adjust how "strong" the contrast is. You can stipple it gently and you have more opaque chip. Last step is speckling, I just thin the oil paint and speckle it randomly over the tank. That way you can add extremely small chips. |
|
|
|
Post by 406 Silverado on Aug 10, 2023 4:46:17 GMT -5
Thank you all for interest. VERY VERY nice!!! What chipping technique are you using? I start with lighter base color, apply it mostly with sponge and acrylic paint. Some hard to reach spots with brush. Then comes the metal/rusty layer and here I use oil paint. Again, sponge and brush is used here. And why oils? They are easy to wipe away if I make a mistake/or apply too much chip etc. And work time allows you start again the whole tank if it doesn't look good. Second point is that you have much better control to adjust how "strong" the contrast is. You can stipple it gently and you have more opaque chip. Last step is speckling, I just thin the oil paint and speckle it randomly over the tank. That way you can add extremely small chips. Thank you for taking the time to explain the whole chipping process with us Jukka. I'll be taking notes on this one.  +1 Karma to you bud. |
|
kaktus
Full Member
Member since: May 2013
Posts: 307
Member is Online
May 5, 2013 3:26:51 GMT -5
May 5, 2013 3:26:51 GMT -5
|
Post by kaktus on Aug 10, 2023 6:45:03 GMT -5
Thanks and no problem! Of course I will share, no secrets in this hobby.. |
|
handiabled
Community Relations Moderator 
Member since: February 2023
Posts: 2,464
MSC Staff
|
Post by handiabled on Aug 10, 2023 6:48:24 GMT -5
Weathering on this is wonderful! Thanks for sharing you techniques
|
|
|
|
Post by mrt51 on Aug 10, 2023 8:07:41 GMT -5
Oh wow! This is looking great!
|
|
kaktus
Full Member
Member since: May 2013
Posts: 307
Member is Online
May 5, 2013 3:26:51 GMT -5
May 5, 2013 3:26:51 GMT -5
|
Post by kaktus on Aug 12, 2023 9:31:28 GMT -5
Thank you all. Today I was thinking work sequence in this one, what are the most important things to do next. I need to complete lower hull, (not even started to weather it yet), but I need running gear complete before it because I'm doing a base for this and it's best to plan and measure when tank isn't missing tracks etc. Tracks are build to other side and other is maybe 50% done so I decided to start weathering road wheels and because tank is sitting abandoned in water, those should be rusted in surface. Normally I do vehicles that are in use, so rusty surfaces are a little bit new thing for me to do. Normally I would go with pigments, but now I can't because the water element. Resin would absorb the pigments. Soo more new things to try, let's paint those with acrylics. I started with gun metal base color, as those were shiny metal once. Then put ak rust colors to wet pallet and started stippling different tones to wheels. Wet blending is the key here. 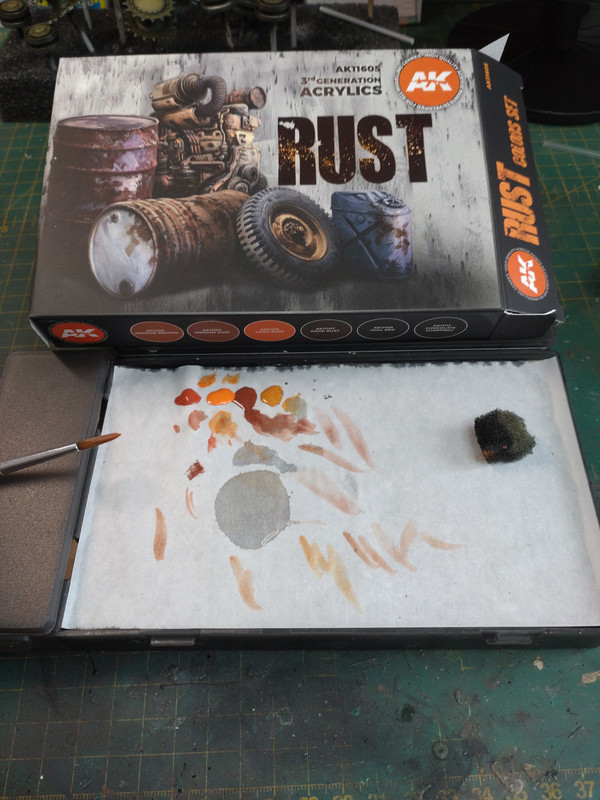 And a few wheels done, what do you think? 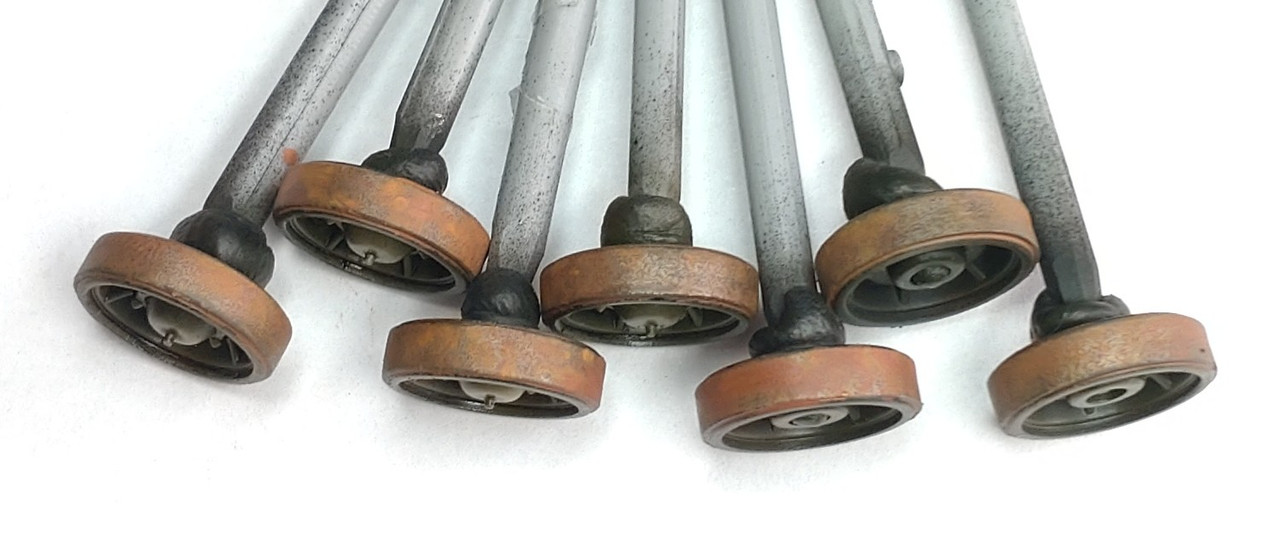 |
|
41chevy
Full Member
Member since: June 2023
Posts: 242
Jun 5, 2023 11:01:03 GMT -5
Jun 5, 2023 11:01:03 GMT -5
|
Post by 41chevy on Aug 12, 2023 12:21:27 GMT -5
Te spotty lighter rust areas looks perfect.I feel you hit it 100%.
Question, sitting in even slightly moving water, would there be a bit of light silt on wheel tops?
|
|
|
|
Post by deafpanzer on Aug 14, 2023 20:54:39 GMT -5
I think you have done it far better than I would have done! That's all I can say... LOL
|
|
kaktus
Full Member
Member since: May 2013
Posts: 307
Member is Online
May 5, 2013 3:26:51 GMT -5
May 5, 2013 3:26:51 GMT -5
|
Post by kaktus on Sept 3, 2023 9:19:24 GMT -5
Today I got the time to start making weathering effects to lower hull. Nothing too special, just a few enamel products used here. First was ammo splashes effect, stippled quite heavily on lower parts. Then some darker brown earth effect top of it and then blending those with white spirit. Remember this is only a base for weathering, more shades will be added when it's dried. Now it looks quite dull. 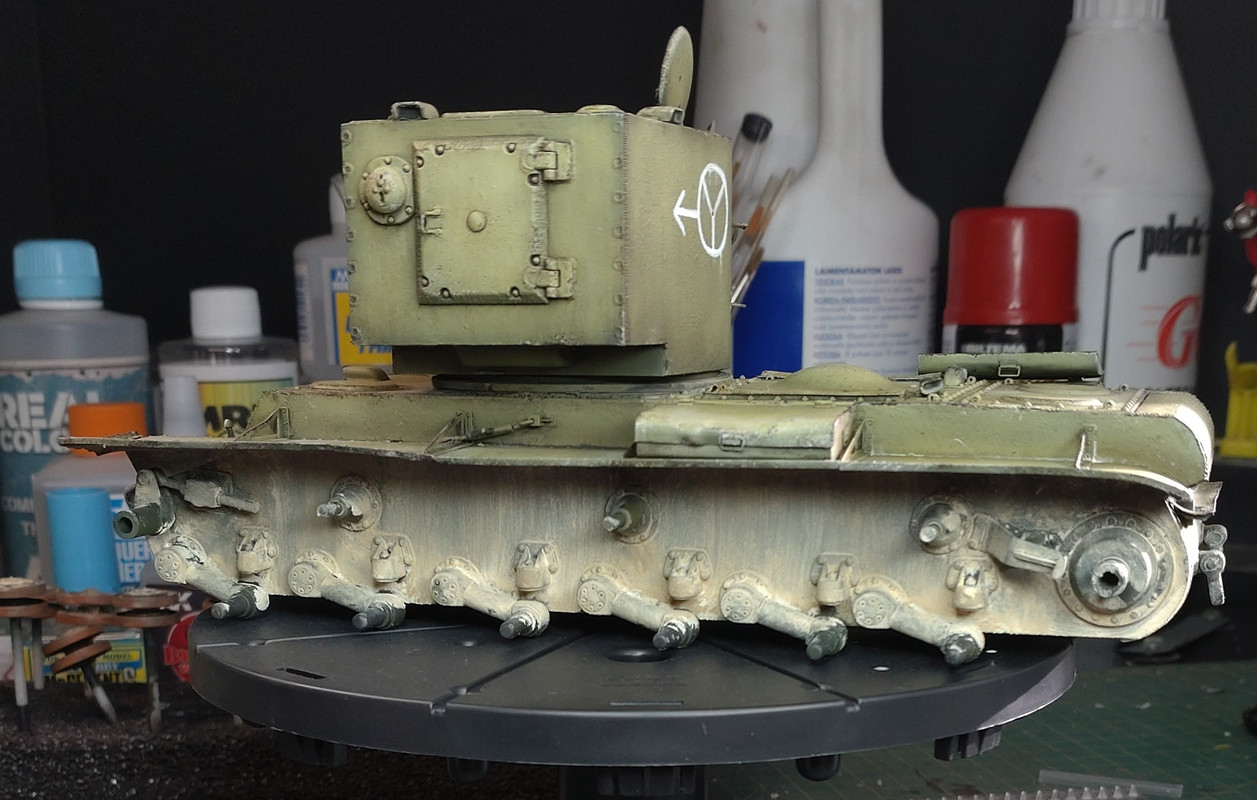 This is a little experimental thing for me, because I always make this step with pigments. |
|
|
|
Post by deafpanzer on Sept 3, 2023 11:02:45 GMT -5
As usual you got me all excited again for looking at your weathering work! LOL Nice streaking work by the way.
|
|
M1Carbine
Senior Member

Member since: November 2012
Posts: 1,630
Nov 16, 2012 2:49:11 GMT -5
Nov 16, 2012 2:49:11 GMT -5
|
Post by M1Carbine on Sept 9, 2023 12:47:36 GMT -5
Kaktus - Now that's how you build a KV-2. Beautiful work. Base weathering on the lower hull looks fine, as you get more shades added everything will pop.
-Bob
|
|
buddho
Forum Moderator
Member since: February 2019
Posts: 1,086
MSC Staff
|
Post by buddho on Sept 9, 2023 20:09:10 GMT -5
Incredible weathering on the KV2...
|
|
kaktus
Full Member
Member since: May 2013
Posts: 307
Member is Online
May 5, 2013 3:26:51 GMT -5
May 5, 2013 3:26:51 GMT -5
|
Post by kaktus on Sept 11, 2023 10:44:33 GMT -5
Thanks guys! As we speak on weathering and adding more tones, today I had some time to start doing it. Started with a couple of darker enamel tones, stippled those quite randomly. And it looks horrible.  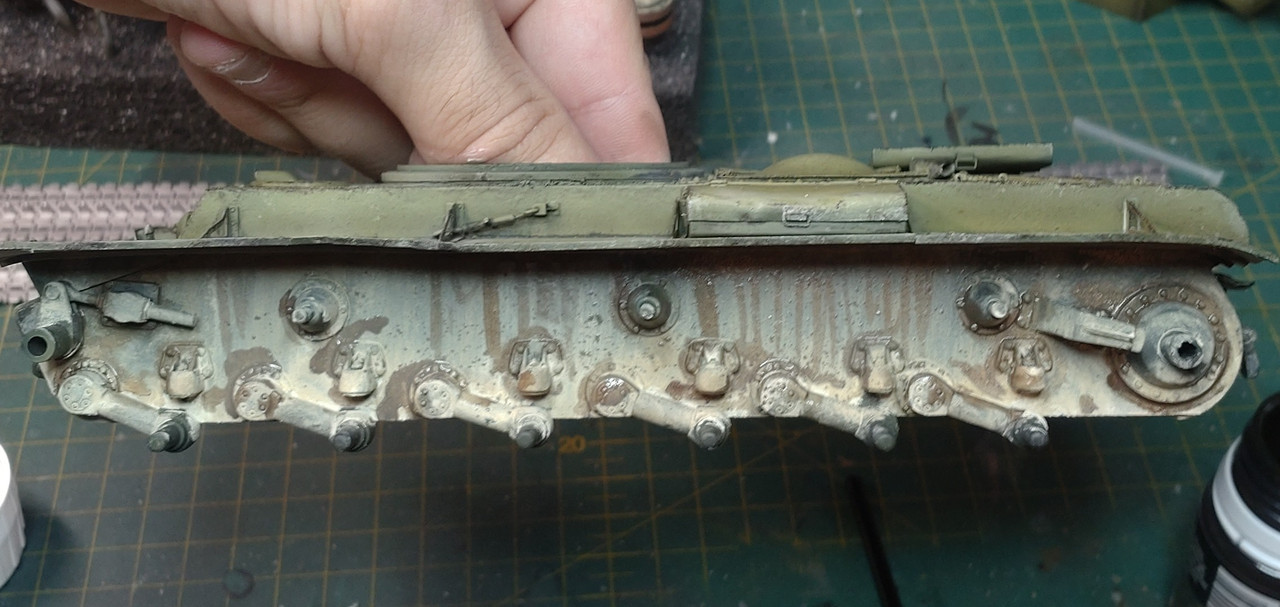 Then blend those with white spirit. 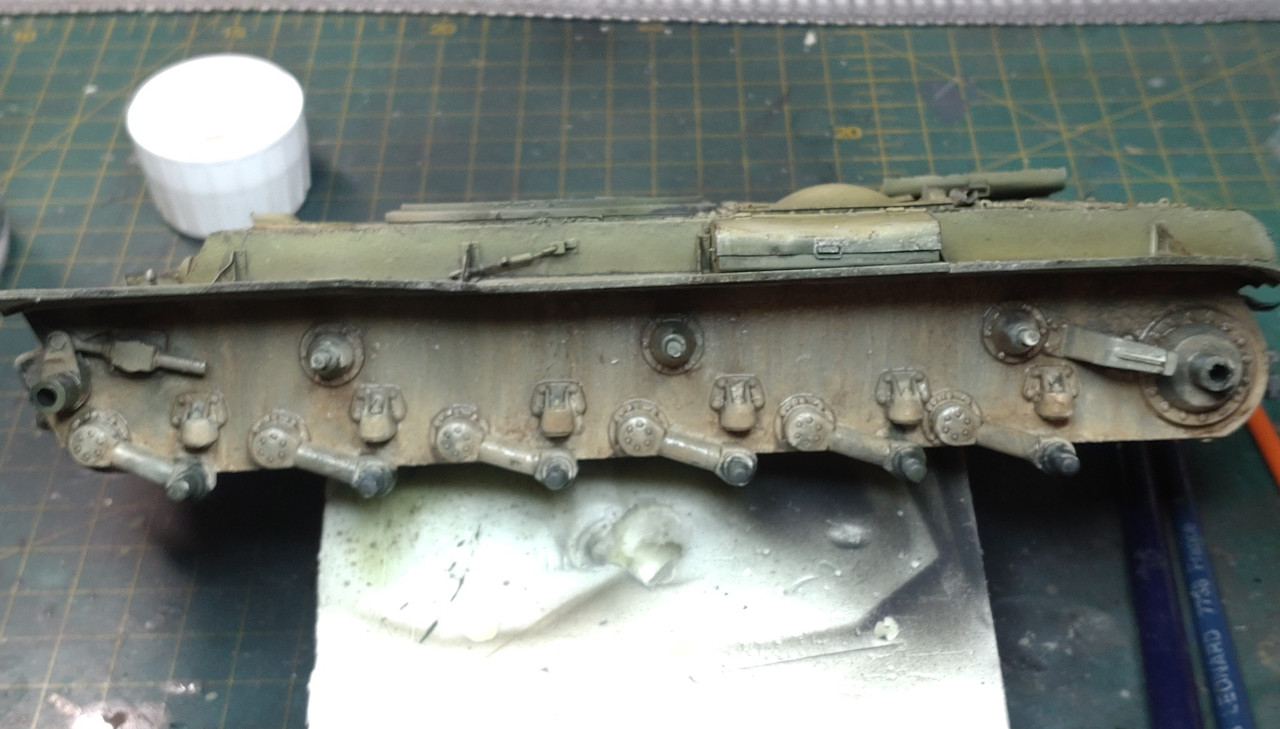 Did this a couple of layers, then added some very dark enamel to the game. Focusing on lower parts, and more heavy streaks. 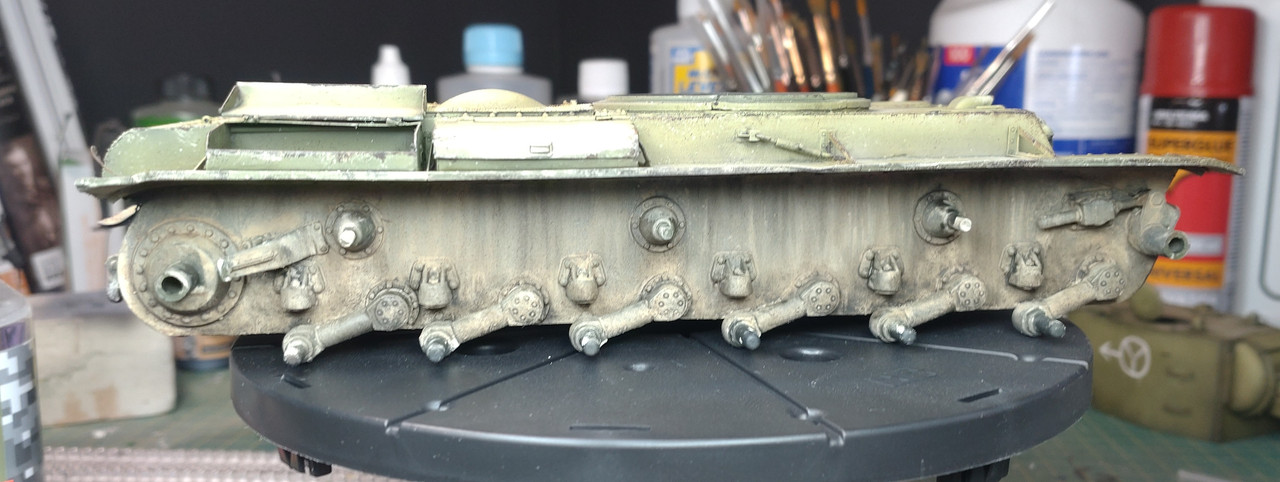 This was about five rounds for dark tones and last step was spekling with the same dark color. It blends everything nicely together. Now the tones are more what they should be. 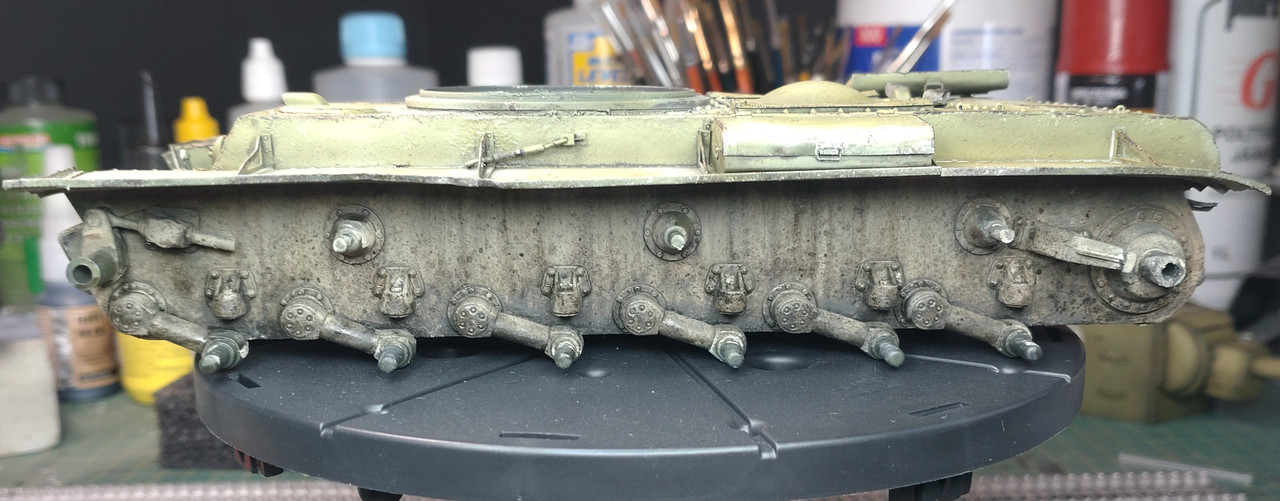 |
|
|
|
Post by Steve Zuleski on Sept 11, 2023 11:11:30 GMT -5
Realistic, wow!
|
|
|
|
Post by chromdome35 on Sept 11, 2023 12:04:02 GMT -5
Simply beautiful work, I love the weathering you are doing.
|
|
|
|
Post by deafpanzer on Sept 11, 2023 19:41:43 GMT -5
You hit home run on this. It takes several layers to make it look great!
|
|
|
|
Post by kyledehart5 on Sept 11, 2023 23:17:57 GMT -5
Man this is looking so good
|
|
kaktus
Full Member
Member since: May 2013
Posts: 307
Member is Online
May 5, 2013 3:26:51 GMT -5
May 5, 2013 3:26:51 GMT -5
|
Post by kaktus on Sept 13, 2023 9:46:11 GMT -5
Thanks! Next step will be adding some wet mud tones. |
|
Real G
Full Member
Member since: April 2023
Posts: 607
|
Post by Real G on Sept 13, 2023 14:22:02 GMT -5
"In Mother Russia, you not get muddy. Mud get YOU!" |
|
|
|
Post by rbaer on Sept 24, 2023 9:20:58 GMT -5
I'm in love. I've always gotten a kick out of that picture, says a lot about the KV series.
Superb weathering going on here!
|
|
buddho
Forum Moderator
Member since: February 2019
Posts: 1,086
MSC Staff
|
Post by buddho on Sept 24, 2023 10:59:23 GMT -5
The realism you have created on this model is stunning. Just stunning.
|
|
kaktus
Full Member
Member since: May 2013
Posts: 307
Member is Online
May 5, 2013 3:26:51 GMT -5
May 5, 2013 3:26:51 GMT -5
|
Post by kaktus on Dec 16, 2023 8:56:36 GMT -5
A little progress with this, started to paint tracks. My goal is to achieve a rusted tracks, with dried mud and some shine still. At first grey base color.  Then rust washes, again with ak rust colors. 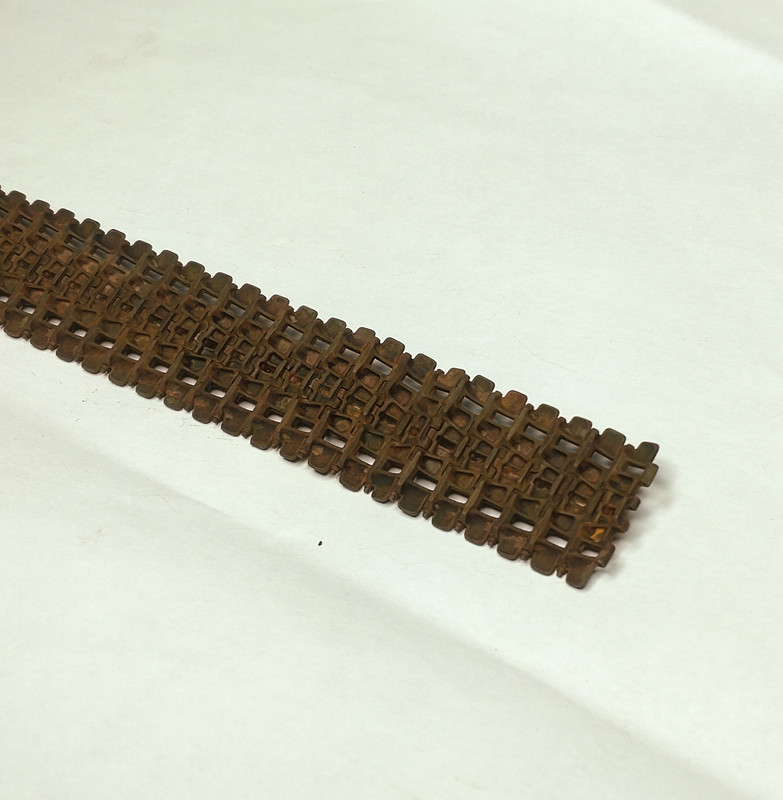 |
|
thug626
Senior Member
Member since: January 2013
Posts: 1,798
Jan 15, 2013 13:05:28 GMT -5
Jan 15, 2013 13:05:28 GMT -5
|
Post by thug626 on Dec 16, 2023 10:15:33 GMT -5
Your work is quite impressive and inspiring.
|
|
|
|
Post by kyledehart5 on Dec 16, 2023 11:29:03 GMT -5
Great start on those tracks. Very convincing.
|
|
reserve
Senior Member
Member since: July 2012
Si vis pacem para bellum
Posts: 2,355
Jul 11, 2012 9:11:45 GMT -5
Jul 11, 2012 9:11:45 GMT -5
|
Post by reserve on Dec 16, 2023 11:30:38 GMT -5
Top shelf sir
|
|
kaktus
Full Member
Member since: May 2013
Posts: 307
Member is Online
May 5, 2013 3:26:51 GMT -5
May 5, 2013 3:26:51 GMT -5
|
Post by kaktus on Dec 16, 2023 12:58:16 GMT -5
Thank you. Always nice if i can help or inspire others with my work. |
|
|
|
Post by deafpanzer on Dec 19, 2023 11:59:57 GMT -5
The tracks really look good!!! It has been a while for me to work on the tracks so I am so glad I saw this. Need to do Panther tracks real soon...
|
|
kaktus
Full Member
Member since: May 2013
Posts: 307
Member is Online
May 5, 2013 3:26:51 GMT -5
May 5, 2013 3:26:51 GMT -5
|
Post by kaktus on Dec 27, 2023 12:46:10 GMT -5
Tracks are almost done, next I will finish weathering lower hull at once. Then I can be sure that everything ties up nicely. Let this be a little teaser.  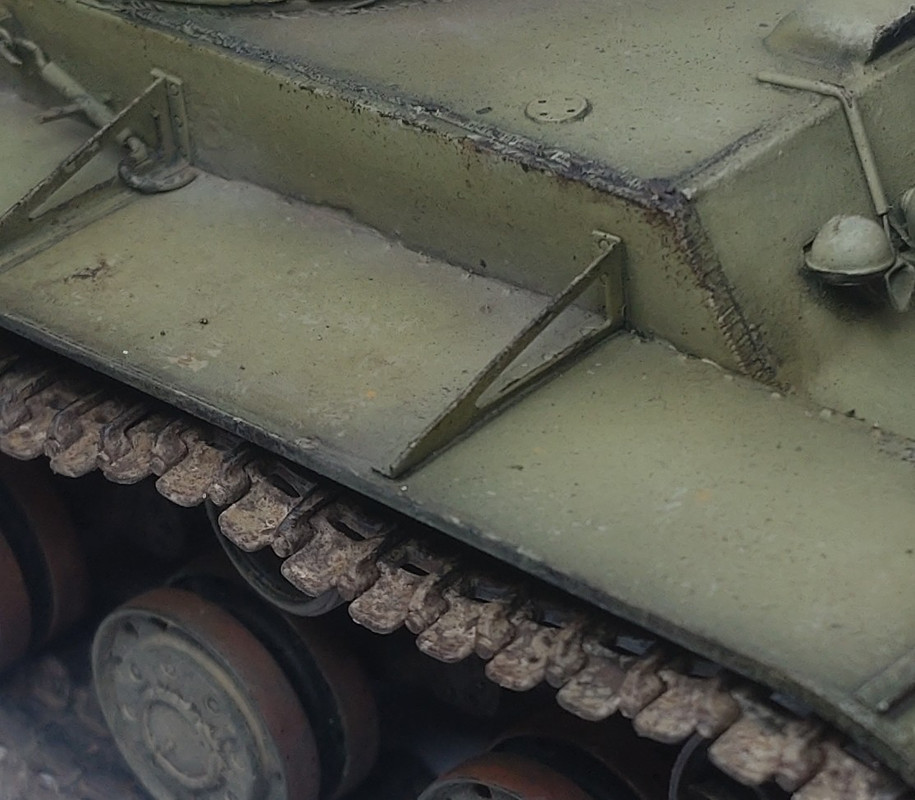 |
|
|
|
Post by deafpanzer on Dec 27, 2023 12:46:58 GMT -5
DAMN! It is really looking so great and very realistic!
|
|