redleg12
Full Member
  
Member since: August 2012
www.redleg2scale.com
Posts: 401
Aug 28, 2012 18:59:10 GMT -5
Aug 28, 2012 18:59:10 GMT -5
|
Post by redleg12 on Dec 27, 2012 22:00:39 GMT -5
Fire Mission M1009 ¾ Ton Commercial Utility Combat Vehicle Introduction The Chevy Utility vehicles were introduced in the 1980s as an interim replacement of the M880 series vehicles which had replaced the old WC series. The CUCV were eventually replaced in combat units by the HMMWV but served many roles through the early 2000s 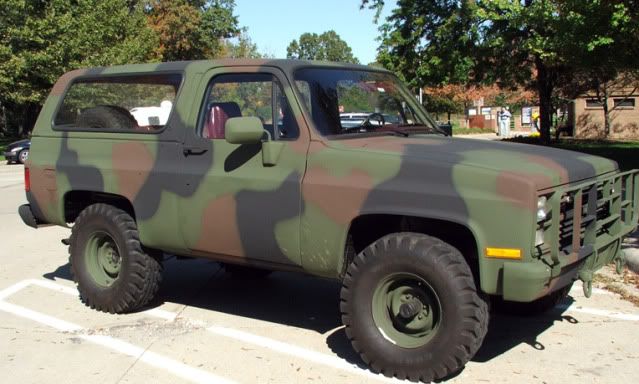 Background While serving as a battalion Assistant S-3 I had a M1009 in place of a HUMMV. Though not suited perfectly for combat use, HQ34 served me well through many training exercises. Build I will be using a Miniman M1009 resin kit for this build  The kit is well made with numerous details and is excellent casting with almost no fisheyes or voids. The instructions are picture based and similar to styrene kit instructions. The parts themselves require very little cleaning with the exception of removal of casting blocks. The kit is mostly resin but also includes soft metal parts, clear lenses and windows, photo etch parts, decals and a pressed paper front brush guard. Step 1 is to install the white metal leaf springs and the resin transfer case. I installed the transfer case after removing the casting blocks from the floor panel and the case. The floor board has pin holes to spot the white metal leaf springs. The holes needed to be cleaned with a drill bit to comfortable fit the springs, which were then installed. 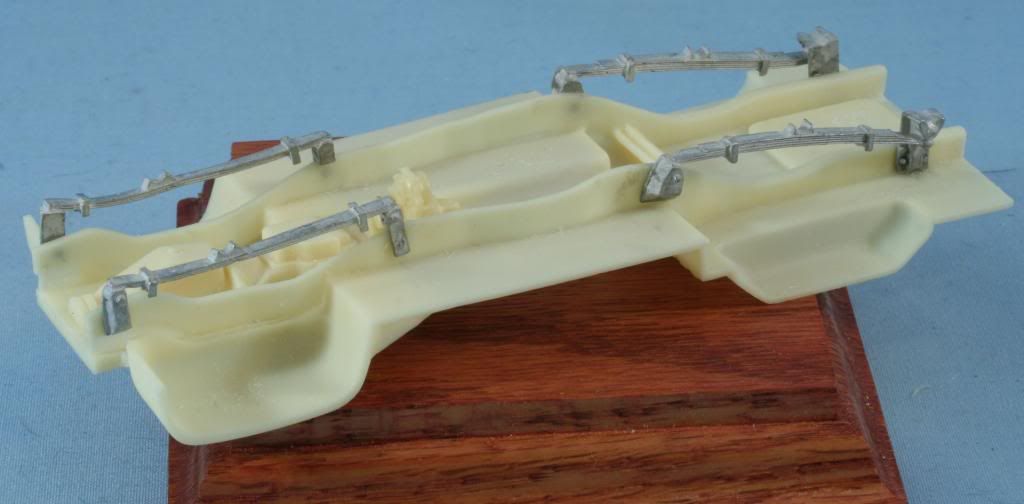 Next step is to install the universal drive shafts. The axels are white metal while the drive shafts are resin. Care needs to be taken to center the axels for proper tire alignment and proper rotation to install the universal. The front assembly fit perfectly but the rear universal needed some slight trimming, which I did on the transfer case end, in order to get proper fit. 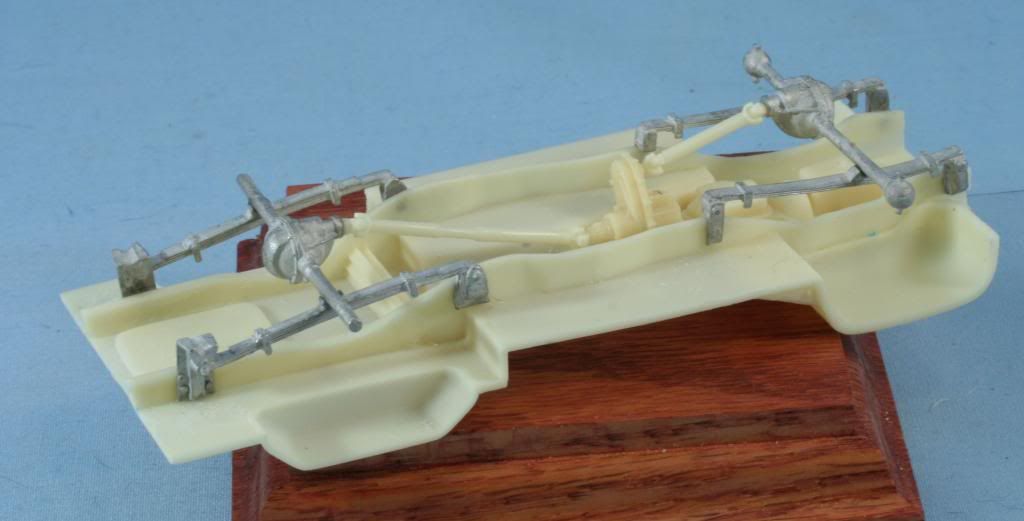 Step 3 installs the shocks and the dual exhaust system. Removal of the exhaust systems from their pour blocks needs to be do done carefully to avoid breaking the exhaust pipes, which are long and thin. First I installed the shocks, which fit in a pin- hole on the floor-board and a pin on the axel. The shocks were slightly shorter in length than the line up pins. In order to install, I lined up the pin on the axel and shortened up on the line up on the floor-board which required a new pin hole to be drilled. The exhaust has to be threaded under the rear axel and the front end lines up with a pin-hole in the floor board while the tailpipe rests on the rear block of the rear leaf spring. Once threaded these parts lined up perfectly and fit well. 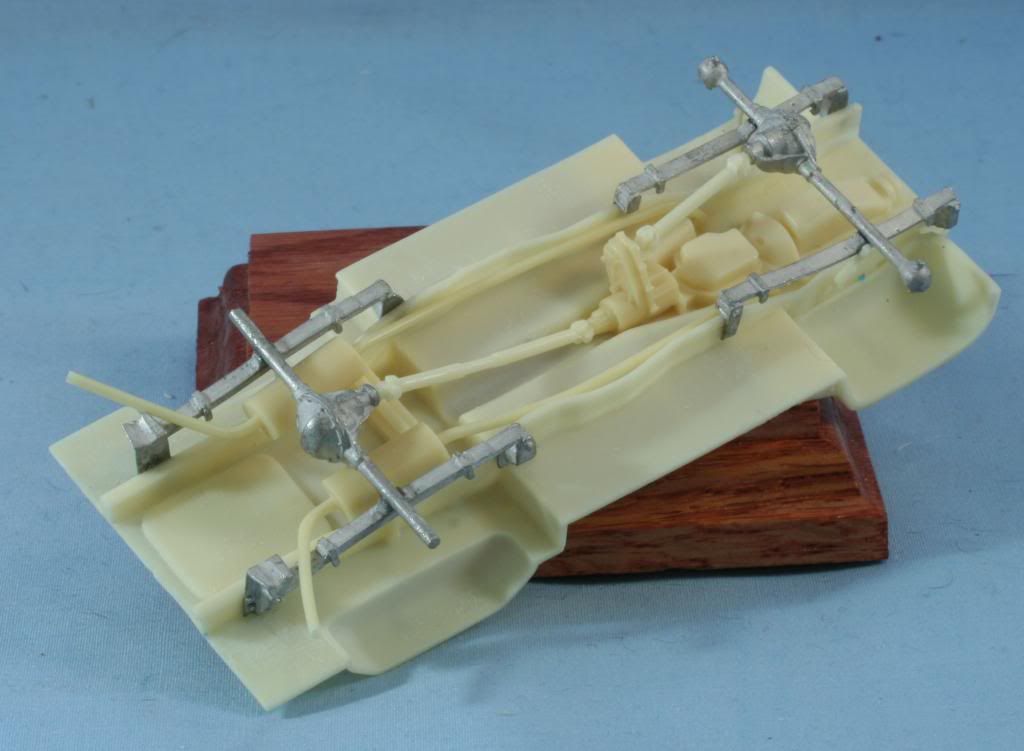 The first three steps complete the undercarriage. Step 4 requires the tires to be assembled, which I will skip until final assembly. At this point, the undercarriage assembly will head to the paint booth, as the bottom will be basically black with steel for the exhausts. The top is the inside of the vehicle and the floor inside was a NATO green. As always feel free to leave a comment either positive or negative Rounds Complete!! |
|
|
|
Post by bbd468 on Dec 27, 2012 22:23:29 GMT -5
Hey Red, This is gonna be a sweet little build. Love the old Chevy Blaizer.  Gary |
|
M1Carbine
Senior Member
    November '23 Showcased Model Awarded
Member since: November 2012
Posts: 1,739
Nov 16, 2012 2:49:11 GMT -5
Nov 16, 2012 2:49:11 GMT -5
|
Post by M1Carbine on Dec 27, 2012 23:30:04 GMT -5
Red- WOW! another piece that brings back memories of tearing up north Ft. Hood back in the day and ripping up some turf in Germany on REFORGER
Bob
|
|
|
|
Post by deafpanzer on Dec 28, 2012 1:57:31 GMT -5
I remember seeing many of those growing up not far from National Guard base in Buffalo... it'll be fun watching your work as usual!
|
|
ogrejohn
Full Member
   Oct '23 Showcased Model Awarded
Member since: June 2012
Go away or I shall taunt you a second time!
Posts: 1,303
Jun 1, 2012 17:33:59 GMT -5
Jun 1, 2012 17:33:59 GMT -5
|
Post by ogrejohn on Dec 28, 2012 5:33:47 GMT -5
Nice work Mike!
|
|
redleg12
Full Member
  
Member since: August 2012
www.redleg2scale.com
Posts: 401
Aug 28, 2012 18:59:10 GMT -5
Aug 28, 2012 18:59:10 GMT -5
|
Post by redleg12 on Dec 28, 2012 7:40:00 GMT -5
Gary - The old Blazer was a nice vehicle. Was terrible off road but for running around on main or even dirt roads it was great. Nice to have yo along.
Bob - This is a memory build for me too. it has be over 25 years since I have traveled with HQ 34. That's what makes my modeling fun for me....the memories
Andy - Thanks for stopping in. Yep, as time wore on many were transferred to the Guard & Reserve to be used with support units.
John - Always a pleasure to have you stop in.
Rounds Complete!!
|
|
reserve
Senior Member
   
Member since: July 2012
Si vis pacem para bellum
Posts: 2,373
Jul 11, 2012 9:11:45 GMT -5
Jul 11, 2012 9:11:45 GMT -5
|
Post by reserve on Dec 28, 2012 8:11:58 GMT -5
I did not know anyone was making such a kit, it's nice to see. Here in Montana they are all over the place.
Looks nice, perhaps a bit fiddly but I am sure the final result will be worth the fiddlin
Regards,
Mark
|
|
redleg12
Full Member
  
Member since: August 2012
www.redleg2scale.com
Posts: 401
Aug 28, 2012 18:59:10 GMT -5
Aug 28, 2012 18:59:10 GMT -5
|
Post by redleg12 on Dec 28, 2012 11:12:52 GMT -5
Mark - Miniman makes a good resin kit. Well thought out, and well made. There are a bunch of details I will be adding. Stay along for the ride. As for fiddilin.... that's what the hobby is all about
Rounds Complete!!
|
|
|
|
Post by 406 Silverado on Dec 28, 2012 11:16:49 GMT -5
oh man, LOTS of memories with that vehicle. Off to a good start Mike.
|
|
|
|
Post by wbill76 on Dec 28, 2012 12:18:00 GMT -5
Cool project Mike, looking forward to seeing this one come alive in your hands.
|
|
redleg12
Full Member
  
Member since: August 2012
www.redleg2scale.com
Posts: 401
Aug 28, 2012 18:59:10 GMT -5
Aug 28, 2012 18:59:10 GMT -5
|
Post by redleg12 on Dec 28, 2012 12:37:17 GMT -5
Rob - I am sure...those of us form that period all can remember the M1009. Hope they are good memories! thanks for the peek
Bill - Thanks for stopping by, this will be a fun build of my old vehicle
Rounds Complete!!
|
|
redleg12
Full Member
  
Member since: August 2012
www.redleg2scale.com
Posts: 401
Aug 28, 2012 18:59:10 GMT -5
Aug 28, 2012 18:59:10 GMT -5
|
Post by redleg12 on Dec 28, 2012 13:56:49 GMT -5
Dicky - You have to take the plunge... resin is good!! LOL
All kidding aside, there are good and bad, Miniman make a good resin kit. Think about expanding your mind.... it will be fun
Rounds Complete!!
|
|
|
|
Post by fightnjoe on Dec 28, 2012 19:40:44 GMT -5
well sir i am definitely along for the ride on this one.
joe
|
|
redleg12
Full Member
  
Member since: August 2012
www.redleg2scale.com
Posts: 401
Aug 28, 2012 18:59:10 GMT -5
Aug 28, 2012 18:59:10 GMT -5
|
Post by redleg12 on Dec 28, 2012 22:29:17 GMT -5
Joe - I will make room on the passenger side!! I am picking up my interior details now!
Rounds Complete!!
|
|
|
|
Post by eastrock on Dec 28, 2012 22:31:42 GMT -5
details looks great, Red leg  |
|
redleg12
Full Member
  
Member since: August 2012
www.redleg2scale.com
Posts: 401
Aug 28, 2012 18:59:10 GMT -5
Aug 28, 2012 18:59:10 GMT -5
|
Post by redleg12 on Dec 28, 2012 22:41:38 GMT -5
Eastrock - Thanks, much more to come
Rounds Complete!!
|
|
redleg12
Full Member
  
Member since: August 2012
www.redleg2scale.com
Posts: 401
Aug 28, 2012 18:59:10 GMT -5
Aug 28, 2012 18:59:10 GMT -5
|
Post by redleg12 on Dec 30, 2012 17:03:33 GMT -5
Having some time with the holiday allows me to keep moving on this build. First the undercarriage assembly was primed and then the bottom painted flat black. 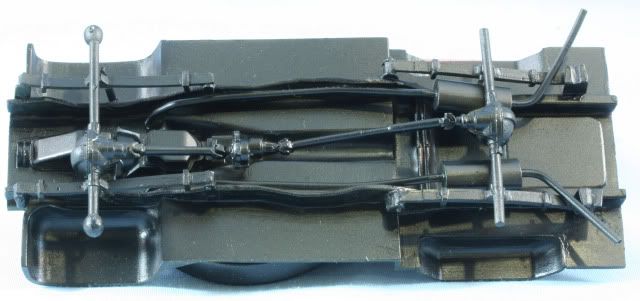 Once dry, the flip side which is the interior was painted NATO Green 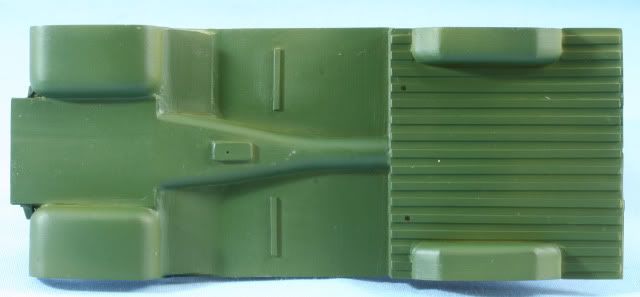 Next were the interior components including the seats door panels and the dashboard. The vinyl in the M1009 was a reddish brown to close to NATO Brown. The dash had vinyl in NATO Brown, plastic in Black and the metal underside in NATO Green. After painting the respective parts, I then used MM Acryl Semi Gloss Clear on the vinyl and plastic areas to give the proper sheen to the components. 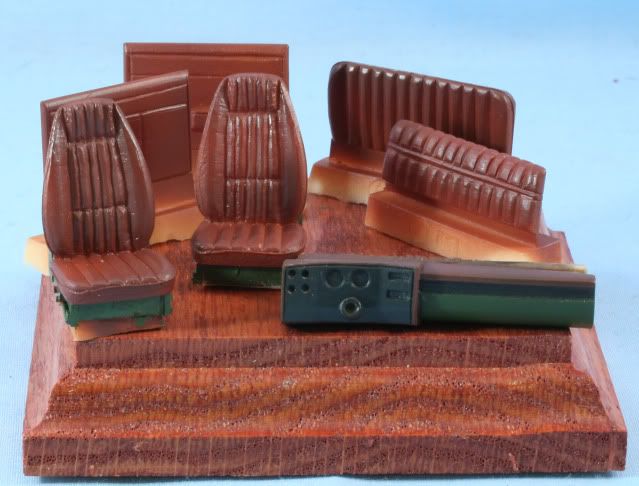 With all the paint dry on the undercarriage, I did some basic underside weathering using AK Filter for NATO. Dabbing in spots to create the dirty stained effect.  Next I assembled the interior installing the front and rear seats and the floor transfer case shifter. 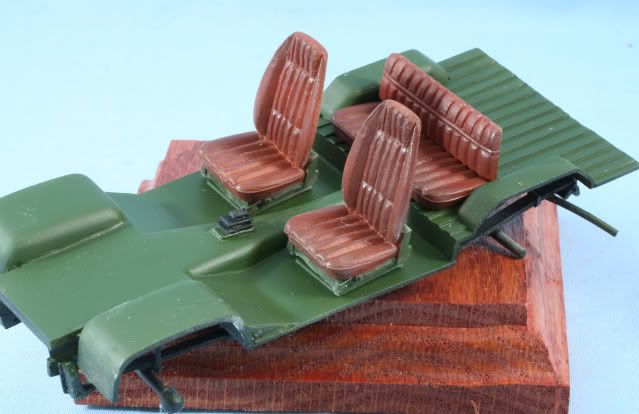 With that complete the interior was weathered with a light coat of AK Filter for NATO followed by AK Dust Effects. 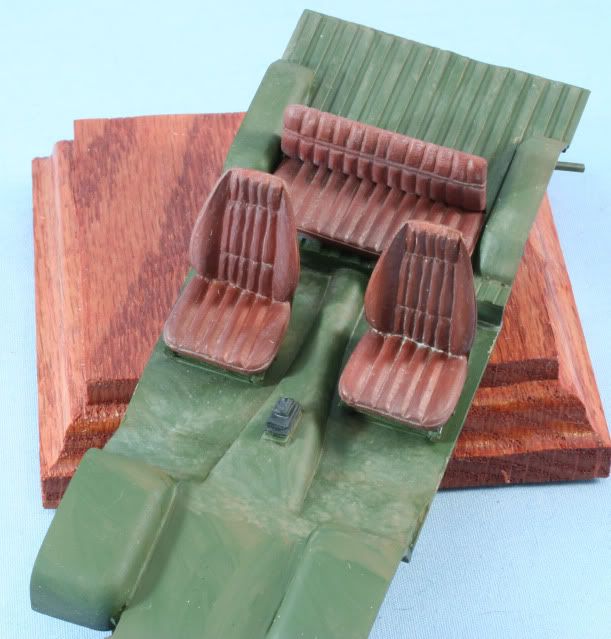 With the kit interior parts now assembled it is time to add a bunch of details. First I completed the dashboard. I used Archer transfer gauges and the put a drop of future over each gauge. When the future dries it simulates the gauge glass. The data plate is from Archer Data Plate set. I attached the PE dash bracket and then attached a Verlinden speaker. The speaker is painted with Tamiya Olive Green and the speaker wire, which goes from the speaker under the dash, is 26 gauge SS wire painted Flat Black. I then assembled the steering column and steering wheel to finish the dashboard assembly 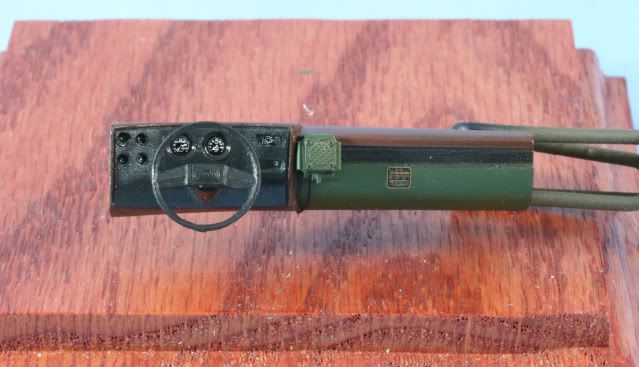 Lastly I worked on the radio assembly. I started with a Verlinden RT-524 and R-442 radios with their mounts and painted them with Tamiya Olive Green. The details on the radio include the white area for grease pencils to write frequency, the black area for the frequency, the orange for the incoming call light, and dry brush on some of the knobs with white for indicator. I also dry bushed using Alclad Aluminum for the jacks and the paint wear on the edges of the radio. Next I made the brackets to hold the radio assembly using .060 C channels styrene. After assembly, the channels were painted with Alclad Steel. Once everything was dried I assembled everything for installation into the M1009.  That is it for now. Lots more interior details coming. As always feel free to leave a comment either positive or negative Happy New Year! Rounds Complete!! |
|
|
|
Post by wbill76 on Dec 30, 2012 20:01:17 GMT -5
You're flying along with this one Mike, Happy New Year to you as well!
|
|
redleg12
Full Member
  
Member since: August 2012
www.redleg2scale.com
Posts: 401
Aug 28, 2012 18:59:10 GMT -5
Aug 28, 2012 18:59:10 GMT -5
|
Post by redleg12 on Dec 30, 2012 20:27:53 GMT -5
Bill - It's great to finally have some bench time....thanks
Rounds Complete!!
|
|
|
|
Post by fightnjoe on Dec 31, 2012 12:52:01 GMT -5
looking very good.
joe
|
|
|
|
Post by bbd468 on Dec 31, 2012 14:50:20 GMT -5
Fine detail on the interior bit fella, looks great!  Gary |
|
redleg12
Full Member
  
Member since: August 2012
www.redleg2scale.com
Posts: 401
Aug 28, 2012 18:59:10 GMT -5
Aug 28, 2012 18:59:10 GMT -5
|
Post by redleg12 on Dec 31, 2012 15:48:25 GMT -5
Dicky - thanks, I spent plent of time in my old HQ 34. As for building what I know.... that's why I love US artillery and the support equipment. Builds like this one though, as Rob said, bring back memories
Joe - thanks for the peek
Gary - thanks....more to come.
Rounds Complete!!
|
|
|
|
Post by deafpanzer on Dec 31, 2012 15:54:31 GMT -5
You are having a great process there! Archer dry transfer rocks!!!
|
|
redleg12
Full Member
  
Member since: August 2012
www.redleg2scale.com
Posts: 401
Aug 28, 2012 18:59:10 GMT -5
Aug 28, 2012 18:59:10 GMT -5
|
Post by redleg12 on Dec 31, 2012 21:28:53 GMT -5
Andy - Love the Archer Transfers, great for all the little details. Thanks for stopping in.
Rounds Complete!!
|
|
Deleted
Member since: January 1970
Posts: 0
Dec 2, 2024 3:09:01 GMT -5
Dec 2, 2024 3:09:01 GMT -5
|
Post by Deleted on Dec 31, 2012 23:36:03 GMT -5
Liking that interior Mike  |
|
ogrejohn
Full Member
   Oct '23 Showcased Model Awarded
Member since: June 2012
Go away or I shall taunt you a second time!
Posts: 1,303
Jun 1, 2012 17:33:59 GMT -5
Jun 1, 2012 17:33:59 GMT -5
|
Post by ogrejohn on Jan 1, 2013 5:29:56 GMT -5
That interior is looking great Mike!
|
|
redleg12
Full Member
  
Member since: August 2012
www.redleg2scale.com
Posts: 401
Aug 28, 2012 18:59:10 GMT -5
Aug 28, 2012 18:59:10 GMT -5
|
Post by redleg12 on Jan 1, 2013 8:50:41 GMT -5
Carl - Thanks old friend.
John - Thanks for the peek
More coming soon guys.
Happy New Year Guys!1
Rounds Complete!!
|
|
redleg12
Full Member
  
Member since: August 2012
www.redleg2scale.com
Posts: 401
Aug 28, 2012 18:59:10 GMT -5
Aug 28, 2012 18:59:10 GMT -5
|
Post by redleg12 on Jan 1, 2013 16:09:41 GMT -5
OK, I was able to get some details done over the holiday. First, you cannot go anywhere with a military vehicle without your vehicle logbook. The logbook is on the floor next to the driver seat. The logbook is .020 styrene covered with Sungumini BDU camouflage decal. Next is the chain welded to the floor to lock the steering wheel. I used chain from Michaels painted with Alclad Steel. On the passenger seat is the “pork chop” or radio microphone. This is from the Pro Art radio set. The microphone wire is 26 gauge SS wire, coiled and painted flat black. Now as the Assistant S-3 of an artillery battalion, I was the Fire Direction Officer, responsible for coordination all of the battalion firing. The manual that covers all artillery fire direction is FM-6-40. A copy of the early 1980s version is on the front seat. Photo of the real manual shrunk down to 1/35, printed and glued to .020 styrene. Next to the manual is a Graphical Firing Table, which is like a slide ruler to calculate firing data. Produced the same way as the manual except I used .010 styrene (yes….I do have the real items to photo). Lastly, the sign of the times, the empty pack of Marlboro on the floor….long day. 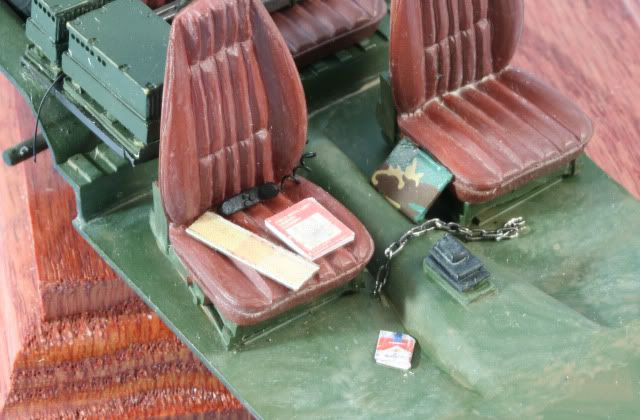 I had a buddy make me a copy of the rear tire, as the kit does not come with a spare, (thanks S.R.) which on the M1009 has a spare stored in the rear. The tire is painted with tire mix of 50/50 Flat and NATO black, the rim is NATO Green. The mount is made from .030 styrene angle painted flat black. 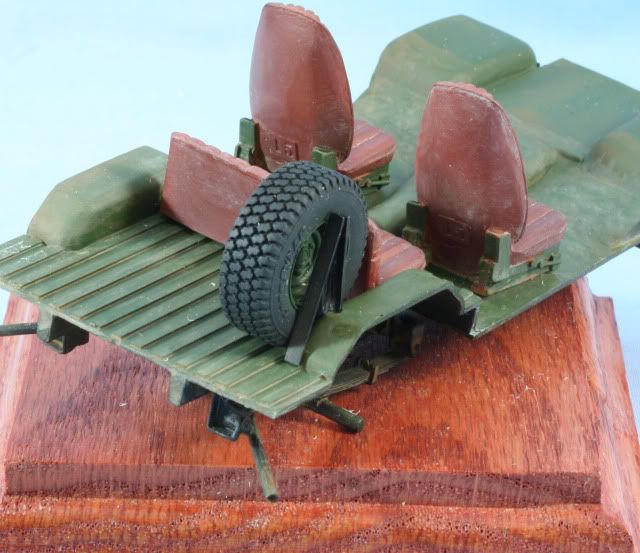 The back seat has the radio mounted. The mount is supported by .030 angle painted with Alclad Steel. The radio connecting jacks are .020 styrene rod painted with Alclad Aluminum. The speaker and microphone wires are 26 gauge SS painted flat black. Then on the seat, there is my army cot (hopefully at some point I got to use it if only for an hour). The cot frame is Alclad Aluminum and the canvas is Tamiya Drab Green. In the back are two water cans from Real Models painted flat black. Also two cases of MREs made from Verlinden set. The box is a resin box, which would be a FDC plotting kit. The box is painted with Tamiya Olive Green and edges worn with a #2 pencil. Lastly is my pack painted NATO Green and faded with AK dust effects. 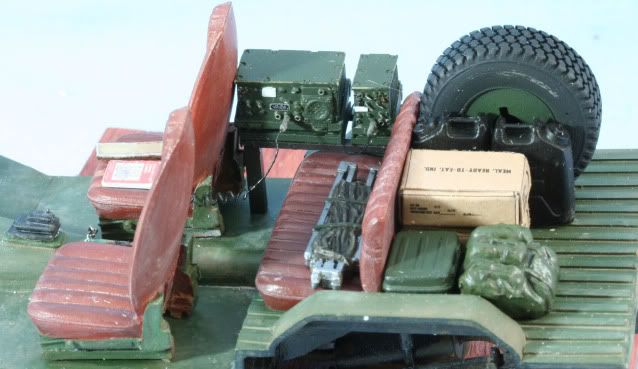 Well that is it for the interior, now it is time to start working on the body. As always feel free to leave a comment either positive or negative Rounds Complete!! |
|
|
|
Post by bullardino on Jan 1, 2013 16:13:40 GMT -5
Nice progress. The Marlboro packet on the floor adds a lot  |
|
redleg12
Full Member
  
Member since: August 2012
www.redleg2scale.com
Posts: 401
Aug 28, 2012 18:59:10 GMT -5
Aug 28, 2012 18:59:10 GMT -5
|
Post by redleg12 on Jan 1, 2013 17:18:31 GMT -5
Luigi - Thanks for the peek. Things like the pack of cigs on the floor give the model a sense of reality!!
Rounds Complete!!
|
|


