redleg12
Full Member
  
Member since: August 2012
www.redleg2scale.com
Posts: 401
Aug 28, 2012 18:59:10 GMT -5
Aug 28, 2012 18:59:10 GMT -5
|
Post by redleg12 on Feb 4, 2013 21:44:42 GMT -5
Tread - Yep...I am all confused myself...have to look in a bunch of places....getting accustomed to it
Muticam - thanks, it is as the letters stand for CUCV...Commercial Utility Combat Vehicle
Rounds Complete!!
|
|
|
|
Post by bbd468 on Feb 4, 2013 22:33:48 GMT -5
Hey Red, comin' along nice fella!  |
|
redleg12
Full Member
  
Member since: August 2012
www.redleg2scale.com
Posts: 401
Aug 28, 2012 18:59:10 GMT -5
Aug 28, 2012 18:59:10 GMT -5
|
Post by redleg12 on Feb 6, 2013 22:01:12 GMT -5
bbd - Thanks for the peek and for the comment
Rounds Complete!!
|
|
redleg12
Full Member
  
Member since: August 2012
www.redleg2scale.com
Posts: 401
Aug 28, 2012 18:59:10 GMT -5
Aug 28, 2012 18:59:10 GMT -5
|
Post by redleg12 on Feb 10, 2013 22:11:44 GMT -5
Finally found some bench time with some snow on the ground this weekend. First I put the windows in the body. The kit calls for the door windows to be one solid window while the M1009 had a main window and a wing window. In order to allow view of the inside, I cut the window to create the wing window. Then I used a .010 strip painted black to create the window bar/gasket. With the windows in place I then installed the dashboard assembly. Next was the assembly of the chassis to the body. This kit is well made but assembling the two halves is a PITA. After some sanding to relieve some tight fit, repairs after attempts would break loose one of the internal parts, and lots of colorful metaphors, the mating was complete!! With that out of the way, I weathered the wheel wells first by using acrylic ceramic stucco mixed with burnt umber paint to create that chunky stuff stuck in the wells. After it dried I coated it with AK NATO Wash and then used MIG Dried Mud pigment to finish. The same was done to the wheel treads and the backside of the tires. With everything dry I then attached the tires.  Working now on some small details. The antenna base for the RT 524 is on the back and I used a resin base from the Pro Art Radio set. The antenna for the R442 is the short mast type from the Verlinden lights and antenna set. I used 24 gauge black wire to create the antenna wires for each of the antenna bases. The rear light lenses were coated with Tamiya Clear Red. I masked off a small box on each lens for the reverse light. To create the reflective rear markers I coated decal paper with thin coats of Tamiya Clear Black, Alclad Chrome and Tamiya Clear Red. I then cut strips and applied to the rear tailgate.  Next I installed the mirrors using some bent SS 24 gauge wire for the mounting band. This picture shows the mirror, the front R442 antenna & base and shows the completed wing window in the door. 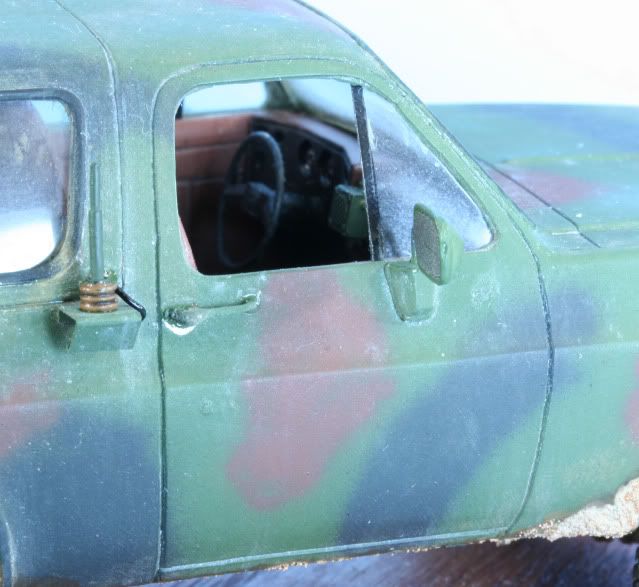 In the front the headlight and turn signal sockets were painted Black and then Alclad Polished Aluminum. The headlight lenses were installed. The turn lenses were painted on the inside with Tamiya Clear Orange and then installed. Then I installed the brush guard and the tow hooks. Here is the completed front view. 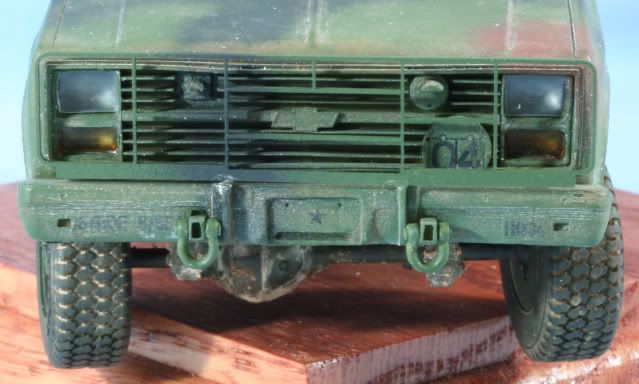 After installing the windshield wipers, I worked the model with AK NATO rainmarks to attain the “chalky” look. I have begun weathering the widows. Here is a look at the M1009 before final weathering. 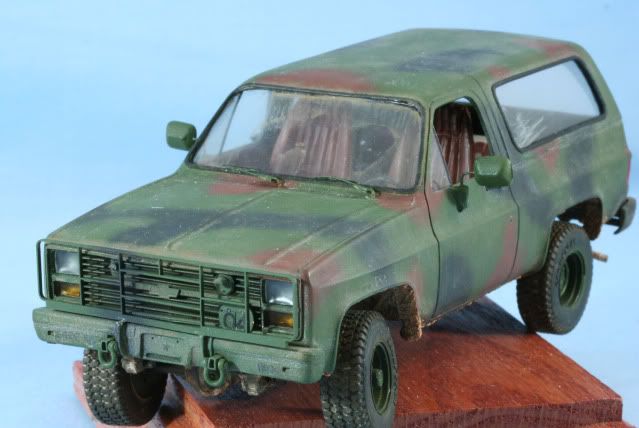 And from the rear  I have also spent some time in the wood shop and started getting the base together. Next up is finishing the base and weathering on the M1009. As always feel free to leave a comment either positive or negative Rounds Complete!! |
|
|
|
Post by deafpanzer on Feb 11, 2013 0:22:36 GMT -5
Hey Mike! Looking really GREAT!! Thanks for bringing back memories as my bus passed the National Guard base twice every day. The lot was filled with those beast... always loved those.
Can't wait to see it done soon!
|
|
redleg12
Full Member
  
Member since: August 2012
www.redleg2scale.com
Posts: 401
Aug 28, 2012 18:59:10 GMT -5
Aug 28, 2012 18:59:10 GMT -5
|
Post by redleg12 on Feb 11, 2013 7:13:51 GMT -5
Andy - Thanks. Yep, should be soon. I have to get the base ready and finish the weathering of the model. As for the memories, that is especially what I love building something within my era, it brings back the memories.
Rounds Complete!!
|
|
|
|
Post by robbo on Feb 11, 2013 7:22:33 GMT -5
Nice work Mike, one you don't see very often
|
|
|
|
Post by bullardino on Feb 11, 2013 10:48:04 GMT -5
That's looking the real thing, Mike  |
|
Deleted
Member since: January 1970
Posts: 0
Dec 2, 2024 2:32:28 GMT -5
Dec 2, 2024 2:32:28 GMT -5
|
Post by Deleted on Feb 11, 2013 16:18:43 GMT -5
Hi Mike, great work on the NATO camo and AK wash, a superb build  |
|
redleg12
Full Member
  
Member since: August 2012
www.redleg2scale.com
Posts: 401
Aug 28, 2012 18:59:10 GMT -5
Aug 28, 2012 18:59:10 GMT -5
|
Post by redleg12 on Feb 11, 2013 19:16:07 GMT -5
Robbo - That is me, "the different" .... if everyone builds it, I don't
Luigi - Thanks for the peek and the comment
Dicky - Always love the little details.. thanks for the comment
Steve - Thanks, love painting camo and totally love the AK products. IMO far superior to MIG. I am sure AK is kicking the old company's butt. I would not be surprised to see MIG eventually disappear.
Thanks guys
Rounds Complete!!
|
|
|
|
Post by wbill76 on Feb 11, 2013 21:15:21 GMT -5
Nice to see you're able to get in some bench time Mike, nice progress on the 'ride'!
|
|
|
|
Post by ceresvesta. on Feb 11, 2013 21:28:19 GMT -5
very good looking interior Red!
|
|
redleg12
Full Member
  
Member since: August 2012
www.redleg2scale.com
Posts: 401
Aug 28, 2012 18:59:10 GMT -5
Aug 28, 2012 18:59:10 GMT -5
|
Post by redleg12 on Feb 11, 2013 22:11:18 GMT -5
Bill - Thanks...looks like my ride should be ready soon to leave the motor pool. I will finish with a look like it needs to get to the wash rack!!
Ceresvesta - Thanks for stopping by and for the comments. It is the little things like the interior that make people look twice!!
Rounds Complete!!
|
|
redleg12
Full Member
  
Member since: August 2012
www.redleg2scale.com
Posts: 401
Aug 28, 2012 18:59:10 GMT -5
Aug 28, 2012 18:59:10 GMT -5
|
Post by redleg12 on Feb 12, 2013 18:58:39 GMT -5
Exrememal - Thanks for the look and for the comments.
Rounds Complete!!
|
|
|
|
Post by bbd468 on Feb 12, 2013 19:06:07 GMT -5
Great lookin' truck red! I too remember these Blazers at Reese AFB and the National Guard when i was a teen...always thought id own one someday, but girls and alcohol screw me out of it!   Gary |
|
redleg12
Full Member
  
Member since: August 2012
www.redleg2scale.com
Posts: 401
Aug 28, 2012 18:59:10 GMT -5
Aug 28, 2012 18:59:10 GMT -5
|
Post by redleg12 on Feb 12, 2013 22:44:24 GMT -5
BBD - Thanks.....understand the girls and alcohol...happens to the best of us!!
Kevin - Just give me a map, a grid square and a piece of string....I can bring fire and damnation anywhere... sorry having flashbacks... ahhh the BDU, not my favorite uniform but distinctive.
Thanks for the comments. still have a bit more weathering to go and then the antenna and base mounting...in the home stretch now.
Thanks guys
Rounds Complete!!
|
|
M1Carbine
Senior Member
    November '23 Showcased Model Awarded
Member since: November 2012
Posts: 1,739
Nov 16, 2012 2:49:11 GMT -5
Nov 16, 2012 2:49:11 GMT -5
|
Post by M1Carbine on Feb 13, 2013 0:48:01 GMT -5
Looks awesome Mike, ready to go pick up the CO...LOL
Bob
|
|
redleg12
Full Member
  
Member since: August 2012
www.redleg2scale.com
Posts: 401
Aug 28, 2012 18:59:10 GMT -5
Aug 28, 2012 18:59:10 GMT -5
|
Post by redleg12 on Feb 13, 2013 6:50:20 GMT -5
Bob - Thanks, LOL.... The BC (Battery Commander) would be comfy!!
Rounds Complete!!
|
|
sfcmikej
Full Member
  
Member since: December 2012
Peace through superior firepower.
Posts: 153
Dec 4, 2012 10:00:36 GMT -5
Dec 4, 2012 10:00:36 GMT -5
|
Post by sfcmikej on Feb 15, 2013 14:08:25 GMT -5
Mike
Like I said before, brings back memories. I have to say you nailed the look perfectly. BTW can you see that awesome logbook you made? It would be a shame to miss it!
Mike
|
|
|
|
Post by fightnjoe on Feb 16, 2013 1:16:42 GMT -5
very nice. very realistic.
joe
|
|
redleg12
Full Member
  
Member since: August 2012
www.redleg2scale.com
Posts: 401
Aug 28, 2012 18:59:10 GMT -5
Aug 28, 2012 18:59:10 GMT -5
|
Post by redleg12 on Feb 16, 2013 8:46:11 GMT -5
Mike - Looking at the interior is one of the reasons I modeled the door windows open.... so you could look in and see the interior. Yep from the passenger side you look in and see the logbook and the chain on the floor to lock the steering column. The good stuff you and I remember!! Thanks for stopping by and the comments.
Joe - Thanks for stopping by and for the comment.
Rounds Complete!!
|
|
reserve
Senior Member
   
Member since: July 2012
Si vis pacem para bellum
Posts: 2,373
Jul 11, 2012 9:11:45 GMT -5
Jul 11, 2012 9:11:45 GMT -5
|
Post by reserve on Feb 17, 2013 19:57:01 GMT -5
Nice!! Love the mud buildup
Regards,
Mark
|
|
redleg12
Full Member
  
Member since: August 2012
www.redleg2scale.com
Posts: 401
Aug 28, 2012 18:59:10 GMT -5
Aug 28, 2012 18:59:10 GMT -5
|
Post by redleg12 on Feb 17, 2013 23:09:13 GMT -5
Mark - thanks for stopping by
Rounds Complete!!
|
|
redleg12
Full Member
  
Member since: August 2012
www.redleg2scale.com
Posts: 401
Aug 28, 2012 18:59:10 GMT -5
Aug 28, 2012 18:59:10 GMT -5
|
Post by redleg12 on Feb 17, 2013 23:09:26 GMT -5
Well I completed the base, cut from Oak, then to the router table, stain, polyurethane satin finish. Then a cut of Styrofoam covered with paper mache, mixed with paint. After it dries, it was glued to the wood base, weathered with the same pigments as the model, added some turf grass and a bush. As for the model, the final weathering was done with AK Wash for NATO models. The area below the fuel fill I created a stain with Floquil Oil Stain and on the lower half of the body the weathering is darkened with MIG Pigments Dried Mud. The last thing added was the antenna, which is .020 brass wire. Painted with Poly Scale Dark Green and the tie down made from wax coated ship rope painted Tamiya Olive Green. That’s it, here is the final model 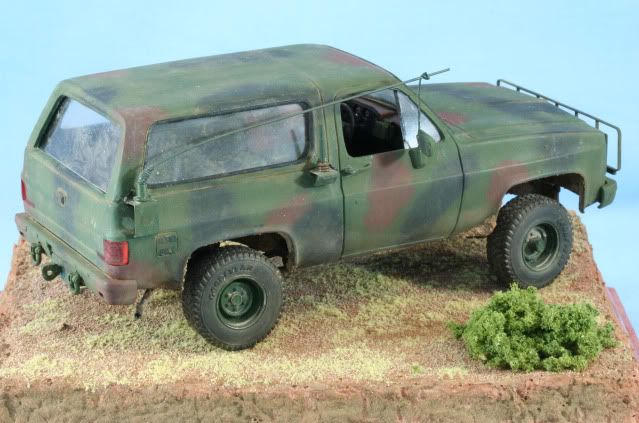 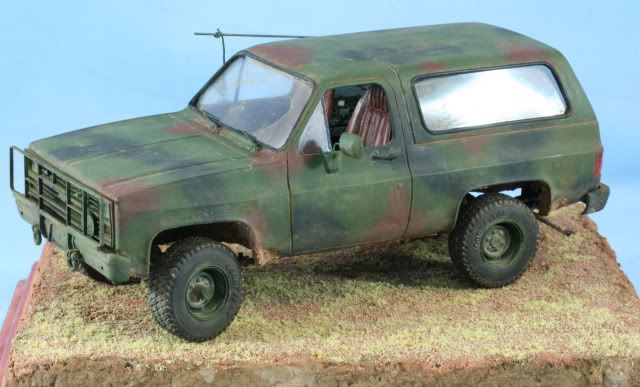 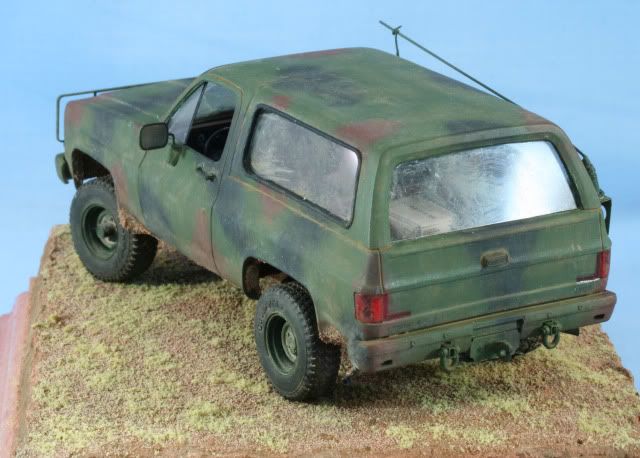 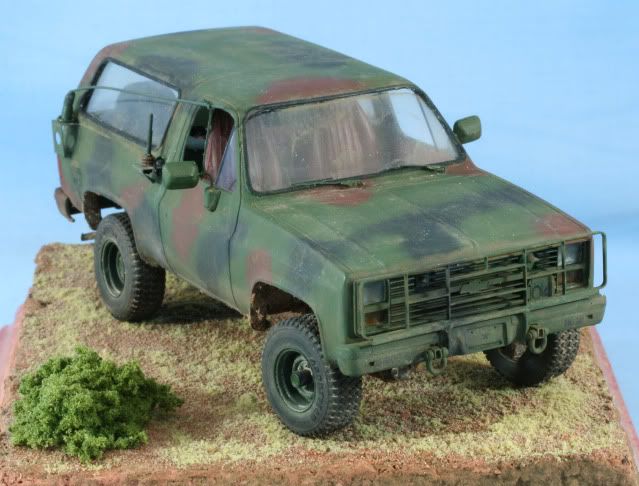 As always feel free to leave a comment either positive or negative. Thanks for following along. Next mission will be the M114A1 155mm Howitzer End of Mission. Rounds Complete!! |
|
|
|
Post by fightnjoe on Feb 18, 2013 10:37:38 GMT -5
the dang thing looks like you could hop in and drive away. dang nice build sir.
joe
|
|
|
|
Post by deafpanzer on Feb 18, 2013 15:06:05 GMT -5
Fantastic build!!! Now I want to carjack it... can not promise if I will ever return it. Looking forward to your next build...
|
|
Deleted
Member since: January 1970
Posts: 0
Dec 2, 2024 2:32:28 GMT -5
Dec 2, 2024 2:32:28 GMT -5
|
Post by Deleted on Feb 18, 2013 15:21:54 GMT -5
now that's nice and very different from the norm
|
|
redleg12
Full Member
  
Member since: August 2012
www.redleg2scale.com
Posts: 401
Aug 28, 2012 18:59:10 GMT -5
Aug 28, 2012 18:59:10 GMT -5
|
Post by redleg12 on Feb 18, 2013 19:34:08 GMT -5
Joe - Key are in the ignition!! thanks
Andy - Thanks, I understand the feeling
Pete - I love to build the different and artillery. Thanks for the visit and the comment
Rounds Complete!!
|
|
|
|
Post by bbd468 on Feb 18, 2013 19:37:46 GMT -5
Outstanding build! Man...the weathering really brought this thing to life. You nailed this RL!!!  Gary |
|
|
|
Post by wbill76 on Feb 18, 2013 20:33:17 GMT -5
Enjoyed watching you recreate your old ride Mike, nice work on the vehicle and base. Definitely looking forward to seeing that M114 come to life as the next victim!
|
|