|
|
Post by fightnjoe on Jan 1, 2013 19:39:10 GMT -5
very cool. looks very good.
joe
|
|
redleg12
Full Member
  
Member since: August 2012
www.redleg2scale.com
Posts: 401
Aug 28, 2012 18:59:10 GMT -5
Aug 28, 2012 18:59:10 GMT -5
|
Post by redleg12 on Jan 1, 2013 20:49:23 GMT -5
Steve - Thanks for the peek and yes I spent some time in one.
As for the spare, they were Chevys and all came with a spare. The M1009 had the spare mounted in the rear as you see in my build. The M1008 which was the pickup version had the spare under the cargo area. As for the kit, he did a great job with the basic details but as you know everything you add costs. I am sure he was trying to stay within a target price.....this no spare.
Joe - Thanks again for stopping in.
Rounds Complete!!
|
|
redleg12
Full Member
  
Member since: August 2012
www.redleg2scale.com
Posts: 401
Aug 28, 2012 18:59:10 GMT -5
Aug 28, 2012 18:59:10 GMT -5
|
Post by redleg12 on Jan 2, 2013 21:41:09 GMT -5
Dicky - Thanks, the ruck is dull but not flat, could be the lights. I have one light high and one low on each side. I will admit it is not as dull as some of the other items. I think I will hit it with some dull coat for good measure. Thanks again.
Rounds Complete!!
|
|
Deleted
Member since: January 1970
Posts: 0
Dec 2, 2024 3:00:57 GMT -5
Dec 2, 2024 3:00:57 GMT -5
|
Post by Deleted on Jan 2, 2013 21:50:16 GMT -5
Mike , the details are adding some good business ! No cig butts on the floor ? ;D
|
|
|
|
Post by bbd468 on Jan 2, 2013 23:02:01 GMT -5
lookin' great Mike! Really like the little details ya added. OH BTW, dont let CB see tha Cig pack....might get his cravings up....hes doin' sooo good! ;D
Gary
|
|
redleg12
Full Member
  
Member since: August 2012
www.redleg2scale.com
Posts: 401
Aug 28, 2012 18:59:10 GMT -5
Aug 28, 2012 18:59:10 GMT -5
|
Post by redleg12 on Jan 3, 2013 7:02:52 GMT -5
Carl - Thanks, no butts on the floor...they are in the ash tray!!
Gary - Thanks for the peek. CB....its an old empty pack!!
Rounds Complete!!
|
|
|
|
Post by deafpanzer on Jan 3, 2013 11:04:05 GMT -5
Nice touch adding details and stowage to the interior!!!
|
|
|
|
Post by wouter on Jan 3, 2013 11:44:50 GMT -5
Nice work mate, I must say I love the weathering on the lower hull and inside. Those leather seats look very cool and the stowage really adds some nice extra to it
Cheers
|
|
redleg12
Full Member
  
Member since: August 2012
www.redleg2scale.com
Posts: 401
Aug 28, 2012 18:59:10 GMT -5
Aug 28, 2012 18:59:10 GMT -5
|
Post by redleg12 on Jan 3, 2013 21:27:21 GMT -5
Malc - Glad you found it. Thanks for stopping by
Andy - Thanks for the peek and the comments
Wouter - Thanks, I was worried how the seats would turn out. I think they came close to the real deal. Thanks for the comments
Brian - For those who know me, off beat is my middle name. Thanks for the comments on the cab, I strive for reality....as I remember it!
Rounds Complete!!
|
|
redleg12
Full Member
  
Member since: August 2012
www.redleg2scale.com
Posts: 401
Aug 28, 2012 18:59:10 GMT -5
Aug 28, 2012 18:59:10 GMT -5
|
Post by redleg12 on Jan 6, 2013 20:24:57 GMT -5
Moving on to the body. Before any assembly on the body, which is a one piece cast, has to be cleaned up including cutting out the excess resin from all the window areas. The first assembly to the body is to glue in the front grille in place. 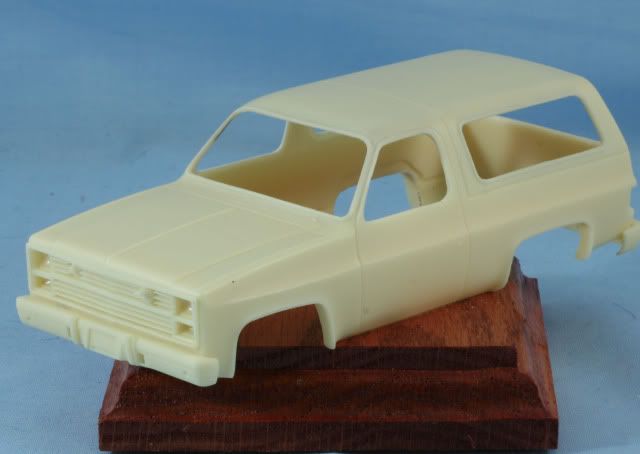 Next is to complete the front adding the bumper, tow hook holders the PE Chevy logo and the PE bridge marker plate. On each side the base for the rear view mirrors and the door handles. Let me just say the door handles are a PITA to remove from the pour block without breaking 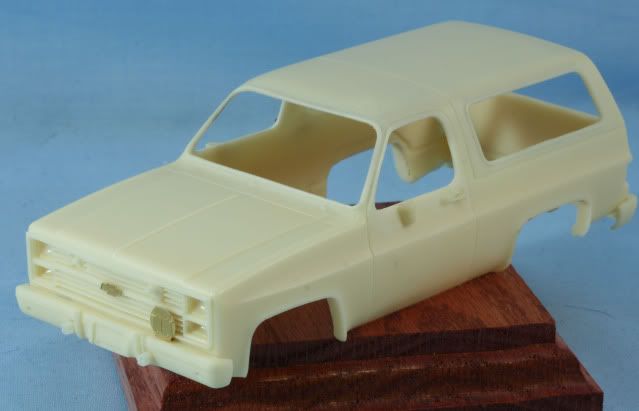 In the rear, the bumper and tow hook holders. Also the PE rear window handle and license plate cover. With the PE cover added, the PE bolt plate and resin tow hook can be added. The rear bumper on the M1009 has 4 bolt heads, which are not on the kit bumper. I used some PE rivet heads to add these to the bumper. The kit includes an antenna mounting bracket in PE. This bracket is for a full size antenna for the RT-524, which I mounted in the rear. I went into my PE spare parts to find the PE to fabricate the smaller bracket for the short antenna used on the R-442. With the antenna brackets in place, the kit includes PE antenna wire grommets. One is mounted above each antenna mount on the body. 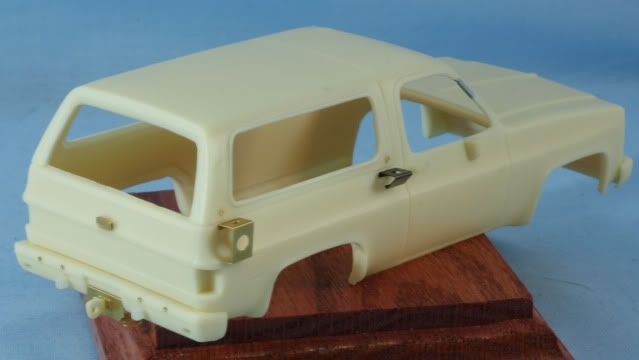 That’s it for now. The body is off to the paint shop. As always feel free to leave a comment either positive or negative Rounds Complete!! |
|
|
|
Post by fightnjoe on Jan 6, 2013 20:40:52 GMT -5
awesome. looking dang good from here.
joe
|
|
|
|
Post by wbill76 on Jan 6, 2013 21:10:59 GMT -5
Looking good Mike! I imagine cleaning out all those window openings wasn't much fun. The added PE details are a nice touch as well.
|
|
|
|
Post by bbd468 on Jan 6, 2013 21:42:24 GMT -5
Looks to be a sweet piece of resin Mike...nice job fella!  Gary |
|
redleg12
Full Member
  
Member since: August 2012
www.redleg2scale.com
Posts: 401
Aug 28, 2012 18:59:10 GMT -5
Aug 28, 2012 18:59:10 GMT -5
|
Post by redleg12 on Jan 6, 2013 21:48:28 GMT -5
Joe - Thanks for the comment
Bill - Cleaning the windows requires careful cutting and sanding. The hard part is the pillar between the front windshield and the door windows. The grey on the passenger side pillar is putty from repair after cleaning the excess resin. There is a PE set with the model...just a few extra PE items needed from the PE spares box.
Thanks again
Rounds Complete!!
|
|
|
|
Post by bullardino on Jan 7, 2013 4:10:05 GMT -5
What a nice progress, Redleg  Dunno why, but when I see this car I think of Chuck Norris... |
|
|
|
Post by deafpanzer on Jan 7, 2013 10:33:28 GMT -5
I will give you five bucks if you can replace the Chevy logo with Ford logo. Did I ever tell you I love PE? Nice PE work buddy!
|
|
|
|
Post by wing_nut on Jan 7, 2013 13:45:42 GMT -5
I think this is the closest thing to a non- military vehicle I've seen, and probably will see, from you. Good progress.
|
|
redleg12
Full Member
  
Member since: August 2012
www.redleg2scale.com
Posts: 401
Aug 28, 2012 18:59:10 GMT -5
Aug 28, 2012 18:59:10 GMT -5
|
Post by redleg12 on Jan 7, 2013 20:20:16 GMT -5
Luigi - Thanks...Chuck Norris...hummm
Andy - Now first of all i am a GM man and have had plenty of Chevy's. As far as PE...love it myself, except the real tiny stuff that always flies off into space!!
Brian - Thanks for the comments.
Marc - Well it is a M1009 CUCV...the CUCV is Commercial Utility Cargo Vehicle!! It was a direct military use of a commercial available vehicle. GM even had their commercial option codes for the different military options on the M1009. With that said....yep its not custom!!
Thanks guys
Rounds Complete!!
|
|
joelsmith
Full Member
  
Member since: July 2012
There no winners in war, only survivors.
Posts: 1,404
Jul 5, 2012 22:33:58 GMT -5
Jul 5, 2012 22:33:58 GMT -5
|
Post by joelsmith on Jan 7, 2013 22:48:45 GMT -5
Redleg, were those Blazers gas or diesel?
|
|
redleg12
Full Member
  
Member since: August 2012
www.redleg2scale.com
Posts: 401
Aug 28, 2012 18:59:10 GMT -5
Aug 28, 2012 18:59:10 GMT -5
|
Post by redleg12 on Jan 8, 2013 7:00:06 GMT -5
Joel - The M1008/1009 utilized a 6.2 liter diesel engine. The same engine was used on the original HMMWV, that was the major advantage of the M1009. Prior to the M1008/9 the M151A2 1/4 ton or the M880 series vehicle ran on gasoline. units had to carry two different fuels. By eliminating the earlier vehicles, units only had to carry diesel for the vehicles.
Thanks for stopping in
Rounds Complete!!
|
|
joelsmith
Full Member
  
Member since: July 2012
There no winners in war, only survivors.
Posts: 1,404
Jul 5, 2012 22:33:58 GMT -5
Jul 5, 2012 22:33:58 GMT -5
|
Post by joelsmith on Jan 8, 2013 17:56:40 GMT -5
Redleg. thanks for the answer, My "Adopted" Dad bought one out of Reforger stock when they were replaced. He drove it for years 'till one of his Grandkids found out 4 wheel drive Does NOT make you immune to ice. Talk more soon, Joel.
|
|
redleg12
Full Member
  
Member since: August 2012
www.redleg2scale.com
Posts: 401
Aug 28, 2012 18:59:10 GMT -5
Aug 28, 2012 18:59:10 GMT -5
|
Post by redleg12 on Jan 8, 2013 19:35:47 GMT -5
Joel - The 4wheel drive of the M1009 was not the greatest. Then again, even track will slide on ice.
Dicky - Miniman's casting is outstanding. There are no voids, no fisheyes, and all the parts are perfect. There are many different levels of "quality" for resin kit manufacturers. Miniman ranks among the highest and I would highly recommend their kits.
Rounds Complete!!
|
|
|
|
Post by 406 Silverado on Jan 8, 2013 19:38:32 GMT -5
Looking good Mike. I think Steve R. was doing this same kit.
|
|
sfcmikej
Full Member
  
Member since: December 2012
Peace through superior firepower.
Posts: 153
Dec 4, 2012 10:00:36 GMT -5
Dec 4, 2012 10:00:36 GMT -5
|
Post by sfcmikej on Jan 9, 2013 18:10:19 GMT -5
Mike
Looking good! Man does that bring back memories. We used to call them Cut-Vees. BTW many moons ago I was an Army recruiter in Hamilton Township, not too far from you.
Mike
|
|
redleg12
Full Member
  
Member since: August 2012
www.redleg2scale.com
Posts: 401
Aug 28, 2012 18:59:10 GMT -5
Aug 28, 2012 18:59:10 GMT -5
|
Post by redleg12 on Jan 9, 2013 23:18:21 GMT -5
Rob - Yep, as I remembered, Steve was working on one. Wait.....
Steve - Shelf of shame.....It is never over until it is over....you can finish it...Thanks for the peek
Mike - Yep the Cut-Vee...there are a bunch of us here going down memory lane looking at this one. My moons are many also....lets just say my military time began with the only thing I ever won....the draft lottery. That's a bunch of moons and a couple of fortnights thrown in!! Always nice to hear another brother!
Thanks guys
Rounds Complete!!
|
|
Deleted
Member since: January 1970
Posts: 0
Dec 2, 2024 3:00:57 GMT -5
Dec 2, 2024 3:00:57 GMT -5
|
Post by Deleted on Jan 10, 2013 0:45:24 GMT -5
Lookin good Mike  |
|
redleg12
Full Member
  
Member since: August 2012
www.redleg2scale.com
Posts: 401
Aug 28, 2012 18:59:10 GMT -5
Aug 28, 2012 18:59:10 GMT -5
|
Post by redleg12 on Jan 10, 2013 7:02:47 GMT -5
Carl - Thanks for taking a peek and for your comments.
Rounds Complete!!
|
|
|
|
Post by Tojo72 on Jan 10, 2013 11:37:41 GMT -5
Good looking build Mike,one you don't see everyday
|
|
redleg12
Full Member
  
Member since: August 2012
www.redleg2scale.com
Posts: 401
Aug 28, 2012 18:59:10 GMT -5
Aug 28, 2012 18:59:10 GMT -5
|
Post by redleg12 on Jan 10, 2013 19:33:23 GMT -5
Tojo - Thanks for the look and for the comments. I always love to build the strange and different.
Rounds Complete!!
|
|
redleg12
Full Member
  
Member since: August 2012
www.redleg2scale.com
Posts: 401
Aug 28, 2012 18:59:10 GMT -5
Aug 28, 2012 18:59:10 GMT -5
|
Post by redleg12 on Jan 13, 2013 16:10:42 GMT -5
Well, into the paint shop, the entire body is given a primer coat Poly Scale NATO Green and a finish coat of Tamiya NATO Green. 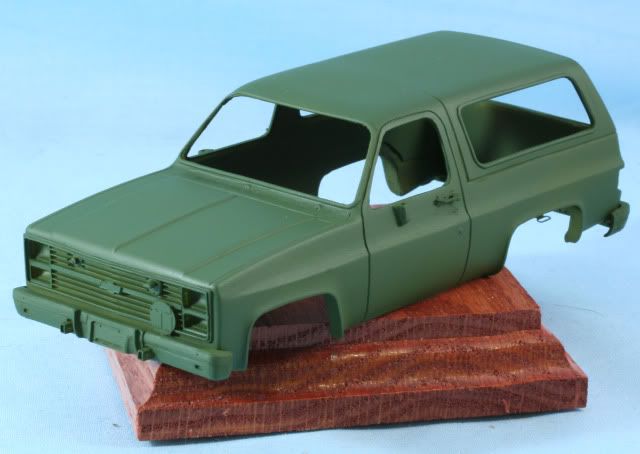 After letting the green dry overnight the window openings are masked to keep overspray getting on the inside. Next is the Tamiya NATO Black. The camo pattern is done with my Grex airbush on a low airflow setting, using the vented tip and painted by eye, looking at photos. 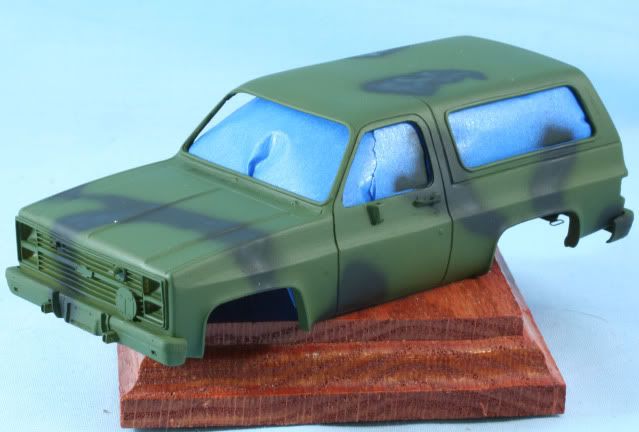 Lastly, the Tamiya NATO Brown to finish the 3 color camo. 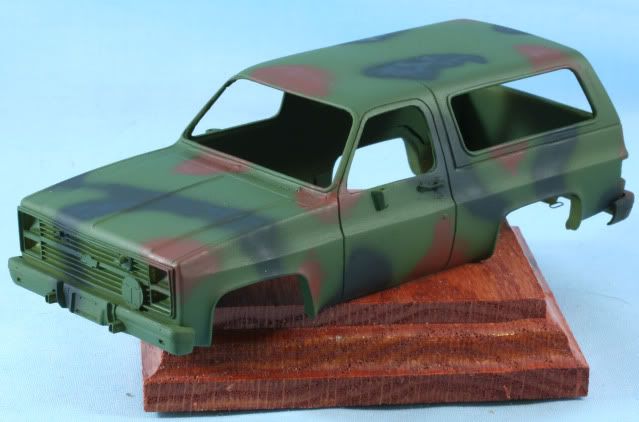 Once the paint was allowed to dry, the body was coated with Future Clear in preparation for decals and weathering. That’s it for now, more coming. As always feel free to leave a comment either positive or negative Rounds Complete!! |
|