|
|
Post by deafpanzer on Oct 22, 2013 10:58:54 GMT -5
WHOA WHOA WHOA! Almost missed your weekly update! BigJohn kept me very busy on that day... LOL
Great tip about drilling inside the cleaning rods! Never thought about that... great PE work on the clasps too!
|
|
|
|
Post by Tobi on Oct 22, 2013 12:09:22 GMT -5
Great work Bill, but I want some paint!
Cheers,
Tobi
|
|
|
|
Post by wbill76 on Oct 22, 2013 17:30:38 GMT -5
Andy, you've got to stay on your toes there buddy! Between being distracted by kits, BJ, and the Colts beating the Broncos, it's amazing you could find your way anywhere!  Tobi Tobi, getting closer, one step at a time.  Thanks for looking in!
|
|
|
|
Post by Deano on Oct 22, 2013 17:37:56 GMT -5
Very nice detailing Bill , as always its the little things that make all the difference .
Deano
|
|
|
|
Post by wbill76 on Oct 22, 2013 19:50:09 GMT -5
Agree with you there Deano! Thanks for looking in.
|
|
|
|
Post by wbill76 on Oct 27, 2013 13:58:35 GMT -5
Work moved on to the turret in the latest round with efforts focused on Steps 13 and 14 to build up the main gun and mantlet. The kit includes a metal spring to allow for 'recoil' but it's not essential and I left it out deliberately. I opted for the kit-included turned aluminum barrel. The small locking piece that secures the base of the barrel into the breech and recoil housing, part A9, is shown in the instructions installing upside down. The 'open' end installs down and not up, otherwise you can't get the recoil housing halves together. 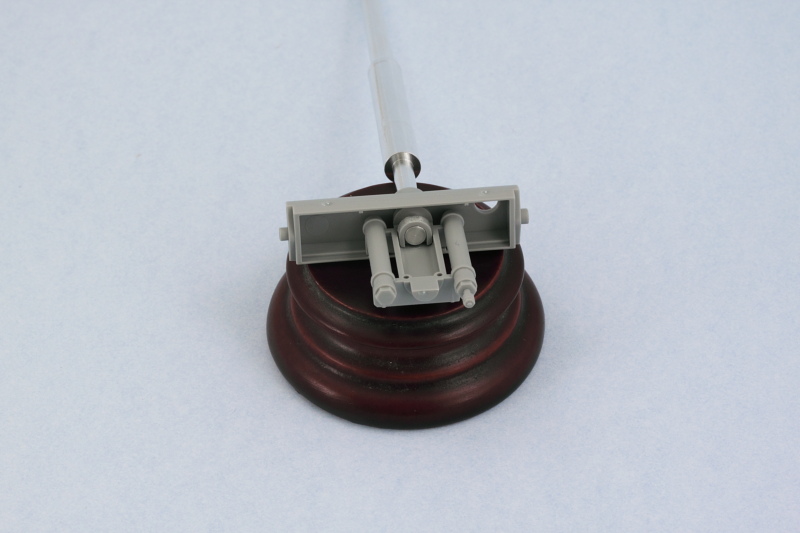 The Atak set includes two different resin replacement mantlets that have the zim pattern, The 'monocular' sight version was introduced in April '44 so I went with that one. I replaced the kit coaxial MG34 barrel with a turned brass item from JB Models. I used a small amount of ApoxieSculpt putty to provide something for the brass barrel to hold onto and also blank off the open port since the JB barrel's base diameter was smaller than that of the kit part. 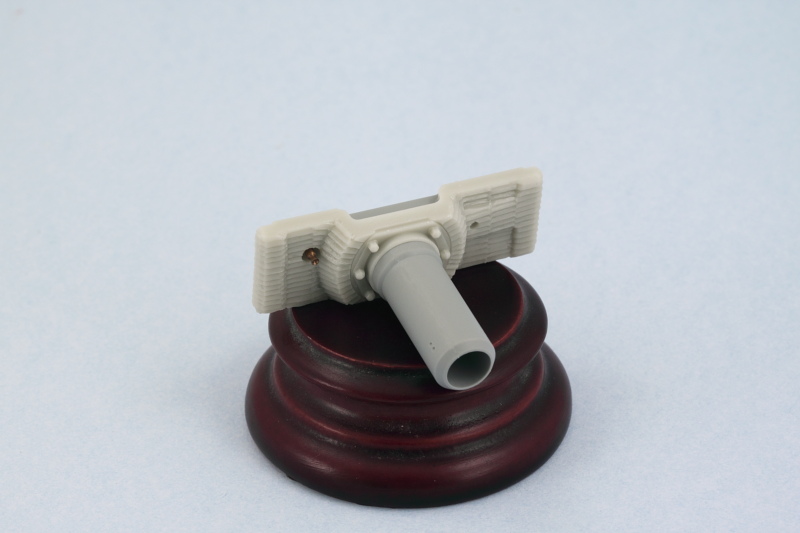 The rest of the gun was assembled per the instructions. The kit provides a choice of muzzle brakes but has the part numbers backward on the instruction diagrams. Parts A11-A17-A18 construct the larger type brake used before April '44 while parts E7-E10-E11 construct the smaller type seen after that date. I used the smaller type to match with the mantlet type selected previously. The brake has a 'D' shaped opening that has to be opened up to a full round opening to mate up with the aluminum barrel, so that was carefully drilled out with a small drill pit and pin vise. 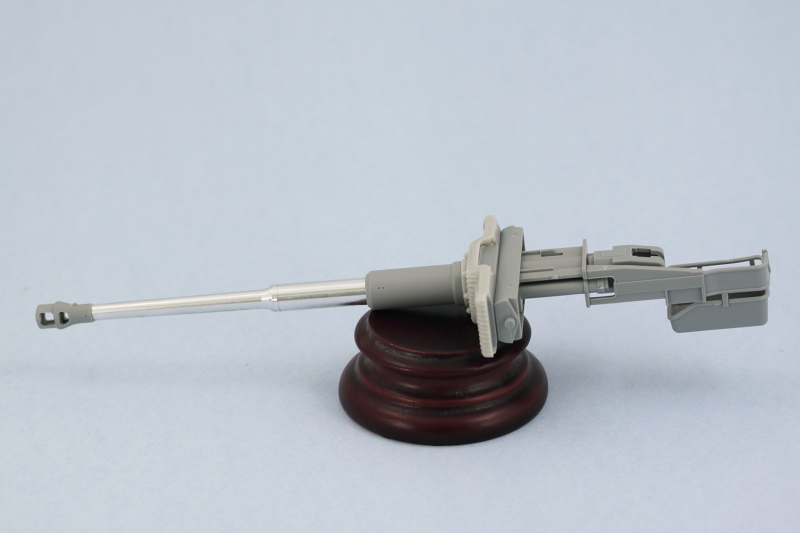 Step 15 adds interior details that I skipped since I'm not showing any of the turret hatches open. Step 16 addresses the turret roof, I chose the roof style used after June '44 and added the hatches and other details. The clear periscopes were left out for now since they can be installed into their spots from the turret underside later after painting. 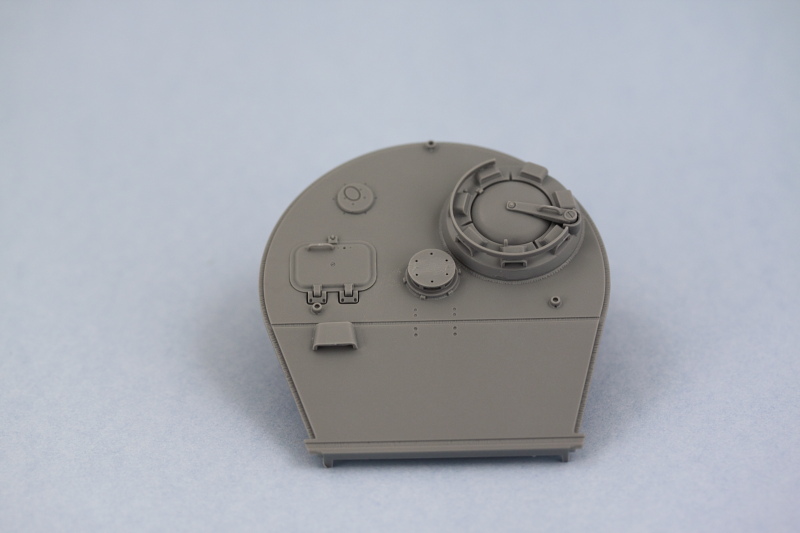 Step 17 assembles the turret but before I could do that, I needed to add the zim. The Atak set includes the choice of small or large ridge patterns panels and I opted for the larger patterns often seen on Tiger turrets vs. the smaller pattern used on the hull. Panels were added using a combination of CA gel and liquid glue since the curves of the turret put a little more stress on the panels in terms of the surfaces they needed to conform to. Strategic use of some smooth-jaw clips helped get everything to stay put until the glue set. The Atak set provides a replacement resin escape hatch as well as zimmed parts for the view ports on the turret sides. The view port parts aren't the same size as what is molded on the turret, so the turret ports were carefully sanded down until the resin parts sat flush with the zim panel. Then just a little bit of white putty to join everything up to round it out. 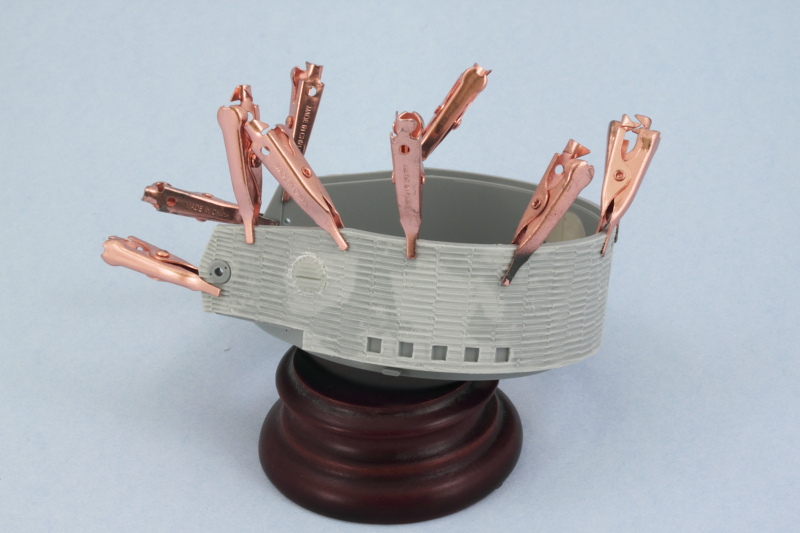 Turret roof was then installed in place and the rest of the details added in the form of the spare track holders, the rear turret bin, and the MG AA mount. 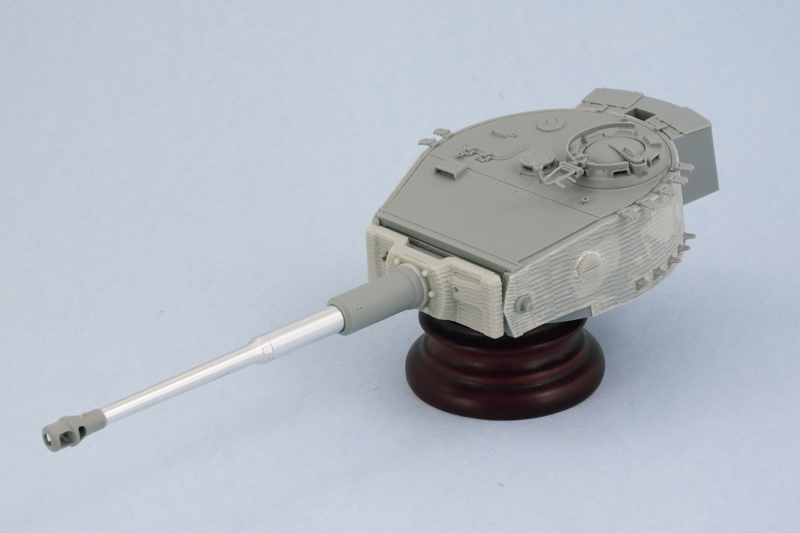 Test fit with the hull showed that I needed to adjust the placement of the shovel clamp installed earlier to allow it to clear the bottom of the mantlet. Otherwise everything else played nice. 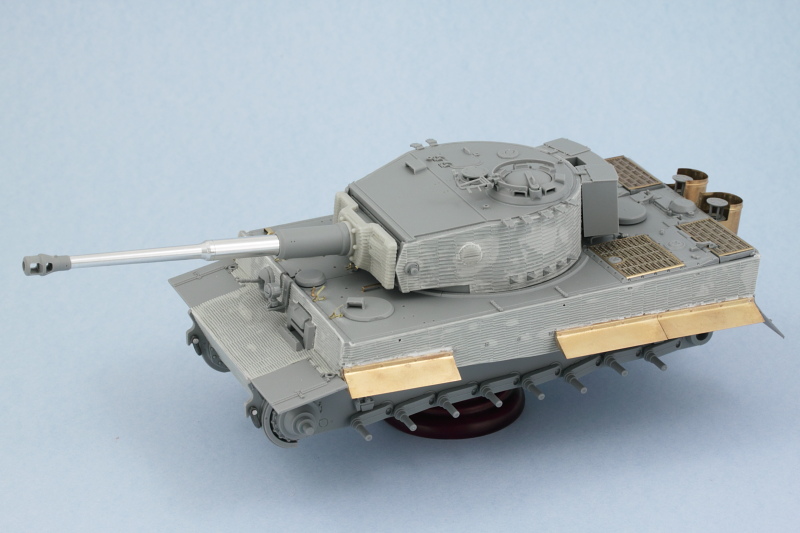 Next up will be starting the paint work. |
|
Deleted
Member since: January 1970
Posts: 0
Dec 2, 2024 9:17:43 GMT -5
Dec 2, 2024 9:17:43 GMT -5
|
Post by Deleted on Oct 27, 2013 15:30:53 GMT -5
looks very nice indeed that zim really does look good
|
|
panzerconor.
Full Member
  
Member since: April 2013
My cat's breath smells like cat food.
Posts: 176 
|
Post by panzerconor. on Oct 27, 2013 17:38:49 GMT -5
I've been waiting a while to see the turret and hull together, and it was well worth the wait. The zimmerit is flawless! I've got a Verlinden damaged zimm kit for my panther, but thats made of copper I think. Might be more trouble than it's worth hahaha. Looking forward to the next installment!
|
|
|
|
Post by tonylee-Rest In Peace on Oct 27, 2013 17:55:17 GMT -5
Yeah me too looking forward that is.  Cheers Tony lee  |
|
totalize
Full Member
  
Member since: February 2013
Don't take yourself too seriously. It's just plastic.
Posts: 260 
|
Post by totalize on Oct 27, 2013 17:58:16 GMT -5
Bill,
Your big cat is coming together very nicely. It's great you mentioned that ATAK gives you the choice of either narrow or broad pattern Zimm for the turret. I didn't know this. Good thinking on ATAK's part. Of course you have done a great job getting the zimm on and the rest of the tank.
Dave.
|
|
|
|
Post by deafpanzer on Oct 27, 2013 18:04:44 GMT -5
Great update! I just love Zimmerit so much...
|
|
|
|
Post by wbill76 on Oct 27, 2013 20:17:23 GMT -5
Pete, thanks as always! Conor, I hear you on the PE zim, it can be used but has its own challenges especially when it comes to joining edges and painting. Tony, always glad to have you looking to the future!  Dave Dave, I didn't know the Atak set offered the choice either until I got it. I thought that was a great 'extra' for them to include as it allows a lot more flexibility to go with the '3-in-1' nature of the kit. Yet another reason why I love their sets!  Andy Andy, I hear that zim looks good on houses in Indiana... 
|
|
Deleted
Member since: January 1970
Posts: 0
Dec 2, 2024 9:17:43 GMT -5
Dec 2, 2024 9:17:43 GMT -5
|
Post by Deleted on Oct 27, 2013 20:41:10 GMT -5
Bill that's lookin pretty !
|
|
bigjohn
Reviews member    
Member since: December 2011
John Hale
Posts: 3,438
Dec 21, 2011 2:17:45 GMT -5
Dec 21, 2011 2:17:45 GMT -5
|
Post by bigjohn on Oct 27, 2013 21:04:52 GMT -5
Looks like this one is moving pretty fast for you Bill. I have to agree with the others, that Zim set really sets it off nicely. Looking forward to paint!
|
|
|
|
Post by Leon on Oct 27, 2013 21:11:38 GMT -5
Coming along very nicely Bill.The zim looks awesome.   |
|
danb.
Reviews member     March 2013 MoM Winner
Member since: November 2011
Posts: 2,808
Nov 17, 2011 9:22:52 GMT -5
Nov 17, 2011 9:22:52 GMT -5
|
Post by danb. on Oct 28, 2013 2:24:51 GMT -5
Wow Bill i have been away from this build for a couple of days then BAM the beast is all built and nearing the paint stage looking forward to this
Dan B
|
|
|
|
Post by TRM on Oct 28, 2013 4:47:46 GMT -5
Right on Bill!! Seen the FB update...finally getting around over to here...looking pretty sweet!! I hear the rumblings of the compressor!!  |
|
|
|
Post by bbd468 on Oct 28, 2013 10:43:53 GMT -5
Gorgeous brother Bill! Clean-crisp build as usual.  |
|
|
|
Post by wbill76 on Oct 28, 2013 12:20:39 GMT -5
Carl, thanks buddy! You'll have to fight Andy for engagement rights though, watch out!  BJ BJ, I've managed to keep this one moving on a steady pace so far, fingers crossed that I can keep it going. Paint and weathering is always when things slow down vs. the build stages but I don't anticipate any major delays...yet.  Leon Leon and Gary, thanks for the comments as always! Dan, it build up reasonably quickly, now on to paint! You have to remember that we aren't all like Andy's DUKW marathon project. 
|
|
elco
Full Member
   July & Oct 2014 MoM Winner
Member since: May 2013
MOY 2014 Winner
Posts: 660 
|
Post by elco on Oct 28, 2013 12:54:54 GMT -5
Nice clean build, looking perfect from here! Are you going to place all sparetracks on the turret?
|
|
Deleted
Member since: January 1970
Posts: 0
Dec 2, 2024 9:17:43 GMT -5
Dec 2, 2024 9:17:43 GMT -5
|
Post by Deleted on Oct 28, 2013 13:00:00 GMT -5
Bill , LOL !  I wouldn't think of interfering with Andy's romances !  |
|
|
|
Post by wbill76 on Oct 28, 2013 13:25:05 GMT -5
Elco, yep, the spare tracks will be added to the turret in their holders after the paint work is done. Thanks for the comments! Carl, smart man...we all know about Andy's penchant for the 'ladies'! 
|
|
|
|
Post by robbo on Oct 28, 2013 13:31:44 GMT -5
The detail in this kit is so crisp and clean just makes me want to go and get one, mind you your pics are of a lovely quality Bill, great blog to follow mister
|
|
|
|
Post by dupes on Oct 28, 2013 15:42:06 GMT -5
Ahhhh, now the real fun begins!  |
|
|
|
Post by wbill76 on Oct 28, 2013 15:53:10 GMT -5
Thanks Ian! This particular kit has become something of a collector's item but any of Dragon's Tiger I kits would be up to the same standard. You know you want to!  Dupes Dupes, yes indeed! Paint and weathering on a zimmed vehicle is always fun.  |
|
|
|
Post by Deano on Oct 28, 2013 16:43:01 GMT -5
Great progress here Bill , cant wait to see this one under paint !
Deano
|
|
thug626
Senior Member
   
Member since: January 2013
Posts: 2,035
Jan 15, 2013 13:05:28 GMT -5
Jan 15, 2013 13:05:28 GMT -5
|
Post by thug626 on Oct 28, 2013 19:40:23 GMT -5
Hello Bill.
This cat is taking shape quite nicely.
Dave
|
|
|
|
Post by wbill76 on Oct 28, 2013 20:29:15 GMT -5
Thanks Deano and Dave, much appreciated gents!
|
|
Keith Christie
Full Member
  
Member since: June 2012
Posts: 292 
|
Post by Keith Christie on Oct 29, 2013 3:55:18 GMT -5
Very nice Bill,
Im looking forward to seeing some paint.
Keith
|
|
|
|
Post by wbill76 on Oct 29, 2013 12:09:31 GMT -5
Thanks Keith! Me too, fingers crossed that no Halloween gremlins get in the way!  |
|