|
|
Post by bullardino on Oct 30, 2013 6:37:13 GMT -5
I had seen the update on FB, but had no time for the forum  The build is so clean and perfect, a true piece of art  |
|
|
|
Post by ceresvesta. on Oct 30, 2013 7:28:22 GMT -5
AWESOMNESS AND DELIGHTIFICATION OF A BUILD. That is what`s happening here.  I may add scrumtrulescent  And why does Andy get all the hotties? This is unfair  Bill this tiger rocks! Phil. |
|
|
|
Post by wbill76 on Oct 30, 2013 12:33:33 GMT -5
Thanks Luigi! I'm enjoying this one quite a bit. Phil, appreciate the comments as well, you're starting to rival Dicky for new vocabulary additions, scrumtrulescent is a new one! Andy's quick, that's the only explanation I can give. You just have to beat him out is all!  |
|
|
|
Post by bullardino on Oct 30, 2013 15:10:35 GMT -5
Thanks Luigi! I'm enjoying this one quite a bit The result shows it in full  |
|
|
|
Post by armorguy on Nov 1, 2013 9:49:33 GMT -5
Wow Bill, that's one helluva zimmerited beast ! Nice clean build mate, as Deano said it, the paint stages will be more than just interesting !
|
|
|
|
Post by wouter on Nov 1, 2013 11:57:44 GMT -5
Nice to see the turret coming to shape Bill. Really looking nice with all the zimmerit and all. Just a small detail remark: if possible you might want to retract the turret MG a bit. I made the same error on my first Tiger build and David Byrden was so kind to make me adjust it.  oh, almost Sunday evening/Monday morning update...can't wait for that...exciting times indeed  Cheers |
|
|
|
Post by wbill76 on Nov 1, 2013 22:31:30 GMT -5
Thanks AG! I hope to have plenty of time this weekend to do the paint work! Wouts, getting closer to the regularly scheduled update! Thanks for the pointer on the MG, but I used the info on Byrden's site and the image below as my guide for how far to have the MG out from this link: tiger1.info/EN/DragonCoaxMG.html There could be a possible contradiction and it should indeed be more flush with the opening as yours is, but I can't change it now on mine regardless. It's set in rock-hard epoxy putty with CA to boot so it's got to remain as-is. |
|
|
|
Post by wouter on Nov 2, 2013 1:27:01 GMT -5
darn, seems like I didn't look close enough to Davids site...mine ain't right as well  oh well, it's just a minor issue anyway. ^^ Paint soldier  Cheers |
|
|
|
Post by wbill76 on Nov 2, 2013 11:56:37 GMT -5
No worries Wouts! Paint is coming sir!  |
|
thug626
Senior Member
   
Member since: January 2013
Posts: 2,035
Jan 15, 2013 13:05:28 GMT -5
Jan 15, 2013 13:05:28 GMT -5
|
Post by thug626 on Nov 2, 2013 11:57:23 GMT -5
Consider the MG fit a "field mod"  Sorry, it's all I got. I need another cup o'java.   Dave |
|
|
|
Post by Leon on Nov 2, 2013 12:10:43 GMT -5
The Tiggie is really looking sharp Bill.Great job on the PE.  |
|
|
|
Post by wbill76 on Nov 2, 2013 14:05:13 GMT -5
No worries Dave, definitely not a show-stopper by any stretch! Leon, thanks as always!  |
|
bbrowniii
Full Member
  
Member since: March 2012
If you are not part of the solution, you are part of the precipitate.
Posts: 1,239
Mar 25, 2012 22:08:04 GMT -5
Mar 25, 2012 22:08:04 GMT -5
|
Post by bbrowniii on Nov 2, 2013 19:29:34 GMT -5
Looking the part now, Bill! Always a pleasure to watch your builds.
|
|
|
|
Post by wbill76 on Nov 3, 2013 10:44:57 GMT -5
Thanks Boyd! Glad to have you along for the ride!  |
|
|
|
Post by ceresvesta. on Nov 3, 2013 11:08:43 GMT -5
She is fab! Keep it up Bill.
|
|
|
|
Post by deafpanzer on Nov 3, 2013 12:03:45 GMT -5
I smell an update coming u in 6 or 7 hours despite my cold...
|
|
|
|
Post by wbill76 on Nov 3, 2013 18:08:52 GMT -5
Thanks Phil! Andy, wow, your cold must have given you super-human abilities...I look at your post and it was exactly 6 hours ago! Update inbound.  Dicky Dicky, no worries Sir Nemo, there's a lot of stuff to keep up with around here, glad you found it and have caught up...just in time for the next round! The Atak folks know what they are doing, the zim panels come on a single sheet that you have to remove them from but the sheet is packaged in a plastic sleeve with a stiff cardboard insert backing. Panels are always flat, so things like the turret it's up to you to shape the panel to the right curves, but the panels are so super-thin, it's just like shaping a sheet of paper.  Love the Atak stuff, it's my go-to zim solution whenever possible. |
|
|
|
Post by wbill76 on Nov 3, 2013 18:09:00 GMT -5
I had a couple of small details to attend to on the build before paint work could begin. Those details involved the spare tracks. The 7 links that mount to the turret were missing their individual pin details so I used some 0.8mm diameter styrene rod to recreate the pins on each link. I also drilled out the exposed end of each link to show the empty pin hole at the top that's exposed once they are mounted in their holders. 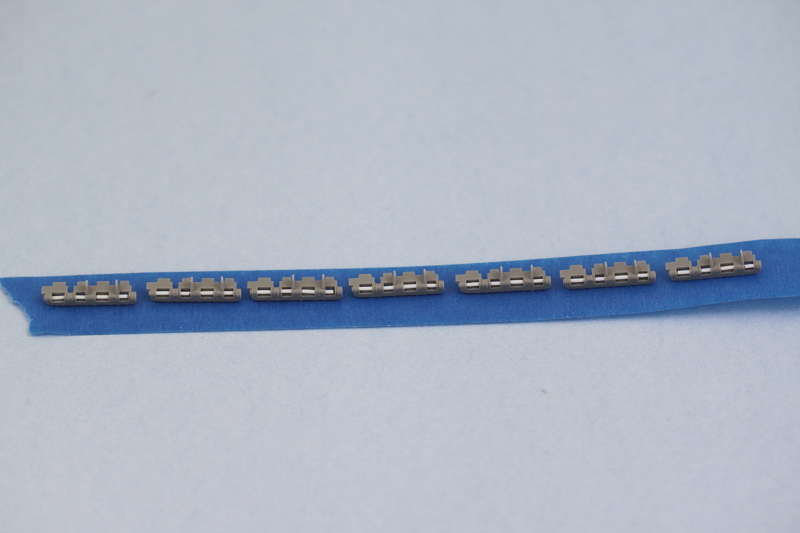 For the front spare track run, I used the remaining links I had from the MK set for the 12 links required there. There weren't enough links left over in the MK set to do this and the turret links and since the workables are better suited here, that's where they got used. The instructions for this little addition are in Step 12 but they parts callout for the support bar is wrong, it should be K3 and not C15. 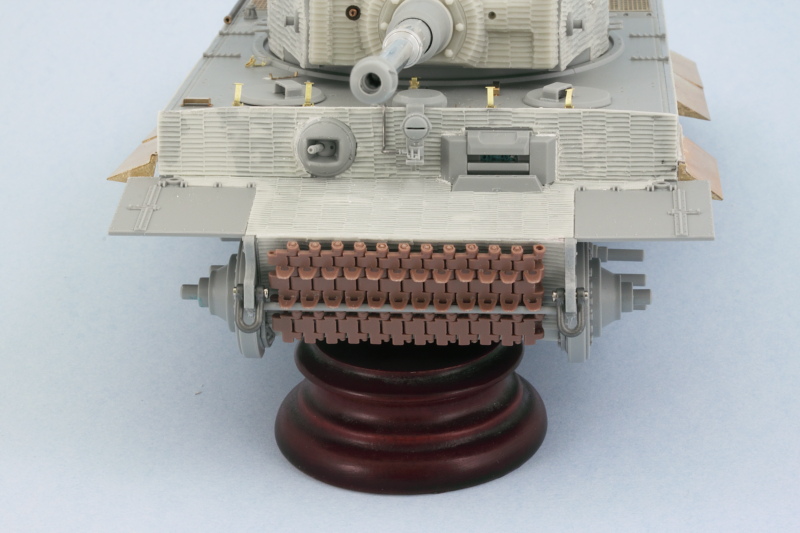 With that done, I prepped the vehicle for painting by masking off all the suspension arm mount points with blue-tack to prevent paint build-up from causing an issue with the wheel fit later on. I also mounted all the wheels, sprockets, and idlers on toothpicks with blue tack to make it easier to deal with them, fitted a temporary handle to the turret in the form of a cardboard toilet-paper cylinder cut down to size and let the paint fly. First up was an overall primer treatment using MM enamel Italian Dark Brown. The zimmed surfaces exponentially increase the surface area so more paint than usual was required to get complete coverage. 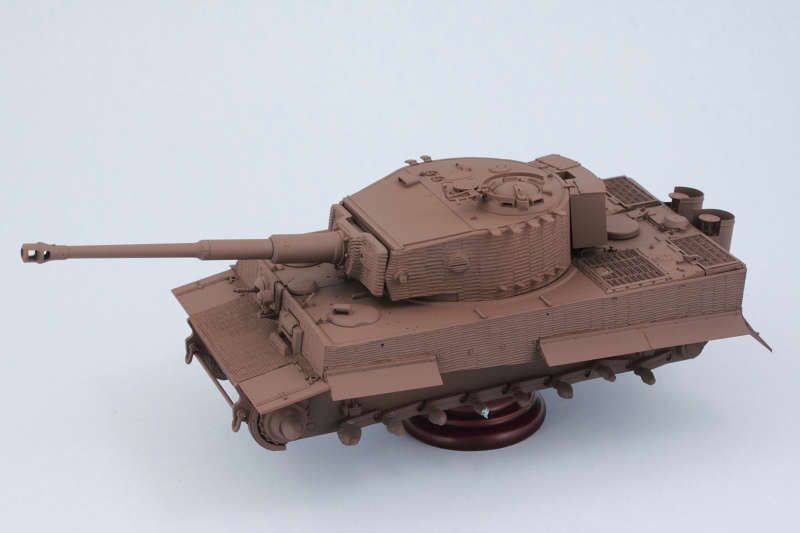 Next came the base coat using a custom mix of 50/50 MM enamel Panzer Dunkelgelb and enamel Light Gray.  Same treatment was applied to the road wheels, sprockets, and idlers. Since everything's all steel wheels, that sped up the process here a little bit but I still have to paint and detail the contact surfaces for them before they are fully detailed. 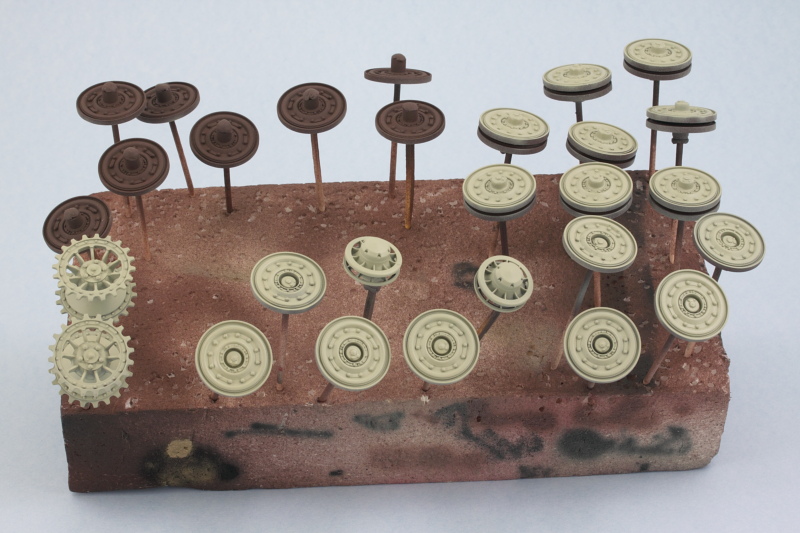 Then the real fun began with the application of the camo pattern. First I applied the rot-braun elements using a custom mix of 50/50 MM enamel Military Brown and Leather and then the olivgrun elements using MM enamel Khaki. Final step involved spraying a mist coat/filter of the original base coat highly thinned from a distance of about 12 inches to help tie everything together. 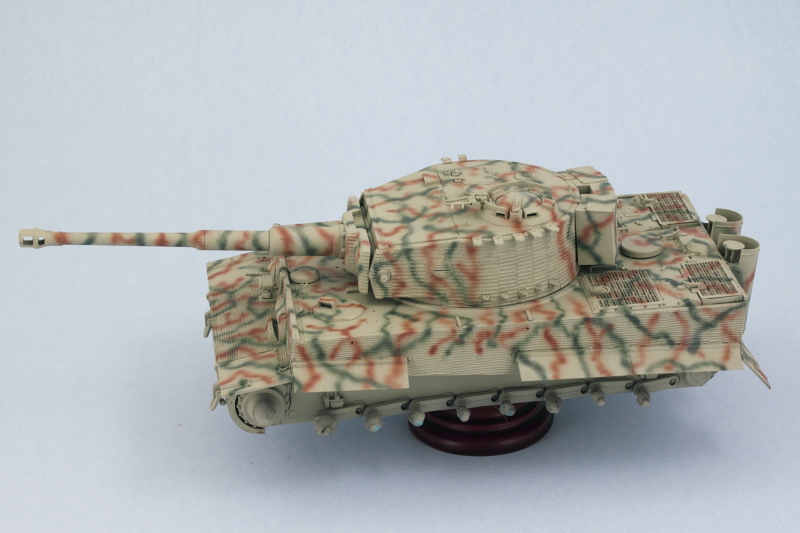 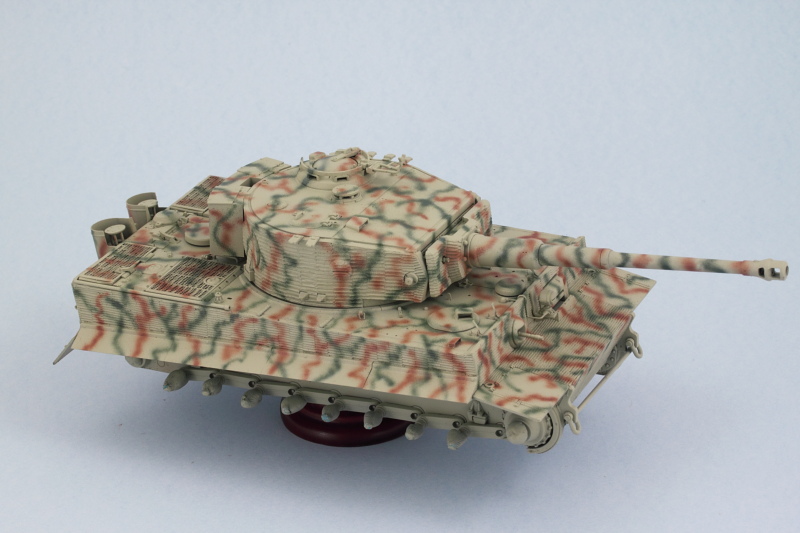 Top down view shows what it would've looked like from the air. 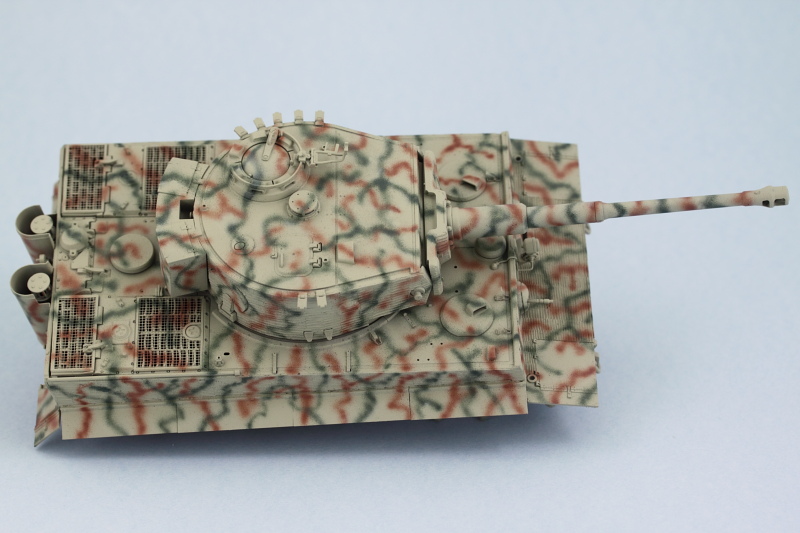 This will get a chance to sit and cure up thoroughly before moving on to the next phases. Still a lot of work to do in the details department as well with the tools and suspension. |
|
|
|
Post by ceresvesta. on Nov 3, 2013 18:11:35 GMT -5
O.M.G.
I will have an affair with Andy new girl friend!
|
|
bigjohn
Reviews member    
Member since: December 2011
John Hale
Posts: 3,438
Dec 21, 2011 2:17:45 GMT -5
Dec 21, 2011 2:17:45 GMT -5
|
Post by bigjohn on Nov 3, 2013 19:22:59 GMT -5
Nice!!! Love the cammo Bill!
|
|
|
|
Post by tonylee-Rest In Peace on Nov 3, 2013 19:32:35 GMT -5
Man that hurts my eyes Bill. Reminds me of a bad hangover I experienced once.  Not really,i've been a well mannered good boy all my life.  Tony lee |
|
|
|
Post by wbill76 on Nov 3, 2013 19:46:51 GMT -5
Phil, be careful, Andy's got access to firearms and knows how to use them!  Thanks as always! BJ, glad you like the pattern! Got to love those Normandy schemes! Tony, it's like those old 3-D pictures that were so popular in the 90's, just focus on a distant point and you'll be fine!  Somehow I have a hard time believing your last statement is entirely true though... 
|
|
|
|
Post by tonylee-Rest In Peace on Nov 3, 2013 19:50:37 GMT -5
|
|
|
|
Post by deafpanzer on Nov 3, 2013 21:32:13 GMT -5
DAMN! I blinked and it has paint on!!! Love the camo!!!
Phil, no worries... I like to share! You are safe...
|
|
|
|
Post by Leon on Nov 3, 2013 22:30:24 GMT -5
Bill,the camo looks fantastic.Really making good progress.  |
|
afvfan
Senior Member
   
Member since: December 2012
Bob
Posts: 1,772
Dec 10, 2012 17:32:38 GMT -5
Dec 10, 2012 17:32:38 GMT -5
|
Post by afvfan on Nov 3, 2013 23:16:21 GMT -5
Interesting paint there, Bill. It is a bit rough on the eyes right now, but I know the washes and weathering will calm it down.... 'course it could be used as a secret weapon. You get 3 or 4 of those things cutting figure "8"s in a field and all the enemy gunners trying to sight on them would get vertigo, start barfing, and couldn't defend their positions.  By the by.. congrats on the FSM cover!  |
|
Deleted
Member since: January 1970
Posts: 0
Dec 2, 2024 11:30:48 GMT -5
Dec 2, 2024 11:30:48 GMT -5
|
Post by Deleted on Nov 4, 2013 2:17:04 GMT -5
nice work there and quick too! looking forward to the weathering
|
|
|
|
Post by wouter on Nov 4, 2013 3:58:46 GMT -5
What can I say, I really like what you did with it Bill, that camo sets her off nicely. And I might repeat myself  , but again, very much a typical Bill P scheme. Cool! Cheers |
|
|
|
Post by TRM on Nov 4, 2013 7:18:56 GMT -5
Ya know, when you miss the Sunday update all together...it is just as sweet the next morning!!! Top notch work per usual Bill!! Love the camo!! Getting close to the fun part!!!  |
|
|
|
Post by ceresvesta. on Nov 4, 2013 9:32:27 GMT -5
Your Honnor is safe Andy, my wife told me that I have already more than enough ``affairs`` going on in the workshop!!!   Phil. |
|