losboz
Full Member
  
Member since: September 2013
Posts: 322 
|
Post by losboz on Oct 16, 2013 19:55:45 GMT -5
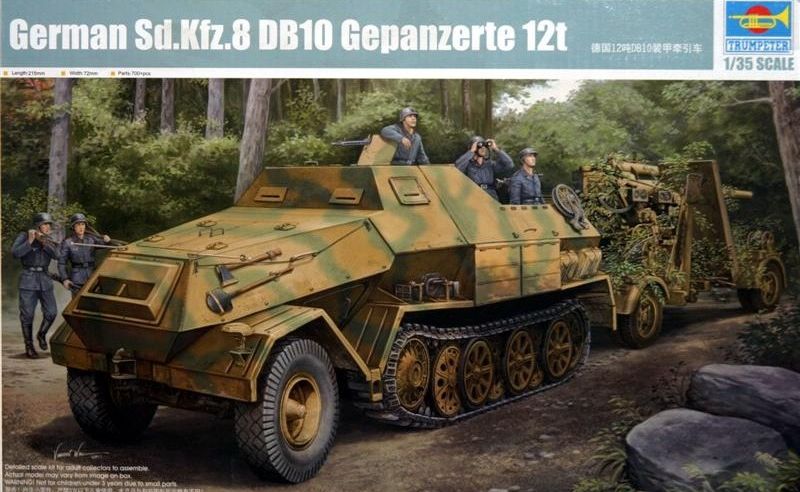 For the princely sum of £30 and a mega efficient (ordered at 3pm and on my doorstep at 10am next day) delivery from Affinity models UK along with some other tasty treats this is one I had to tuck right into. Its a very rare beast and modeled on the recovered and now fully restored DB10 in Poland www.youtube.com/watch?v=mA4sSIm4yEw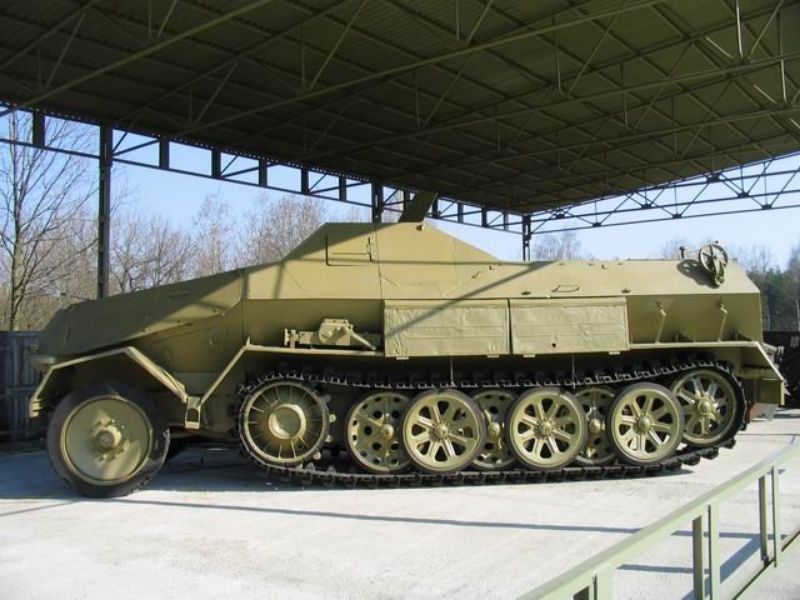 What is interesting is that this little-known variant of the Sd.Kfz 8 vehicle was all-but-forgotten until an example was fished out of a Polish river and restored to operational condition . This variant featured a full-hull around the chassis and drive train and was likely a prototype of an armored artillery tractor that was lost during combat evaluations. 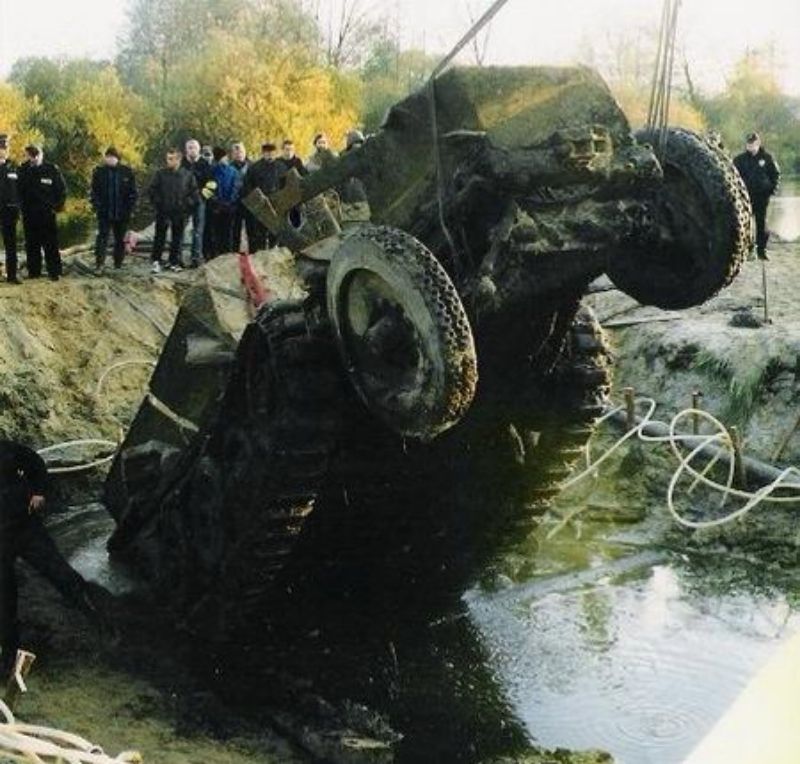 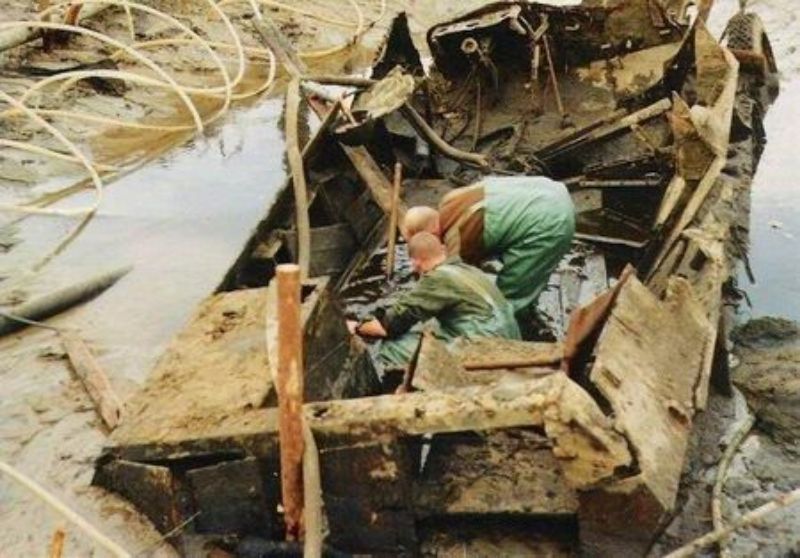 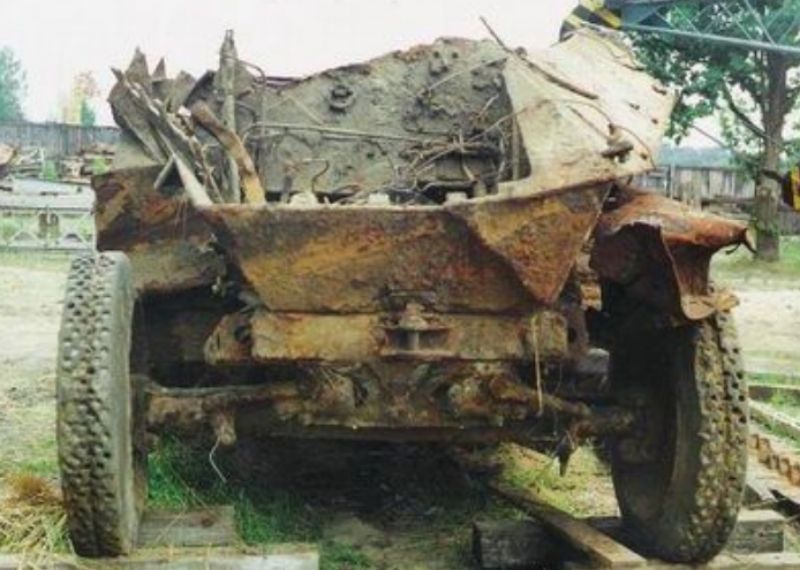 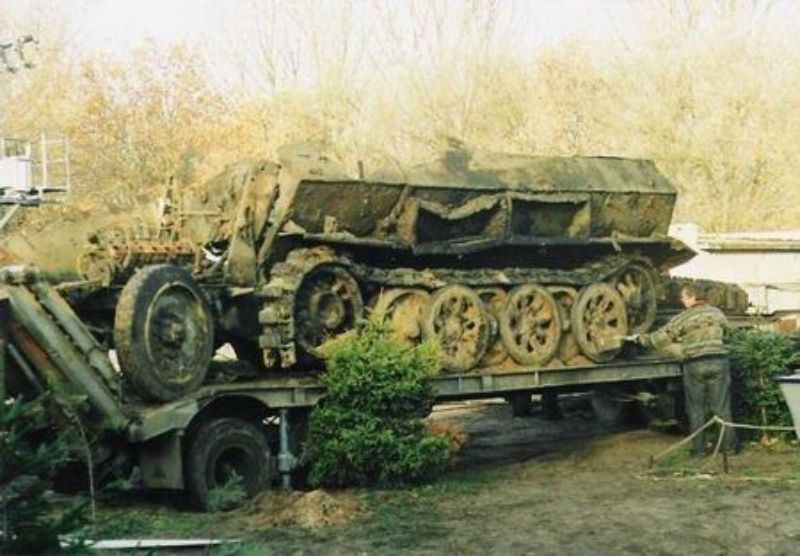 Although 4000 odd Sd.Kfz8's were manufactured this particular model is thought to be extremely rare indeed and quite likely one of only a few prototypes made. Archive photos are almost non existent but I managed to find a couple of original war time pics and there appears to be two versions ! A 2 rear door model 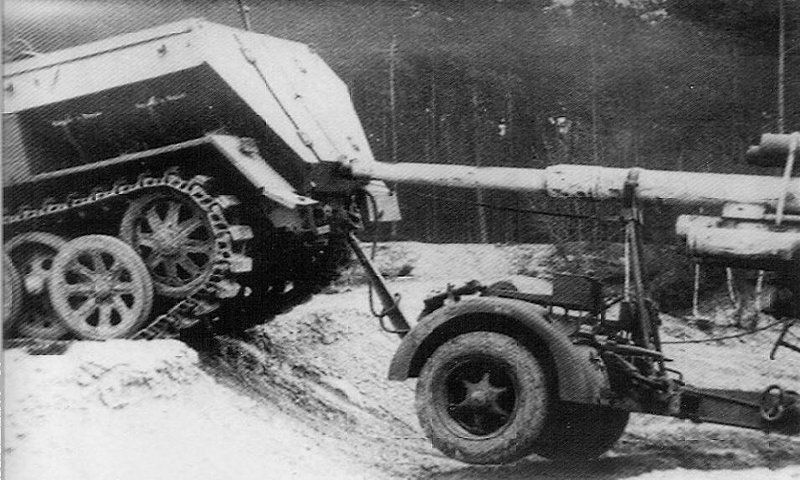 And a four rear door version 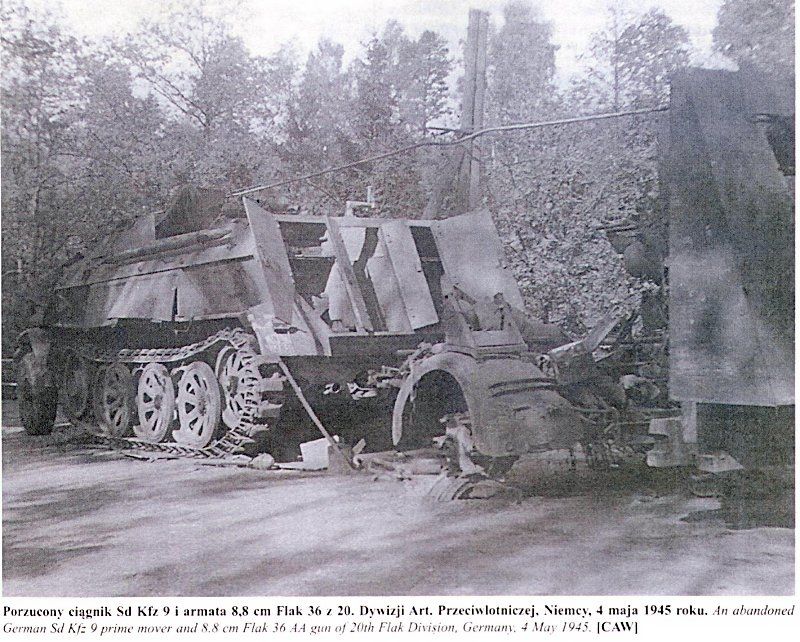 Trumpeter has been producing several tow vehicles to support the impressive range of heavy artillery in their kit line-up and this is an obscure 2011 released version of the standard German Sd.Kfz.8 that was based upon the vehicle recovered (see above). Moulded in desert tan styrene, the kit is presented on 13 parts trees and two main hull halves, plus 10 trees of individual track links in brown color, and a fret of photo-etched parts. The kit provides some very intricate detailing throughout the model, from a complete engine compartment to the fully appointed interior. It was clear that the Trumpeter team had full access to this unique vehicle during their research. It was also great that the vehicle was in such good condition that it could be restored to the fidelity that made the kit possible. If the decal is consistent with the license plate recovered from the full-scale vehicle, this rare example served in Luftwaffe service likely towing 8.8cm FlaK guns around the battlefield 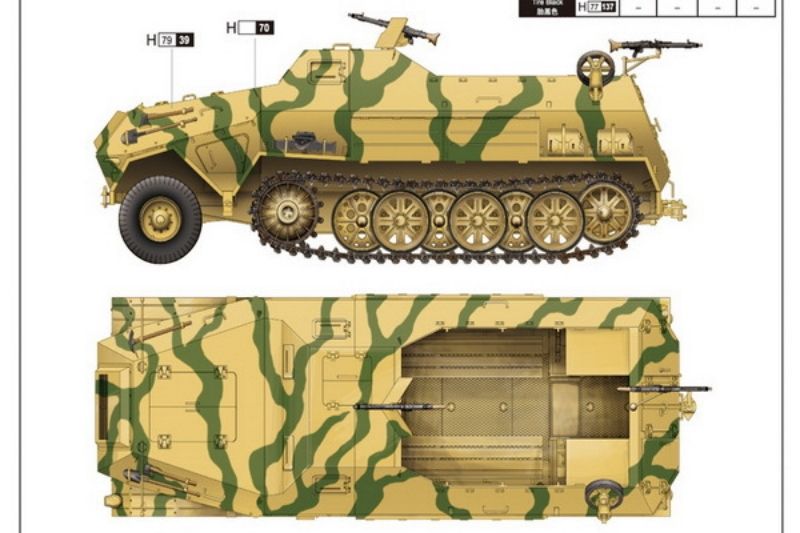 The first thing I noticed upon opening the box was that the instructions are mad busy on one page yet a whole page devoted to one individual item on another. Very strange  and a couple of part number omissions but its not quite dragon instruction territory  There are a couple of issues to deal with, the first is there should be pairs of bolt heads around the inner sprocket rims to hold the track pads sections in position and given the size of the sprockets their absence is quite conspicuous. These can easily be added from available hex bolt sets or from chopped up sprue, again the size of the sprockets makes this job a little easier. The second is the drive teeth (rollers) are not offset as they should be. The rollers on all German half-tracks were offset towards the front (left and right sides) of the flat track pad section of the sprocket to allow the roller to intermesh with the tracks correctly. This is a very easy to fix by just cutting off the locating tabs on the inside of the separate tooth rings (parts B22) and fit with the rollers aligned correctly for the right and left side sprockets. For full details see www.perthmilitarymodelling.com/reviews/vehicles/trumpeter/tr01584.htmlThe ONLY aftermarket upgrade I could find was for some wheel masks and front wheels but the supplier doesn't show stock anymore so I have no idea what the wheels look like ! cs.finescale.com/fsm/modeling_subjects/f/3/t/145170.aspxThis particular build has defo not used the Trumpy ones 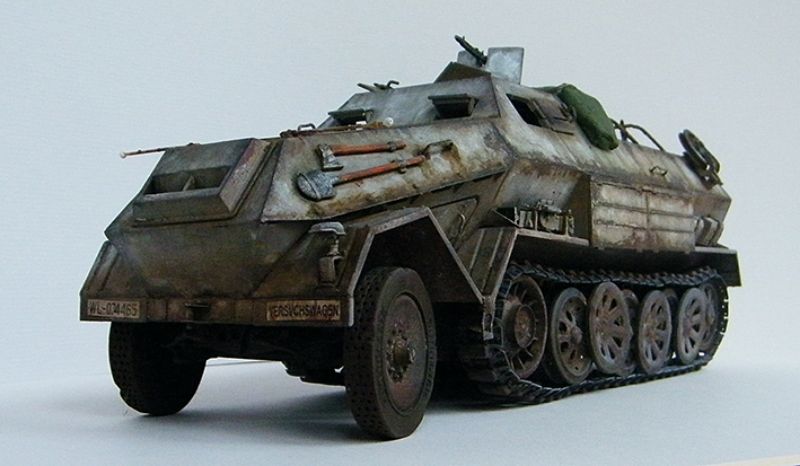 OK, onto the build First up is the engine which fits together nicely with very little additional work. There is no radiator but this would be difficult to see through any of the hatches should you wish to display them open. 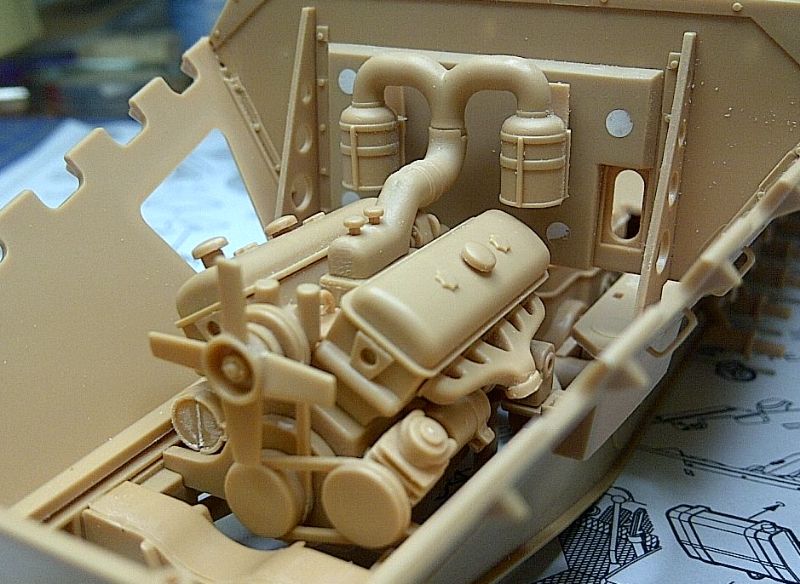 And the real thing 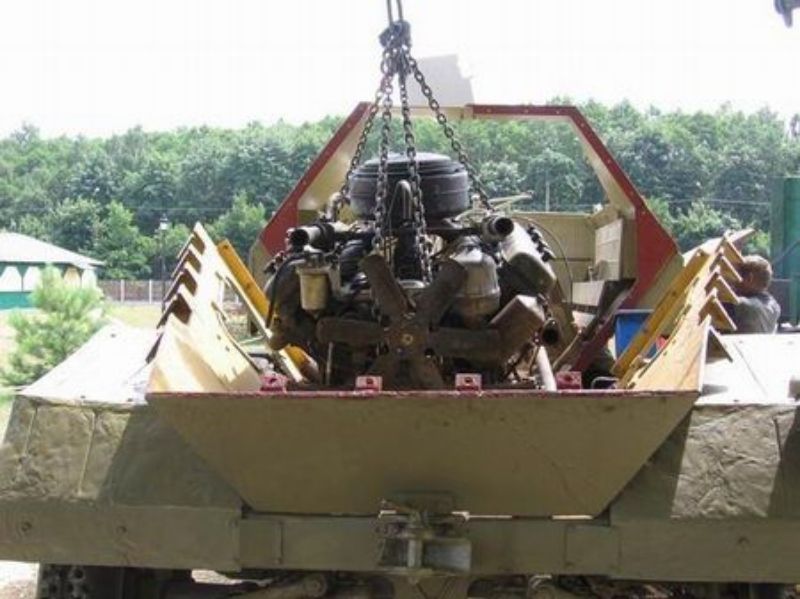 Next up for me was the chassis and in familiar Trumpy style its in multiple parts. Both chassis legs were luckily warp free and it all fitted together satisfyingly well. 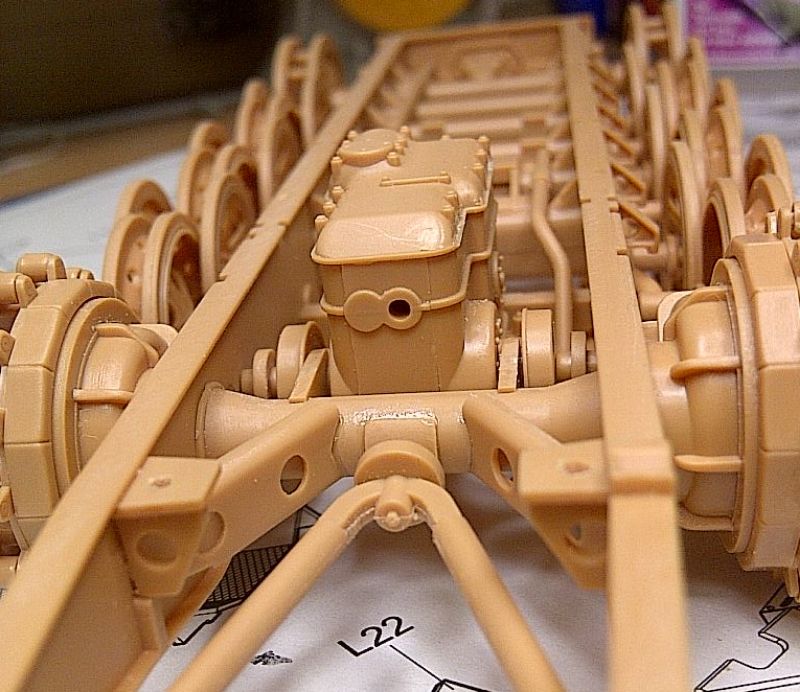 There are injector marks on the inside of the chassis legs and the chassis ladder rung mouldings (I just made that up as I have no idea what they are really called  ) are made up of two pieces which are difficult to present as one solid piece. Both will be well hidden upon final assembly 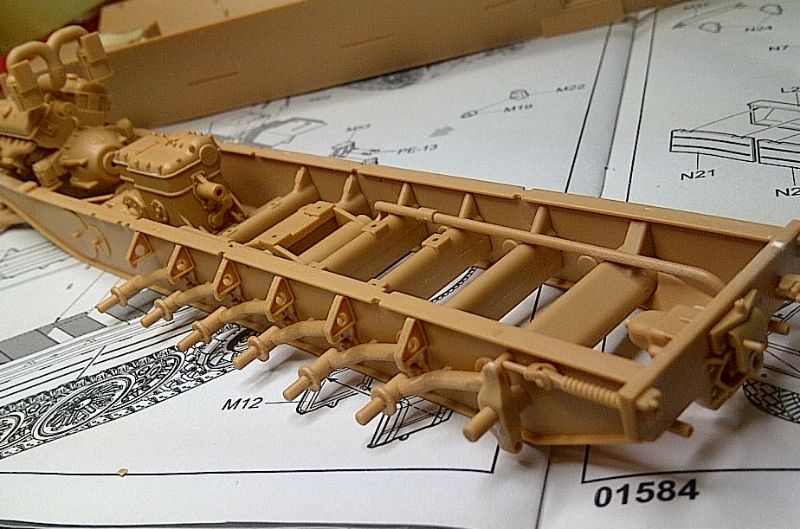 The gearbox is a simple affair but again will not be visible once fully assembled The kit offers two types of rubber tyres of which neither are branded 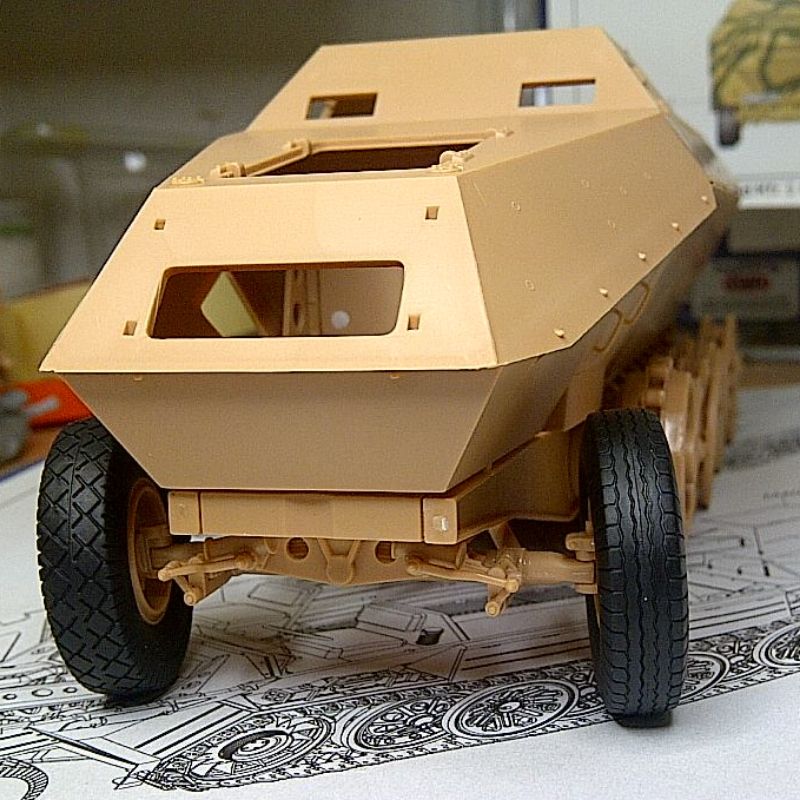 The running gear assembled 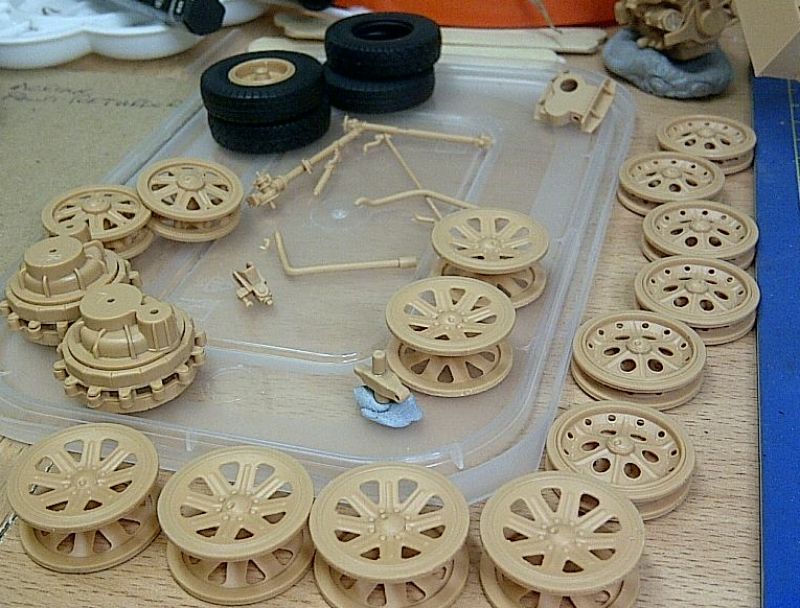 The only downside was that the idler wheel was a mega loose fit to the suspension arm on my kit and I will need to knock up a sleeve for it to align well Running gear dry fitted to chassis 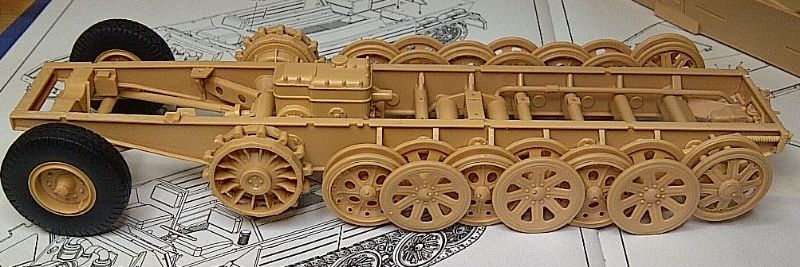 Adios till next time I get some bench time  |
|
|
|
Post by wbill76 on Oct 16, 2013 19:59:11 GMT -5
Cool project on a rare beast indeed! Looking forward to more on this one.
|
|
Deleted
Member since: January 1970
Posts: 0
Nov 22, 2024 9:05:19 GMT -5
Nov 22, 2024 9:05:19 GMT -5
|
Post by Deleted on Oct 16, 2013 20:05:33 GMT -5
I'm surprised that the recovered vehicle survived as well as it did after being submerged in mud and water for that period of time .
Your build looks quite clean and well done .
|
|
|
|
Post by Leon on Oct 16, 2013 20:14:24 GMT -5
Off to a very good start Los.Looking forward to your next update.
|
|
ironhand6
Full Member
  
Member since: March 2013
Posts: 280 
|
Post by ironhand6 on Oct 16, 2013 20:15:10 GMT -5
Wow!! I really am enjoying this build, I saw this online and was really interested I it. i cant wait to see more!!
|
|
losboz
Full Member
  
Member since: September 2013
Posts: 322 
|
Post by losboz on Oct 17, 2013 8:18:16 GMT -5
Thanks for looking in fellas 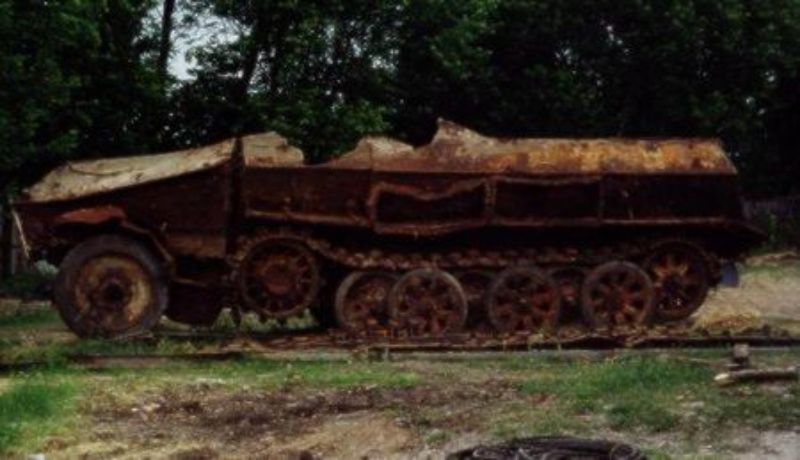 The restoration must have been a real labour of love. It did look in remarkable condition considering how long it had been sat in mud and water but still must have required a huge amount of work. I suspect what was left of the original Maybach HL 85 TUKRM engine was scrap and a suitable engine sourced as the one in the pic above doesn't look like the kit one. Will any plans or drawings have survived of the DB10 ? If not how did they go about authentically restoring it ? 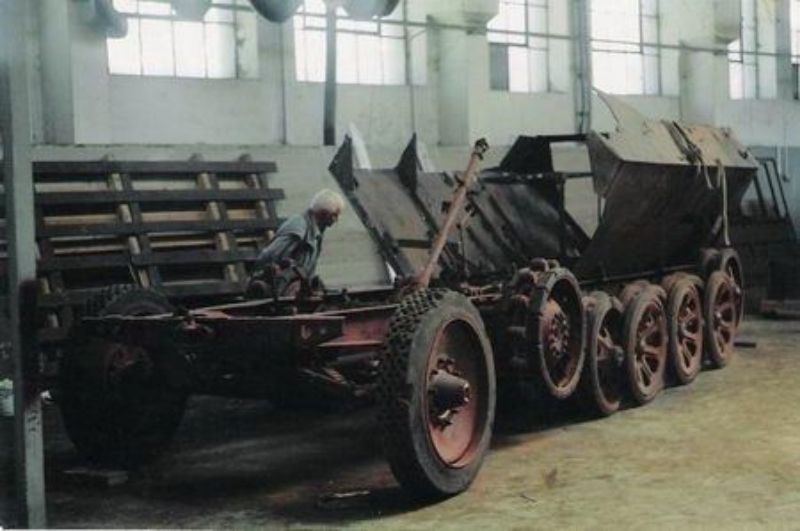 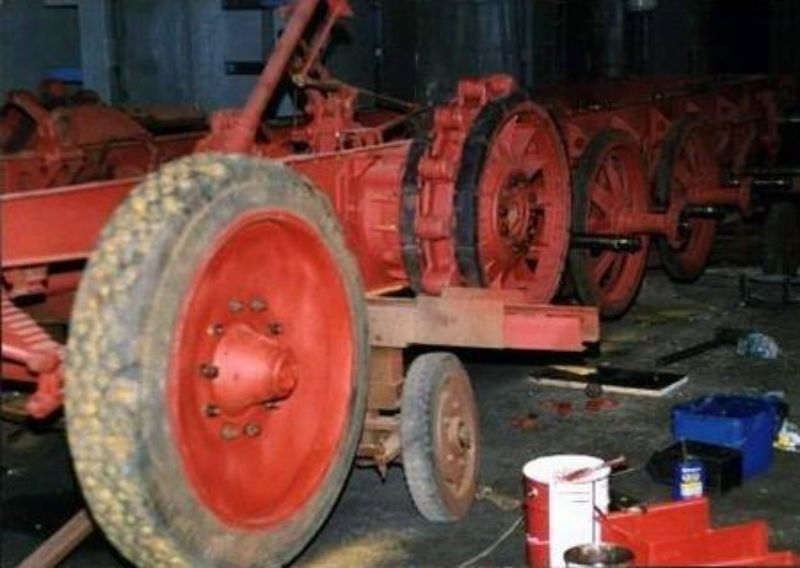 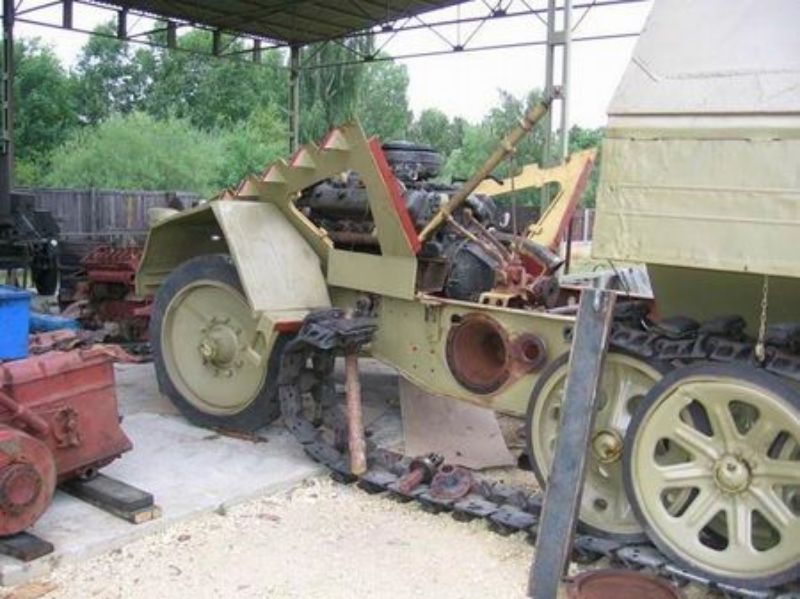 Anyways back to the kit The sprocket roller issue fixed. The pic below is the right hand sprocket. Not sure what to do about adding the track pad rivets yet so will sleep on that one for now  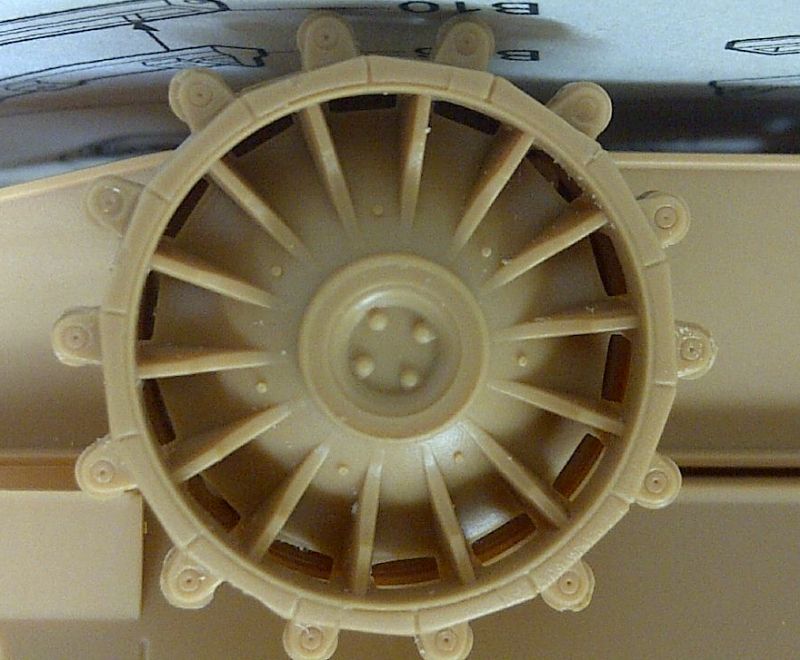 As the twin exhaust is in multiple parts care is needed to mount correctly and its defo advisable to add the exhaust to manifold parts to ensure a good fit as there is very little room to mount up after the engine is set in place. I dry fitted the engine then attached these parts and let the glue set. The pic below also shows the track rod ends and track rod fitted. This is quite fiddly to get right as the track rod end parts locate in to a very shallow hole in the upper back of each wheel hub and have to align with the hub direction and sit at 45 degrees to the axle. Its not helped by the wobbly loose fitting of the hub to the front axle (another 'snap on fit') I tried assembling the track rod ends to each hub first and even though I left to dry overnight still found one detached when the 'snap on' track rod was attached  So my solution was to mount the track rod to each track rod end first, let it set correctly in a little jig then attach the whole assembly to the hubs. 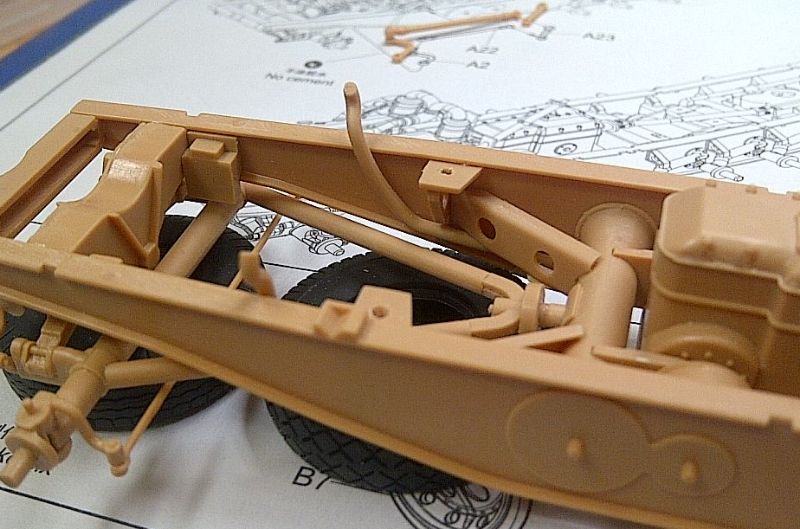 The lower hull fits snugly on to the chassis with the aid of some tabs at the front and mounting guides along the rear so with a good fit ensured I started assembling the interior. First up is the bulkhead and the steering shaft has to fit through this before attaching to the chassis. I did find myself clamping the lower hull sides slightly to get the bulkhead to fit correctly and its also advisable to dry fit the separate cab floor part also at this stage so as there are no fitment issues once the bulkhead is secured. Everything else is pretty straight forward. The wooden benches will be attached later to aid painting 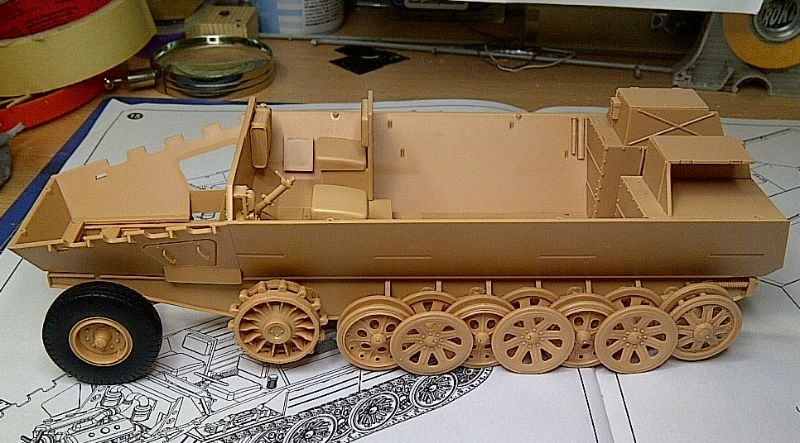 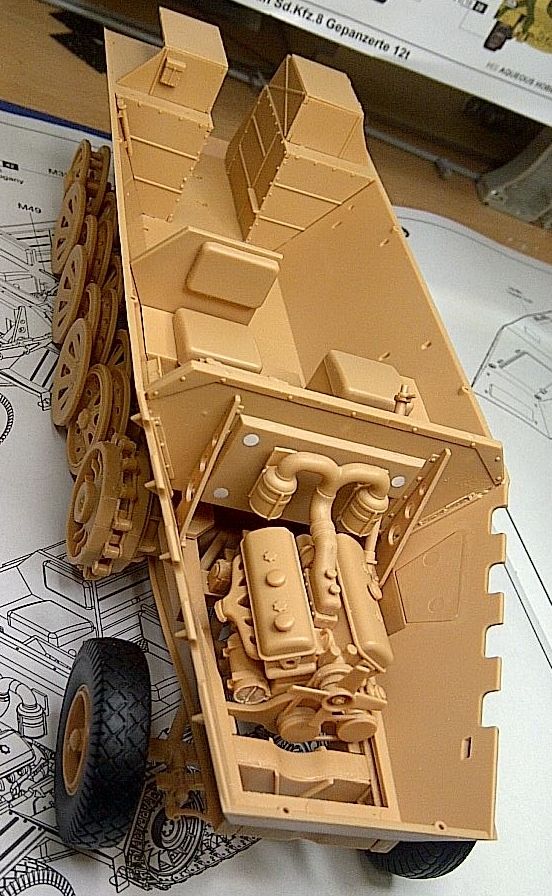 At this stage with the engine dry fitted I noticed the air filter backing plates don't actualy engage with the bulkhead. Oh feck !......Have I srewed up the bulkhead fitment ?  The cab floor butted up nice to it on the other side so whats going on ? I had the crappy feeling I had made a big error somewhere ? The engine 'sits' on the chassis legs at the front but at the back it sits in two locating holes. The locating holes sit in a kind of box section which are made up of parts C6 & B15 in step 3. Together they attach to two locating holes on the inner side of each chassis leg. There are in fact three locating holes and its not really clear which holes the box section locates into as the 3rd hole rear of the other two is for a chassis to drive axle strengthening rib in a later step. I was mightily relieved to find all my attachments were correct so after checking and double checking I cant explain this anomaly ! Its not a biggy but I have consumed far too many irreplaceable and valuable brain cells in the process  So chassis is complete and track fenders attached to lower hull. Time for some etch  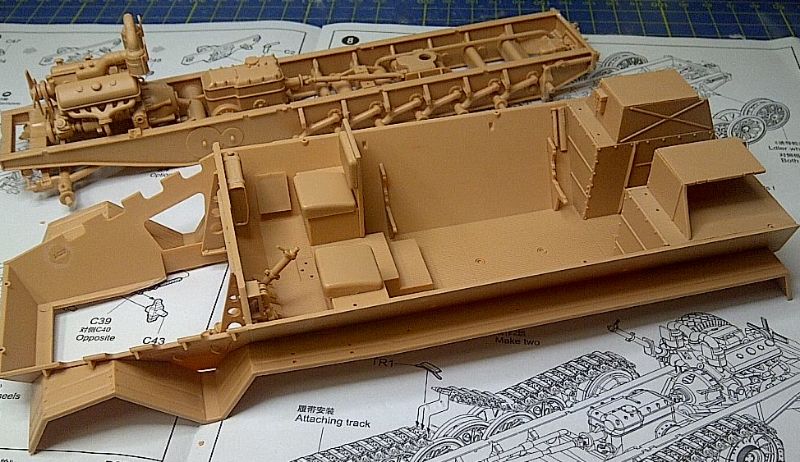 |
|
|
|
Post by deafpanzer on Oct 17, 2013 16:05:41 GMT -5
Enjoying this thread... great deal of historical info and pics! Keep it coming...
|
|
|
|
Post by wbill76 on Oct 17, 2013 20:03:30 GMT -5
Sometimes the mystery of the kit design never fully reveals itself! It could be worse...it can always be worse!  Nice build progress and update on the beast. |
|
losboz
Full Member
  
Member since: September 2013
Posts: 322 
|
Post by losboz on Oct 18, 2013 11:10:32 GMT -5
Enjoying this thread... great deal of historical info and pics! Keep it coming... What you see is pretty much all there is to find on this one so paint scheme is pretty much anything goes I guess  |
|
losboz
Full Member
  
Member since: September 2013
Posts: 322 
|
Post by losboz on Oct 18, 2013 11:13:48 GMT -5
Sometimes the mystery of the kit design never fully reveals itself! It could be worse...it can always be worse!  Nice build progress and update on the beast. Tis a mystery indeed but luckily no one will notice if I shut the engine hatches  |
|
Deleted
Member since: January 1970
Posts: 0
Nov 22, 2024 9:05:19 GMT -5
Nov 22, 2024 9:05:19 GMT -5
|
Post by Deleted on Oct 18, 2013 12:43:48 GMT -5
great subject and interesting kit been looking out for one of these myself
|
|
losboz
Full Member
  
Member since: September 2013
Posts: 322 
|
Post by losboz on Oct 18, 2013 21:05:14 GMT -5
Flying along now Got the cab PE, track guard brackets on (6 per side) and the storage bins fitted (inside and outside) 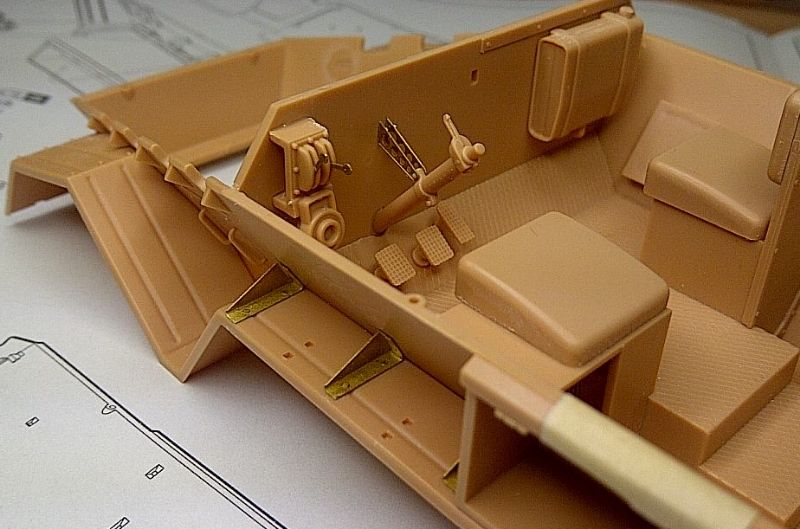 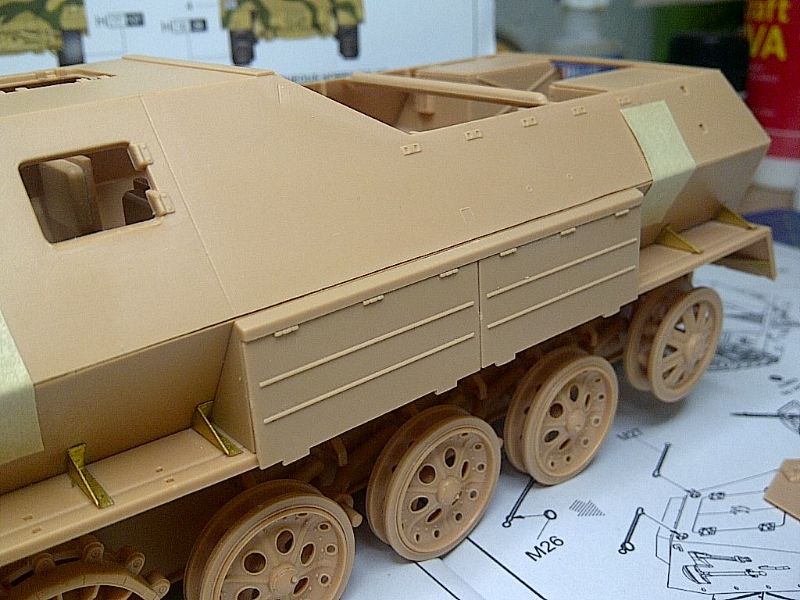 And made a start on the tracks 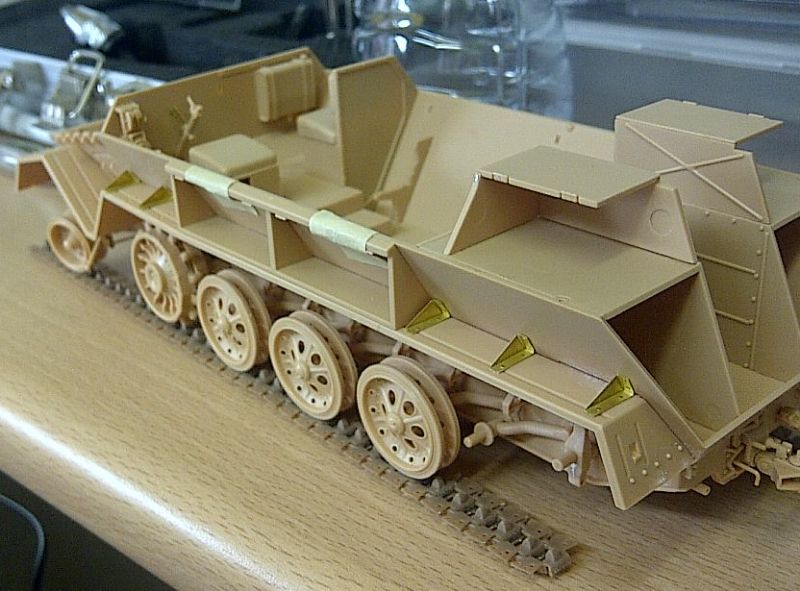 Little jig for the guide horns with lolly pop sticks and apart from the odd one or two the pads clicked into the track reassuringly well with very little need for glue.....which was nice  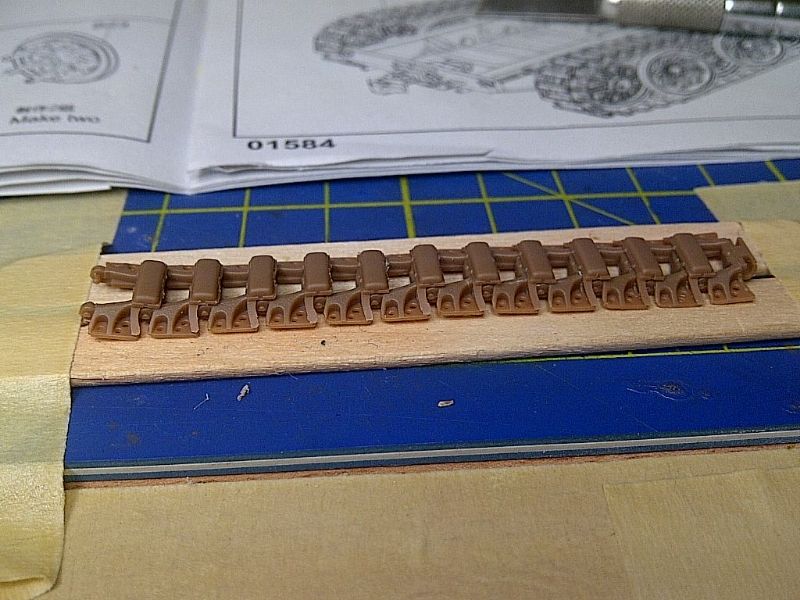 And dry fitted. Track sag looking good  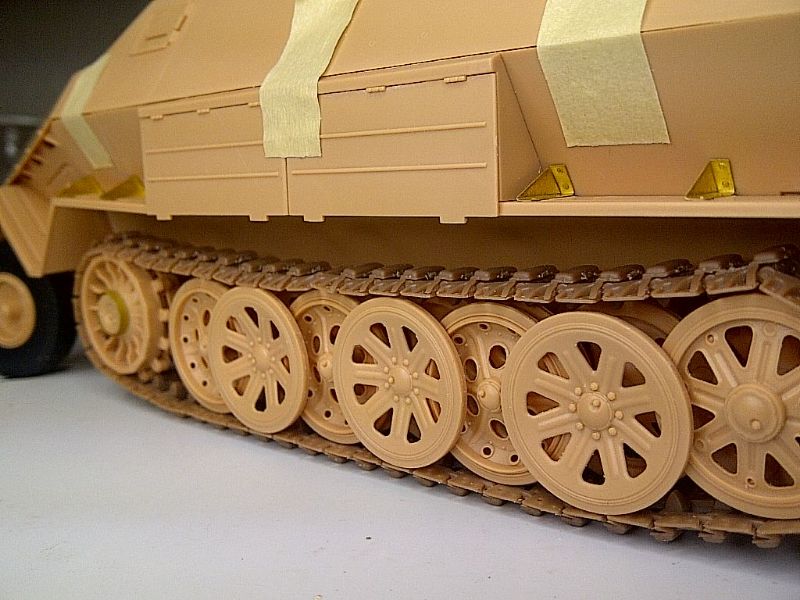 I decided I would fit the rear panel to the lower hull first. The edges of both are chamfered for a snug fitment with minimum filing required. What you do have to watch out for is the lockers in the interior even though correctly located in the floor still protrude slightly rearwards and this bows out the rear panel slightly in the middle. I did (honest !) dry fit the panel when assembling the stowage bins but not well enough it seems  .......so a bit of jiggery pokery with some sanding sticks shaved enough off to make it acteptable 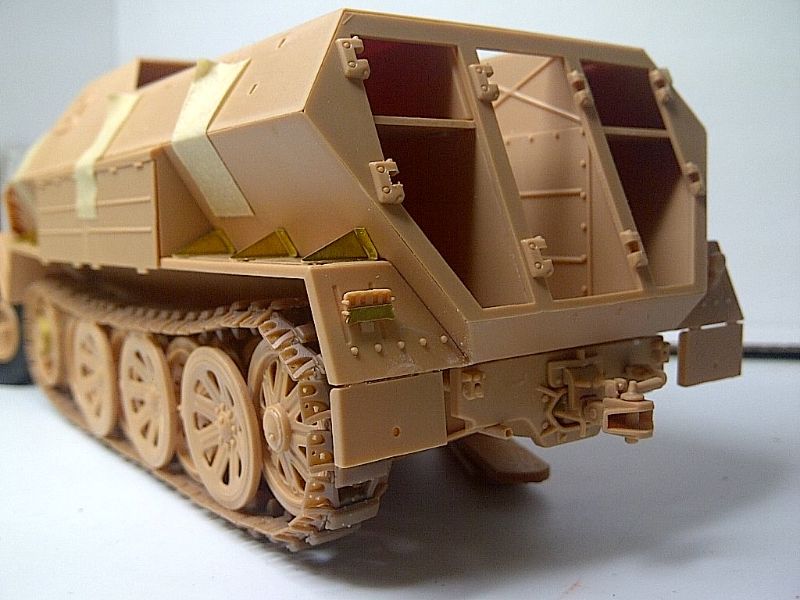 Plan is to get some primer on this weekend Los |
|
Deleted
Member since: January 1970
Posts: 0
Nov 22, 2024 9:05:19 GMT -5
Nov 22, 2024 9:05:19 GMT -5
|
Post by Deleted on Oct 18, 2013 23:52:37 GMT -5
Those tracks and running gear look familiar .
Your on a role now Los .
|
|
|
|
Post by tonylee-Rest In Peace on Oct 19, 2013 15:39:27 GMT -5
Frame Rails and Torsion bar housing cross members. Now you know the rest of the story. Gooooooood Day Tony lee  |
|
noll
Full Member
  
Member since: August 2012
Posts: 522
Aug 28, 2012 9:40:11 GMT -5
Aug 28, 2012 9:40:11 GMT -5
|
Post by noll on Oct 19, 2013 15:42:05 GMT -5
Looks very nice! The restoration of the one in the ref. pics looks to have been interesting, to say the least  . |
|
ironhand6
Full Member
  
Member since: March 2013
Posts: 280 
|
Post by ironhand6 on Oct 19, 2013 18:04:36 GMT -5
clean build Los. I really like how this is coming together.
|
|
possum
Full Member
  
Member since: January 2013
Posts: 113
Jan 6, 2013 7:20:56 GMT -5
Jan 6, 2013 7:20:56 GMT -5
|
Post by possum on Oct 20, 2013 6:34:49 GMT -5
That's a really great build,& l like the research you have done
|
|
|
|
Post by wbill76 on Oct 20, 2013 19:58:51 GMT -5
Moving right along there Los! Nice progress.
|
|
losboz
Full Member
  
Member since: September 2013
Posts: 322 
|
Post by losboz on Oct 21, 2013 11:28:24 GMT -5
Frame Rails and Torsion bar housing cross members. Now you know the rest of the story. Gooooooood Day Tony lee  I doff my hat Tony A thank you  |
|
AndyArgent.
Senior Member
    Aug 2013 MoM Winner
Member since: November 2011
Andy Bodge Argent - Aug 2013 MoM Winner
Posts: 1,746
Nov 17, 2011 17:09:43 GMT -5
Nov 17, 2011 17:09:43 GMT -5
|
Post by AndyArgent. on Oct 21, 2013 12:41:11 GMT -5
Nice one Los cracking job and blog so far
|
|
elco
Full Member
   July & Oct 2014 MoM Winner
Member since: May 2013
MOY 2014 Winner
Posts: 660 
|
Post by elco on Oct 21, 2013 12:54:53 GMT -5
Nice one, what a great kit. I like the fact that is a rare version.. Must remember this one when i am done with al those Panthers versions  Following along! |
|
losboz
Full Member
  
Member since: September 2013
Posts: 322 
|
Post by losboz on Nov 26, 2013 11:21:24 GMT -5
After a mad few weeks including a poorly Mother (back on the mend  ) and an engine rebuild in 1/1 scale  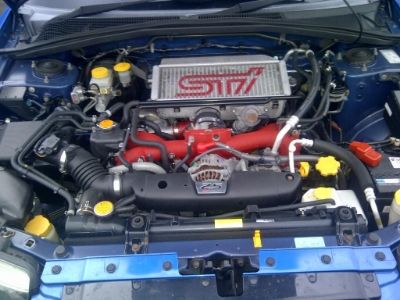 I have finally got some quality time at the bench. Much inspiration has come from Carl's superb blog of his recent Trumpy Selbstfahrlafette w/flak 18 build and seeing as my hands were still oily from the real thing I figured first up for paint was the Maybach HL85 First it was given a coat of trusty Halford's rattle can primer then a light overall spray coat of Vallejo 'steel' followed by a second coat of Vallejo 'oily steel'. The whole engine was then given a very diluted wash of a mixture of both oily steel and black. All rubber components were then hand painted Vallejo 'dark rubber. I am now laying out the various pipework and working out attachment locations etc Once I am happy with all the pipework it will painted and attached to the engine. As there is no radiator present I am toying with the idea of acquiring one from another Sd.Kfz 8 I have yet to build but that will depend on exactly how much is visible through the top access hatches and that wont be possible until I have completed priming and base coating the interior 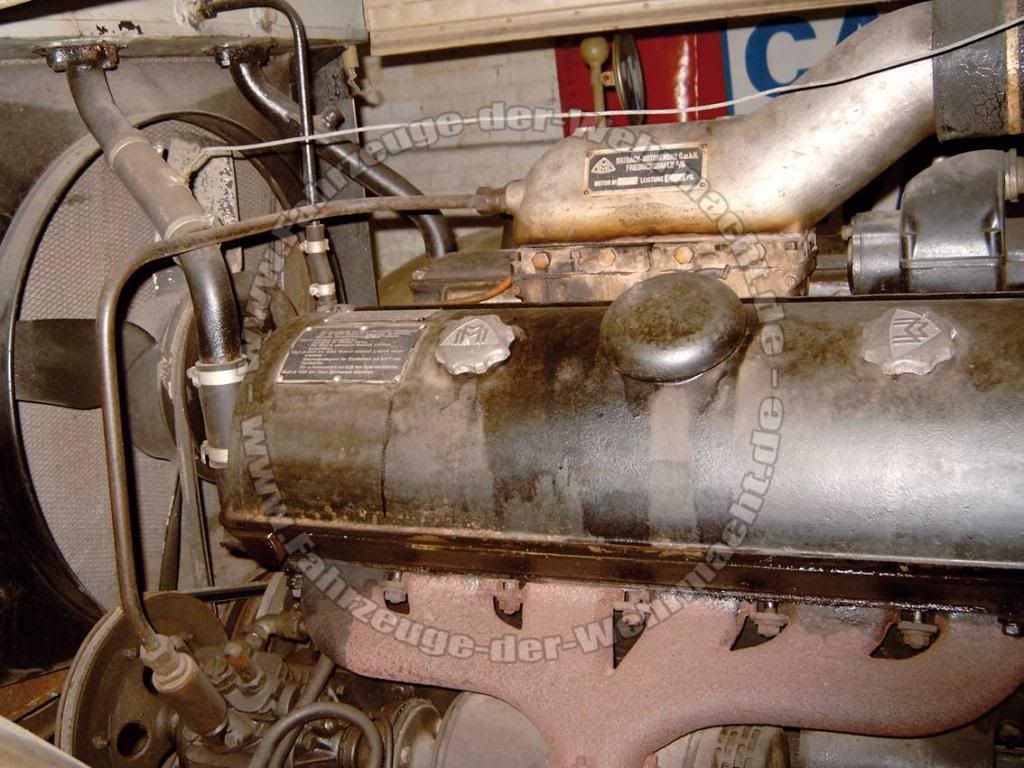 Carburetor and air filter section left off to aid forthcoming pipework connections 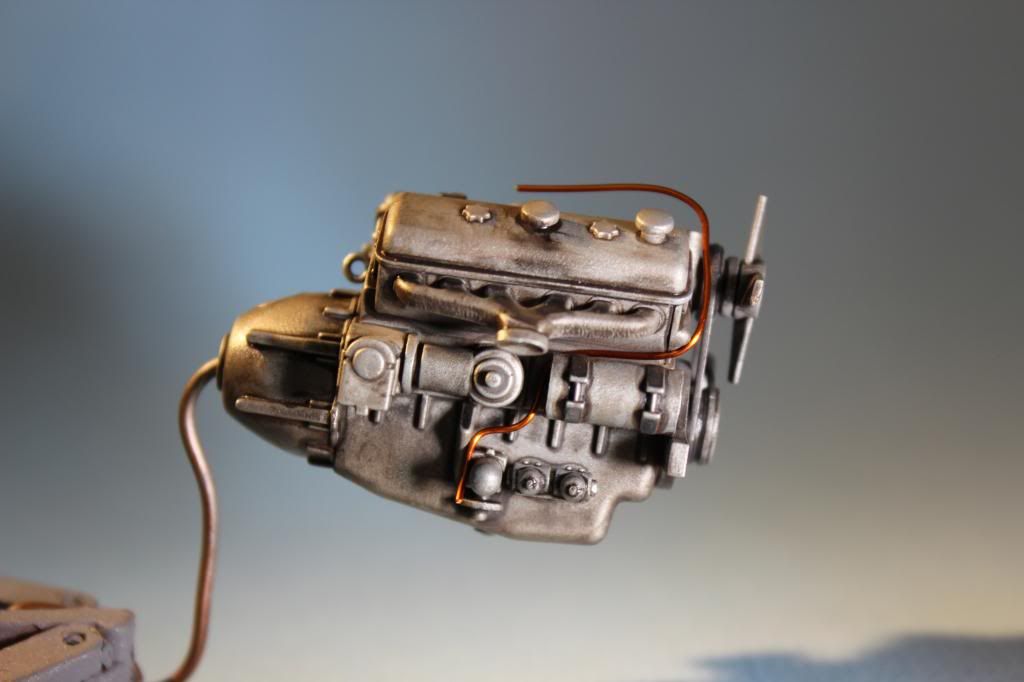 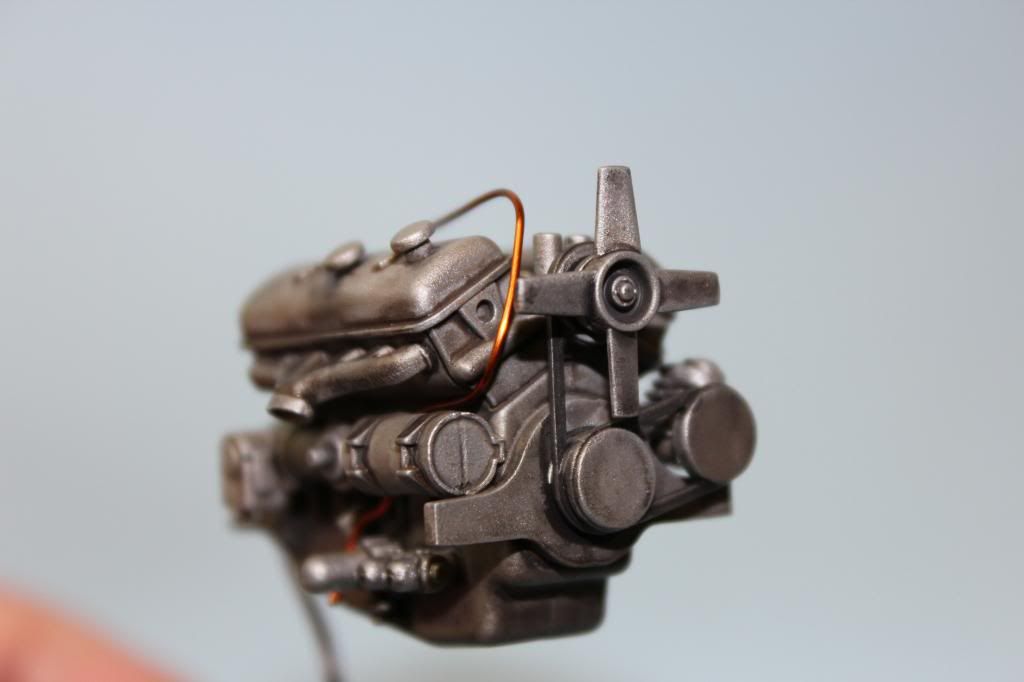 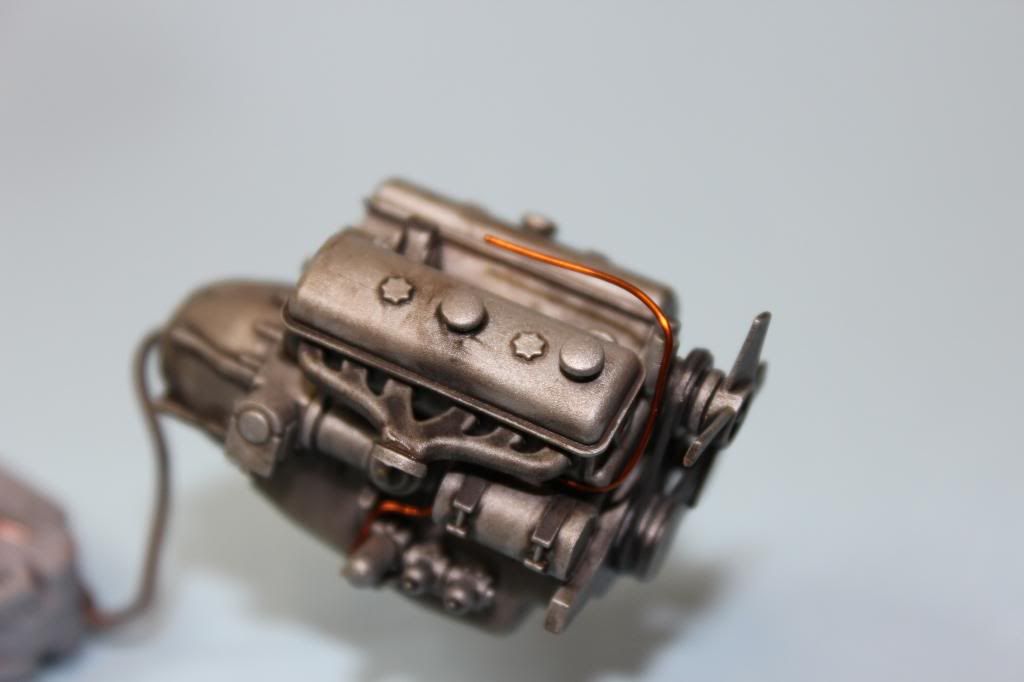 Once all painted pipework is attached she will be treated to an oil session 'a la Carl stylee' although I'm not intending to 'dirty' it up as much as the prototypes are unlikely to have covered too many kilometers. Once that stage is dry next up will be some pinky mottled manifolds and some oil drybrushing Los |
|
|
|
Post by deafpanzer on Nov 26, 2013 13:34:00 GMT -5
Great work on the engines... both real and fake little one!  |
|
Deleted
Member since: January 1970
Posts: 0
Nov 22, 2024 9:05:19 GMT -5
Nov 22, 2024 9:05:19 GMT -5
|
Post by Deleted on Nov 26, 2013 14:55:28 GMT -5
nice to see you back at this, glad your mum is on the mend
|
|
Deleted
Member since: January 1970
Posts: 0
Nov 22, 2024 9:05:19 GMT -5
Nov 22, 2024 9:05:19 GMT -5
|
Post by Deleted on Nov 26, 2013 18:51:18 GMT -5
Hey Los engine and Engine look superb ! On the 1/1 did you rebuild for better performance ? Good to see you back on this like Pete said .  |
|
|
|
Post by wbill76 on Nov 26, 2013 21:28:51 GMT -5
Looking good! Nice progress on the engine.
|
|
losboz
Full Member
  
Member since: September 2013
Posts: 322 
|
Post by losboz on Nov 27, 2013 4:51:50 GMT -5
Hey Los engine and Engine look superb ! On the 1/1 did you rebuild for better performance ? Good to see you back on this like Pete said .  Cheers guys Carl, Oh I wish it was that simple  330 BHP 2.5 flat 4 turbo engined Subaru Forester (Jap import). Up to now always been lucky with used vehicle purchases but this one's been a PITA  Engine out in March for head gasket replacement and then 2 weeks ago bottom end bearings let go. Into the workshop for a complete bottom end rebuild including new crankshaft etc. Just running it in now just in time for our winter (whatever that decides to be this year !) Primer is on the SD.Kfz 8 interior, chassis and running gear. Now to decide on a color scheme ? |
|
Deleted
Member since: January 1970
Posts: 0
Nov 22, 2024 9:05:19 GMT -5
Nov 22, 2024 9:05:19 GMT -5
|
Post by Deleted on Nov 27, 2013 8:00:03 GMT -5
Very nice work!
|
|
losboz
Full Member
  
Member since: September 2013
Posts: 322 
|
Post by losboz on Dec 2, 2013 13:24:21 GMT -5
While I wait for oils to dry on the engine the rest received a Halfords rattle can primer grey coat and was allowed to dry for 48hrs Then I added a Tamiya red oxide mix to all bare metal surfaces and again left to dry overnight. Next came two light coats of hairspray (Tresemme fine mist) but curiously for the first time this left a rather fetching weathered patina on the red oxide. As I had already decided I was going to use Tamiya paints on this project I used a Dunkelgelb, white, Deck Tan mix in an approx 40/40/20 ratio. I intended to lightly chip the base coat so its essential that this coat is not too thick so modulating the paint was a no no. I would have to use oils and filters to accomplish this effect. I gave all parts two light coats of this mix which left the red oxide slightly visible in places (German armour often had very thin coats of Dunkelgelb applied) As soon as this was dry (30mins does the trick) I set about agitating the hairspray with warm water and lightly chipping the base coat around strategic places that would attract scratches and scuffs Some pics not showing actual colour due to a numptie operator using a 'cool effect' in error  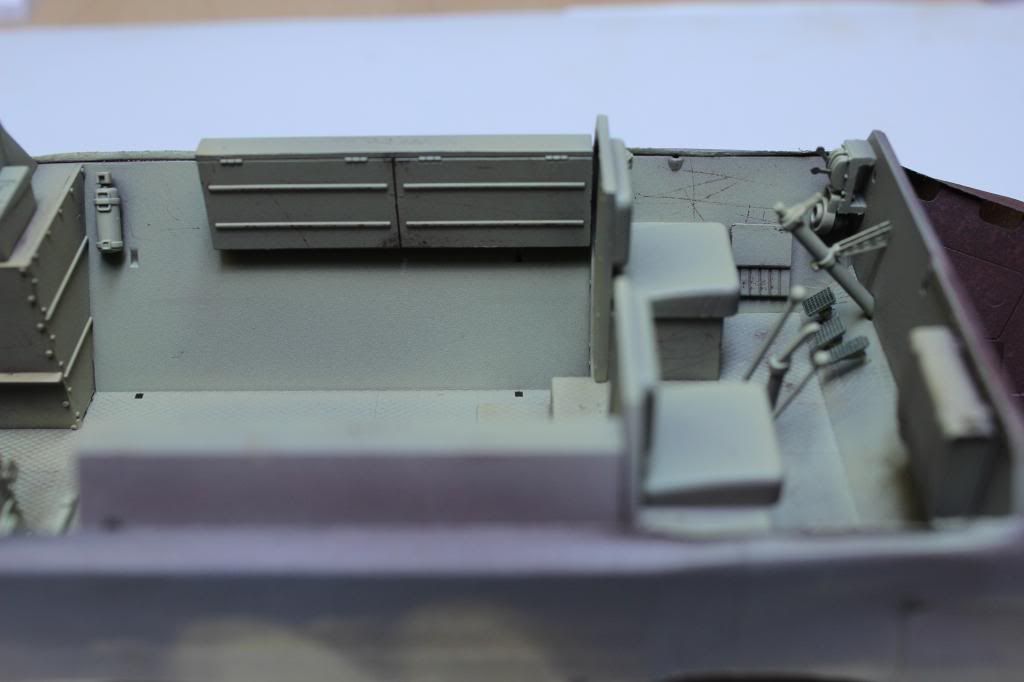 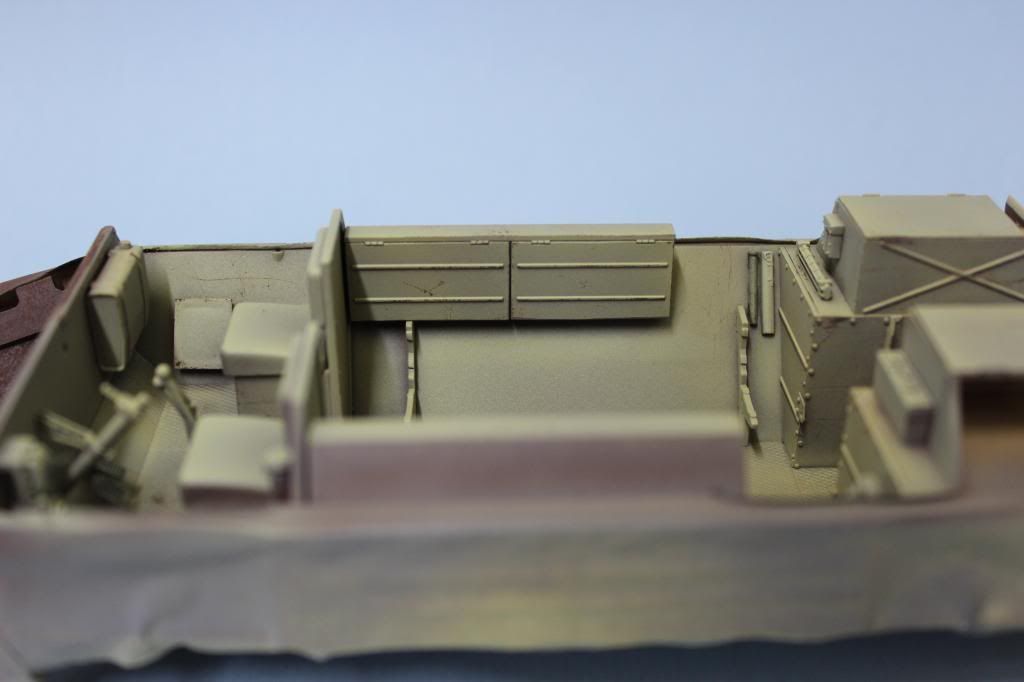 The wheels received the same treatment 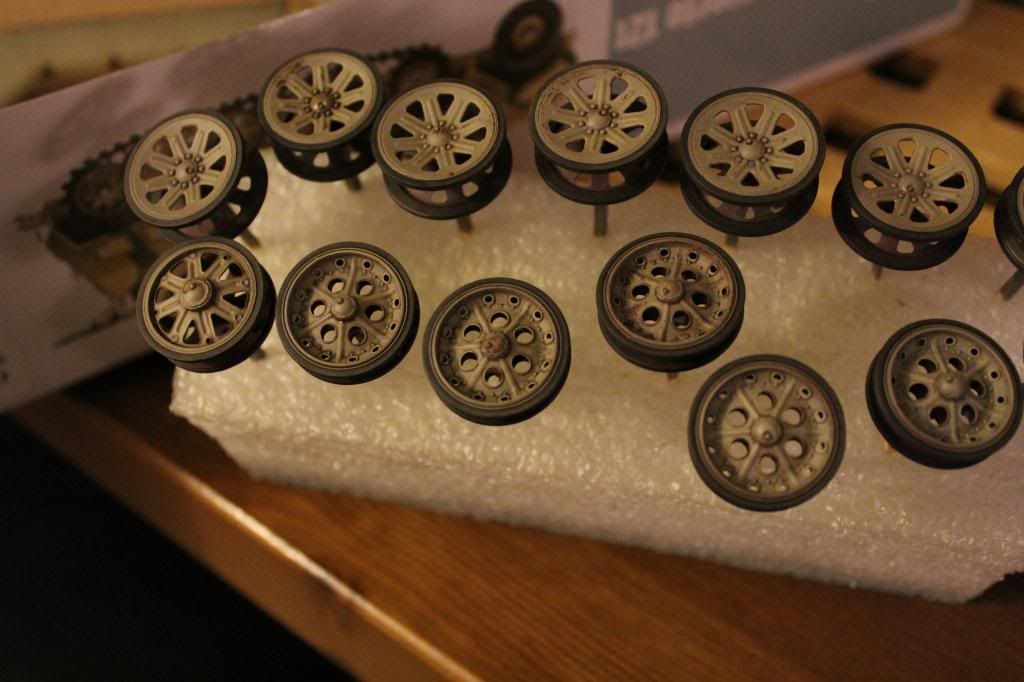 The sprocket roller bearings got a scrubbing also. Vallejo steel will be applied to the rollers in the next stage 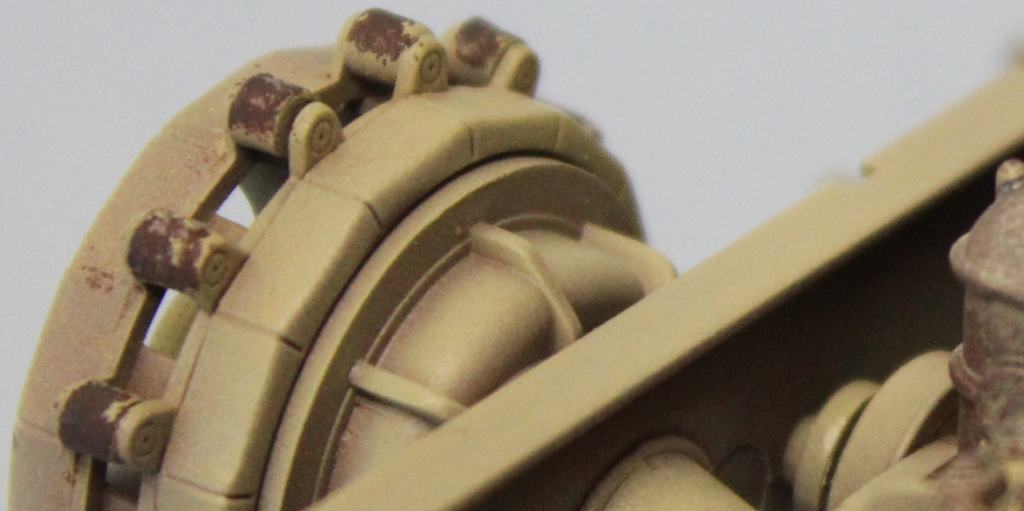 As none of the details on the top of the chassis will be visible I didn't go overboard here 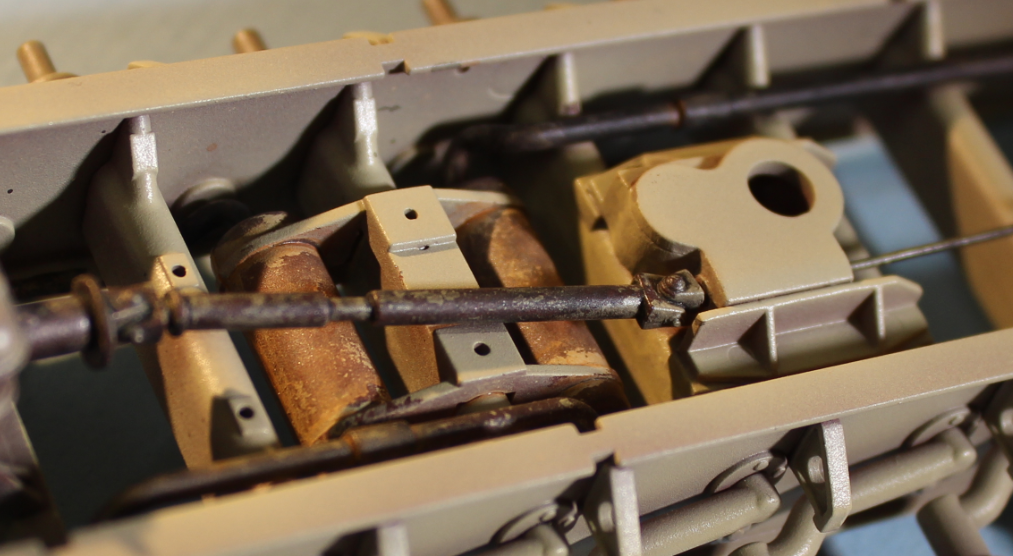 Once I was happy with results I gave all parts a gloss varnish/Light Dunkelgelb 90/10 mix (Important for me as its difficult to see the coverage applied with just clear varnish) Next step is filters and pin wash Los |
|
Deleted
Member since: January 1970
Posts: 0
Nov 22, 2024 9:05:19 GMT -5
Nov 22, 2024 9:05:19 GMT -5
|
Post by Deleted on Dec 2, 2013 15:29:29 GMT -5
Great attention to detail old chap love the effects thus imparted
|
|


 and a couple of part number omissions but its not quite dragon instruction territory


 ) are made up of two pieces which are difficult to present as one solid piece. Both will be well hidden upon final assembly


 So my solution was to mount the track rod to each track rod end first, let it set correctly in a little jig then attach the whole assembly to the hubs.


 The cab floor butted up nice to it on the other side so whats going on ? I had the crappy feeling I had made a big error somewhere ?


 .......so a bit of jiggery pokery with some sanding sticks shaved enough off to make it acteptable

 .
.
 )
)


