|
|
Post by wbill76 on Sept 8, 2014 20:04:34 GMT -5
Thanks Jeremy! Between what Trumpeter provides in the kit, the Eduard sets, and the Wood Hunter add-ons, there's plenty of 'bling' on this baby for sure.  |
|
|
|
Post by Leon on Sept 8, 2014 21:00:57 GMT -5
Bill you have a lot of patience gluing on 56 tiny parts  .They look great.  |
|
Foenetik
Full Member
   November '24 Showcased Model Awarded
Member since: March 2014
Posts: 609 
|
Post by Foenetik on Sept 8, 2014 21:56:25 GMT -5
agreed. i thought i had patience with the MP4/4 but this is above and beyond. I cant wait to see more.
|
|
|
|
Post by wbill76 on Sept 9, 2014 12:00:42 GMT -5
Thanks Leon and Tony! There's still more like that to come, just have to do it one piece at a time!  |
|
|
|
Post by wbill76 on Sept 9, 2014 20:01:29 GMT -5
Last couple of rounds have focused on the ship's compliment of various boats. This is a little trickier than it might be otherwise because you have to kind of puzzle piece things together between what's in the instructions and what you actually install and where...but more on that in a moment. First order of business was improving some of the details on the three different steam-powered barge and pinnace craft. Trumpeter provides them as two part assemblies with the cabins molded solid (but hollow on the inside) as part of the upper deck portion. The Eduard set really improves the detail here by providing actual wheel-house/cabins with open windows, but that means surgically removing/cutting-down the molded on item so it can take its place. 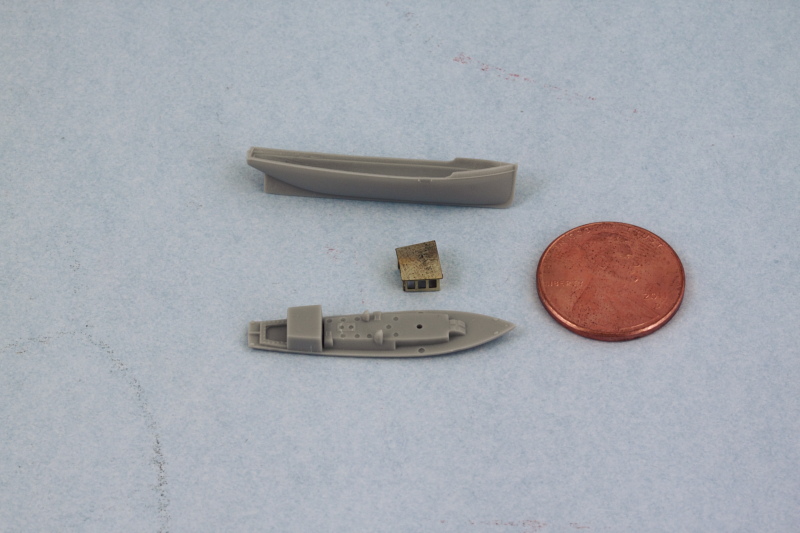 After careful surgery and some sanding, you can get a pretty good result between the two. I also improved the detail level by drilling out the air funnels and the smokestacks on each of the three boats along with the main cabin port holes. 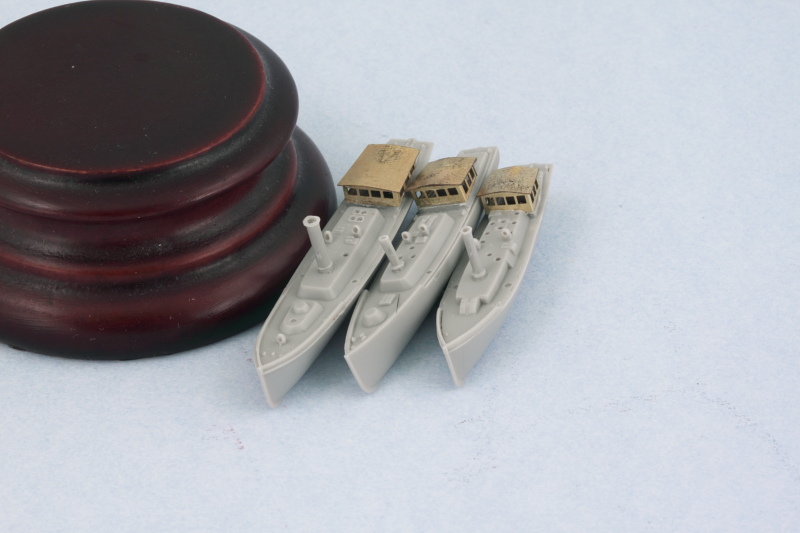 Now where life gets interesting is figuring out which of the kit-supplied oar-powered boats to use and where they will ultimately go. After studying the Kagero 3D reference photos, I figured out the following: 1) D43 are the 30 ft. gigs, and you need 2 of them, one on either side of the first funnel on the boat deck...but for them to fit, you need to not install the rudders and instead place them inside the boat itself as a stored item. 2) J1 isn't actually used anywhere even though the instructions have you assemble it...it's close in size to D43 but slightly longer...so it doesn't fit anywhere regardless. 3) D35 is the 16 ft. dinghy, you only need one of these and not the two that the instructions would have you build. The one you need will stack inside the port side suspended whaleboat. 4) J3 are the 32 ft. cutter life boats...you need 3 of these (one in the middle of the boat deck and 2 for the davits at the front of the boat deck). Unfortunately, the kit only provides one for the middle...so I've asked my good friend Steve Reid at Celtic Werks to cast some resin copies from the kit part to fill this gap, as a result they are 'MIA' from the group photo below until the casting is done. 5) D3 are the 27 ft. whaleboats, the instructions want you to build 5 but only 3 are needed (one in the middle of the boat deck, the other two hang from supports at the rear of the boat deck). Ignore the weird directions that would have you stack a whaleboat and dinghy on top of the port side steam pinnace, that's a Trumpeter invention as far as I can tell. While the instruction steps never show them actually installed, the 2 whaleboats and the dinghy that suspend from the rear portion of the boat deck do show up on the finishing guide as does the pair of 30 ft. gigs, so if you're paying attention you can catch that at least. All of the boats received their PE rudders in anticipation of some airbrush attention to lay down a base/primer coat of hull gray before they get further hand detailed. 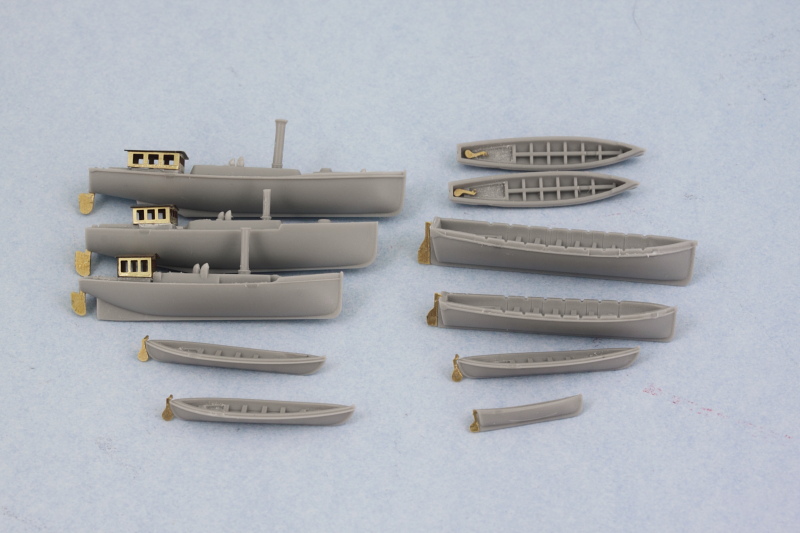 Tomorrow will see the boats get further detailing so they can be ready for installation. |
|
bbrowniii
Full Member
  
Member since: March 2012
If you are not part of the solution, you are part of the precipitate.
Posts: 1,238
Mar 25, 2012 22:08:04 GMT -5
Mar 25, 2012 22:08:04 GMT -5
|
Post by bbrowniii on Sept 9, 2014 21:09:21 GMT -5
Bill
It has been about a month since I could get on the forum due to work. I can see that I missed a LOT in that time! I have really enjoyed getting caught up on your build. What a great job you have done! Like many others, I cannot wait to see more.
|
|
|
|
Post by TRM on Sept 9, 2014 21:26:47 GMT -5
Another fine bit of modelling there Bill!! Huge improvement on the kit parts!!
|
|
|
|
Post by Leon on Sept 9, 2014 21:42:29 GMT -5
Nice PE work on the boats Bill,makes a big improvement.  |
|
|
|
Post by wbill76 on Sept 10, 2014 11:52:34 GMT -5
Thanks Boyd! Glad to see you've returned! A lot has indeed happened with this one in the last month so glad you were able to get up to speed before it steams into the dock.  Todd Todd, thanks as well kind sir! The Eduard parts really make a big difference in this area, especially given how prominently the steam launches are once installed on the boat deck. Leon, thanks as well my friend!  |
|
|
|
Post by deafpanzer on Sept 10, 2014 12:01:43 GMT -5
Impressive work!!! Surprised how big those boats are... did the ship really haul them all?!?!? WOW!
|
|
|
|
Post by wbill76 on Sept 10, 2014 12:18:18 GMT -5
Impressive work!!! Surprised how big those boats are... did the ship really haul them all?!?!? WOW! Yep! But they stacked them inside each other ala 'Russian Doll' style in most cases.  Only the steam powered ones had their own racks due to the smokestacks making it impossible to nest them on top of each other. |
|
Foenetik
Full Member
   November '24 Showcased Model Awarded
Member since: March 2014
Posts: 609 
|
Post by Foenetik on Sept 10, 2014 12:39:35 GMT -5
great job. yeah the PE cabins look so much better.
|
|
moramarth
Full Member
  
Member since: March 2014
Posts: 455 
|
Post by moramarth on Sept 10, 2014 18:10:45 GMT -5
Impressive work!!! Surprised how big those boats are... did the ship really haul them all?!?!? WOW! This might be of interest: royalnavalmuseum.org/collections_boats_pinnace.htmMore info: Armament: Hotchkiss 3 pdr gun built in 1887. Re-proofed, 1945. Previously fitted to an armed yacht sunk later that year and salvaged from a trawlers nets in 1980. One light Maxim machine gun fitted onto the cabin roof. Rifles stowed in after cockpit. Two torpedoes occasionally carried in racks on either side of the hull. When armed, Pinnaces were known as Picket boats to protect capital ships against torpedo attack. Their speed and quick firing made them a formidable adversary in the 1880’s – 1890’s. This also: www.adls.org.uk/t1/content/sundowner-0Regards, M |
|
|
|
Post by wbill76 on Sept 10, 2014 19:22:31 GMT -5
Thanks Tony! M, always cool to get some of the background info on these small boats...they were quite versatile!  More progress in the boat department, we have paint! I airbrushed the hull gray color so that it could do double duty as both a primer for the detail areas and PE parts and provide the main external color for the boats. The detail work was all done with the aid of an Optivisor and a 10/0 pointed brush. Flat White for the trim, a mix of 50-50 Dunkelgelb/Light Gray for the wood areas, and Italian Dark Brown for the steam boat wheel houses. To add a little variety, I applied some non-buffing Metalizer Brass to the smokestacks to round things out. Not a lot in terms of number of pics but a full day's effort to get the detail painting done. 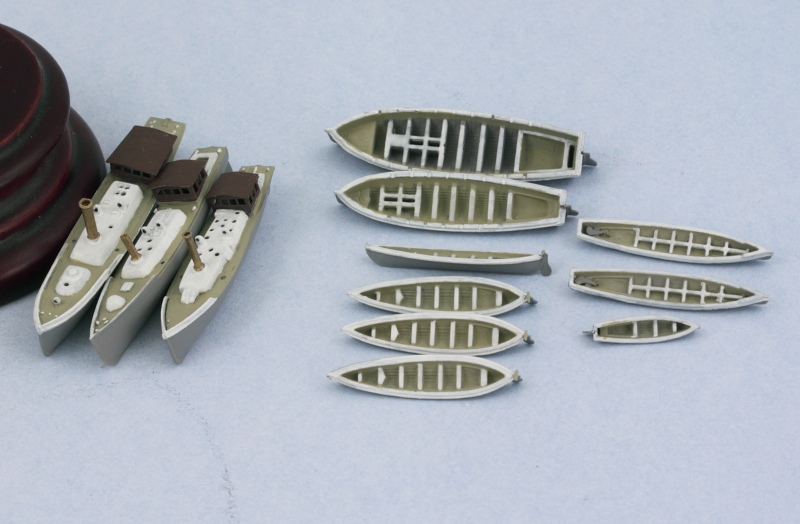 Next up will be placing some of the boats and continuing to work on the remaining main deck details. |
|
|
|
Post by Leon on Sept 10, 2014 19:40:51 GMT -5
Nice detail painting Bill,there going to look great once in place.  |
|
|
|
Post by wbill76 on Sept 11, 2014 12:34:32 GMT -5
Thanks Leon! They are like a little mini-project within the whole ship/kit for sure!  |
|
|
|
Post by deafpanzer on Sept 11, 2014 13:02:38 GMT -5
Impressive work!!! Surprised how big those boats are... did the ship really haul them all?!?!? WOW! This might be of interest: royalnavalmuseum.org/collections_boats_pinnace.htmMore info: Armament: Hotchkiss 3 pdr gun built in 1887. Re-proofed, 1945. Previously fitted to an armed yacht sunk later that year and salvaged from a trawlers nets in 1980. One light Maxim machine gun fitted onto the cabin roof. Rifles stowed in after cockpit. Two torpedoes occasionally carried in racks on either side of the hull. When armed, Pinnaces were known as Picket boats to protect capital ships against torpedo attack. Their speed and quick firing made them a formidable adversary in the 1880’s – 1890’s. This also: www.adls.org.uk/t1/content/sundowner-0Regards, M That was a great site... thank you so much for posting!!! Always learning something... |
|
|
|
Post by deafpanzer on Sept 11, 2014 13:03:06 GMT -5
Bill, those boats are looking superb... they sure makes me feel safer knowing they will be handy when my ship goes down!
|
|
|
|
Post by wbill76 on Sept 11, 2014 13:16:00 GMT -5
Bill, those boats are looking superb... they sure makes me feel safer knowing they will be handy when my ship goes down! Thanks Andy! My wife asked me the question about whether it had 'enough' boats or was it like the Titanic...had to explain to her about the differences between warships and cruise liners...and how the circumstances that would cause a warship of the early 1900s to be sunk would mean that it would have other ships nearby (friendly or enemy depending on who won/lost the engagement) and so wouldn't need enough boats for the entire crew. That and of course the fact that boats would run a high chance of actually being damaged/destroyed from shell fire given their exposed and relatively unprotected state made them more of a 'peace-time' accommodation than anything else.  |
|
|
|
Post by deafpanzer on Sept 11, 2014 13:22:26 GMT -5
I agree with you... looking at USS Indianapolis I didn't see many lifeboats. Most were those cheap small rubber or some kind of foam boats that can barely hold more than 5 or 10. No wonder we lost so many sailors when USS Indy went down...  |
|
DeafStuG
Full Member
  
Member since: May 2013
..
Posts: 1,283 
|
Post by DeafStuG on Sept 11, 2014 17:26:20 GMT -5
Beautiful Micro boats.
|
|
|
|
Post by wbill76 on Sept 12, 2014 11:42:59 GMT -5
Jeremy, thanks as always!
Andy, many factors compounded the tragedy of the USS Indianapolis...not least of which it was travelling alone at high speed, was sunk in the middle of the night (12 minutes after being torpedoed) and at war's end when everyone was complacent regarding the Japanese navy, and no lifeboats...but then the US Navy's procedures at the time were largely to blame for that mix of circumstances. Having lifeboats would've saved a lot of men from the sharks though, no question about that!
|
|
|
|
Post by wbill76 on Sept 12, 2014 16:44:32 GMT -5
Latest progress has lots to report on multiple fronts. First up were all the bow super-deck details. I used the Trumpeter-supplied copper anchor chain and painted it with Model Master non-buffing Metalizer Gunmetal applied by hand. For the two non-fitted 12 pdr mount plates, I cannibalized a couple of the spare guns on the sprue and clipped off their bases, gluing them in place with CA gel then sanding them smooth and painting them in place. Anchors were installed along with the stove pipes, small cranes, and the turret break water. Then the A turret was carefully placed as all the other small details now prevent it from being able to rotate, so it had to be dropped in place vertically at an angle so the rear of the turret would clear the connecting stand to the superstructure. Last but not least I added the jack staff and angled PE brace for it. 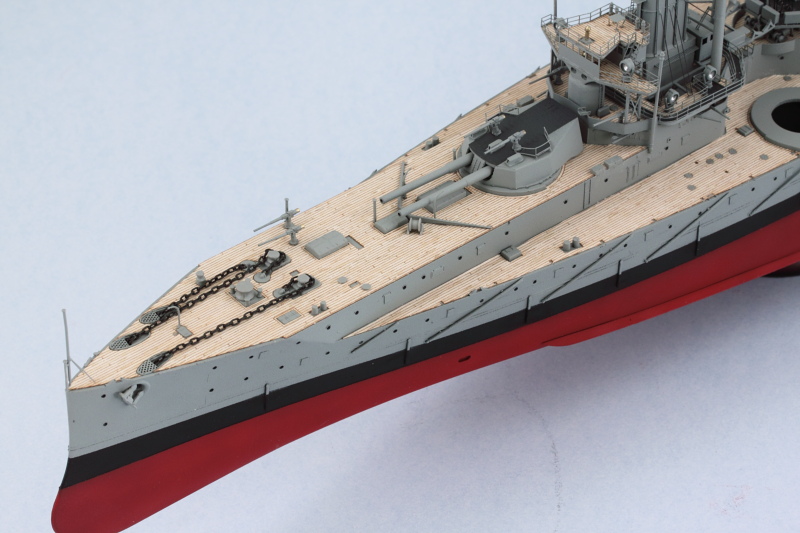 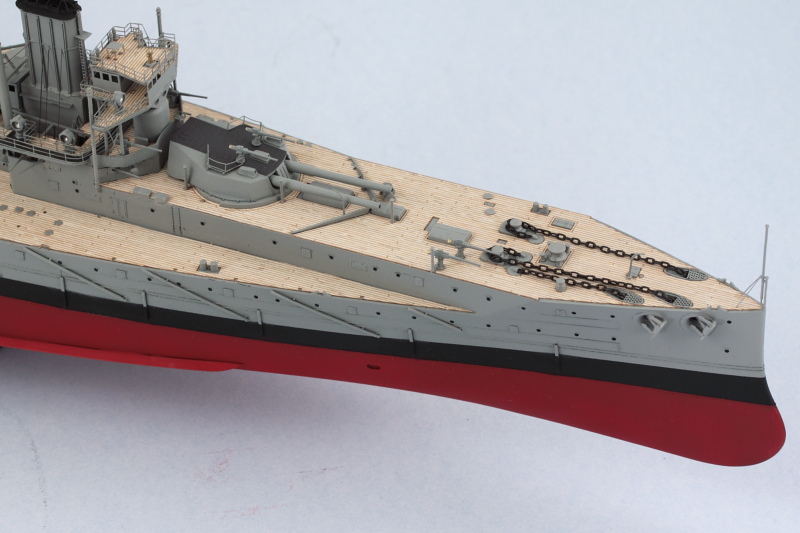 With that out of the way and time to install the boats, I added the last remaining piece of rigging by running aerial lines from the bow to each of the masts as well as connecting lines down into the boat deck roof of the wireless room. 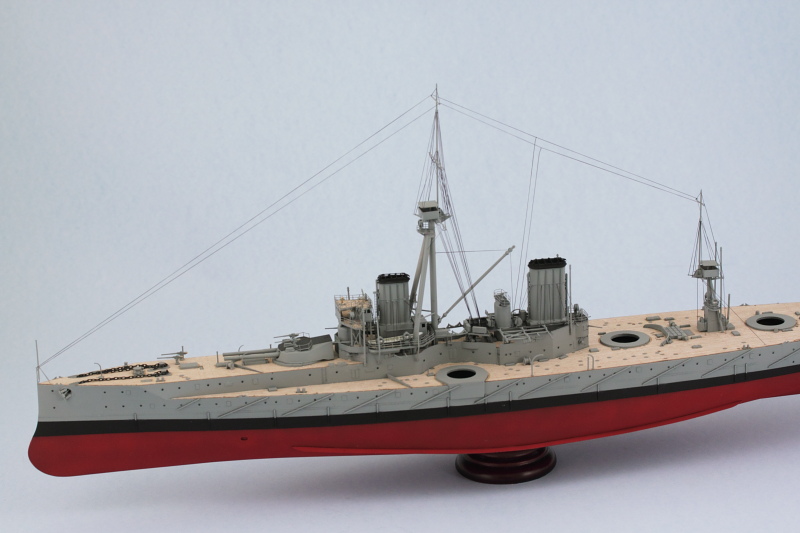 Speaking of the boats, I started on the port side first since it has the most boats. The three-stack was assembled and installed in place followed by the suspended whaler and dinghy combo. For that combo, some EZ line was used to represent the suspended rail/rope combo that holds it up. 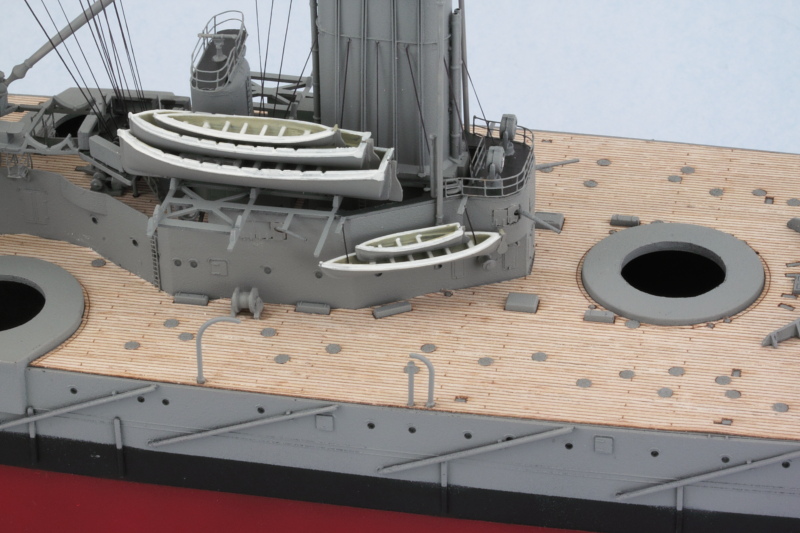 Rounding things out on this side, the steam pinnace was installed. The 30-ft gigs were added as well to both sides of the forward funnel and then the life boat davits added. Other small details like the wing turret break waters and the small mid-ship cranes were also installed. 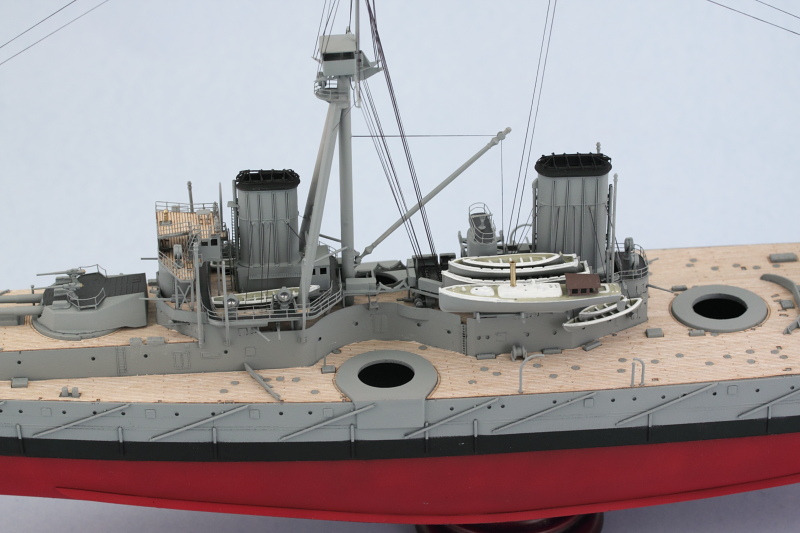 Next up will be the starboard side boats before moving aft to continue with the remaining details there. |
|
|
|
Post by Leon on Sept 12, 2014 18:32:22 GMT -5
WOW Bill  !!!! You made some awesome progress and everything is looking ship shape.   |
|
|
|
Post by wbill76 on Sept 12, 2014 18:53:51 GMT -5
Thanks Leon! I was this >< close to being able to post an update yesterday but didn't want to rush it...that little voice of caution was sounding in the back of my mind and on a build like this, it always pays to listen to it!  |
|
|
|
Post by deafpanzer on Sept 13, 2014 16:49:02 GMT -5
WOW! FANTASTIC! Is it like 80 or 90 percent complete now? If so, you are so close...
|
|
|
|
Post by wbill76 on Sept 13, 2014 19:20:16 GMT -5
Thanks Andy! I'd say it's about the 90-95% mark after today. Almost there!  Work continued on the remaining details. As promised, first up were the starboard boats getting installed in place on the boat deck. 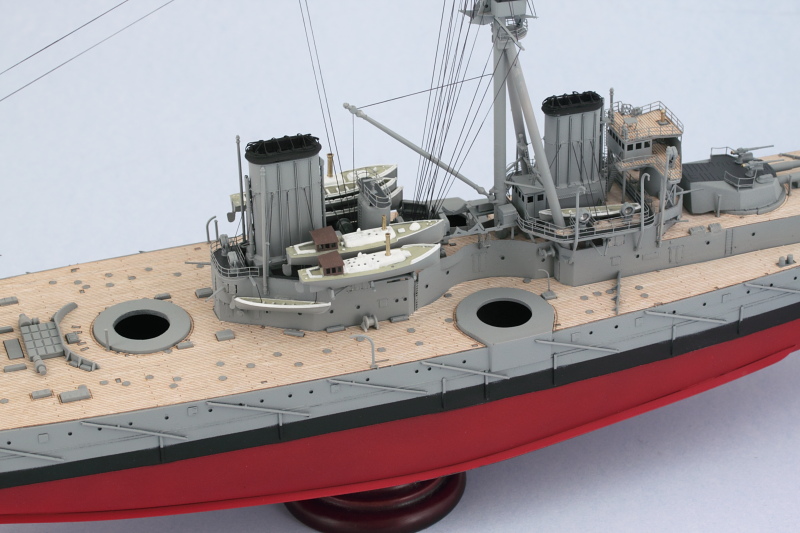 With that done, attention turned to the remaining details on the stern. One of those is the compass stand and I have to admit that the difference here between what Trumpeter provides and what should be there (which the Eduard set does cover) is miles apart. The Trumpeter part is on the right while the Eduard multi-part PE replacement is on the left. I'm sure it's no surprise which one I went with! 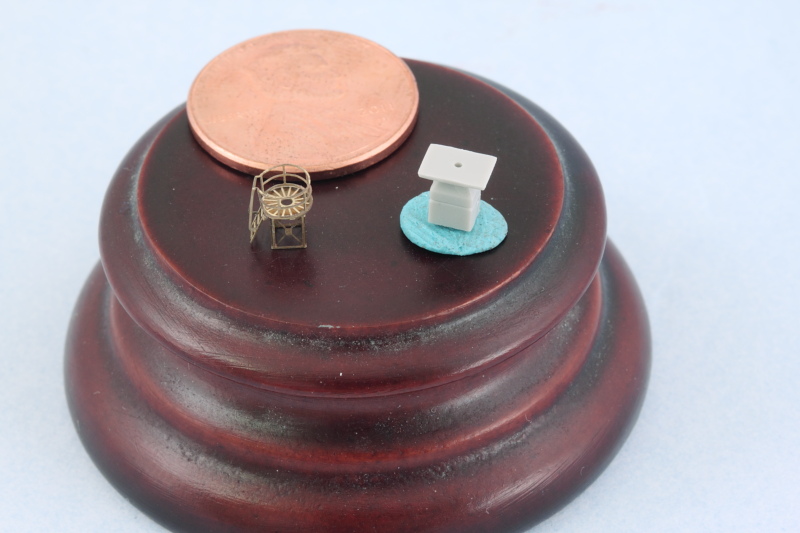 The Eduard set also provides caps for all the bollards, so those were installed and painted to match the posts. Small hoist cranes and stovepipes were added where needed and the X and Y turrets installed in place. 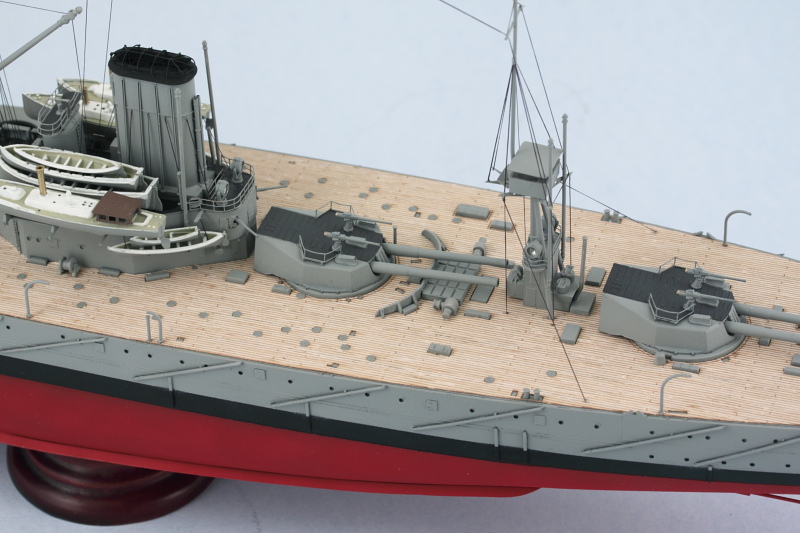 Last but not least, the stern received the previously mentioned compass stand, 2 of the 3 12 pdrs, and the flag pole with its PE brace and small extended access stand. The kit-supplied access stand was just a simple piece of straight PE, so I used the Eduard piece instead to replace it. The third and final 12 pdr gun was left off so I could install the railings without having to fight with it since the barrel extends out over the rail and will be added later. 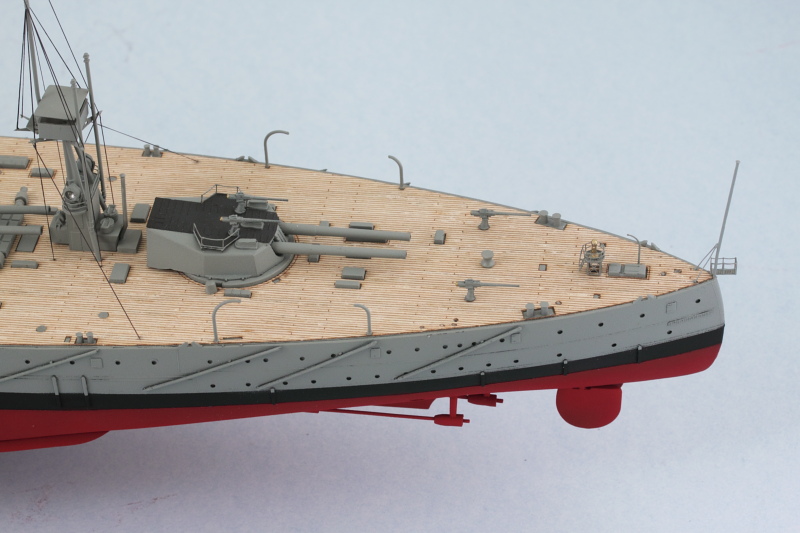 Not a whole lot left to do. Essentially just the railings to add along with the retention arms for the torpedo nets that stick out under the railings, will add those after the railings of course. |
|
Foenetik
Full Member
   November '24 Showcased Model Awarded
Member since: March 2014
Posts: 609 
|
Post by Foenetik on Sept 13, 2014 20:40:16 GMT -5
awesome sir.
|
|
|
|
Post by deafpanzer on Sept 13, 2014 21:12:58 GMT -5
Saw on FB... am so excited for you as it is so close to the finish line. Loving it...
|
|
|
|
Post by Leon on Sept 13, 2014 21:32:36 GMT -5
Full steam ahead Bill!!! The port is almost in sight.Another great update and the compass stand is looking sharp.  |
|