|
|
Post by Teabone on Mar 22, 2013 16:26:28 GMT -5
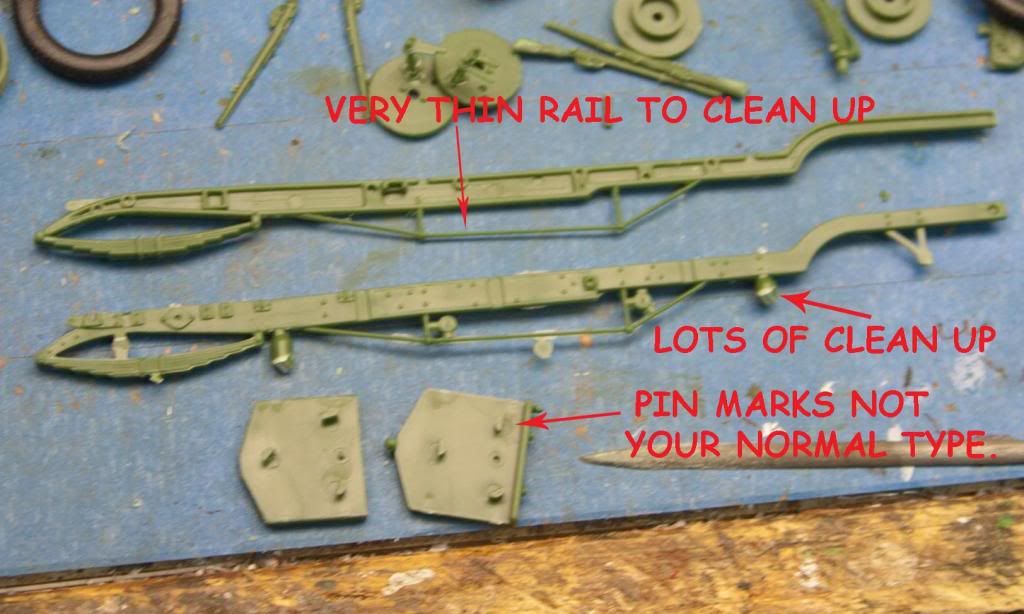
Next we see where the pin marks are half and half with part sunken and part proud. Also shown is the truss rods the were placed, I'm sure, due the load of the armor, to the modeler this is one of those difficult trim areas where there rod loves to break. The other example shows one OOB where all the stuff to clean is still there. I can report I got them clean all in one piece.
Until next photo time that's all folks.
|
|
|
|
Post by Teabone on Mar 22, 2013 16:32:19 GMT -5
oops  |
|
|
|
Post by Teabone on Mar 22, 2013 16:32:30 GMT -5
Wow I'm moving up to full member already and no initiation. Please don't expect any more professional look than what you've seen Iv already exceeded the “Peter’s Principle” and it wont get any better.
|
|
|
|
Post by tonylee on Mar 22, 2013 20:23:24 GMT -5
No matter the outcome Tbone if it suits you it sure as heck will suit me. It's a hobby and enjoying yourself is all that matters really. I'll keep an eye on it. Tony lee  |
|
|
|
Post by deafpanzer on Mar 22, 2013 21:29:24 GMT -5
Looking real good... enjoying this!
|
|
|
|
Post by Leon on Mar 23, 2013 0:39:59 GMT -5
Agree with Tony and Andy.Just have fun with it.  |
|
|
|
Post by Teabone on Mar 23, 2013 13:07:36 GMT -5
tonylee Leon deafpanzer
I always have fun with building and my builds are always done to please my best girl who thinks they are all just great. Thanks for looking I am proceeding with the next phase.
|
|
|
|
Post by bullardino on Mar 23, 2013 13:13:44 GMT -5
I'm following very interested. That looks like a dog of a kit, and you're making a great job on it |
|
|
|
Post by Teabone on Mar 23, 2013 13:46:41 GMT -5
I'm following very interested. That looks like a dog of a kit, and you're making a great job on it |
|
|
|
Post by wbill76 on Mar 26, 2013 20:32:18 GMT -5
Moving right along with this one teabone. Congrats on the 'next level' of your membership. T-shirt's in the mail!  |
|
|
|
Post by Teabone on Mar 26, 2013 21:34:24 GMT -5
Moving right along with this one teabone. Congrats on the 'next level' of your membership. T-shirt's in the mail! "T" shirt in the mail, would it be with my check? Hard to keep up with all the surprises. |
|
|
|
Post by Teabone on Mar 26, 2013 22:24:57 GMT -5
Moving right along with this project, my next moves were to assemble parts that will start to go together in the build. I assembled the main cabin part before having the whole build properly worked out in my mind. I had thought I would build this vehicle and show the engine by cutting the bonnet in two parts that could be shown open where one could look down into the engine compartment. Good thinking when I though the two or three reviews were all the builds out there as they all were buttoned up paint objects, Well I began to study the options and the history which there is quite a bit when you look for it. There are a number of builds of this kit out there that are built with various parts open to viewing the engine and crew compartment. When I saw some of these I could see that I would have to do a little more than I planed just to keep the standard up.
I began to find out more about the 90 or so vehicles that were originally built in the 1920 pattern. As mentioned earlier the engine is of a fascinating design with what I thought to be two magnetos much like an aircraft ignition with two spark-plugs in each cylinder. Low and behold it is not two magnetos but one each of a magneto and regular breaker point coil and distributor ignition which is still beyond my understanding of why. The two magneto aircraft ignition makes more sense to me but I am only an armature automotive engineer at best.
Then there is the interior which for many armored vehicle can be a mystry do to light problems with the old film cameras. Well I got lucky and turned up two interior pictures which made it practical to detail some of the interior. It appears the vehicles were built over a longer period of time than todays assembly lines can turn out so there appear to be some differences between vehicles when it comes to color, dashboards, seating, paint colors of engine, frame, and parts other than the exterior body parts. There is a written narrative by an actual combatant who drove one of the units in police type actions in various places in the middle-east which was quite intersting. In any-event to do the build justice it appears that more hand painting is going to have to be done to make the vehicle more realistic. All that shiny brass and aluminum or chrome on the radiator top were kept shiny as part of the drivers duty, most of the photos I have looked at show the boxes and bed to be metal and not wood so I am going to have to decided on how I am going to treat this. The 1914 pattern evidently was equipped with wooden bed and boxes along with spooked wheels that were found to be not as suitable as solid steel ones. The crew compartment floor was wooden in all vehicles for weight consideration and maintenance access and it was a weak point in the design as the vision from the crew compartment was rather poor and the enemy would try to stall the vehicle and roll grenades under it. On narrow street's the enemy could sun a herd of sheep or goats in the vehicles path and it would slow or stall when there was three or four animal bodies under the front end.
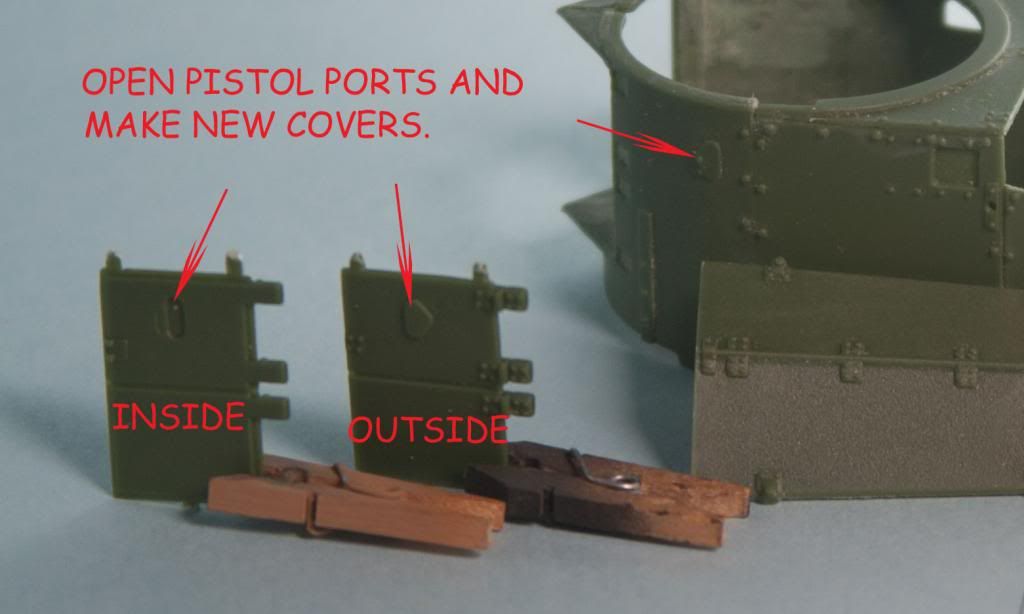
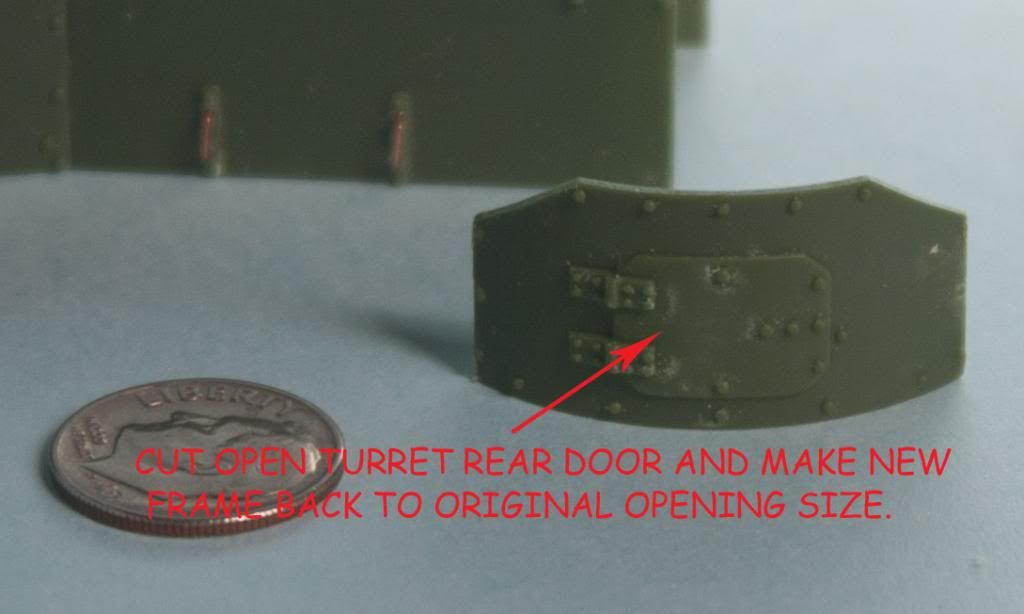
In any event I am now on a mission to do some surgery to the various kit parts that need to be changed for final display purposes. The picture show some of the modifications which I will be working on. The rear crew compartment doors will have to be modified to be open as well as the turret along with the pistol ports and the side curtain for the bonnet, I saw one model that had the bonnet open that had the curtian folded up with the bonnet top onto the opisite side of the bonnet. The side curtian is a seterate piece and was removed and set aside when there was a need to fully access the engine compartment.
One down side with all this work is the thickness of the kit parts are way off scale. 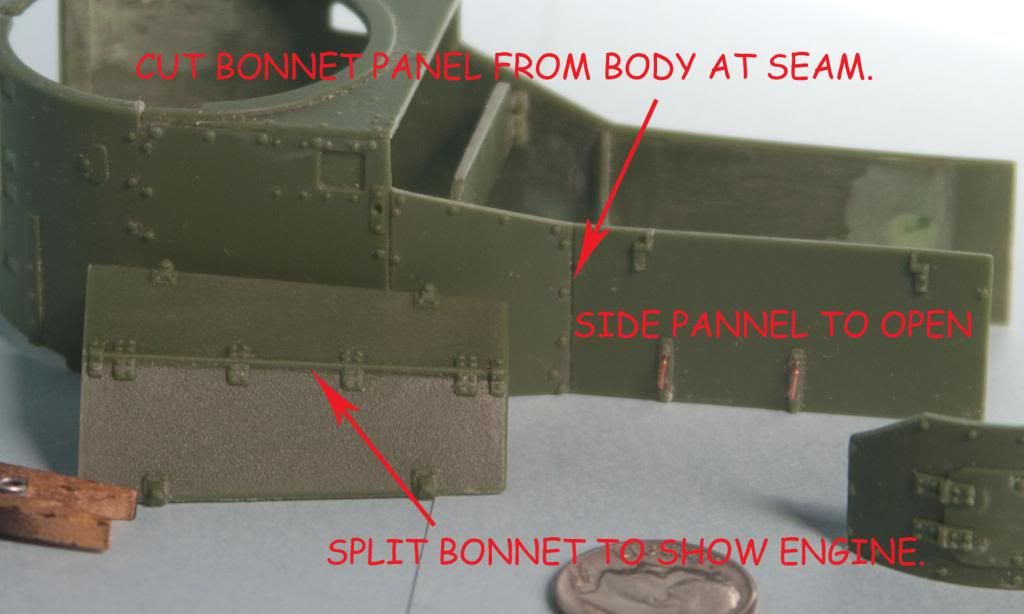
|
|
|
|
Post by Teabone on Mar 26, 2013 22:26:06 GMT -5
|
|
|
|
Post by Teabone on Mar 26, 2013 22:26:50 GMT -5
|
|
|
|
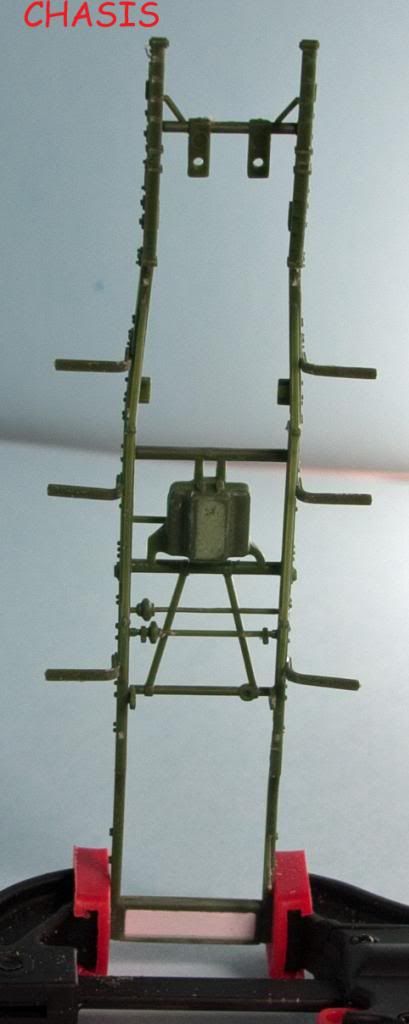
Post by Teabone on Mar 26, 2013 22:35:59 GMT -5
The chassis is an interesting challenge in the fact that the insturctions call for the whole thing , radiator support, steering box, muffler, transmission, petrol tank, rear brace and engine be placed all at the same time. Since painting of much of the nderneath parts will be by hand I had to leave some of them out. By only gluing one side of the radiator baracket in place it allows enough flexibility in the frame to allow for the engine placement later.
|
|
|
|
Post by bullardino on Mar 27, 2013 10:36:36 GMT -5
You're making a really great job on the RR, teabone I love all the improvements, they really enhance the kit's appearance |
|
|
|
Post by Teabone on Mar 27, 2013 12:52:10 GMT -5
You're making a really great job on the RR, teabone I love all the improvements, they really enhance the kit's appearance Thank you for looking, they will be improvements to the extent of my talents I hate to do OOB if I can find any improvements to add. |
|
|
|
Post by wbill76 on Mar 27, 2013 15:52:40 GMT -5
Definitely dressing this one up nicely with the modification teabone! Opening the hatches and ports will give it that 'live' feel of being crewed and in-action for sure.
|
|
|
|
Post by Teabone on Mar 27, 2013 18:40:18 GMT -5
Definitely dressing this one up nicely with the modification teabone! Opening the hatches and ports will give it that 'live' feel of being crewed and in-action for sure. It is nice when they allow for opening up, this one with the thick walls makes it difficult to get the real effect but I did a Tfc Ford Armored car where the thickness was bad and it did not look too bad. |
|
|
|
Post by Teabone on Mar 27, 2013 18:49:43 GMT -5
Nice work TB - good progress and nice explains sir! Not a fall together kit eh, but where's the fun in that? Love the sound of yer plans should make for an interesting display. That engine picture may be from an RR Roadcar eh? The RR Armoured Cars at Bovvy all have black engines I'm sure, but hey the green looks nice too as does all that brass and copper!
|
|
|
|
Post by Leon on Mar 29, 2013 19:02:14 GMT -5
Like what your doing with this TB. |
|
|
|
Post by Teabone on Mar 30, 2013 13:54:10 GMT -5
Like what your doing with this TB. Thank for looking, I need to post some updates, this kit has so many small features that the updates get away from me. |
|
paulh
Senior Member

Member since: November 2011
build, fail, learn, succeed - ENJOY
Posts: 2,389
Nov 15, 2011 15:54:51 GMT -5
Nov 15, 2011 15:54:51 GMT -5
|
Post by paulh on Apr 2, 2013 2:13:22 GMT -5
Very nice so far Teabone. This is also on my bucketlist- ultimately I'm planning to build up all (or at least most) of the AFVs used by the Irish Army and thisone is the starting point. Looking forward to seeing more. P |
|
|
|
Post by Teabone on Apr 4, 2013 13:28:50 GMT -5
Very nice so far Teabone. This is also on my bucketlist- ultimately I'm planning to build up all (or at least most) of the AFVs used by the Irish Army and thisone is the starting point. Looking forward to seeing more. P Thanks for taking the time to look and as you say "nice so far" but I'm still working on it I am currently bogged down with an attempt to wire the ignition using styrene rod with some successes and of course some not so good examples. Getting to the point where I can shelve it while I go back and complete the Vickers Mark VIc. |
|
|
|
Post by Teabone on Apr 10, 2013 13:40:29 GMT -5
Try again
I am still trying to shelve the Rolls 1920 Pattern but have to
set the engine in the frame before I do so I have been finishing some of the parts
so I’m not losing any time. In this
process I started to paint the interior of the crew compartment. The picture I have been using for reference looks
like the interior may have been green on the inside and someone took the tail
off a camel and painted it sort of white.
I tried this effect and decided that it looked a lot like the reference
BUT if I did not display it with the reference those viewing it would think I
just screwed up the paint job so I made the decision to spray it white and that
is when some interesting things were learned.
From the time I started building I have used Tamiya paints exclusively
for the final paint on all subjects. I
have done this because Tamiya paint was readily available to me and it cleaned
up so well with Windex and alcohol. The
only problem and it is a major one with the color white, I could never get the
Tamiya white paint to flow right or cover well no matter what I tried so I was
using shaker cans of RustOleum white which “worked” after a fashion. I happened to keep hearing how some builders
seemed to prefer Vallejo paints and I saw some Vallejo white so I thought I
would give this a try. First observation
was it is quite thick compared to Tamiya and the thinner looks like used thinner
that was used to clean white paint from your equipment.
Trying it with a brush showed me you had to paint quickly as
it dries’ rather quickly so big surfaces are out of the question. This morning I went ahead and painted with my
airbrush and using about 60% thinner to paint it flowed extremely well and
covered like a dream, I have to say the finished paint job is among the best I
have ever done. Then we get to clean up
which is another can of worms completely. The paint not being the same as Tamiya acrylic
base does not like to cleanup as easily with soap and water or Windex. It does respond well to Laquer thinner and MEK but that is a pain in the arse compared to Tamiya. However until I find something else Vallejo is the king for painting White. Anyone else using Vallejo with cleaning advise?
Well with some edits it is somewhat readable.
|
|
|
|
Post by deafpanzer on Apr 10, 2013 19:46:30 GMT -5
I am not sure why it is happening to you. I will clean up or delete that previous post with all of jumbled words. What are you using when you make the post? Maybe we can help you...
|
|
|
|
Post by Teabone on Apr 10, 2013 23:45:19 GMT -5
Andy
I should write my posts directly on the blog site, unfortunately I like to type up my messages in MS Word operating under Windows 7 and then I paste them to the MSCF which may be what causes the message to go astray. You can delete the first message as I posted it a second time and cleaned up enough to be readable. I will type my messages directly on to the blog and see if that avoids the crazy stuff.
Bones
|
|
|
|
Post by deafpanzer on Apr 11, 2013 7:01:09 GMT -5
Understood! Maybe that's the cause. Yes I went ahead and deleted the first post because it was similar to your next post. I haven't used PC for a while but I do remember a special copy feature where you can just copy the text only instead of the whole thing. Maybe a Word or PC guru can help you. I think our friend Bill does the same as he likes to record his blogs on his PC first then paste on forums next.
|
|
|
|
Post by wbill76 on Apr 11, 2013 19:42:52 GMT -5
That explains a lot actually. MS Word has the ability to read and translate HTML into text. So the forum is picking up on that when you copy/paste but since this isn't an HTML environment, all the 'junk' stuff that should be hidden gets copied over as regular text.
|
|
|
|
Post by Teabone on Apr 14, 2013 17:54:46 GMT -5
Well I have just gotten to the point on this build were I am breaking more stuff that I am building so I have decided to post some progress shots while I still have progress. I am sure we have all reached one of these points a few times, I always envy James Wechlser who can assemble a whole kit and then paint it, I have to do it in pieces which always requires extra steps.
Bones
There is supposed to be a picture here but photobucket is not responding so maybe tomorrow.
|
|