Deleted
Member since: January 1970
Posts: 0
Nov 25, 2024 15:31:53 GMT -5
Nov 25, 2024 15:31:53 GMT -5
|
Post by Deleted on Feb 19, 2014 18:44:55 GMT -5
|
|
|
|
Post by wbill76 on Feb 19, 2014 20:50:17 GMT -5
Isn't that the very definition of a bacon wingy?  |
|
|
|
Post by bullardino on Feb 20, 2014 3:57:04 GMT -5
No, it's the definition of my avatar  |
|
MOOSE.
Full Member
  
Member since: May 2013
"Imagination is more important than Knowledge"
Posts: 396 
|
Post by MOOSE. on Feb 20, 2014 4:33:28 GMT -5
How have I been missing this¿!  ? That's one heck of a job you're doing on her! I love the bf... I'm gonna do one eventually after my Spit and Corsair I suppose. Great work Bill!! ;D |
|
|
|
Post by wbill76 on Feb 20, 2014 13:10:17 GMT -5
Luigi ha! That's so true, karma to you my friend!  Moose Moose, glad you found it when you did, things are about to get interesting so you're just in time! 
|
|
modelfreak72
Full Member
  
Member since: January 2012
Why worry, each of us is wearing an unlicensed nuclear accelerator on his back.
Posts: 1,479
Jan 28, 2012 23:21:46 GMT -5
Jan 28, 2012 23:21:46 GMT -5
|
Post by modelfreak72 on Feb 23, 2014 11:56:52 GMT -5
|
|
|
|
Post by wbill76 on Feb 23, 2014 14:04:51 GMT -5
I don't know about that, Dicky's a pretty strong character as things stand already!  |
|
|
|
Post by ceresvesta. on Feb 23, 2014 14:32:02 GMT -5
Fantastic Bill! Loving the decals and the paint...and the build
SWEET!!
|
|
|
|
Post by wbill76 on Feb 23, 2014 15:02:50 GMT -5
Hmmmmm looks like I may continue to blend into the wallpaper,........   The trick is hiding the 'shine' by pretending to be something random. Works for me!  Phil Phil, thanks for the comments, I've been slugging away on the weathering process, should have an update later today (fingers crossed!).  |
|
|
|
Post by wbill76 on Feb 23, 2014 18:17:06 GMT -5
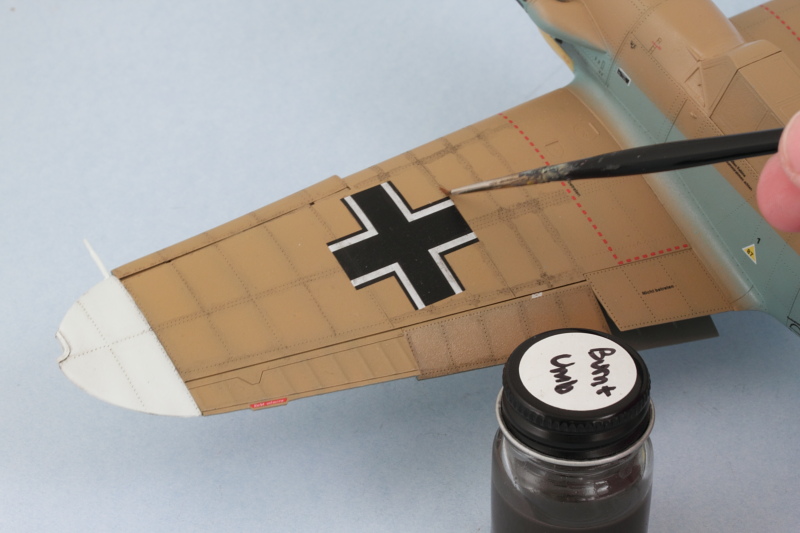
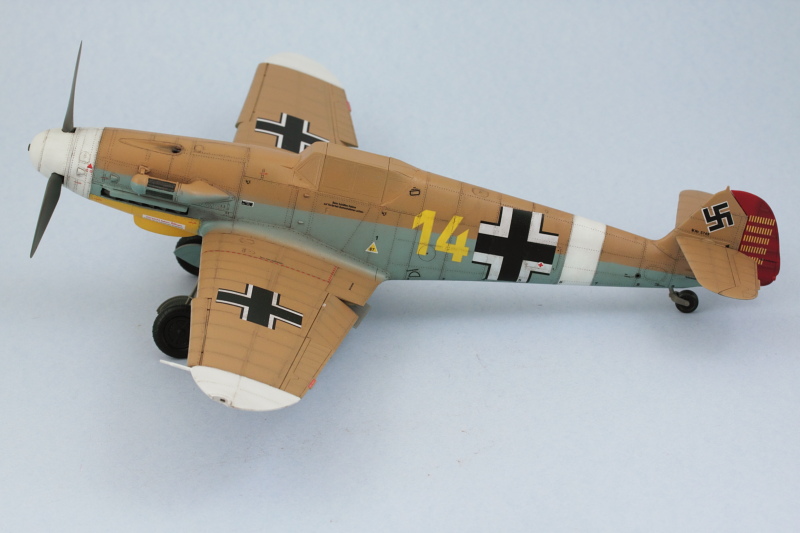
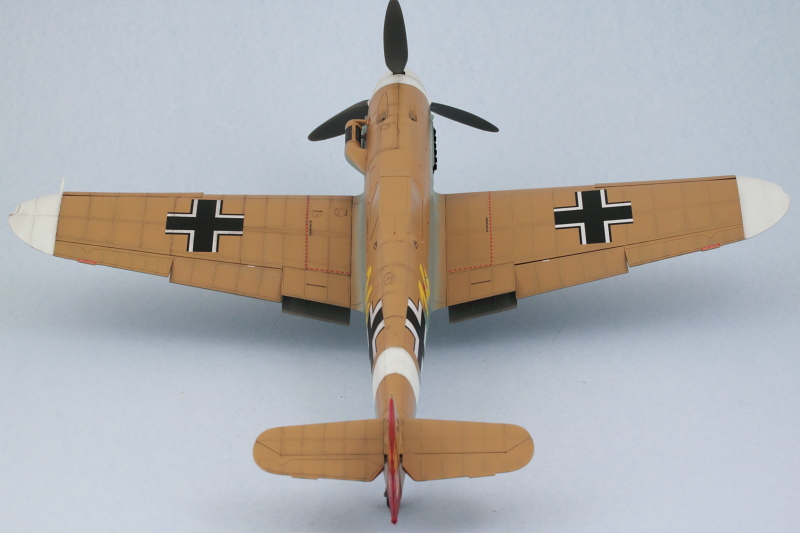
I started in on the weathering process today and had to steel myself for a long session given all the rivets and panel lines that are present. I applied a pin wash of thinned MM enamel Burnt Umber with a 10/0 pointed brush and deliberately applied it 'wide' so that it would cover all the rivets. Then I would come back over it with the same brush and clean thinner and fine-tune it to get a tighter result.  Working in small sections at a time, this process was repeated several times working from the wing inboard to the fuselage. Given the high thinner exposure, I wore a breather mask the whole time so that required some frequent breaks as well. After a few hours I managed to get the left side wing, fuselage, and horizontal stabilizer done on their top sides. The belly tank popped off during handling so that will get re-attached later when I'm ready to work on the undersides.  In this shot you can see a 'before/after' comparison with the right side which is still pending its turn for the same treatment. Since Trumpeter molded all that fine detail, I figured it's only right to make it all 'pop' as much as possible!  |
|
|
|
Post by wbill76 on Feb 23, 2014 19:20:02 GMT -5
Thanks Dicky! Much appreciated my wallpaper-blending friend!  |
|
|
|
Post by wing_nut on Feb 23, 2014 19:51:38 GMT -5
SCHA-WING
|
|
|
|
Post by tonylee-Rest In Peace on Feb 23, 2014 20:29:44 GMT -5
Mighty Mighty pleasin your Turpentine squeezin  That's all I got to say about that. Tony lee |
|
|
|
Post by wbill76 on Feb 23, 2014 20:54:29 GMT -5
Glad you approve o 109-Meister!  |
|
|
|
Post by wbill76 on Feb 23, 2014 20:55:04 GMT -5
Mighty Mighty pleasin your Turpentine squeezin  That's all I got to say about that. Tony lee    Thanks Uncle Tony!  |
|
|
|
Post by deafpanzer on Feb 23, 2014 23:02:28 GMT -5
I can even count the rivets even tho I am not a rivet counter!!! Stunning job!
|
|
|
|
Post by TRM on Feb 24, 2014 6:07:03 GMT -5
Yup, just how it's done!! Wash just make this one really pop!! What a pretty bird Bill!!
|
|
|
|
Post by bullardino on Feb 24, 2014 7:28:56 GMT -5
Great job on those panel lines. Another boring task that adds a lot to the final appearance. The more I see this, the more I like it  |
|
|
|
Post by wbill76 on Feb 24, 2014 12:57:24 GMT -5
Andy Very true! And there's a LOT of them...let me know when you've got the final count down!  T T, glad you like it. The pin wash in combination with the pre-shading is producing some nice effects so far. Now I just have to get the other side to match.  Lui Lui, thanks as well! Not a very interesting process I'm afraid but working in small sections at a time helps break it up so it's not bad. Still better than working on indy tracks!  Glad you like what you see, might even get to sneak in some time this week depending on how things go. 
|
|
|
|
Post by deafpanzer on Feb 24, 2014 15:21:06 GMT -5
DAMN! 10,124... 10.125... 10,128 or was it 10,127... FERK! What was the last number? I lost count several times I will keep trying and please keep Dicky away from me. Thanks! 1... 2... 3... 4...
|
|
|
|
Post by robbo on Feb 24, 2014 15:30:20 GMT -5
That is certainly worth the effort and good to see both sides like that
|
|
Deleted
Member since: January 1970
Posts: 0
Nov 25, 2024 15:31:53 GMT -5
Nov 25, 2024 15:31:53 GMT -5
|
Post by Deleted on Feb 24, 2014 17:17:36 GMT -5
Bill,I know picking out all that detail with a wash is a real pain in the 'arris mate,but stick with it,cos it's looking cushty!!  .....I did have one thought though,if I may...Have you looked at the Flory washes at all? They used to be called Promodeller washes,but they changed their name.On a coat of future,or such like,you could have done this in a fraction of the time,and then sealed it with a satin,or matt finish.Like I said,just a thought.  |
|
|
|
Post by wbill76 on Feb 24, 2014 21:02:10 GMT -5
Andy, sorry mate, you've got to start again, needs to be in German...  Ian Ian, thank you kindly sir! I've got the 2nd side done today...still have the underside to go! CB, it's worth it just takes time. I am applying the enamel wash over a Future coat, that's the easy part. It's the clean-up/tightening of it to get it into all those rivets that's the time-consuming part since the rivets themselves are shallow. Once I'm done, it will get a flat sealing coat to lock it all in.  Dicky Dicky, ah, a cloak made of wallpaper! I would never have thought of that. 
|
|
|
|
Post by bbd468 on Feb 24, 2014 21:08:40 GMT -5
Yup, that pretty well sums it up Bill!  Gorgeous brother! |
|
|
|
Post by Leon on Feb 24, 2014 21:16:46 GMT -5
Just getting caught up Bill.This is looking sweet with the pin wash.   |
|
|
|
Post by wbill76 on Feb 24, 2014 21:42:16 GMT -5
Thanks Gary and Leon, appreciate you stopping by!
|
|
|
|
Post by dupes on Feb 24, 2014 21:47:52 GMT -5
Bill - I know you don't do a ton of a/c, but have you considered doing a "sludge wash"? A looooot easier than pin washing every rivet. Yowza.
|
|
|
|
Post by wbill76 on Feb 24, 2014 23:12:38 GMT -5
Bill - I know you don't do a ton of a/c, but have you considered doing a "sludge wash"? A looooot easier than pin washing every rivet. Yowza. I think there's some small confusion on how I'm doing this. I'm not pin washing each individual rivet. I'm using what I suppose is the sludge wash technique (just not applying it completely over the entire aircraft)...I'm applying the wash as a line/band over the rivets or as a pin wash to the panel lines (when there's a line) and then coming back over that with clean thinner and removing the excess. In the pic below you can see the outermost section has already been given the full treatment while the mid-section of the wing has had the wash laid down but not yet adjusted. What's taking the most time is the fine-tuning/removal of the extra wash (I did already try removing the excess with a paper towel or finger swipe but that wasn't producing the desired results) so that what's left is what I want in terms of the final result. No way I'm crazy enough to try to pin wash each and every rivet one by one!   |
|
Marcel du Long
Full Member
  
Member since: August 2013
Posts: 331
Aug 22, 2013 13:25:03 GMT -5
Aug 22, 2013 13:25:03 GMT -5
|
Post by Marcel du Long on Feb 25, 2014 2:08:01 GMT -5
This is looking very nice.
Both a very clean build & finish means a BIG respect!
Cheers,
Marcel.
|
|
|
|
Post by dupes on Feb 25, 2014 8:08:53 GMT -5
I think the sludge wash property that's missing IS the ability to let it dry a bit and then just wipe off with a cloth/paper towel/weapon of your choice (versus having to clean with thinner). The dish detergent that you add in makes it workable for a fairly long period of time...assuming that's not something that can be added to an enamel wash! Probably won't make much difference if you're banging out only a few planes per decade.  |
|